Disclaimer (updated as of 17 July 2024): There have been recent reports that Polyfill.io has been compromised and is being used to spread malware. This article, which was last reviewed on 1 September 2022, mentions the use of Polyfill.io for loading polyfills from a CDN. We advise reviewing your usage of this service and considering alternatives or updates to ensure your application’s security.

Have you ever wanted to use a shiny new feature in a new release of JavaScript, but couldn’t because of browser compatibility? Maybe your team wants to try out new ES2015 features, but can’t because a lot of browsers don’t support it yet?
If either of the above situations resonates with you, odds are you’ve probably used a transpiler to generate a version of your code that worked on most browser versions. This would allow you to use newer features while still supporting a wide range of browser versions.
However, if you only want to use a small number of features, a transpiler may be overkill — some of them add significant overhead that increases the bundle size. In such cases, a polyfill might work better.
In this article, we’ll discuss how to use polyfills in your React apps, covering the following topics:
The Replay is a weekly newsletter for dev and engineering leaders.
Delivered once a week, it's your curated guide to the most important conversations around frontend dev, emerging AI tools, and the state of modern software.
A polyfill allows you to use features that are not supported by a browser (or a specific browser version) by adding a fallback that mimics the desired behavior using supported APIs. You can use a polyfill when you want to use a JavaScript feature like String.padEnd, which isn’t supported by older browsers.
By including a fallback for browsers that don’t support it yet, you can use such new features in development while still shipping code that is guaranteed to run on all browsers.
Most major browsers are updated regularly to include support for new JavaScript and CSS features, but a lot of people hardly update their browsers, which is where the need for transpilers and polyfills comes in.
In an ideal world, everyone would update their browsers immediately to support new features as they’re shipped, and we wouldn’t need to transpile our code. Until that day comes, however, we need to support older versions of browsers.
Let’s implement a very simple feature using String.padEnd in a React app.
String.padEnd was released along with String.padStart in ECMAScript 2019 and is currently supported by the latest version of every major browser (we don’t talk about Internet Explorer anymore).
However, we’ll add a polyfill to enable it to run on those older versions without support. First, we’ll write our polyfill and then take a look at using a dedicated polyfill library to handle it for us. By implementing both approaches, we should understand how polyfills work a little better.
Let’s envision a user who says, “I want to be able to view each day of the week along with an emoji. The weekdays should be displayed in a tabular format.”
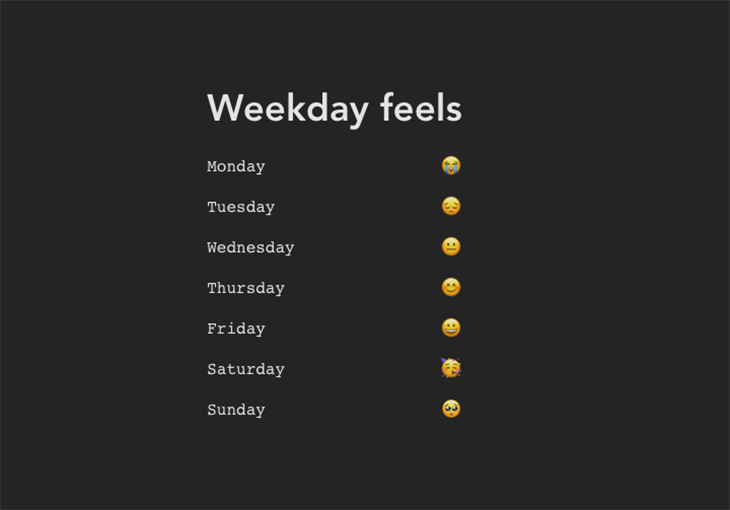
This is a very simple feature where we utilize the padEnd function to generate equal spaces between the weekday and its corresponding emoji to simulate a table view. It’s a silly feature, but hopefully should be sufficient for learning how polyfills work.
To get started, clone this repository containing a starter React and Vite template.
Open up your terminal and run the following command to get a ready-made template.
git clone https://github.com/ovieokeh/react-polyfill-tutorial.git
Navigate into the newly created folder.
cd react-polyfill-tutorial
Install the required dependencies and start the application.
npm install
npm run dev
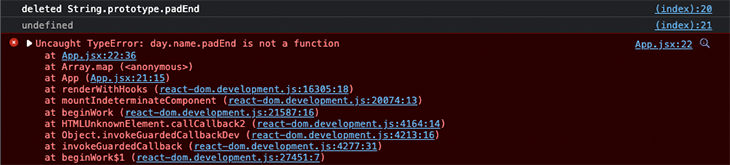
It’ll be cumbersome to download older versions of a browser to simulate not having the String.padEnd feature, and because of this, I’ve included a script in the HTML that deletes padEnd from the String prototype. To view this script, open the index.html file.
You should see the below design:

Now that we have our project running, let’s implement the tabular design.
Open up the src/App.jsx file in your preferred editor and update line 29 to pad the day.name attribute with 23 spaces.
// App.jsx
// ... line 28
const dayName = day.name.padEnd(23);
// ... line 30
Now, save your changes and view the result in the browser. You will notice an error in your browser console, as we’re simulating the browser not having the String.padEnd feature.
We can fix this by writing our polyfill. Notice there’s a comment above the App component (line 13 of the repo). Let’s add some code there like so:
// ... line 13
if (!String.prototype.padEnd) {
  console.log("padEnd is not supported. Using polyfill.");

  String.prototype.padEnd = function padEnd(targetLength, padString) {
    targetLength =
      typeof targetLength !== "number" || targetLength < 0 ? 0 : targetLength;
    padString = String(padString || " ");

    if (this.length > targetLength) return String(this);

    targetLength = targetLength - this.length;
    if (targetLength > padString.length) {
      padString += padString.repeat(targetLength / padString.length);
    }

    return String(this) + padString.slice(0, targetLength);
  };
}
// ... line 32
The contents of the polyfill are not as important as the fact that we’re providing a fallback for a feature, String.padEnd that may not exist in a browser. (I definitely recommend you read through it, of course.) The fallback implements the ECMAScript spec for String.padEnd.
In summary, we’re adding a check to see if the padEnd feature is supported in the current browser runtime, and if not, provide a fallback that implements the behavior as outlined in the official ECMAScript specifications.
If you navigate back to the browser, you should see that the error is gone and the design looks like we expect it to look.
Your code at this stage should look like this:
Now that we’ve written a polyfill by hand, you should hopefully understand more about how polyfills work. However, as with most things in programming, there are already libraries that exist for the sole purpose of providing polyfills.
Instead of doing the check for the existence of a feature and then adding a polyfill manually, you can use a library with a collection of polyfills that will do the same thing for you.
Let’s explore the two primary ways of using a polyfill library;
There are also multiple options available for loading polyfills from a CDN. The most popular one is arguably Polyfill.io, so we’ll use it as an example. However, the concept should still apply to any other polyfill library with a CDN URL.
Open the index.html file and include a <``script``> tag at the bottom of the file.
// ... line 16
<script defer src="https://polyfill.io/v3/polyfill.min.js?features=String.prototype.padEnd|always"></script>
// ... line 18
We use the defer attribute on the script tag to prevent it from blocking the React script from running. Read more about the defer attribute here.
We’re including a polyfill of the String.prototype.padEnd feature and passing the |always flag. This will force the CDN to return the polyfill, as only browsers without support for the padEnd feature will get a JavaScript bundle (remember, most major browsers already support padEnd so without the |always flag, the polyfill won’t be returned).
Now, you can return to the App.jsx file and delete the manual polyfill we added earlier. Refresh the page and confirm that the app is still running fine. If you inspect the console for logs, you’ll notice that we’re still simulating deleting the native String.prototype.padEnd function.
Even though we used Polyfill.io for this example, the concept applies to any polyfill library with a CDN version available.
Your code at this stage should look like this.
Another way to use a polyfill library is through npm. There are packages you can install from npm that will allow you to provide polyfills for JavaScript features.
The most popular by far is core-js, so we’ll use that for this example, but I imagine most other libraries should follow a similar convention.
Open your terminal in the project root and install the core-js package like so:
npm i core-js
With the package installed, we can include the specific polyfill we need, which, in this case, is String.prototype.padEnd because we’re simulating a runtime without native support for padEnd.
Open the App.jsx app and at the top of the file, include the import for the polyfill.
import "core-js/actual/string/pad-end";
// rest of code
Now we can safely remove the CDN import from the previous section. Open the index.html file and delete the script tag for the polyfill.io import.
Your code at this stage should look like this.
Navigate to the browser and confirm that the code still runs as we expect.
We have successfully polyfilled the String.prototype.padEnd feature in three different ways. By now, you should have a good understanding of polyfills and how to work with them regardless of your project structure.
Polyfills are not something you usually work with directly, thanks to the myriad build tools available that handle transpiling code automatically. However, it’s always good to have an understanding of what these robots are doing behind the scenes. After all, it’s only a matter of time before they steal our jobs.
If you followed the tutorial all the way through, you’re awesome ⭐️.
Install LogRocket via npm or script tag. LogRocket.init() must be called client-side, not
server-side
$ npm i --save logrocket

// Code:

import LogRocket from 'logrocket';
LogRocket.init('app/id');
// Add to your HTML:

<script src="https://cdn.lr-ingest.com/LogRocket.min.js"></script>
<script>window.LogRocket && window.LogRocket.init('app/id');</script>

Learn how next-browser gives AI agents runtime context for debugging Next.js apps, including React props, hydration, PPR, forms, and performance.

Build dynamic LLM routing in Next.js with OpenRouter, TanStack AI, task classification, model fallbacks, and cost-aware routing.

TSRX adds first-class control flow, conditional hooks, and scoped styles to React via a TypeScript compiler extension — no new framework required.

Learn how to build a full React Native auth system using Better Auth and Expo — with email/password login, Google OAuth, session persistence, and protected routes.
Would you be interested in joining LogRocket's developer community?
Join LogRocket’s Content Advisory Board. You’ll help inform the type of content we create and get access to exclusive meetups, social accreditation, and swag.
Sign up now

