API services allow applications to connect to other applications using JSON-encoded data. Create an API once, and consume it from any API client or front-end application.
Django REST Framework is a toolkit for building REST APIs with Django. In this tutorial, you’ll use Django REST Framework to build a blog API. This API will have endpoints for users, blog posts, comments, and categories.
You’ll also learn how to authenticate user actions to ensure only authenticated users can modify your app’s data.
This API project demonstrates the following skills:
You should have Python 3 installed on your system, as well as experience interacting with REST APIs. You should also be familiar with relational databases, including primary and foreign keys, database models, migrations, and many-to-one and many-to-many relationships.
You’ll also need some experience with Python and Django.
To create a new API project, first set up a Python environment in your working directory. Run the following in your terminal:
python3 -m venv env
source env/bin/activate
On Windows, run
source env\Scripts\activateinstead.
Be sure to run all commands in this tutorial from this virtual environment (make sure you see (env) at the beginning of the input line in your terminal).
To deactivate this environment, run
deactivate.
Next, install Django and Django REST framework into the virtual environment:
pip install django
pip install djangorestframework
Then create a new project called blog and an app called api:
django-admin startproject blog
cd blog
django-admin startapp api
From the root blog directory (where the manage.py file lives), sync the initial database. This runs migrations for admin, auth, contenttypes, and sessions.
python manage.py migrate
You will also need an admin user to interact with the Django admin site and the browsable API. From the terminal, run the following:
python manage.py createsuperuser --email [email protected] --username admin
Set any password you like (it must be at least eight characters). Note that you might get an error that your password is too common if you set it to something like password123.
To set up your Django REST Framework API, add rest_framework and your api app to blog/blog/settings.py:
INSTALLED_APPS = [
    # code omitted for brevity
    'rest_framework',
    'api.apps.ApiConfig',
]
Adding the ApiConfig object allows you to add other configuration options to your app (see the AppConfig documentation). You won’t need to specify any other options to complete this tutorial.
Finally, start the local development server with the following command in your terminal:
python manage.py runserver
Navigate to http://127.0.0.1:8000/admin and log in to see the Django admin site. Click Users to see your new admin user or to add one or two new users.
Now that you have an admin user and one or two other users, you’ll set up a user API. This will allow read-only access to the list of users and to single users from a set of API endpoints.
Django REST Framework uses serializers to translate querysets and model instances into JSON data. Serialization also determines which data your API returns in a response to the client.
Django’s users are created from the User model defined in django.contrib.auth.
To create a serializer for the User model, add the following to blog/api/serializers.py:
from rest_framework import serializers
from django.contrib.auth.models import User

class UserSerializer(serializers.ModelSerializer):
    class Meta:
        model = User
        fields = ['id', 'username']
As shown in this example, import the User model from Django, along with the collection of serializers from Django REST framework.
Now create the UserSerializer class, which should inherit from the ModelSerializer class.
Define the model that should be associated with this serializer (model = User). The fields array indicates which fields from the model should be included in the serializer. For example, you could also add the first_name and last_name fields.
The ModelSerializer class generates serializer fields that are based on the corresponding model’s fields. This means you don’t need to manually specify any attributes for a serializer field, as these attributes are taken from the model itself.
This serializer also creates simple create() and update() methods. These can be overridden if required.
To read more about how
ModelSerializerworks and how to use other serializers for more control over your data, see Serializers.
There are several ways to create views in Django REST Framework. For reusable functionality and to keep code DRY, use class-based views.
Django REST Framework provides several generic view classes based on the APIView class. These views are intended for the most commonly used API patterns.
For example, the ListAPIView is used for read-only endpoints and provides a get method handler. The ListCreateAPIView class is used for read–write endpoints and provides get and post method handlers.
To create a read-only view for your list of users and a read-only view for a single user, add the following to blog/api/views.py:
from rest_framework import generics
from api import serializers
from django.contrib.auth.models import User

class UserList(generics.ListAPIView):
    queryset = User.objects.all()
    serializer_class = serializers.UserSerializer

class UserDetail(generics.RetrieveAPIView):
    queryset = User.objects.all()
    serializer_class = serializers.UserSerializer
As this code shows, import Django REST Framework’s generics collection of views, along with the User model and the UserSerializer defined in the previous step. The UserList view provides read-only access (via get) to the list of users; the UserDetail view provides read-only access (via get) to a single user.
View names should be in the following form: {ModelName}List and {ModelName}Detail for a list of objects and a single object, respectively.
For each view, the queryset variable contains the list of model instances, as returned here by User.objects.all(). The serializer_class should be set to the UserSerializer, which will serialize the User data.
You’ll set up the endpoint paths for these views in the next step.
With a model, serializer, and set of views for your users, the final step is to define the endpoint paths (called “URL patterns” by Django) for each view.
First, in blog/api/urls.py, add the following:
from django.urls import path
from rest_framework.urlpatterns import format_suffix_patterns
from api import views

urlpatterns = [
    path('users/', views.UserList.as_view()),
    path('users/<int:pk>/', views.UserDetail.as_view()),
]

urlpatterns = format_suffix_patterns(urlpatterns)
Here, you’ve imported Django’s path function and your api app’s collection of views.
The path function creates an element that Django uses to display a page in your app. To do this, Django first finds the correct element by matching a URL pattern (e.g., users/) to a user-requested URL. It then imports and calls the corresponding view (e.g., UserList).
The <int:pk> sequence refers to an integer value that is a primary key (pk). Django captures this part of the URL and sends it to the view as a keyword argument.
In our case, the primary key for the User is the id field, so example.com/users/1 would return the user with id equal to 1.
Before you can interact with these URL patterns (and the ones you’ll create later in this tutorial), you’ll need to add them to the Django project. Add the following to blog/blog/urls.py:
from django.contrib import admin
from django.urls import path, include

urlpatterns = [
    path('admin/', admin.site.urls),
    path('', include('api.urls')),
]
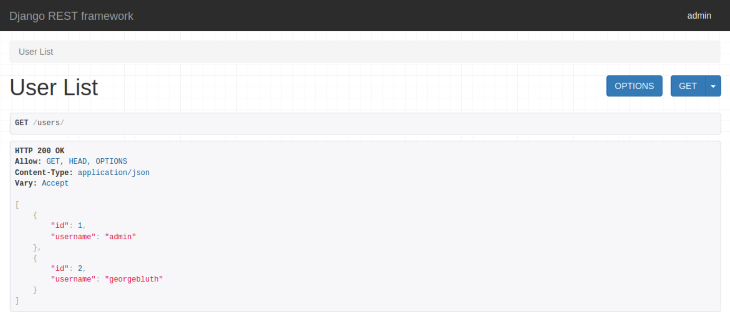
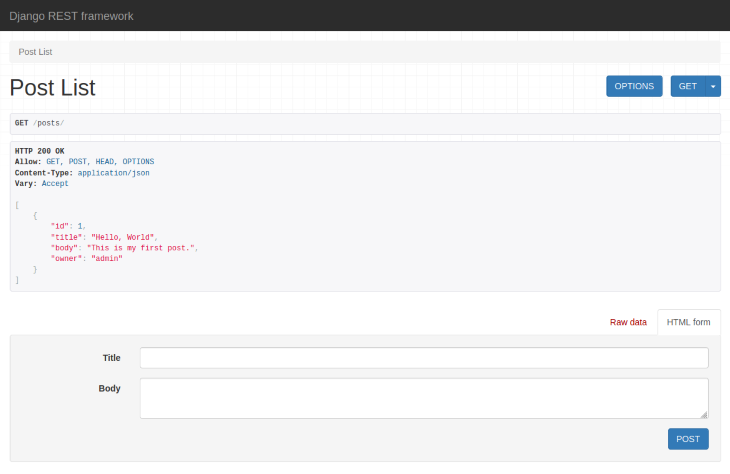
To check that these pieces are working together correctly, navigate to http://127.0.0.1:8000/users in your browser to see a list of your app’s users.
This tutorial uses Django REST Framework’s browsable API to illustrate the endpoints created in this tutorial. This GUI provides authentication and forms that mimic a frontend client. You can also use
cURLorhttpieto test your API from the terminal if you prefer.
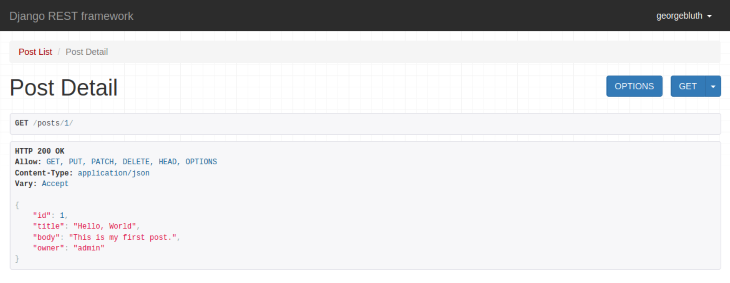
Note the id value of your admin user, and navigate to the endpoint for that user. For example, if the id is 1, navigate to http://127.0.0.1:8000/users/1.
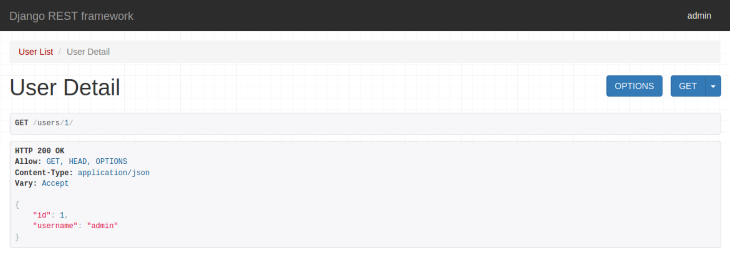
In summary, Django’s model class is serialized using the UserSerializer. This serializer provides data to the UserList and UserDetail views, which are accessed using the users/ and users/<int:pk>/ URL patterns.
With a basic user API set up, you can now create a complete API for a blog, with endpoints for posts, comments, and categories. Start by creating the Post API.
In blog/api/models.py, create a Post model that inherits from Django’s Model class, and define its fields:
from django.db import models

class Post(models.Model):
    created = models.DateTimeField(auto_now_add=True)
    title = models.CharField(max_length=100, blank=True, default='')
    body = models.TextField(blank=True, default='')
    owner = models.ForeignKey('auth.User', related_name='posts', on_delete=models.CASCADE)

    class Meta:
        ordering = ['created']
The field types correspond to field types typically used in relational databases. See Models for more detailed information on Django models and field types.
Note that the ForeignKey type creates a many-to-one relationship between the current model and the model indicated in the first argument (auth.User, which is the User model you’ve been working with).
In this case, one user can be the owner of many posts, but each post can have just one owner. The owner field might be used in a frontend app to retrieve a user and display their username as the post’s author.
The related_name argument allows you to set a custom access name for the current model (posts) instead of the default (post_set). This list of posts will be added to the User serializer in the next step to complete the many-to-one relationship.
Each time you modify a model, run the following to update the database:
python manage.py makemigrations api
python manage.py migrate
Because these are Django models like the User model you’ve been working with, your posts can be modified from Django’s admin site by registering them in blog/api/admin.py:
from django.contrib import admin
from api.models import Post

admin.site.register(Post)
Note that you will be able to create posts from the browsable API later on.
For now, navigate to http://127.0.0.1:8000/admin, click Posts, and add a few posts. You’ll notice that your title and body fields in this form correspond to the CharField and TextField types as defined by the Post model.
You can also select an owner from among the existing users. When creating a post using the browsable API, you won’t need to select a user. The owner will be set automatically to the user who is currently logged in. You’ll set this up in the next step.
To add the Post model to the API, you’ll follow a process similar to the one you followed for the User model.
You first need to serialize the Post model data. In blog/api/serializers.py, add the following:
# code omitted for brevity
from api.models import Post

class PostSerializer(serializers.ModelSerializer):
    owner = serializers.ReadOnlyField(source='owner.username')

    class Meta:
        model = Post
        fields = ['id', 'title', 'body', 'owner']

class UserSerializer(serializers.ModelSerializer):
    posts = serializers.PrimaryKeyRelatedField(many=True, read_only=True)

    class Meta:
        model = User
        fields = ['id', 'username', 'posts']
As this example shows, import the Post model from your api app, and create a PostSerializer that inherits from the ModelSerializer class. Set the model and fields to be used by this serializer.
The ReadOnlyField is a field class that returns a value without modification. In this case, it’s used to return the username field of the owner instead of the default id field.
Next, add a posts field to the UserSerializer. The many-to-one relationship between posts and users was defined by the Post model in the previous step. The field name (posts) should be equal to the related_field argument of the Post.owner field. Change posts to post_set (the default value) if you did not indicate a related_field value in the previous step.
The PrimaryKeyRelatedField represents the list of posts in this many-to-one relationship (many=True signifies there is more than one post).
Note that without setting read_only=True, the posts field would have write access by default. This means you’d be able to manually set the list of posts belonging to a user when that user is created. This is probably not the behavior you want.
Navigate to http://127.0.0.1:8000/users again to see the posts field for each user.
Note that the list of
postsis really a list of postidvalues. You can instead return a list of URLs using theHyperlinkedModelSerializer.
The next step is to create a set of views for the Post API. Add the following to blog/api/views.py:
# code omitted for brevity
from api.models import Post

class PostList(generics.ListCreateAPIView):
    queryset = Post.objects.all()
    serializer_class = serializers.PostSerializer

    def perform_create(self, serializer):
        serializer.save(owner=self.request.user)

class PostDetail(generics.RetrieveUpdateDestroyAPIView):
    queryset = Post.objects.all()
    serializer_class = serializers.PostSerializer

# code omitted for brevity
The ListCreateAPIView and RetrieveUpdateDestroyAPIView together provide the most common API method handlers: get and post for a list (ListCreateAPIView) and get, update, and delete for a single entity (RetrieveUpdateDestroyAPIView).
You must also override the default perform_create function to set the owner field to the current user (the value of self.request.user).
To complete the endpoints for the Post API, create the Post URL patterns. Add the following to the urlpatterns array in blog/api/urls.py:
# code omitted for brevity

urlpatterns = [
    # code omitted for brevity
    path('posts/', views.PostList.as_view()),
    path('posts/<int:pk>/', views.PostDetail.as_view()),
]
Combining the views with these URL patterns creates the get posts/, post posts/, get posts/<int:pk>/, put posts/<int:pk>/, and delete posts/<int:pk>/ endpoints.
To test these endpoints, navigate to to a single post, such as http://127.0.0.1:8000/posts/1, and click DELETE. To change the title of the post, change the title field value and click PUT to update it.
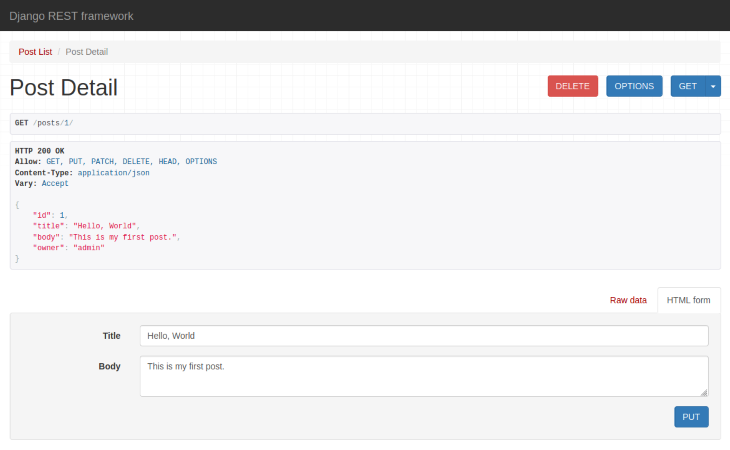
Navigate to http://127.0.0.1:8000/posts to see the list of existing posts or to create a new post. Make sure you’re logged in when attempting to create a post, since a post’s owner is set to the current user.
For convenience, you can add a Log in button to the browsable API by adding the following path to blog/urls.py:
# code omitted for brevity

urlpatterns = [
    # code omitted for brevity
    path('api-auth/', include('rest_framework.urls')),
]
You can now log in to and out of different user accounts to test permissions and modify your posts using the browsable API.
Currently, you can create a post as long as you’re logged in, but you don’t need to be logged in to delete or modify a post — even a post that doesn’t belong to you. Try logging in with a different user account. You should be able to modify or delete a post owned by admin.
To authenticate users and ensure that only the owner of a post can update or delete an existing post, you’ll need to add permissions to your API.
First, add the following to blog/api/permissions.py:
from rest_framework import permissions

class IsOwnerOrReadOnly(permissions.BasePermission):
    def has_object_permission(self, request, view, obj):
        if request.method in permissions.SAFE_METHODS:
            return True

        return obj.owner == request.user
The code for this permission was taken from the Django REST Framework documentation.
The custom IsOwnerOrReadOnly permission checks whether the requesting user is the owner of the given object. In this case, only owners can perform actions such as updating or deleting a post. Non-owners can still retrieve a post, since this is a read-only action.
There is also a built-in IsAuthenticatedOrReadOnly permission. With this permission, any authenticated user can perform any request, whereas non-authenticated users can perform only read-only requests.
Add these permissions to the Post views:
# code omitted for brevity
from rest_framework import permissions
from api.permissions import IsOwnerOrReadOnly

class PostList(generics.ListCreateAPIView):
    queryset = Post.objects.all()
    serializer_class = PostSerializer
    permission_classes = [permissions.IsAuthenticatedOrReadOnly]

    def perform_create(self, serializer):
        serializer.save(owner=self.request.user)

class PostDetail(generics.RetrieveUpdateDestroyAPIView):
    queryset = Post.objects.all()
    serializer_class = PostSerializer
    permission_classes = [permissions.IsAuthenticatedOrReadOnly,
                          IsOwnerOrReadOnly]

# code omitted for brevity
The PostList view needs only the IsAuthenticatedOrReadOnly permission because a user must be authenticated to create a post, and any user can view the list of posts.
The PostDetail requires both permissions, as updating and destroying a post should only be allowed for an authenticated user who is also the owner of the post. Retrieving a single post is read-only and does not require any permissions.
Navigate again to http://127.0.0.1:8000/posts. Log in to your admin account and other user accounts to test which actions can now be performed by authenticated and unauthenticated users.
When logged out, you should not be able to create, delete, or update any posts. When logged in as one user, you should not be able to delete or update the posts owned by a different user.
For more information on permissions in Django REST Framework, see Permissions.
You now have a basic post API. You can now add a comment system to your posts.
A comment is text that is added by a user in response to a post and belongs to an individual user. A user can make many comments on any post, including their own, and a post can have many comments from different users. This means you will set up two many-to-one relationships: one between comments and users and one between comments and posts.
First, create the comment model in blog/api/models.py:
# code omitted for brevity

class Comment(models.Model):
    created = models.DateTimeField(auto_now_add=True)
    body = models.TextField(blank=False)
    owner = models.ForeignKey('auth.User', related_name='comments', on_delete=models.CASCADE)
    post = models.ForeignKey('Post', related_name='comments', on_delete=models.CASCADE)

    class Meta:
        ordering = ['created']
The Comment model is similar to the Post model and has a many-to-one relationship with users through the owner field. A comment also has a many-to-one relationship with a single post through the post field.
Run your database migrations as before:
python manage.py makemigrations api
python manage.py migrate
To create the comment API, first add the Comment model to the PostSerializer and UserSerializer to ensure associated comments are sent along with other post and user data.
Add this code to blog/api/serializers.py:
# code omitted for brevity
from api.models import Comment

class PostSerializer(serializers.ModelSerializer):
    owner = serializers.ReadOnlyField(source='owner.username')
    comments = serializers.PrimaryKeyRelatedField(many=True, read_only=True)

    class Meta:
        model = Post
        fields = ['id', 'title', 'body', 'owner', 'comments']

class UserSerializer(serializers.ModelSerializer):
    posts = serializers.PrimaryKeyRelatedField(many=True, read_only=True)
    comments = serializers.PrimaryKeyRelatedField(many=True, read_only=True)

    class Meta:
        model = User
        fields = ['id', 'username', 'posts', 'comments']
The process here is similar to adding posts to the UserSerializer. Again, this sets the “many” part of the many-to-one relationship between comments and a user and between comments and a post. The list of comments should again be read-only (by setting read_only=True).
Now, add the CommentSerializer to the same file:
class CommentSerializer(serializers.ModelSerializer):
    owner = serializers.ReadOnlyField(source='owner.username')

    class Meta:
        model = Comment
        fields = ['id', 'body', 'owner', 'post']
Notice here that you don’t need to customize the post field. By adding the post field directly to the fields array, it is serialized in the default manner (according to the ModelSerializer). This is equivalent to defining post = serializers.PrimaryKeyRelatedField(queryset=Post.objects.all()).
This means the post field has write access by default: when a user creates a new comment, they also set the post it belongs to.
Finally, create custom views and URL patterns for your comments. This process is similar to the process you followed for the Post API.
Add this code to blog/api/views.py:
from api.models import Comment

class CommentList(generics.ListCreateAPIView):
    queryset = Comment.objects.all()
    serializer_class = serializers.CommentSerializer
    permission_classes = [permissions.IsAuthenticatedOrReadOnly]

    def perform_create(self, serializer):
        serializer.save(owner=self.request.user)

class CommentDetail(generics.RetrieveUpdateDestroyAPIView):
    queryset = Comment.objects.all()
    serializer_class = serializers.CommentSerializer
    permission_classes = [permissions.IsAuthenticatedOrReadOnly,
                          IsOwnerOrReadOnly]
These views are similar to the PostList and PostDetail views.
To complete the comment API, define the URL patterns in blog/api/urls.py:
# code omitted for brevity

urlpatterns = [
    # code omitted for brevity
    path('comments/', views.CommentList.as_view()),
    path('comments/<int:pk>/', views.CommentDetail.as_view()),
]

urlpatterns = format_suffix_patterns(urlpatterns)
You can now navigate to http://127.0.0.1:8000/comments to see a list of existing comments and create new comments.
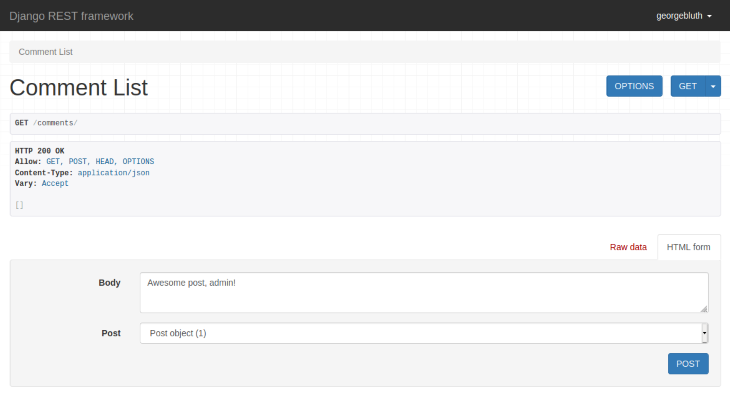
Notice that when creating a new comment in the browsable API, you must choose the post from a list of existing posts.
The final piece of your blog API is a category system.
One or more categories can be added to any post. Because a post can have many categories, and a category can belong to many posts, a many-to-many relationship must be defined.
Create the Category model in blog/api/models.py:
class Category(models.Model):
    name = models.CharField(max_length=100, blank=False, default='')
    owner = models.ForeignKey('auth.User', related_name='categories', on_delete=models.CASCADE)
    posts = models.ManyToManyField('Post', related_name='categories', blank=True)

    class Meta:
        verbose_name_plural = 'categories'
Here, the ManyToManyField class creates a many-to-many relationship between the current model and the model indicated in the first argument. As with the ForeignKey class, this relationship is completed by the serializer.
Note that verbose_name_plural determines how to pluralize the model name in places such as the Django admin site. This avoids pluralizing category as categorys and sets the plural manually to categories.
Run your database migrations as before:
python manage.py makemigrations api
python manage.py migrate
The process of creating the category API is similar to the process you followed in previous steps. First, create a serializer for the Category model by adding this code to blog/api/serializers.py:
# code omitted for brevity
from api.models import Category

class CategorySerializer(serializers.ModelSerializer):
    owner = serializers.ReadOnlyField(source='owner.username')
    posts = serializers.PrimaryKeyRelatedField(many=True, read_only=True)

    class Meta:
        model = Category
        fields = ['id', 'name', 'owner', 'posts']

class PostSerializer(serializers.ModelSerializer):
    owner = serializers.ReadOnlyField(source='owner.username')
    comments = serializers.PrimaryKeyRelatedField(many=True, read_only=True)

    class Meta:
        model = Post
        fields = ['id', 'title', 'body', 'owner', 'comments', 'categories']

class UserSerializer(serializers.ModelSerializer):
    posts = serializers.PrimaryKeyRelatedField(many=True, read_only=True)
    comments = serializers.PrimaryKeyRelatedField(many=True, read_only=True)
    categories = serializers.PrimaryKeyRelatedField(many=True, read_only=True)

    class Meta:
        model = User
        fields = ['id', 'username', 'posts', 'comments', 'categories']
Be sure to add the categories field name to the list of fields in both PostSerializer and UserSerializer. Note that UserSerializer.categories should also be customized with read_only=True. This field represents a viewable list of all categories the user has created.
On the other hand, the PostSerializer.categories field will have write access by default. The default is the same as setting categories = serializers.PrimaryKeyRelatedField(many=True, queryset=Category.objects.all()). This allows a user to select one or more existing categories to assign to a new post.
Next, create the views for the category API in blog/api/views.py:
# code omitted for brevity
from api.models import Category

class CategoryList(generics.ListCreateAPIView):
    queryset = Category.objects.all()
    serializer_class = serializers.CategorySerializer
    permission_classes = [permissions.IsAuthenticatedOrReadOnly]

    def perform_create(self, serializer):
        serializer.save(owner=self.request.user)

class CategoryDetail(generics.RetrieveUpdateDestroyAPIView):
    queryset = Category.objects.all()
    serializer_class = serializers.PostSerializer
    permission_classes = [permissions.IsAuthenticatedOrReadOnly,
                          IsOwnerOrReadOnly]
These views are similar to the other views you’ve created so far.
Finally, to complete the category API, add this code to blog/api/urls.py:
# code omitted for brevity

urlpatterns = [
    # code omitted for brevity
    path('categories/', views.CategoryList.as_view()),
    path('categories/<int:pk>/', views.CategoryDetail.as_view()),
]

urlpatterns = format_suffix_patterns(urlpatterns)
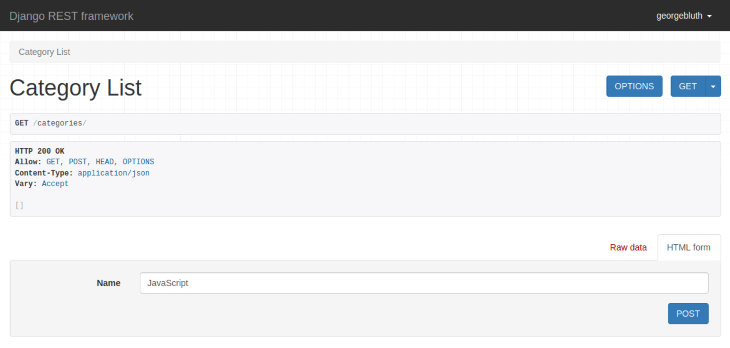
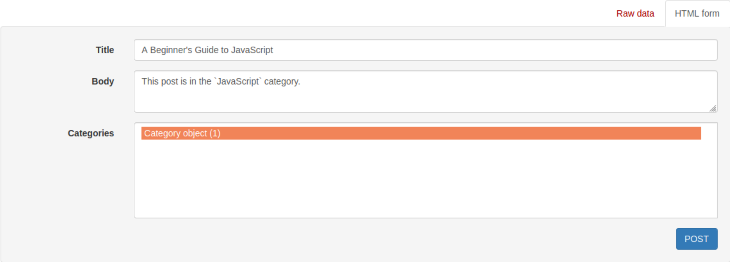
You can now navigate to http://127.0.0.1:8000/categories and create one or two categories.
Next, navigate to http://127.0.0.1:8000/posts and create a new post. You’ll be able to add one or more categories to a post.
Congratulations! You now have a blog API with authentication and many of the most common patterns in API development. You have created endpoints for retrieving, creating, updating, and deleting posts, comments, and categories. You’ve also added many-to-one and many-to-many relationships between these resources.
To expand your API or create a front-end client for it, refer to the Django REST Framework documentation and the Tutorials and Resources.
Install LogRocket via npm or script tag. LogRocket.init() must be called client-side, not
server-side
$ npm i --save logrocket

// Code:

import LogRocket from 'logrocket';
LogRocket.init('app/id');
// Add to your HTML:

<script src="https://cdn.lr-ingest.com/LogRocket.min.js"></script>
<script>window.LogRocket && window.LogRocket.init('app/id');</script>
Hey there, want to help make our blog better?
Join LogRocket’s Content Advisory Board. You’ll help inform the type of content we create and get access to exclusive meetups, social accreditation, and swag.
Sign up now
A breakdown of the wrapper and container CSS classes, how they’re used in real-world code, and when it makes sense to use one over the other.

This guide walks you through creating a web UI for an AI agent that browses, clicks, and extracts info from websites powered by Stagehand and Gemini.

This guide explores how to use Anthropic’s Claude 4 models, including Opus 4 and Sonnet 4, to build AI-powered applications.

Which AI frontend dev tool reigns supreme in July 2025? Check out our power rankings and use our interactive comparison tool to find out.


6 Replies to "Use Django REST Framework to build a blog"
Really nice post! Really apreciated
Nice post. Thanks for sharing.
great tutorial so much easy to understand THANK YOU.
This post is outstanding, it answered the question I had most trouble with: creating a Many2Many relationship with an additional field — and then how to query it! Also, I couldn’t cross reference my models in the serializers correctly, and then connect them to the views. I was going back and forth between function vs class based views and this post made it so much easier to understand. Bravo!
I have been struggling with django rest framework ,this blog has saved my day .But i do have some doubt ,like how to show the time post is created and updated along with other data.Please do help ! And thank you for wonderful tutorial
thanks for useful informations