In December 2021, the world’s largest crypto-native investment firm, Paradigm Lab’s CTO Georgios released a blog regarding the release of a new framework for (evm-based) smart contract development, called Foundry.
It took the Crypto community by storm, and soon became the industry standard for development and testing of smart contracts, owing much to its efficiency in comparison to other frameworks.
In order to understand the significance of Foundry, we need to first look into the problems it tries to solve.
The main problem that lies with frameworks like Hardhat and Truffle is that they require the developers to know a scripting language like JavaScript/TypeScript in order to work with the framework.
As those scripting languages are web development-heavy, the solidity developer need not know such languages for the smart contract development as it is considered more backend oriented.
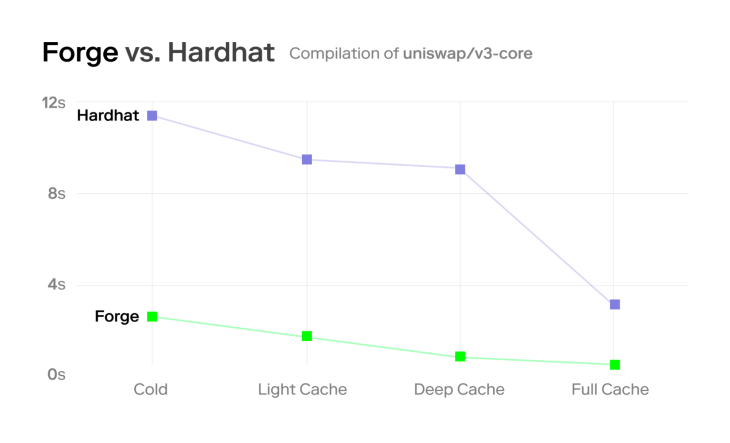
Another issue is that hardhat itself is implemented using TypeScript, so it is slower than Foundry as the latter is implemented using Rust.
(Note: If you are interested in checking the benchmarks, please have a look at this simulation)
Foundry has a lot of cool features aside from this like:
Now, I hope you have an overview of Foundry and the necessity of testing smart contracts using Solidity. Foundry ships with two amazing CLI tools out-of-the-box:
In this article we are going to cover the following:
Let’s get started.
The Replay is a weekly newsletter for dev and engineering leaders.
Delivered once a week, it's your curated guide to the most important conversations around frontend dev, emerging AI tools, and the state of modern software.
Installing Foundry is simple and straightforward.
Open up your terminal and run:
curl -L https://foundry.paradigm.xyz | bash && foundryup
Once Foundry is installed, you can start using Forge and Cast straightaway.
For some OS, you might want to install rust before installing Foundry.
You can instantly setup a Foundry project by right away by running
forge init <PROJECT_NAME>
To make your life easier, I have created a template repository, with which you can get started more easily. It contains the required libraries, scripts and directory setup. So, all you need to do is just run the following command in your terminal:
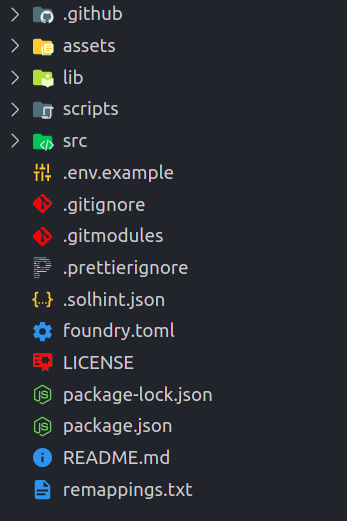
The above command creates a new directory called foundry-faucet and initializes a new Foundry project using my template. This would be the directory structure. The important directories and files that we want to focus on are:
We should also update and install the libraries used; for that run the following commands:
git submodule update --init --recursive
forge install
Now, we are going to implement a faucet contract for our ERC20 token which can drip tokens when requested. We can also restrict the amount of tokens per request by setting a limit which will be 100 by default in our contract.
Open up the src/Faucet.sol file and add the following code:
// SPDX-License-Identifier: UNLICENSED
pragma solidity 0.8.13;

import {Ownable} from "openzeppelin-contracts/access/Ownable.sol";
import {IERC20} from "openzeppelin-contracts/token/ERC20/IERC20.sol";

contract Faucet is Ownable {
   /// Address of the token that this faucet drips
   IERC20 public token;

   /// For rate limiting
   mapping(address => uint256) public nextRequestAt;
   /// Max token limit per request
   uint256 public limit = 100;

   /// @param _token The address of the faucet's token
   constructor(IERC20 _token) {
       token = _token;
   }

   /// Used to send the tokens
   /// @param _recipient The address of the tokens recipient
   /// @param _amount The amount of tokens required from the faucet
   function drip(address _recipient, uint256 _amount) external {
       require(_recipient != address(0), "INVALID_RECIPIENT");

       require(_amount <= limit, "EXCEEDS_LIMIT");

       require(nextRequestAt[_recipient] <= block.timestamp, "TRY_LATER");
       nextRequestAt[_recipient] = block.timestamp + (5 minutes);

       token.transfer(_recipient, _amount);
   }

   /// Used to set the max limit per request
   /// @dev This method is restricted and should be called only by the owner
   /// @param _limit The new limit for the tokens per request
   function setLimit(uint256 _limit) external onlyOwner {
       limit = _limit;
   }
}
Our faucet contract has been added. Now we can go ahead and compile the contracts by running:
forge build
If everything goes well, you should see a similar output:
[⠒] Compiling...
[⠒] Compiling 14 files with 0.8.13
Compiler run successful
Sweet! We have successfully set up our Foundry project and compiled our contract without any errors! Good job, anon 🎉
Now, we can go ahead and start testing our Faucet contract.
As you know, unlike Hardhat, Forge helps us write unit tests using Solidity.
If you open the src/test/Faucet.t.sol file you’ll already see some imports of utils and a BaseSetup contract.
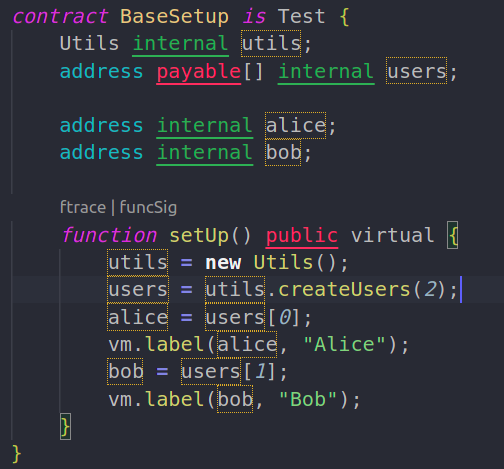
It has some initial setup that initializes a few variables that we can use in our tests. In addition, the setUp() function is similar to beforeEach in hardhat and it runs before every test.
The setUp() function creates two addresses and labels them Alice and Bob. It is helpful when you try to debug via call traces as the label appears in the traces along with the address.
(Note: vm.label is called a cheatcode and it’s specific to Forge; It helps us to do some special operations by interacting with the virtual machine in the test env. We’ll be seeing more cheatcodes during the course of the article. For the full list of cheatcodes, you can refer to this link)
Replace the Faucet.t.sol with the following code to get started with the unit tests;
// SPDX-License-Identifier: MIT
pragma solidity >=0.8;

import {console} from "forge-std/console.sol";
import {stdStorage, StdStorage, Test} from "forge-std/Test.sol";
import {IERC20} from "openzeppelin-contracts/token/ERC20/IERC20.sol";

import {Utils} from "./utils/Utils.sol";
import {Faucet} from "../Faucet.sol";
import {MockERC20} from "../MockERC20.sol";

contract BaseSetup is Test {
   Utils internal utils;
   Faucet internal faucet;
   MockERC20 internal token;

   address payable[] internal users;
   address internal owner;
   address internal dev;
   uint256 internal faucetBal = 1000;

   function setUp() public virtual {
       utils = new Utils();
       users = utils.createUsers(2);
       owner = users[0];
       vm.label(owner, "Owner");
       dev = users[1];
       vm.label(dev, "Developer");

       token = new MockERC20();
       faucet = new Faucet(IERC20(token));
       token.mint(address(faucet), faucetBal);
   }
}
You can see that we have now created new state variables like faucet, token and also we’ve renamed alice and bob to owner and dev for easy interpretation. In this context, dev is someone who requests tokens from the faucet whereas the owner is the owner of the faucet itself.
In the last three lines of the setUp() method, we deploy a mock token for the faucet, pass its address in the constructor of the new Faucet() (faucet deployment), and then call and mint some tokens to the deployed faucet contract.
Now, we’ll inherit the BaseSetup contract to write unit tests for our Faucet contract.
Below the BaseSetup contract, add the following code:
contract FaucetTest is BaseSetup {
   uint256 amountToDrip = 1;

   function setUp() public override {
       super.setUp();
   }
As mentioned earlier, the setUp() method runs before all the testcases and here we are calling the setUp() method of the base contract which is the BaseSetup contract via super.setUp().
Alright, now let us start adding unit tests for our contract. Right below the setUp() method of the FaucetTest contract, add the following piece of code:
   function test_drip_transferToDev() public {
       console.log(
           "Should transfer tokens to recipient when `drip()` is called"
       );
       uint256 _inititalDevBal = token.balanceOf(dev);

       /// Make sure that initial dev balance is Zero
       assertEq(_inititalDevBal, 0);

       /// Request some tokens to the dev wallet from the wallet
       faucet.drip(dev, amountToDrip);

       uint256 _devBalAfterDrip = token.balanceOf(dev);

      /// The difference should be equal to the amount requested from the faucet
       assertEq(_devBalAfterDrip - _inititalDevBal, amountToDrip);
   }
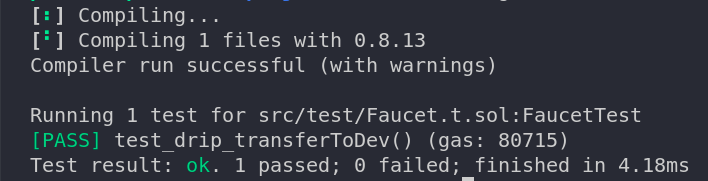
The above code helps us to test the drip() method. The workflow is simple.
assertEq(_inititalDevBal, 0); doesdrip() method from the faucet contract instancedev after the drip() is calleddev account before and after the drip() should be equal to amountToDrip, which is stored as a state variable in the FaucetTest contractNow, let us save the file and run the test: forge test.
You should see the output in your terminal something similar to this:
Cool! Let’s add some more tests.
The above test verifies that the drip() method transfers the tokens to the dev. So, we should also check that the transfer is a valid one, which means the token balance of the faucet should be reduced.
Add the following test below — the test_drip_transferToDev() method.
 function test_drip_reduceFaucetBalance() public {
       console.log("The faucet balance should be reduced");
       faucet.drip(dev, amountToDrip);
       assertEq(token.balanceOf(address(faucet)), faucetBal - amountToDrip);
   }
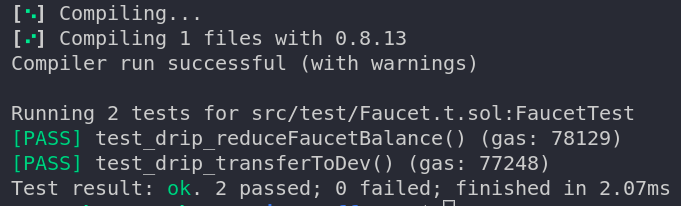
This makes sure that the tokens that the dev received are actually sent from the faucet — if so, the balance of the faucet should be reduced.
We can make sure by running the test suite again : forge test
If everything goes well, then your output should be similar to this:
Sweet! If you have noticed, we have console.log statements in our test cases, but they are not showing up in the console. The reason is that Forge does not display logs by default. To get the logs displayed, we need to run the command with verbosity 2 : forge test -vv will display the logs.
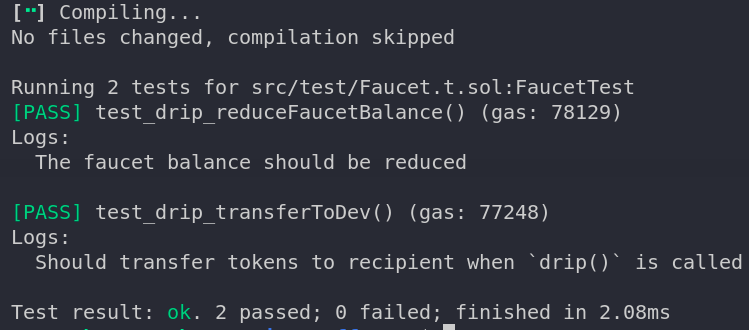
Also if there are any events that are emitted by your contract, you can view them in the tests with verbosity three (-vvv). You can get a detailed call trace for your tests as high as verbosity level five, which helps in better debugging.
Alright, let’s keep adding more tests. Now we are going to test our rate limit mechanism. There should be at least a five-minute interval before calling drip() with the same recipient address.
   function test_drip_revertIfThrottled() public {
       console.log("Should revert if tried to throttle");
       faucet.drip(dev, amountToDrip);

       vm.expectRevert(abi.encodePacked("TRY_LATER"));
       faucet.drip(dev, amountToDrip);
   }
vm.expectRevert(bytes32) is another cheat code that checks if the next call reverts with the given error message. In this case, the error message is TRY_LATER. It accepts the error message as bytes not as a string, hence we are using abi.encodePacked.
If you remember, I mentioned that Forge ships with a fuzzer out-the-box. Let’s give it a try.
We combine the tests test_drip_transferToDev and test_drip_reduceFaucetBalance, and instead of passing the inputs manually, we would allow the fuzzer to input the values so that we can make sure that our contract handles different inputs.
   function test_drip_withFuzzing(address _recipient, uint256 _amount) public {
       console.log("Should handle fuzzing");
       /// inform the constraints to the fuzzer, so that the tests don't revert on bad inputs.
       vm.assume(_amount <= 100);
       vm.assume(_recipient != address(0));
       uint256 _inititalBal = token.balanceOf(_recipient);
       faucet.drip(_recipient, _amount);
       uint256 _balAfterDrip = token.balanceOf(_recipient);
       assertEq(_balAfterDrip - _inititalBal, _amount);
       assertEq(token.balanceOf(address(faucet)), faucetBal - _amount);
   }
Fuzzing is property-based testing. Forge will apply fuzzing to any test that takes at least one parameter.
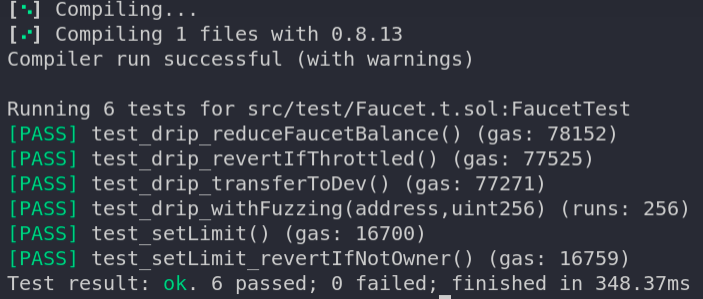
When you execute the test suite, you can find the following line in the output:
[PASS] test_drip_withFuzzing(address,uint256) (runs: 256)
From the above output we can infer that the Forge fuzzer called the test_drip_withFuzzing() method 256 times with random inputs. However, we can override this number using the FOUNDRY_FUZZ_RUNS environment variable.
Now, let us add a couple more tests for the owner-only method setLimit()
function test_setLimit() public {
       console.log("Should set the limit when called by the owner");
       faucet.setLimit(1000);

       /// the limit should be updated assertEq(faucet.limit(), 1000); } function test_setLimit_revertIfNotOwner() public { console.log("Should revert if not called by Owner"); /// Sets the msg.sender as dev for the next tx vm.prank(dev); vm.expectRevert(abi.encodePacked("Ownable: caller is not the owner")); faucet.setLimit(1000); }
In the test_setLimit_revertIfNotOwner() method, a new cheatcode vm.prank(address) is used. It pranks the vm by overriding the msg.sender with the given address; in our case it’s dev. So, the setLimit() should revert with the caller is not the owner message as our Faucet contract inherits the Ownable contract.
Okay let us make sure that no tests fail by running forge test again.
Sweet 🥳 Now it’s time for deployment.
Create a new file from .env.example file and name it as .env. Please fill your INFURA_API_KEY and the PRIVATE_KEY (with Kovan testnet funds).
Once all the fields are populated, you are all set for deployment to Kovan. Before deploying the faucet, we need to deploy our ERC20 token.
You can find the deployment scripts inside the scripts directory, and deploy the MockERC20 token to Kovan testnet by executing the ./scripts/deploy_token_kovan.sh bash script.
The output would look something like this:
Deployer: (YOUR_DEPLOYMENT_ADDRESS)

Deployed to: 0x1a70d8a2a02c9cf0faa5551304ba770b5496ed80

Transaction hash: 0xa3780d2e3e1d1f9346035144f3c2d62f31918b613a370f416a4fb1a6c2eadc77
To make sure that the transaction actually went through, you can search the transaction hash in https://kovan.etherscan.io
Copy the Deployed to: address, as it is the address of the MockERC20 token that we should use for deploying our Faucet contract. To deploy the faucet, you can execute the ./scripts/deploy_faucet_kovan.shscript.
It will prompt you to enter the token address; then enter the copied MockERC20 token address that was deployed earlier.
The output should look something like this:
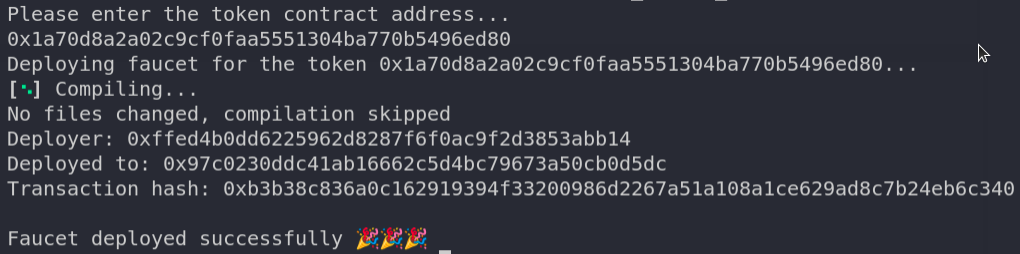
Woohoo 🚀🚀 We have successfully compiled, tested, and deployed our contract to the Kovan testnet using Forge
We still need to verify the contract on Etherscan and also mint some MockERC20 tokens to the Faucet (you can use cast for this!) for it to work as intended. I’ll leave this to you guys as an exercise to try it yourselves!
As always, you can find the GitHub repository for this article here.
In this article we only covered a few pieces of Forge. Foundry is a very powerful framework for smart contracts and it’s rapidly developing as well.
There are more cool features like code-coverage, contract verification, gas snapshots, call traces, and interactive debugging. Feel free to play around with the repo by testing out more features. Happy coding 🎊
Client-side issues that impact users’ ability to activate and transact in your apps can drastically affect your bottom line. If you’re interested in monitoring UX issues, automatically surfacing JavaScript errors, and tracking slow network requests and component load time, try LogRocket.

LogRocket lets you replay user sessions, eliminating guesswork around why bugs happen by showing exactly what users experienced. It captures console logs, errors, network requests, and pixel-perfect DOM recordings — compatible with all frameworks.
LogRocket's Galileo AI watches sessions for you, instantly identifying and explaining user struggles with automated monitoring of your entire product experience.
Modernize how you debug web and mobile apps — start monitoring for free.

Learn what context rot is, why AI agent sessions degrade over time, and how to fix it with compaction, prompt anchoring, context files, plan files, and RAG.

Learn about TypeScript v6’s breaking changes, new ES2025 features, and deprecated options. A complete migration guide from v5 to prepare for v7.

Learn how Vite+ unifies Vite, Vitest, Oxlint, Oxfmt, Rolldown, and Node.js management in one CLI.

AI companies are buying developer tools as coding agents turn runtimes, package managers, and linters into strategic infrastructure.
Would you be interested in joining LogRocket's developer community?
Join LogRocket’s Content Advisory Board. You’ll help inform the type of content we create and get access to exclusive meetups, social accreditation, and swag.
Sign up now

