In web development, achieving pixel-perfect designs across different browsers and devices can be challenging. These challenges could arise from anywhere — from styling for different device screens to overridden styles from somewhere else in our code and more.

Oftentimes, overridden styles can occur when our styles conflict due to specificity. When this happens, we could simply add the !important property to the style so it takes priority over others. But as the world of CSS continues evolving, better ways to solve these challenges are being introduced. One solution is CSS cascade layers.
In this article, we’ll explore CSS cascade layers — and, specifically, the revert-layer keyword — to help you refine your styling strategy. We’ll cover how cascade layers work and when to use them, how the revert-layer keyword comes into play and what its use cases are, and more.
Cascade layers introduce the new at-rule of @layer. This at-rule is great when you’re working with multiple CSS sources where the author is allowed to define and order their CSS rule or layering scheme and avoid specificity conflicts.
Essentially, if and when you’re considering using the !important property in your CSS stylings, that’s the best time to use cascade layers, as this feature is highly relevant for such situations. Another example of when you should use cascade layers is when there are conflicting CSS selectors and specificity.
We’ll discuss more use cases for cascade-layers later. In the meantime, let’s see an example. In the code below, we have two cascade layers:
@layer base, special;

@layer special {
    .item {
        color: red;
    }
}

@layer base {
    .item {
        color: blue;
    }
}
We defined two layer schemes — base and special. Similarly, we have ordered the layers such that special takes priority or importance over the base layer:
This means that we can have multiple CSS sources or different layers. Then, instead of using selector specificity or the !important property, we can order our layers and override whatever styling we want.
As mentioned previously, in this article, the goal is to understand a cascade layer keyword called revert-layer. We’ll also be looking at some of its use cases. Note that we’ll be using certain CSS terminologies throughout this tutorial. For example:
You can refer back to this terminology list as needed. Now, let’s dive into the revert-layer CSS keyword.
revert-layer in CSS?revert-layer is a CSS keyword or value that allows the property in a cascade layer to revert or roll back to the value of the matching property in a previous cascade layer. In other words, it rolls back to the initial value set by the author.
However, if there’s no matching styling set for that property, then the property reverts to the styling of the user-agent origin — that is, the default browser styles.
You can apply the revert-layer keyword to any CSS property, including the shorthand property all. Let’s see an example. Take a look at the code below:
/* index.html */

<html lang="en">
    <head>
        <meta charset="UTF-8" />
        <meta
            name="viewport"
            content="width=device-width, initial-scale=1.0"
        />
        <title>Understanding CSS revert-layer</title>
        <link
            rel="stylesheet"
            href="style.css"
        />
    </head>
    <body>
        <h1>Hello World</h1>
        <ul>
            <li class="item feature">Item one</li>
            <li class="item">Item two</li>
            <li class="item">Item three</li>
        </ul>
    </body>
</html>
In the code above, we have a heading element and a list of items. Now, let’s write our CSS:
/* style.css */

@layer base, special;

@layer special {
    .item {
        color: red;
    }
}

@layer base {
    .item {
        color: blue;
    }
    .feature {
        color: green;
    }
}
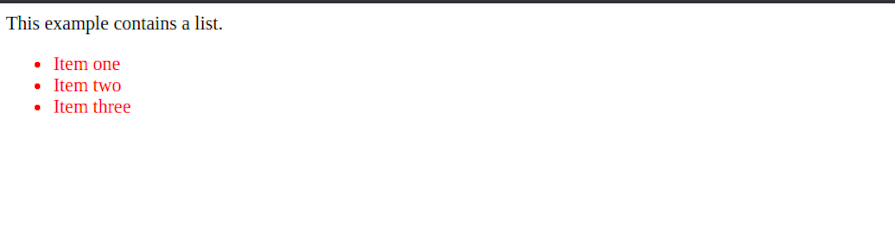
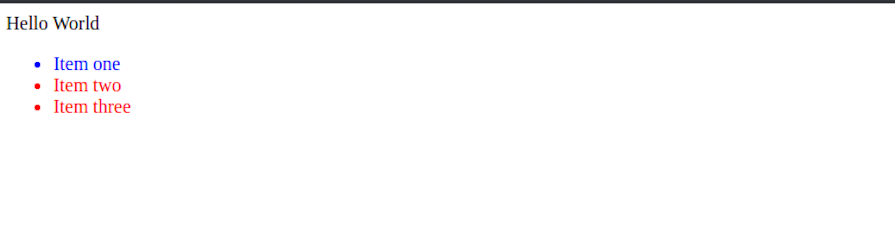
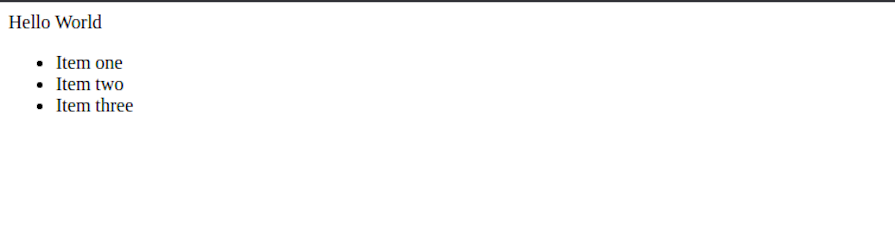
Like in our previous example, we have two layers. As we also explained earlier, all items will take the red color because inside the special layer scheme — which takes the highest priority — the value of the color property is red:
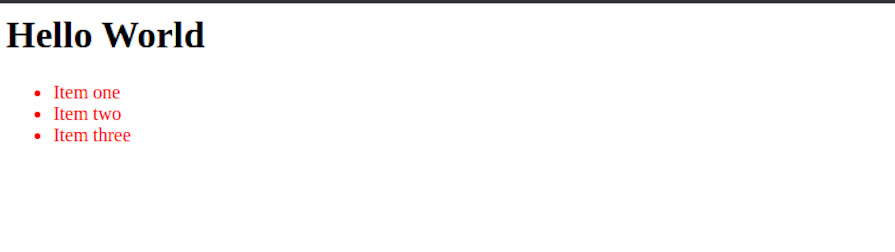
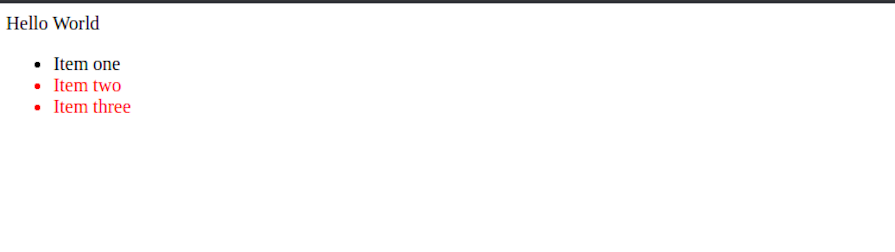
If we reorder our layer to *@layer* special, base; then all items will become blue, excluding the first item, which will be green. This because of its specificity priority, as the .feature style comes after the .item style:
Now, to implement the revert-layer keyword, let’s add the styles below:
/* style.css */

@layer base, special;

@layer special {
    .item {
        color: red;
    }
    .feature {
        color: revert-layer;
    }
}

@layer base {
    .item {
        color: blue;
    }
    .feature {
        color: green;
    }
}
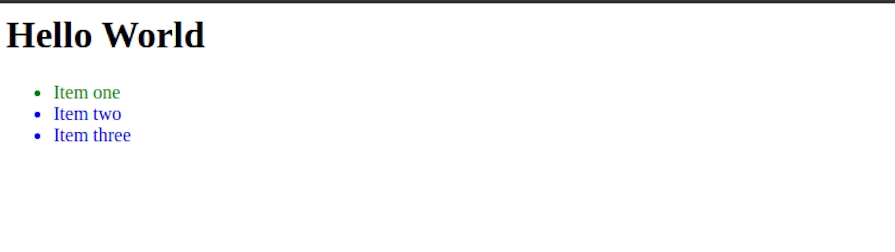
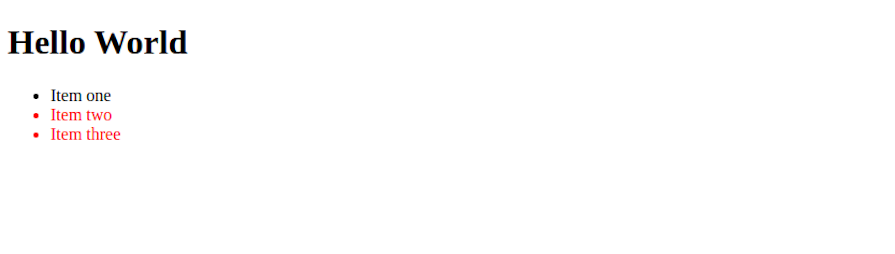
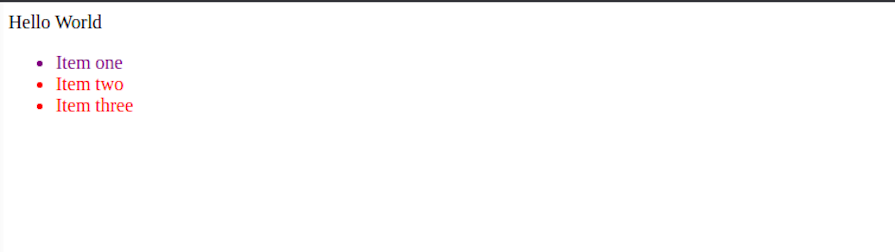
Inside our special layer, we assign the color to the revert-layer value in the .feature item’s selector.
What happens is that every other color in the list of items becomes red, while the .feature item becomes green. This is because it reverts to the matching property of the previous cascade layer, which we assigned as green:
Let me explain further:
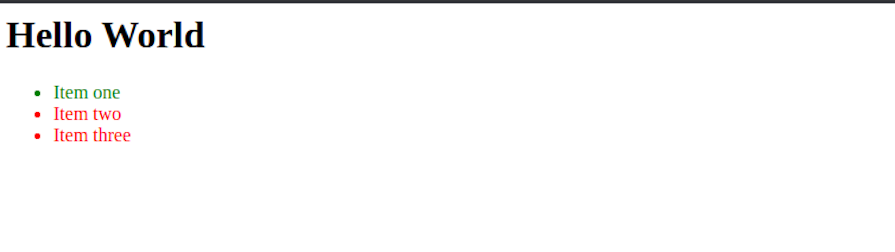
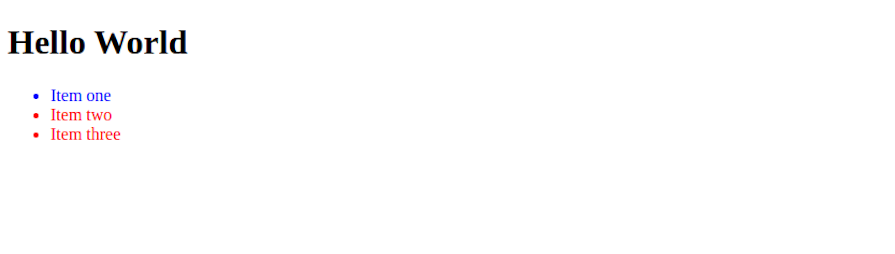
@layer special over @layer base — i.e., the styles in @layer special come before @layer base.feature selector is revert-layer in @layer specialrevert-layer, the color property for .feature goes to the previous layer to find a value. In this case, the previous layer is @layer base@layer base, there is a matching selector called .feature that also has a color: green property, which is the value it takesAdditionally, if we remove the .feature matching selector from @layer base, the item becomes blue. This is because it reverts to the user-agent origin, which is black. However, since it has another class called item, it becomes blue, as it takes that property value:
Conversely, if there’s no matching selector property, it reverts or rolls back to the user-agent origin styles. See the HTML below:
  <ul>
    <li class="feature">Item one</li>
    <li class="item">Item two</li>
    <li class="item">Item three</li>
  </ul>
And here’s the CSS:
@layer base, special;
@layer special {
    .item {
        color: red;
    }
    .feature {
        color: revert-layer;
    }
}
@layer base {
    .item {
        color: blue;
    }
}
Based on what we’ve learned so far, do you know what color each list item will be? Let’s see:
revert-layerWe have seen and understood how the revert-layer works and how to use it. Now, let’s look at some use cases where it can come in handy. While revert-layer is still new and not widely used, it offers some unique advantages in specific scenarios.
The first use case — modular styles — is what we’ve been exploring so far in the article. The revert-layer keyword is useful for reverting module or element styles:
@layer base, special;

@layer base {
    .button {
        background-color: #4caf50;
        color: white;
        padding: 10px 30px;
        border: none;
        border-radius: 5px;
        cursor: pointer;
    }
}

@layer special {
    .button {
        background-color: revert-layer;
        color: revert-layer;
        border: revert-layer;
        border-radius: revert-layer;
        cursor: revert-layer;
        padding: 8px 20px;
    }
}
Here, we retained every other property and changed only the padding. The result will look like so:

If you have used the revert keyword, you will know that it removes the styles applied in the author origin and rolls back the style to the user origin or user-agent origin.
To better understand this use case, let’s look at the difference between revert and revert-layer using the examples below.
First, here’s an example usage of the revert keyword:
@layer base, special;

@layer special {
    .item {
        color: red;
    }
    .feature {
        color: revert;
    }
}
@layer base {
    .item {
        color: blue;
    }
}
In this scenario:
.item selector has a color: red property.feature selector, which takes priority due to specificity, will take the specified color. In this case, we are applying a revert keywordThe revert keyword doesn’t consider if there’s another layer with the same styling, it just rolls the styles back to the user or user-agent origin.
See the result of the code above in the image below:
Now, let’s look at an example usage of the revert-layer keyword:
@layer base, special;

@layer special {
    .item {
        color: red;
    }
    .feature {
        color: revert-layer;
    }
}
@layer base {
    .item {
        color: blue;
    }
}
In this usage of the revert-layer keyword, the .feature item will be styled blue. This is because it rolls the styles back to the previous layer; in our case, the item is styled blue in the @layer base. It only rolls back to the user and user-agent origin if there’s no similar selector in the previous layer. Here’s the result:
Moving on, let’s take the following example to see how we can use revert-layer as a global reset:
&,
* {
    all: revert;
}

@layer base, special;

@layer special {
    .item {
        color: red;
    }
    .feature {
        color: revert-layer;
    }
}

@layer base {
    .item {
        color: blue;
    }
}
The result of this code is shown below. Just as we saw when we used revert-layer, it reset the full stylings to user-agent origin, which is the browser’s default style:
However, revert-layer comes in handy because it only rolls back the styles to the previous origin, making it more relevant to use than revert. You can update the code like so:
&,
* {
    all: revert-layer;
}

...
We have seen that the revert-layer keyword can be used to roll back to the previous user-agent origin. Let’s look at a scenario where we want to introduce a new styling layer.
This scenario could happen due to a large and complex code base where we don’t want to have styling conflicts and ruin the designs. In this scenario, a good and efficient way to go about it is to move the current designs into a layer and then create a new layer.
See the code below:
@layer oldStyles, newStyles;

@layer oldStyles {
    .item {
        color: red;
    }
    .feature {
        color: #008000;
    }
}

@layer newStyles {
    &,
    * {
        all: revert-layer;
    }

    /* ... new styles here */
    .feature {
        color: purple;
    }
}
We moved the old styles into a layer we called @layer oldStyles. Then, we created a new layer called @layer newStyles and started writing the new styles we wanted. This strategy allows elements to retain the old styles if we want them to, as we are reverting to the previous author origin:
This could also apply to style management or versioning.
revert-layerCSS cascade layers, including the revert-layer keyword, offer promising capabilities for CSS architecture. However, it’s essential to consider browser compatibility. Additionally, revert-layer is not easily polyfillable, which further complicates its adoption in projects targeting a wide range of browsers.
Officially, CanIUse said in their documentation that its browser support is limited. But having tested it myself, as of now, the revert-layer keyword is compatible and supported across multiple browsers like Chrome, Firefox, Opera, and Brave. Safari should also be supported.
You should first test it with your preferred browser to see if it is supported too.
We have seen how revert-layer works and how to use it. Understanding revert-layer and its potential use cases or applications can empower developers to leverage their capabilities effectively in projects where browser compatibility allows.
As web frontends get increasingly complex, resource-greedy features demand more and more from the browser. If you’re interested in monitoring and tracking client-side CPU usage, memory usage, and more for all of your users in production, try LogRocket.

LogRocket lets you replay user sessions, eliminating guesswork around why bugs happen by showing exactly what users experienced. It captures console logs, errors, network requests, and pixel-perfect DOM recordings — compatible with all frameworks.
LogRocket's Galileo AI watches sessions for you, instantly identifying and explaining user struggles with automated monitoring of your entire product experience.
Modernize how you debug web and mobile apps — start monitoring for free.

Learn how to set up Meilisearch, index documents, and build keyword, semantic, and hybrid search with AI-powered retrieval.

Compare pnpm and npm across security defaults, disk usage, dependency strictness, and workspace policy to decide which package manager fits your project.

I migrated 20 production-style components from Tailwind to StyleX. Here’s what the data showed about LOC, CSS bundle size, build time, and type safety.

A guide for using JWT authentication to prevent basic security issues while understanding the shortcomings of JWTs.
Hey there, want to help make our blog better?
Join LogRocket’s Content Advisory Board. You’ll help inform the type of content we create and get access to exclusive meetups, social accreditation, and swag.
Sign up now

