One of the challenges I’ve experienced with TypeScript is the limit on only inheriting or extending from a single class at a time. You can circumvent this constraint, especially in a more complex architecture, by using TypeScript mixins to improve multiple class inheritance.

In this tutorial, we’ll learn more about mixins in general, explore TypeScript mixins, and walk through a typical mixins use case.
Here’s what we’ll cover:
To follow along with this tutorial, you should have:
I used playcode.io to write the example programs.
The Replay is a weekly newsletter for dev and engineering leaders.
Delivered once a week, it's your curated guide to the most important conversations around frontend dev, emerging AI tools, and the state of modern software.
Mixins are special classes that contain a combination of methods that can be used by other classes. Mixins promote code reusability and help you avoid limitations associated with multiple inheritance.
Even though attributes and instantiation parameters are defined at compile time, mixins can defer definition and binding of methods until runtime.
To create a mixin, we’ll take advantage of two aspects of TypeScript: interface class extension and declaration merging.
Interface class extension is used, unsurprisingly, to extend multiple classes in TypeScript. Declaration merging refers to TypeScript’s process of merging together two or more declarations with the same name. Interfaces can also be merged into classes and other constructs if they have the same name.
Here’s an example of declaration merging:
    interface Car {
      steering: number;
      tyre: number;
    }
    interface Car {
      exhaustOutlet: number;
    }
    // contains properties from both Car interfaces
    const BMW: Car = {
        steering: 1,
        tyre: 4,
        exhaustOutlet: 2
    };
Now that we understand these two TypeScript features, we’re ready to get started.
First, we need to create a base class to which the mixins will be applied:
class Block {
    name = "";
    length = 0;
    breadth = 0;
    height = 0;
    constructor(name: string, length: number, breadth: number, height: number, ) {
        this.name = name;
        this.length = length;
        this.breadth = breadth;
        this.height = height;
    }
}
Next, create the the classes to which the base class will extend:
class Moulder {
  moulding = true;
  done = false
  mould() {
    this.moulding = false;
    this.done = true;
  }
}
class Stacker {
  stacking = true;
  done = false
  stack() {
    this.stacking = false;
    this.done = true;
  }
}
Create an interface that merges the expected classes with the same name as your base class (Block):
interface Block extends Moulder, Stacker {}
The new interface is defined with the exact same name as the class Block we created earlier. This is crucial because this interface is extending both Moulder and Stacker classes. This means the interfaces will merge their method definition into a single construct (the interface) while at the same time merging into the class definition with the same name.
Due to declaration merging, the Block class will be merged with the Block interface.
To create a function to join two or more class declarations, we’ll use the function provided in the official TypeScript handbook:
function applyMixins(derivedCtor: any, constructors: any[]) {
  constructors.forEach((baseCtor) => {
    Object.getOwnPropertyNames(baseCtor.prototype).forEach((name) => {
      Object.defineProperty(
        derivedCtor.prototype,
        name,
        Object.getOwnPropertyDescriptor(baseCtor.prototype, name) ||
          Object.create(null)
      );
    });
  });
}
The preceding function iterates over Moulder and Stacker classes, then iterates over its list of properties and defines those properties into the Block class. Essentially, we’re manually linking all methods and properties from the Moulder and Stacker classes into the Block class.
To continue, execute the preceding function as follows, then check out the example below:
applyMixins(Block, [Moulder, Stacker]);
let cube = new Block("cube", 4, 4, 4);
cube.mould();
cube.stack();
console.log(cube.length, cube.breadth, cube.height, cube.name, cube.moulding, cube.stacking);
Here, we assigned cube to the instance of the base class Block. Now the Block instance can directly access the mould() and stack() methods from the Moulder and Stacker classes, respectively.
While there are other ways to create TypeScript Mixins, this is the most optimized pattern because it relies less on the compiler and more on your codebase to ensure both runtime and type-system are kept in sync.
Let’s go over some use cases for TypeScript mixins you’re likely to encounter or may want to consider.
TypeScript classes cannot extend several classes at the same time unless a mixin is introduced to the interface.
Consider the following snippet:
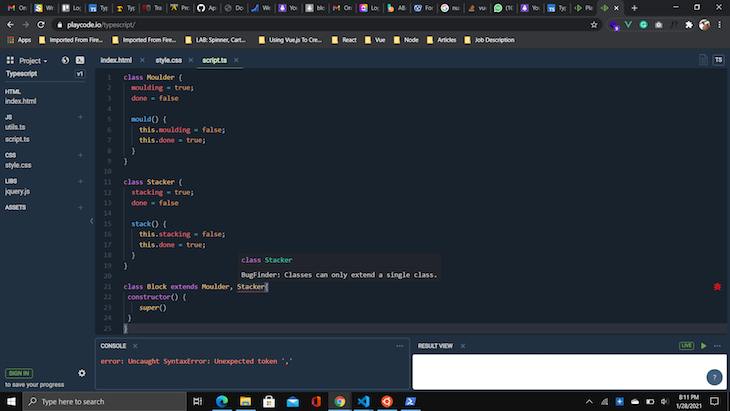
class Moulder {
  moulding = true;
  done = false
  mould() {
    this.moulding = false;
    this.done = true;
  }
}
class Stacker {
  stacking = true;
  done = false
  stack() {
    this.stacking = false;
    this.done = true;
  }
}
class Block extends Moulder, Stacker{
 constructor() {
    super()
 }
}
In this example, the Block class tries to extend two classes at the same time without introducing the mixins concept. If you add this snippet to the online editor (playcode.io), you’ll get the following error:
At this point, the only solution to this limitation is to introduce TypeScript mixins.
TypeScript mixins come in handy when building applications that are likely to grow in complexity. When building TypeScript applications with complex architecture, you’ll want to extend multiple classes at the same time. With mixins you can overcome the limitations associated with multiple inheritance.

LogRocket lets you replay user sessions, eliminating guesswork by showing exactly what users experienced. It captures console logs, errors, network requests, and pixel-perfect DOM recordings — compatible with all frameworks, and with plugins to log additional context from Redux, Vuex, and @ngrx/store.
With Galileo AI, you can instantly identify and explain user struggles with automated monitoring of your entire product experience.
Modernize how you understand your web and mobile apps — start monitoring for free.

useEffect breaks AI streaming responses in ReactSee why useEffect breaks AI streaming in React, and how moving stream state outside React fixes flicker and stale updates.

A real-world debugging session using Claude to solve a tricky Next.js UI bug, exploring how AI helps, where it struggles, and what actually fixed the issue.

CSS wasn’t built for dynamic UIs. Pretext flips the model by measuring text before rendering, enabling accurate layouts, faster performance, and better control in React apps.

Why do real-time frontends break at scale? Learn how event-driven patterns reduce drift, race conditions, and inconsistent UI state.
Would you be interested in joining LogRocket's developer community?
Join LogRocket’s Content Advisory Board. You’ll help inform the type of content we create and get access to exclusive meetups, social accreditation, and swag.
Sign up now

