When deploying a Vue.js app, using the right hosting service can make all the difference. Heroku had been the go-to platform for many for years, renowned for its simplicity and popularity among developers because of the features available on its free tier.

In late 2022, however, Heroku eliminated its free deployment features. So today, we’ll explore the best free alternatives for deploying your Vue apps, along with step-by-step instructions on how to deploy your app on each platform.
Jump ahead:
To follow along with this tutorial, you’ll need to have basic knowledge of how to create a Vue app as well as the following software installed on your machine:
First, let’s create a simple ecommerce website with Vue, and then we’ll explore how to deploy the application using free hosting services. You can find the code for the demo app in this GitHub repo. Once you have Vue CLI installed, you can create a new Vue project by running the command below in the terminal:
npm init vue@latest
Next, follow the prompt options to select the application features. I’ll configure this demo ecommerce application using the following settings:
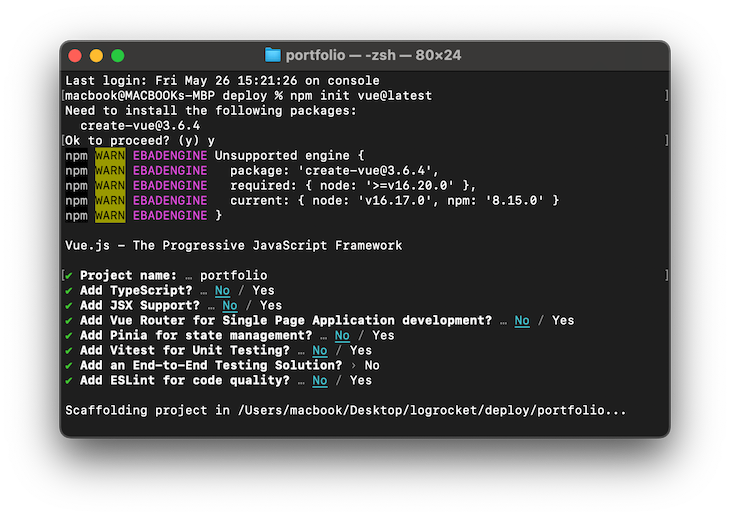
After configuration, run the following command in your terminal to complete the application installation and setup:
cd ecommerce-app
npm install
Now, open the application folder in your code editor and navigate to the src directory, then open the App.vue file and replace it with the following code:
<template>
 <div>
   <nav>
     <ul>
       <li><a href="#">Home</a></li>
       <li><a href="#">Products</a></li>
       <li><a href="#">About</a></li>
       <li><a href="#">Contact</a></li>
     </ul>
   </nav>
 </div>
 <center><h3>Latest Shoes</h3></center>
 <div class="container">
   <div class="card">
     <img
       src="https://images.unsplash.com/photo-1542291026-7eec264c27ff?ixlib=rb-4.0.3&ixid=M3wxMjA3fDB8MHxwaG90by1wYWdlfHx8fGVufDB8fHx8fA%3D%3D&auto=format&fit=crop&w=1740&q=80"
       alt="Product 1"
     />
     <h3>Product 1</h3>
     <p>Description of Product 1</p>
     <button>Add to Cart</button>
   </div>
   <div class="card">
     <img
       src="https://images.unsplash.com/photo-1543163521-1bf539c55dd2?ixlib=rb-4.0.3&ixid=M3wxMjA3fDB8MHxwaG90by1wYWdlfHx8fGVufDB8fHx8fA%3D%3D&auto=format&fit=crop&w=1180&q=80"
       alt="Product 2"
     />
     <h3>Product 2</h3>
     <p>Description of Product 2</p>
     <button>Add to Cart</button>
   </div>
   <div class="card">
     <img
       src="https://images.unsplash.com/photo-1603808033192-082d6919d3e1?ixlib=rb-4.0.3&ixid=M3wxMjA3fDB8MHxwaG90by1wYWdlfHx8fGVufDB8fHx8fA%3D%3D&auto=format&fit=crop&w=830&q=80"
       alt="Product 3"
     />
     <h3>Product 3</h3>
     <p>Description of Product 3</p>
     <button>Add to Cart</button>
   </div>
   <!-- Add more product cards here -->
   <div class="card">
     <img
       src="https://images.unsplash.com/photo-1542291026-7eec264c27ff?ixlib=rb-4.0.3&ixid=M3wxMjA3fDB8MHxwaG90by1wYWdlfHx8fGVufDB8fHx8fA%3D%3D&auto=format&fit=crop&w=1740&q=80"
       alt="Product 1"
     />
     <h3>Product 1</h3>
     <p>Description of Product 1</p>
     <button>Add to Cart</button>
   </div>
   <div class="card">
     <img
       src="https://images.unsplash.com/photo-1603808033192-082d6919d3e1?ixlib=rb-4.0.3&ixid=M3wxMjA3fDB8MHxwaG90by1wYWdlfHx8fGVufDB8fHx8fA%3D%3D&auto=format&fit=crop&w=830&q=80"
       alt="Product 3"
     />
     <h3>Product 3</h3>
     <p>Description of Product 3</p>
     <button>Add to Cart</button>
   </div>
 </div>
</template>
To add styling to the application, navigate to the assets directory and replace the main.css stylesheet with the following:
body {
 font-family: Arial, sans-serif;
}
.container {
 display: flex;
 flex-wrap: wrap;
 justify-content: space-between;
}
nav {
 background-color: #f2f2f2;
 padding: 10px;
 display: flex;
 justify-content: center;
}

nav ul {
 list-style-type: none;
 margin: 0;
 padding: 0;
}

nav ul li {
 display: inline;
 margin-right: 10px;
}

nav ul li a {
 text-decoration: none;
 color: #333;
 padding: 5px;
}

.card {
 width: 300px;
 margin-bottom: 20px;
 padding: 20px;
 border: 1px solid #ccc;
 border-radius: 4px;
}

.card img {
 width: 100%;
 height: auto;
 margin-bottom: 10px;
}

.card h3 {
 margin: 0;
 font-size: 18px;
 font-weight: bold;
}

.card p {
 margin: 10px 0;
 font-size: 14px;
}

.card button {
 padding: 10px 20px;
 font-size: 14px;
 background-color: #4caf50;
 color: #fff;
 border: none;
 border-radius: 4px;
 cursor: pointer;
}
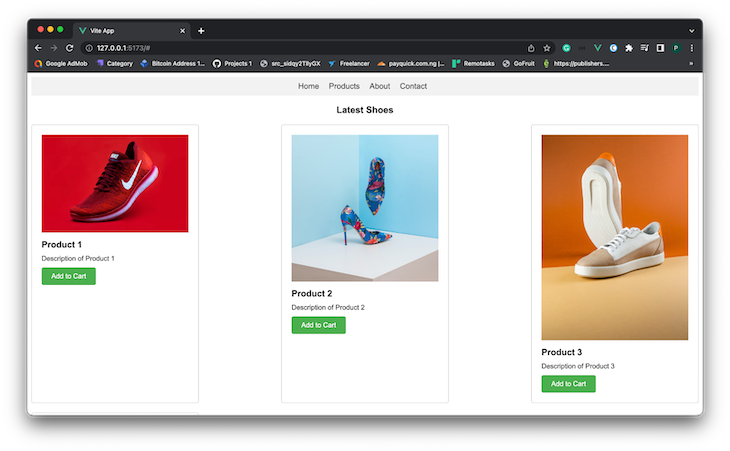
When running the application in development mode, we should have the output below in the browser:
The first step in deploying our application is to push the source code to a GitHub repository. Most deployment services allow developers to deploy from their GitHub repository, which makes it easy to rebuild the application when changes are made to the codebase.
First, we need to link the source code to a GitHub repository. In the terminal, navigate to the project directory and run the following commands:
git init
gh repo create
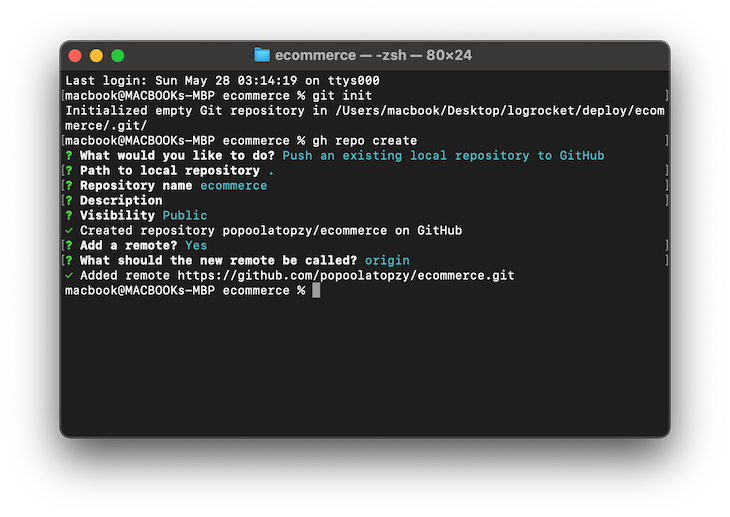
After running the above commands, you will be prompted to create and configure a new GitHub repository. You can configure the repository as shown in the image below:
Next, the following commands will push the code to the new GitHub repository:
git add .
git commit -m "pushing vue app to githup repo"
Netlify is a cloud-based platform that provides developers with various tools and services to build, deploy, and manage websites and web applications. It offers a unified platform for web development, hosting, and content delivery, simplifying the process of building and deploying websites.
The Netlify free starter plan, available at no cost, offers the following features:
Register a new Netlify account or log in to the Netlify dashboard to start deploying your Vue application:
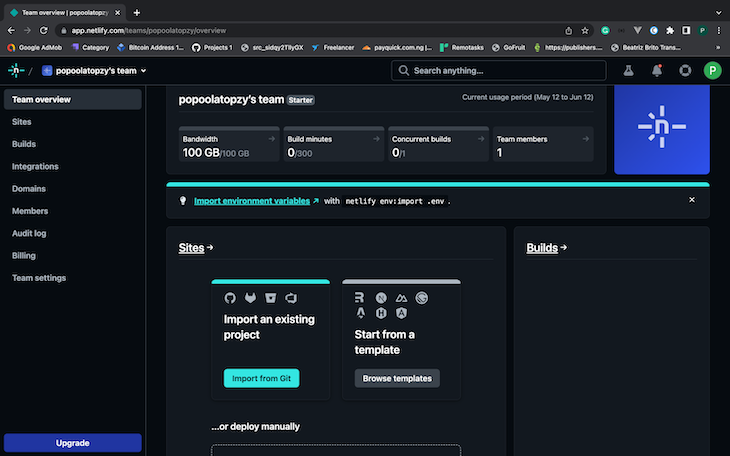
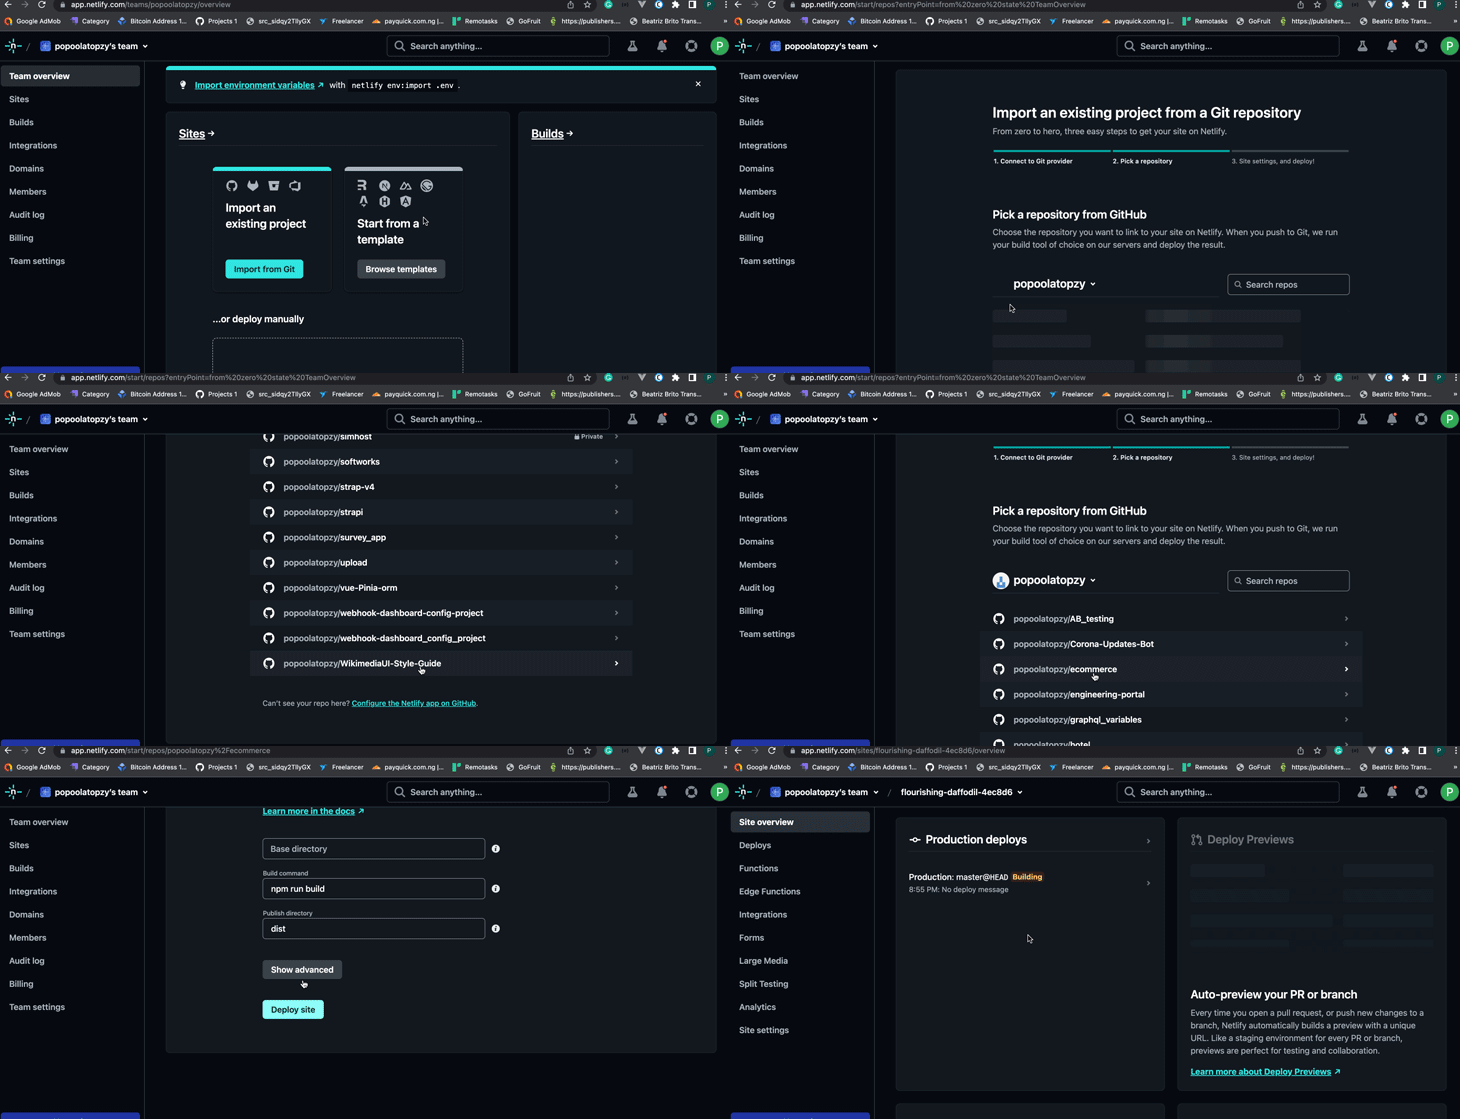
From the dashboard page, click the Import from Git button, which will prompt you to connect to a Git provider; click GitHub and configure the application as shown in the GIF below. Finally, click the Deploy site button:
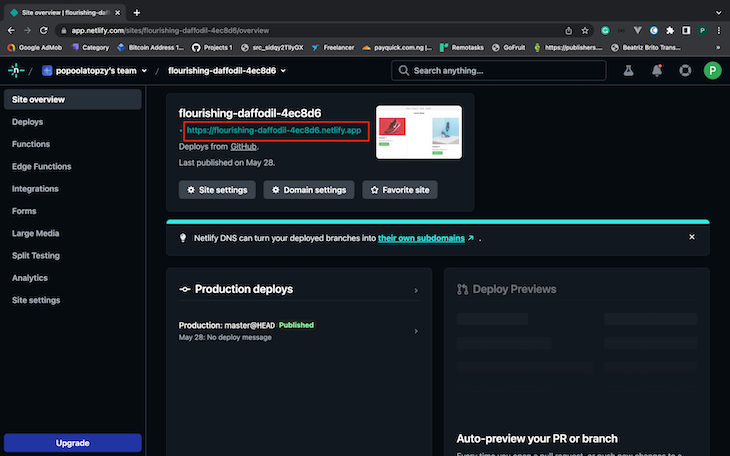
Once the application is successfully deployed, you will find the link to the application at the top of your dashboard page:
Vercel is a serverless cloud platform for hosting applications and serverless functions. It provides a seamless and efficient way to deploy applications and websites.
With Vercel, developers can easily host their projects and enjoy benefits such as instant deployment, automatic scaling, and optimized performance. Vercel’s free hobby plan has the following features:
To deploy on Vercel, register a new account or log in to your Vercel dashboard page:
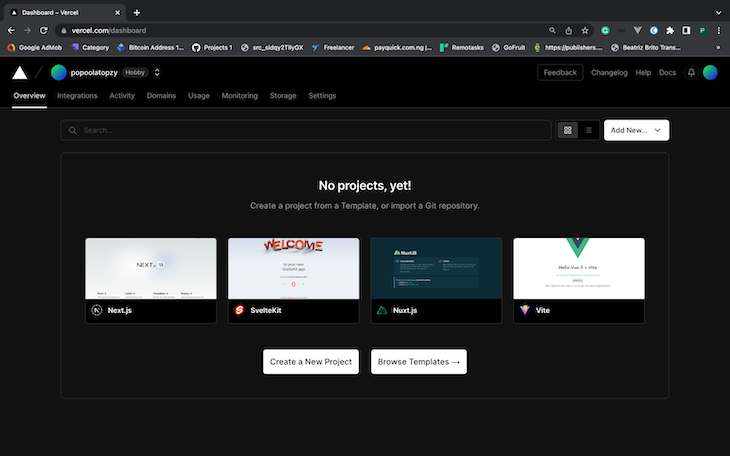
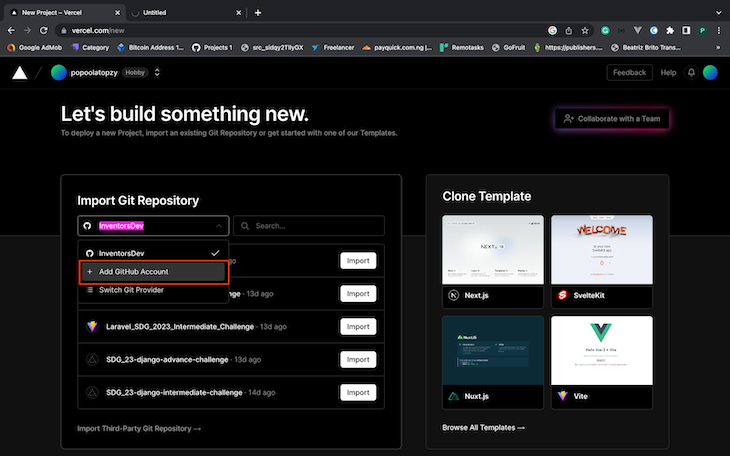
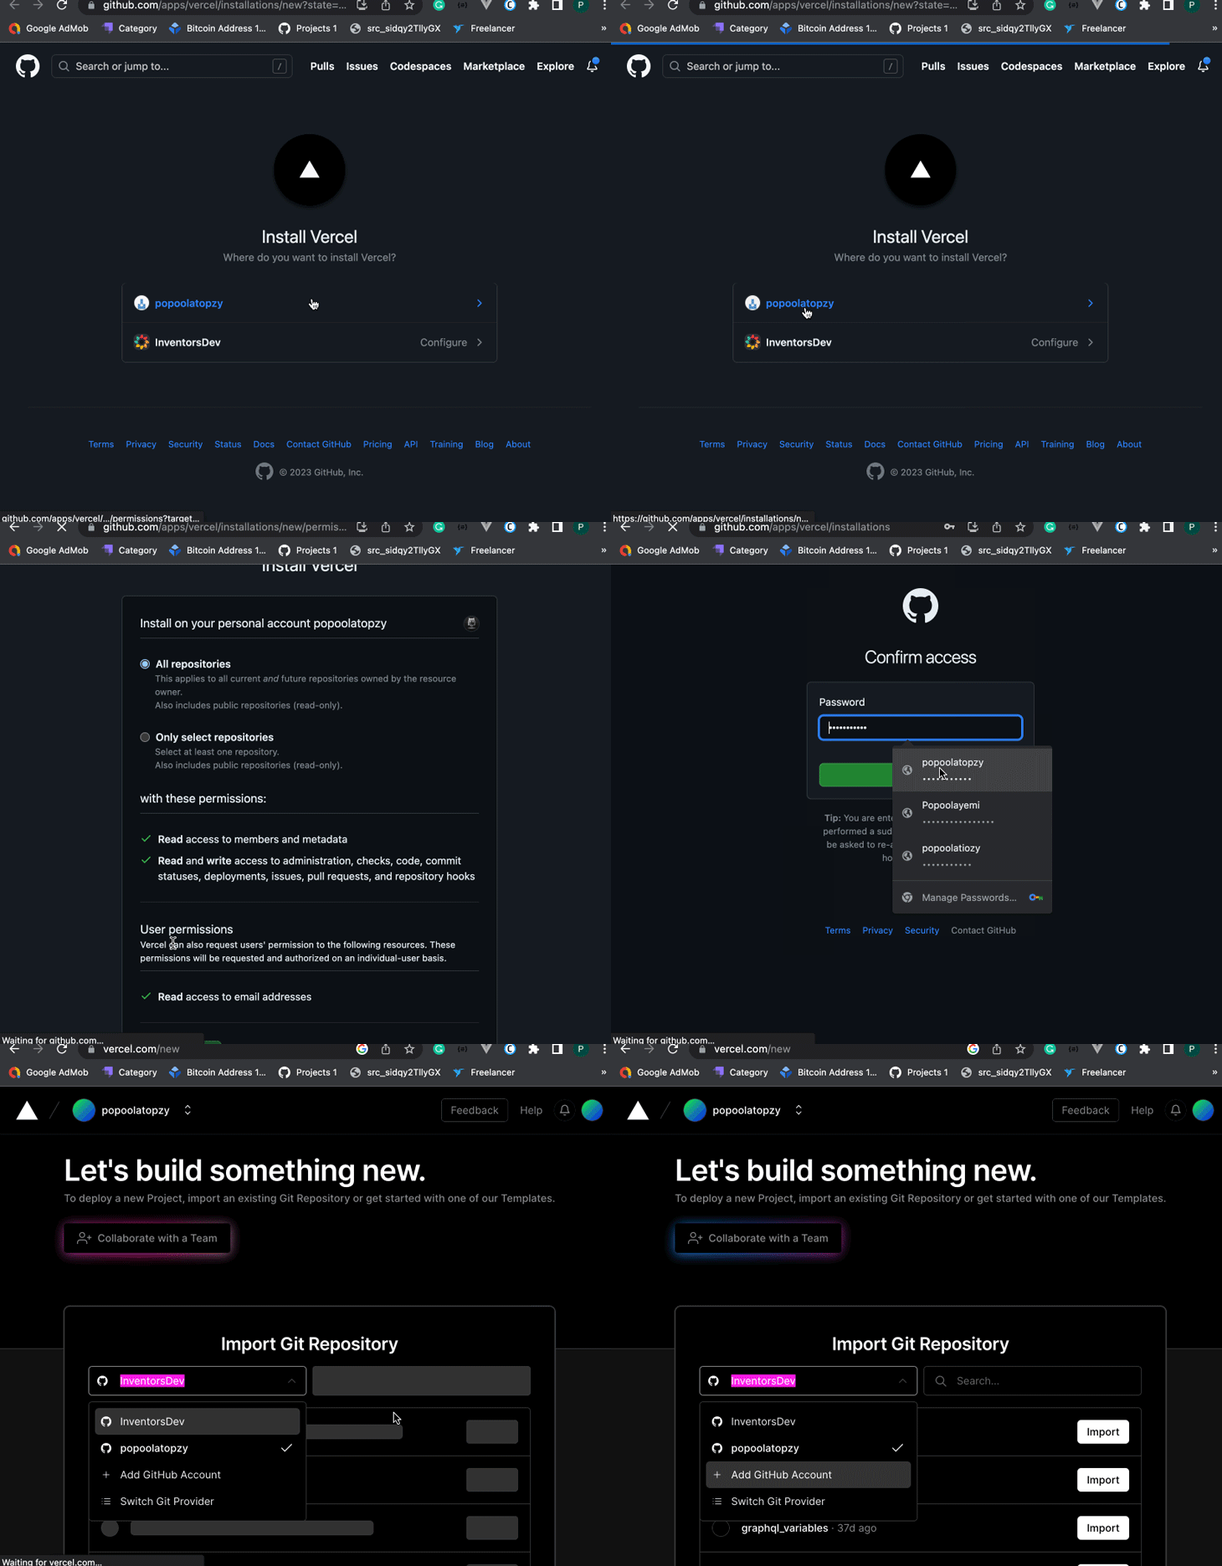
Click the Create a New Project button on the dashboard, which redirects you to the Import Git Repository page. Select Add GitHub Account, as shown in the image below:
You will be redirected to GitHub to install Vercel on your GitHub repository. Select the repository you want to deploy from and click the Install button:
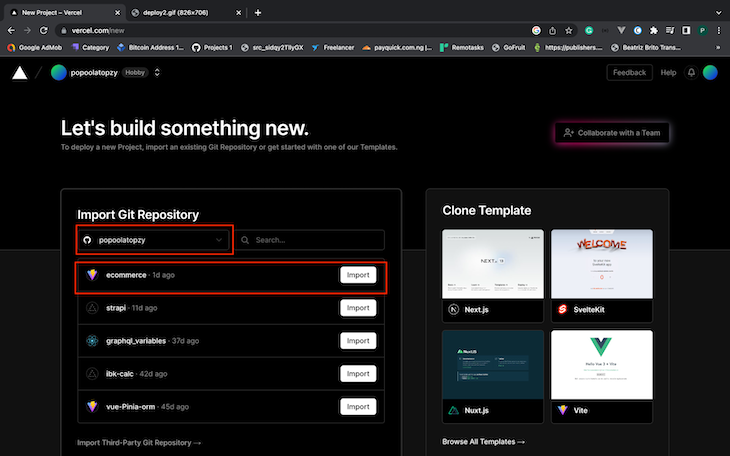
Once the installation is complete, select the repository you want to deploy from and click Import:
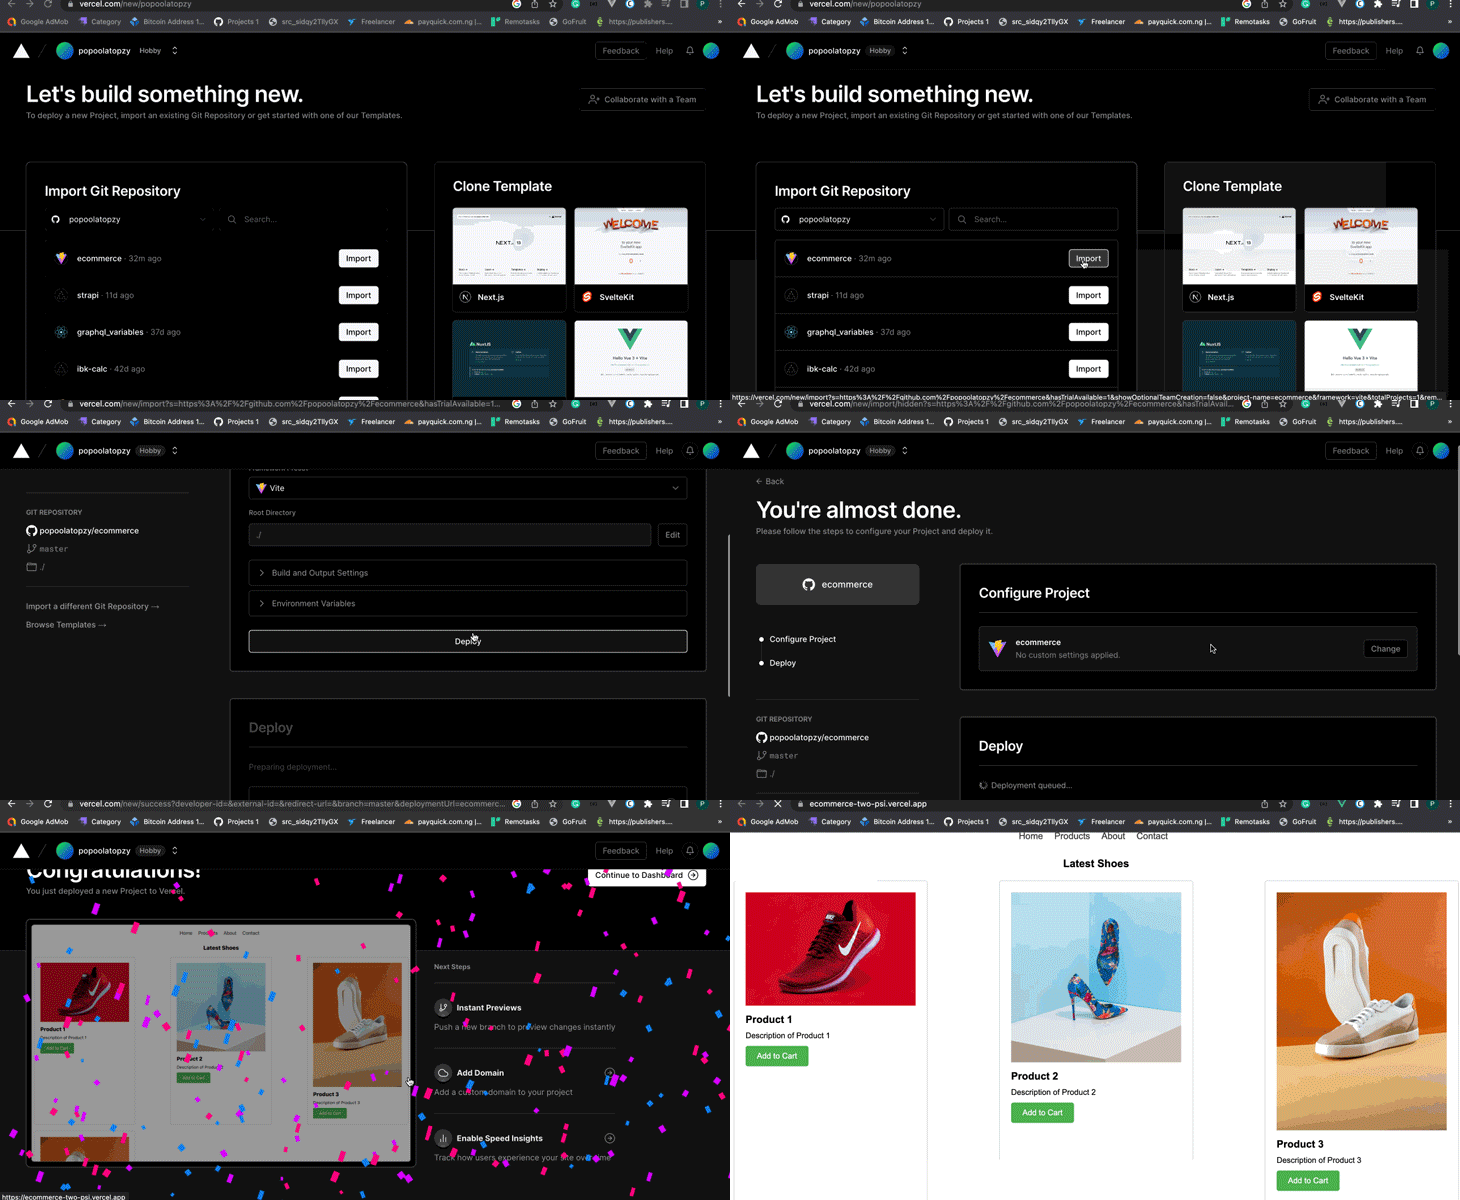
Next, you must configure the application name and click the Deploy button. Your application will be live within a few seconds:
Render is a hosting platform that provides a simple and efficient way to deploy and manage applications and websites. Render provides developers with features like automated deployment, scaling, and monitoring, making it easier to focus on building their applications rather than dealing with infrastructure management.
Render offers a free “Individual” hosting plan, dedicated to hobbyists, students, and developers who want to test their apps. The Render Individual plan has the following features:
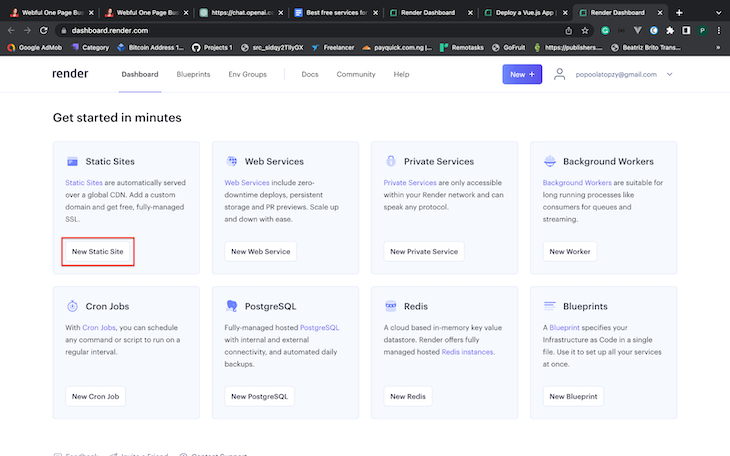
To deploy your application on Render, log in to the Render dashboard. From the dashboard page, click on New Static Site:
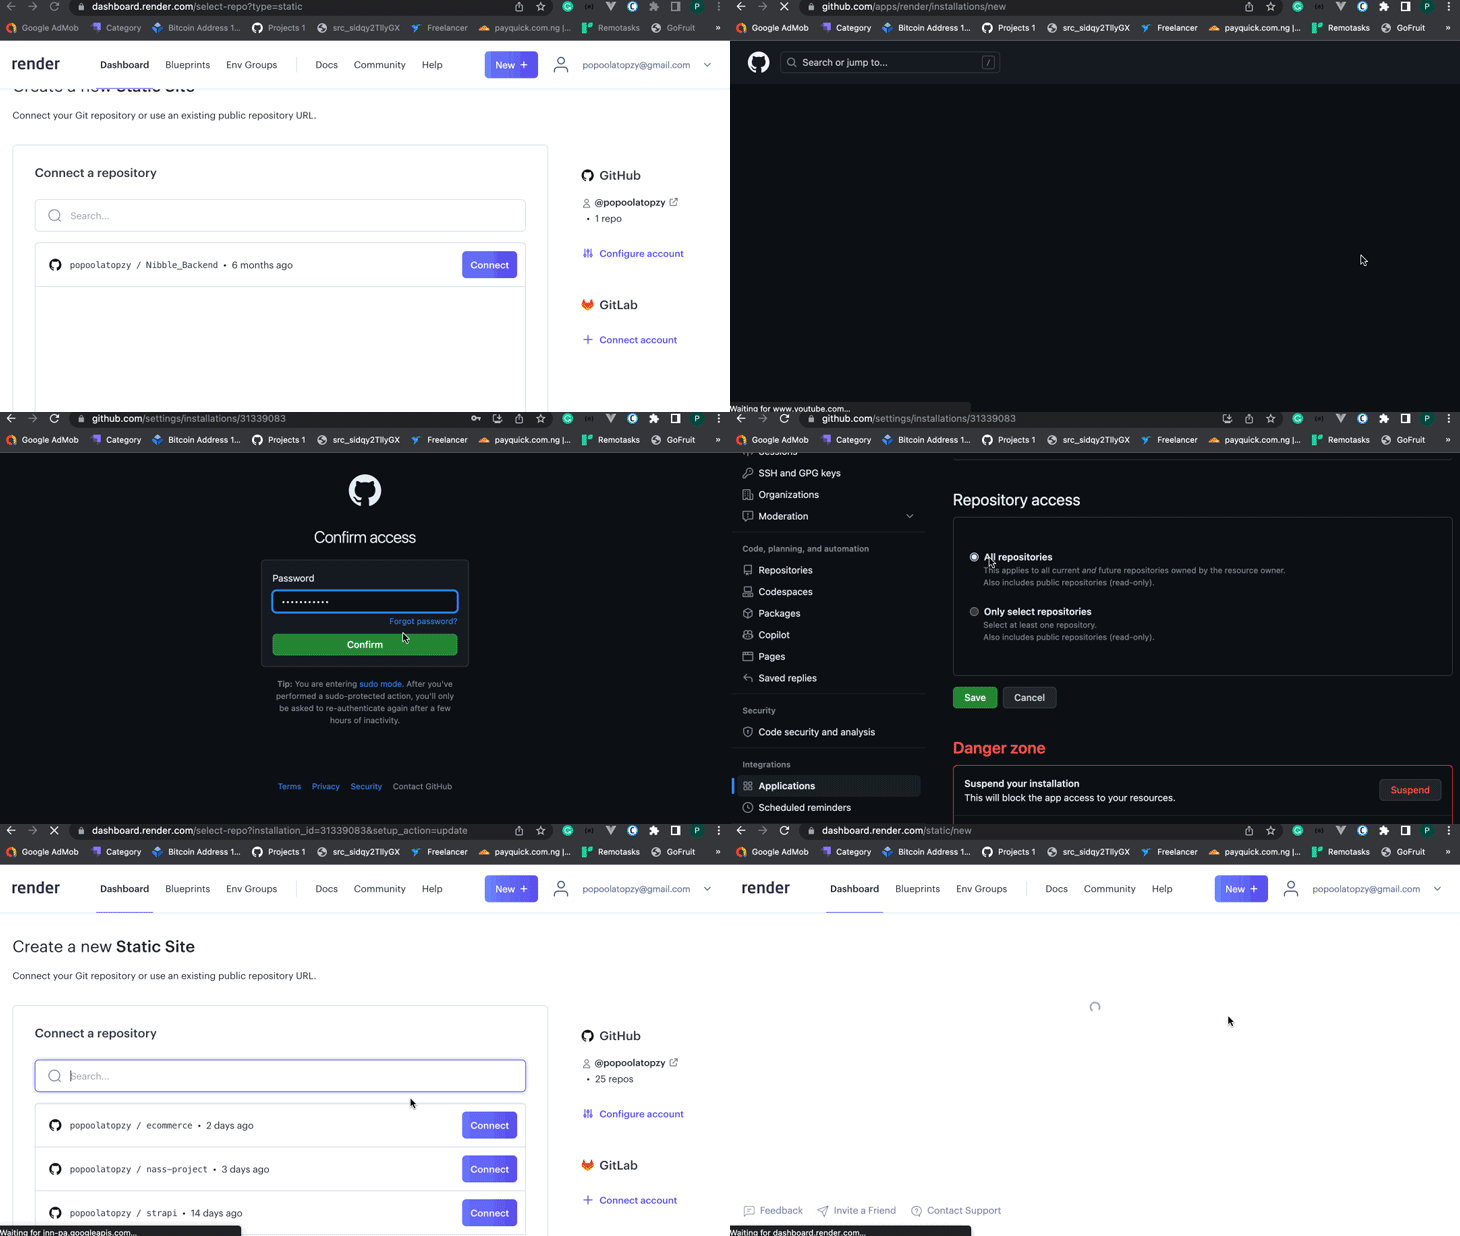
Next, you must install Render on the repository from which you want to deploy. Click Connect GitHub and follow the prompt instruction to install Render, as shown below:
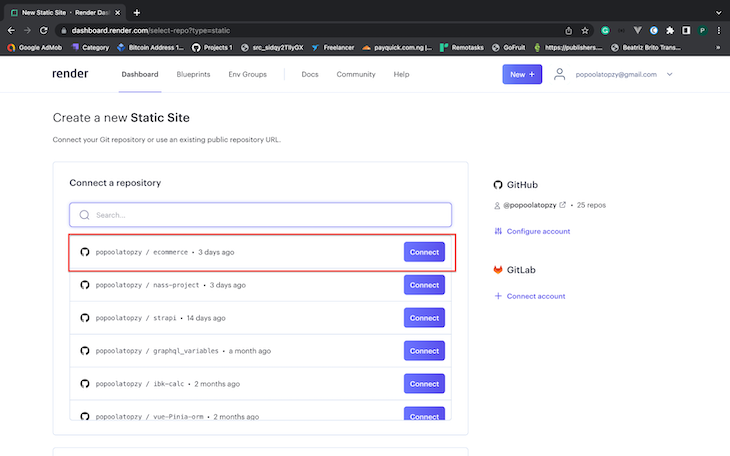
Once the installation is complete, you will be redirected back to Render. Select the repository you want to deploy from and click Connect:
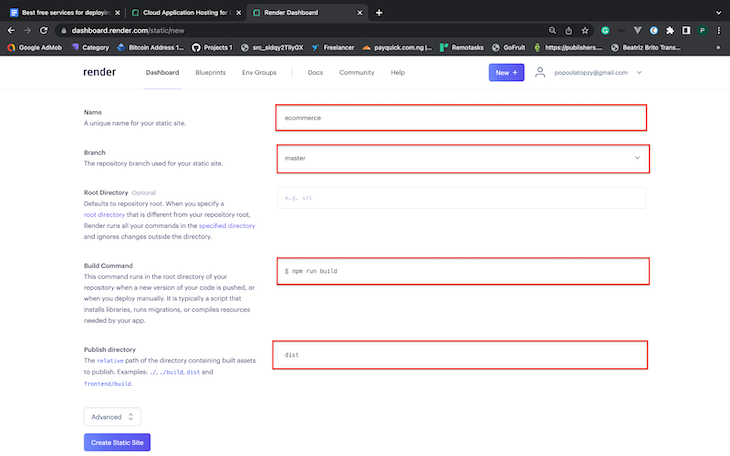
Next, you must set the application Name, Branch, Build Command, and Publish directory, then click Create Static Site:
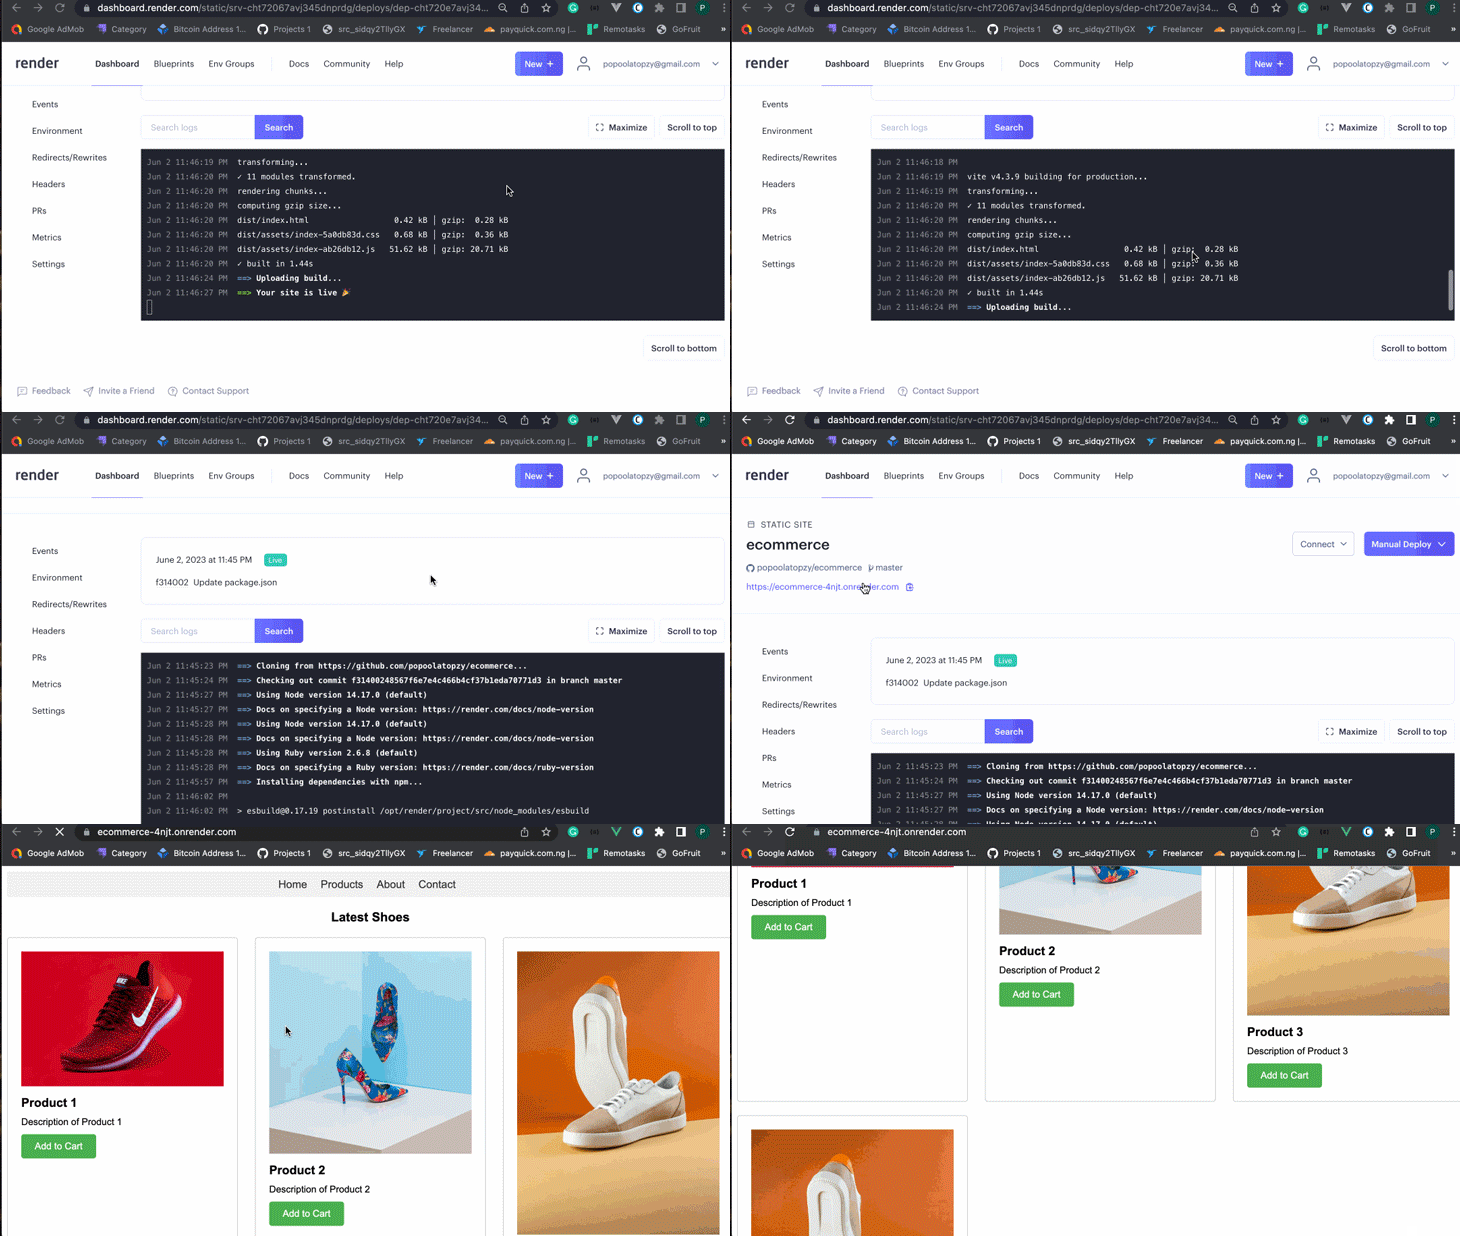
Your application should now be live. You will find the link to the application at the top of the dashboard:
In this tutorial, we learned about the best free hosting services for deploying Vue.js app. During application development or testing, using a free hosting service to deploy applications gives developers more control and power to test their applications on a live server.
Choosing the best free hosting service for your Vue app will depend on your specific needs and preferences. Netlify, Vercel, and Render are good free hosting options if you are looking for a simple and easy-to-use solution.
You can access the source code for the demo app used in this article on my GitHub.
Debugging Vue.js applications can be difficult, especially when users experience issues that are difficult to reproduce. If you’re interested in monitoring and tracking Vue mutations and actions for all of your users in production, try LogRocket.

LogRocket lets you replay user sessions, eliminating guesswork by showing exactly what users experienced. It captures console logs, errors, network requests, and pixel-perfect DOM recordings — compatible with all frameworks.
With Galileo AI, you can instantly identify and explain user struggles with automated monitoring of your entire product experience.
Modernize how you debug your Vue apps — start monitoring for free.
Hey there, want to help make our blog better?
Join LogRocket’s Content Advisory Board. You’ll help inform the type of content we create and get access to exclusive meetups, social accreditation, and swag.
Sign up now
Not sure if low-code is right for your next project? This guide breaks down when to use it, when to avoid it, and how to make the right call.

Compare Firebase Studio, Lovable, and Replit for AI-powered app building. Find the best tool for your project needs.

Discover how to use Gemini CLI, Google’s new open-source AI agent that brings Gemini directly to your terminal.

This article explores several proven patterns for writing safer, cleaner, and more readable code in React and TypeScript.