Software development doesn’t have to be clunky or cumbersome. In fact, most modern programming languages have various tools to ensure that developers who interact with them have a seamless experience.
In this article, we’ll look at some of the most useful tools that provide a better development experience when coding in Go. Go provides us with several amazing tools, as well as a package we can use to write custom Go tools that fit our needs.
To follow along with this tutorial, you will need:
Go commandTo get started with Go tools, we have to first learn about the go command, which is used when executing a Go tool. When you install any Go distribution, you will have access to the go keyword.
According to Rob Pike, one of the creators of Go, “The purpose of the new go command is our return to this ideal, that Go programs should compile without configuration or additional effort on the part of the developer beyond writing the necessary import statements.”
When working with Go tools, the syntax for the execution command is usually the name of the tool appended to the go command, such as go fix. To see a list of all known tools, simply run the go tools command in your terminal.
In this section, we’ll look at various Go tools that can improve our development workflow:
Errors — either syntactic, semantic, or logical — are bound to occur when writing code in any programming language. The go vet tool checks Go code for any syntactic errors and reports them. This tool is especially handy when you’re working with a team.
When the go vet command is run, it checks for errors within the code in the path it was called for. The go vet can also be called with a path like go vet home/src/google-clone, where it would check the specified path for errors.
One of the most powerful features of the go vet tool is that it provides a list of checks we can specify. When a check is specified, the Vet tool will only report instances where our code does not obey the rule of the specified check.
For example, if we run the command, go vet -tests=true, the Vet tool will check for any errors in the test files of that directory. To see a full list of all the checks that can be specified, run the go tool vet help command.
gofmtThe gofmt tool is one of the most popular tools in the Go ecosystem. Its function is to format Go source code. The gofmt tool favors tabs over spaces and replaces any instance of indentation in your code base with tabs. There are a few flags you can specify to further extend the functionality of the gofmt tool:
package main

import "fmt"

func main() {
   s := []string{"foo", "bear", "bar", "bare"}
   v := s[1:len(s)]
   for x, _ := range v {
      fmt.Println(x)
   }
}
The code snippet above ranges over a slice and prints out the index of each element in that slice. If we want to format it, we simply run this command : gofmt -w -s .
The command includes the w flag, which tells the gofmt tool to overwrite the default formatting of our file and not to print out the differences made. The s flag we specified makes the gofmt tool check for certain ambiguity in our code and simplify it.
When we run the above command, our code will be refactored as seen below.
func main() {
   s := []string{"foo", "bear", "bar", "bare"}
   v := s[1:]
   for x := range v {
      fmt.Println(x)
   }
}
The slice and range expression were simplified. Amazing, right? The gofmt tool should be a friend of every Go developer.
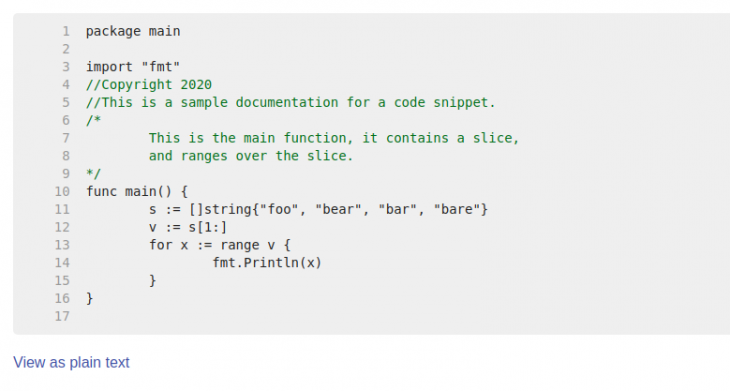
A quick look at the source code of your favorite Go package will tell you how seriously documentation is taken within the Go ecosystem. The GoDoc tool is used to generate documentation for Go source code based on comments written within the code. This generated documentation can then be displayed as either HTML — specified by using the -html tag — or plain text.
package main

import "fmt"
//Copyright 2020
//This is a sample documentation for a code snippet.
/*
   This is the main function, it contains a slice,
   and ranges over the slice.
*/
func main() {
   s := []string{"foo", "bear", "bar", "bare"}
   v := s[1:]
   for x := range v {
      fmt.Println(x)
   }
}
The snippet above is the commented version of the range example discussed above. If we run godoc -http=:6060 and visit localhost:6060 on the browser, we would see an HTML page like this, which shows us our documentation couple with our code.
GoDoc also provides us with the functionality to view the documentation of any package available in the Go standard library locally and without internet connection. To view the documentation of a package, simply append the name of the package to godoc and run the command.
The Get tool, as the name implies, is used for fetching and installing third party packages or dependencies into Go projects. The go get command takes in the URL of the package to be installed.
Developers can create third-party Go tools that are open source. We can also install these third-party tools using the go get command, passing in the URL to the package like go get github.com/kisielk/errcheckgithub.com/kisielk/errcheck. The go get tool is by far the most important and commonly used Go tool.
All of these Go tools can be used in combination with Git hooks to automatically execute them before they are committed with version control. This article is a great guide to get you started with Git hooks.
In this blog post, we covered how to leverage various Go tools to improve our development workflow and overall experience while writing code. To learn more about the various Go tools, visit the Go website.
Install LogRocket via npm or script tag. LogRocket.init() must be called client-side, not
server-side
$ npm i --save logrocket

// Code:

import LogRocket from 'logrocket';
LogRocket.init('app/id');
// Add to your HTML:

<script src="https://cdn.lr-ingest.com/LogRocket.min.js"></script>
<script>window.LogRocket && window.LogRocket.init('app/id');</script>
Hey there, want to help make our blog better?
Join LogRocket’s Content Advisory Board. You’ll help inform the type of content we create and get access to exclusive meetups, social accreditation, and swag.
Sign up now
Discover how to use Gemini CLI, Google’s new open-source AI agent that brings Gemini directly to your terminal.

This article explores several proven patterns for writing safer, cleaner, and more readable code in React and TypeScript.

A breakdown of the wrapper and container CSS classes, how they’re used in real-world code, and when it makes sense to use one over the other.

This guide walks you through creating a web UI for an AI agent that browses, clicks, and extracts info from websites powered by Stagehand and Gemini.


