Selenium is a popular browser automating tool that is primarily used for automating web applications for testing purposes. Selenium supports most operating systems and browsers, including Chrome, Firefox, Edge, and others.

Selenium Grid is a tool that enables you to run tests in parallel across multiple machines. It allows the execution of browser session scripts on remote machines by routing commands sent by the client to remote browser instances.
Docker, as I explained in this article, is an open source software containerization platform that allows you to package applications into standardized, isolated units called containers. These containers combine the applications’ source code with the operating system libraries and dependencies required to run that code in any environment.
In this tutorial, you will learn why and how to use Selenium and Docker to test a website. You will also learn how to start a Selenium Grid that will allow you to test a website on multiple browsers at the same time.
To jump ahead:
You should use Selenium with Docker to avoid issues such as session creation, cross-browser testing, and scalability.
Let’s assume that you wish to use Selenium to test how a website behaves on a Chrome browser. To do that, you would have to download the correct ChromeDriver version that is compatible with the Chrome browser version that you have installed on your machine. Otherwise, you wouldn’t be able to run your tests at all. With Docker, you only have to run one Docker command to pull the image containing the Chrome browser version that you want.
Now, let’s assume that you wish to test how a website behaves on a Chrome browser version that is only supported in a specific operating system and on a Firefox browser version that is only supported in another operating system. In this case, you would have to install two different operating systems on two separate machines just to test the website. With Docker, you would just have to pull the images of the specific browsers, start a Selenium Grid, and test the website with a single machine.
What if you want to test a website on multiple browser versions at the same time? Again, Docker allows you to easily do that by giving you the simplest way to configure and start a Selenium Grid.
To follow this tutorial, you are going to need the following:
In this section, you will create a directory, and inside it, you will create a new Node project, and install the required dependencies. In the next sections, this directory will be used to store the scripts that will allow you to test a website.
Open a terminal window and create a new directory called selenium-docker:
mkdir selenium-docker
Navigate into the directory:
cd selenium-docker
Use the npm init command to create a new node project with default settings:
npm init -y
Now, use the npm install command to install the dependencies selenium-webdriver and jest:
npm install selenium-webdriver jest
After running the command above, you have installed the following dependencies:
selenium-webdriver: is a node module that allows you to control one of Selenium’s automated browser instances. You will use this module to control a browser instance running inside a Docker containerjest: is a JavaScript testing framework with a focus on simplicity. You will use this framework alongside Selenium to test a websiteOpen your package.json file and replace the contents of the test property inside scripts like the following:
"scripts": {
    "test": "jest"
}
Here, you specified that, when you run the command npm run test, you want to call the jest command and execute your test.
In this section, you will first pull a Docker image named selenium/standalone-chrome, that will allow you to control a Chrome browser instance running inside a container. After pulling the image, you will create a container with the image. Lastly, you will write a script that will allow you to test Wikipedia’s homepage.
Go back to your terminal window and run the following Docker command:
docker pull selenium/standalone-chrome
With the Docker command above, you pulled the image that will allow you to control a Chrome browser instance running inside a container.
Now use the following Docker command to create a container with the image you have just pulled:
docker run -d -p 4444:4444 -p 7900:7900 --shm-size="2g" selenium/standalone-chrome
Here, you specified that you want the Docker container to run in detached mode.
After specifying the mode, you mapped the container’s ports 4444 and 7900 with your machine’s ports 4444 and 7900, respectively. You will be able to control a Selenium browser instance by pointing your tests to the URL http://localhost:4444 and see what is happening in your container by visiting the URL http://localhost:7900 (The password is secret).
Lastly, you set the shared memory size to 2g because a container running a selenium/standalone-chrome image requires more shared memory than the default 64M that Docker containers have allocated.
With the container ready to be used, it is now time to write the script that will allow you to test Wikipedia’s homepage.
The script that you are going to write to test Wikipedia’s homepage will use Selenium to automate the following tasks:
Create a file named chrome.test.js and add the following code to it:
const webdriver = require('selenium-webdriver');
const { Builder, Capabilities } = webdriver
let capabilities = Capabilities.chrome();
In the block of code above, you required the selenium-webdriver module and stored it in a variable named webdriver. Each webdriver provides automated control over a browser session.
After importing the module, you used a destructuring assignment to unpack the Builder and capabilities properties that the webdriver object has.
Lastly, you used the capabilities property to specify that you want to use Selenium to automate a Chrome browser and stored this specification in a variable named capabilities.
Add the following code below the capabilities variable:
describe("Test if Wikipedia's home page's title is correct", () => {
    let driver;

    beforeAll(async () => {
        driver = new Builder()
            .usingServer('http://localhost:4444')
            .withCapabilities(capabilities)
            .build();
        await driver.get("https://www.wikipedia.org/");
    }, 30000);

    afterAll(async () => {
        await driver.quit();
    }, 40000);
});
Here, you first used the describe function provided by Jest to write a description for the test.
After writing the description, you created a variable named driver. Then, you used the beforeAll function provided by Jest to specify the setup work that needs to happen before the test can run. Inside the beforeAll function, you used the Builder property to create a new webdriver, and passed the URL http://localhost:4444 and the capabilities as arguments. Then, you stored the new webdriver in a variable named driver, and then you used the driver.get() method to navigate to Wikipedia’s homepage.
Lastly, you used the afterAll function provided by Jest to specify the work that needs to happen after running the test. Inside the afterAll function, you used the driver.quit() method to terminate the browser session.
Add the following code below the afterAll function:
it('test', async () => {
    try {
        await driver.takeScreenshot().then(
            function (image) {
                require('fs').writeFileSync('screenshot.png', image, 'base64');
            }
        );
        let title = (await driver.getTitle()).trim()
        expect(title).toEqual("Wikipedia");
    } catch (err) {
        throw err;
    }
}, 35000);
In the code above, you used the it function provided by Jest to specify the test that needs to be run in this test file.
First, you used the driver.takeScreenshot() method to take a screenshot of the webpage, and then you used the fs module to save the screenshot in your working directory under the name screenshot.png.
After taking and saving the screenshot, you used the driver.getTitle() method to get the webpage’s title, and saved the value returned in a variable named title.
Lastly, you used the expect function provided by Jest to check if the webpage’s title is equal to “Wikipedia.” The test will only pass if the webpage’s title is equal to “Wikipedia.”
After adding this last bit of code, your chrome.test.js file should look like the following :
const webdriver = require('selenium-webdriver');
const { Builder, Capabilities } = webdriver
let capabilities = Capabilities.chrome();

describe("Test if Wikipedia's home page's title is correct", () => {
    let driver;
    beforeAll(async () => {
        driver = new Builder()
            .usingServer('http://localhost:4444')
            .withCapabilities(capabilities)
            .build();
        await driver.get("https://www.wikipedia.org/");
    }, 30000);

    afterAll(async () => {
        await driver.quit();
    }, 40000);

    it('test', async () => {
        try {
            await driver.takeScreenshot().then(
                function (image) {
                    require('fs').writeFileSync('screenshot.png', image, 'base64');
                }
            );
            let title = (await driver.getTitle()).trim()
            expect(title).toEqual("Wikipedia");
        } catch (err) {
            throw err;
        }
    }, 35000);
});
Use either of the following commands to run the test:
npm run test
Or:
npm test
You should see an output similar to the following:
PASS  ./chrome.test.js (7.399 s)
  Test if Wikipedia's home page's title is correct
    ✓ test (189 ms)

Test Suites: 1 passed, 1 total
Tests:       1 passed, 1 total
Snapshots:   0 total
Time:        7.44 s
Ran all test suites.
If your output is similar to the one above, this means that the test you wrote to test Wikipedia’s homepage in a Chrome browser has passed.
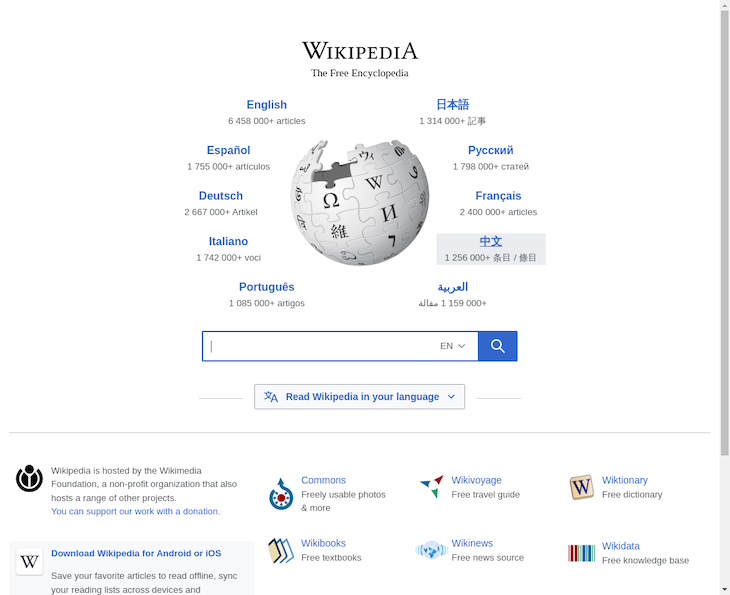
In your working directory, you will find that an image named screenshot.png was created, and if you open it, it will look like the following:

In this section, you will first pull a Docker image named selenium/standalone-firefox, that will allow you to control a Firefox browser instance running inside a container. After pulling the image, you will create a container with the image. Lastly, you will write a script that will allow you to test Wikipedia’s search bar, and then you will learn how to watch what is happening inside the container.
Go back to your terminal window and run the following Docker command:
docker pull selenium/standalone-firefox
With the Docker command above, you pulled the image that will allow you to control a Firefox browser instance running inside a container.
Before you can create a container with this image, you have to stop the container that you created in the previous section:
docker stop container_id
Now use the following Docker command to create a container with the image you have just pulled:
docker run -d -p 4444:4444 -p 7900:7900 --shm-size="2g" selenium/standalone-firefox
Here, you created a Docker container with the selenium/standalone-firefox image with the same configurations you used in the previous section.
With the container ready to be used, it is now time to write the script that will allow you to test Wikipedia’s search bar.
The script that you are going to write to test Wikipedia’s search bar will use Selenium to automate the following tasks:
Create a file named firefox.test.js and add the following code to it:
const webdriver = require('selenium-webdriver');
const { By, until, Builder, Capabilities } = webdriver
let capabilities = Capabilities.firefox();
In the block of code above, you did the same thing you did in the previous section, only this time you also unpacked the properties By and until and specified that you want to use a Firefox browser.
Add the following code below the capabilities variable:
describe('Test if the search bar is working correctly', () => {
  let driver;

  beforeAll(async () => {
    driver = new Builder()
      .usingServer('http://localhost:4444/')
      .withCapabilities(capabilities)
      .build();
    await driver.get("https://www.wikipedia.org/");
    await driver.wait(until.titleMatches(/Wikipedia/i), 5000);
  }, 30000);

  afterAll(async () => {
    await driver.quit();
  }, 40000);
});
Here, you used the describe function provided by Jest to write the description of the test.
In the beforeAll function, first, you created a new webdriver, just like you did in the previous section. After creating a new webdriver, you used the driver.get() method to navigate to Wikipedia’s home page. Lastly, you used the driver.wait() method alongside the until property to make that webdriver wait to move to the next step until the webpage title matches the word “Wikipedia.”
In the afterAll function, you did the same thing you did in the previous section.
Add the following code below the afterAll function:
it('test', async () => {
  try {
    const searchBar = await driver.wait(until.elementLocated(By.id('searchInput')), 5000);
    await searchBar.click()
    await searchBar.sendKeys("Programming language")
    await searchBar.submit()
    let span = await driver.wait(until.elementLocated(By.className('mw-page-title-main')), 5000)
    let title = await span.getText()
    expect(title).toEqual("Programming language");
  } catch (err) {
    throw err;
  }
}, 35000);
In the code above, you used the it function provided by Jest to specify the test that needs to be run in this test file.
First, you used the driver.wait() method alongside the until and By properties to make the webdriver wait to move to the next step until the search bar element is located. Once this element is located, you stored it in a variable named searchBar.
After locating the search bar, you used the click() method to simulate a mouse click in the search bar element, used the sendKeys() method to write text in the search bar, and then you used the submit() method to submit the form where this search bar element is located and navigate to a new page.
In the new page, you used the driver.wait() method alongside the until and By properties to make the webdriver wait to move to the next step until an element in this new page is located. You stored the element found in a variable named span. This element is where the title of an article is stored.
Once the element was stored in a variable named span, you used the getText() method to retrieve this element’s text and then stored the text in a variable named title.
Lastly, you used the expect function provided by Jest to check if the value stored in the variable named title is equal to “Programming language.” The test will only pass if the value stored in the variable title is equal to “Programming language.”
Your firefox.test.js file should look like the following:
const webdriver = require('selenium-webdriver');
const { By, until, Builder, Capabilities } = webdriver
let capabilities = Capabilities.firefox();

describe('Test if the search bar is working correctly', () => {
    let driver;

    beforeAll(async () => {
        driver = new Builder()
            .usingServer('http://localhost:4444/')
            .withCapabilities(capabilities)
            .build();
        await driver.get("https://www.wikipedia.org/");
        await driver.wait(until.titleMatches(/Wikipedia/i), 5000);
    }, 30000);

    afterAll(async () => {
        await driver.quit();
    }, 40000);

    it('test', async () => {
        try {
            const searchBar = await driver.wait(until.elementLocated(By.id('searchInput')), 5000);
            await searchBar.click()
            await searchBar.sendKeys("Programming language")
            await searchBar.submit()
            let span = await driver.wait(until.elementLocated(By.className('mw-page-title-main')), 5000)
            let title = await span.getText()
            expect(title).toEqual("Programming language");
        } catch (err) {
            throw err;
        }
    }, 35000);
});
Use the following command to run the test:
npm test firefox.test.js
Here you need to specify the filename because, by default, Jest will run all the files with the .test.js extension in your working directory.
After running the command, you will see an output like this:
PASS  ./firefox.test.js (14.673 s)
  Test if the search bar is working correctly
    ✓ test (1563 ms)

Test Suites: 1 passed, 1 total
Tests:       1 passed, 1 total
Snapshots:   0 total
Time:        14.719 s, estimated 18 s
Ran all test suites matching /firefox.test.js/i.
If you get an output like the one above, it means that the test you wrote passed. Please note that, at the time of writing, this test is passing but this might change if Wikipedia decides to change the website’s code in the future.
To see what is happening inside the container, open your web browser and navigate to the URL http://localhost:7900, enter the password secret, and run your test again.
You should see something similar to the following:

Please note that in the gif above, you are only able to see the new page containing the searched topic because a line asking the webdriver to wait a few seconds was added below the line of code where the variable named span was initialized.
In this section, you will first pull the Selenium Docker images that will allow you to start a Selenium Grid and run your tests on both Chrome and Firefox browsers. After pulling the images, you will use them to start a grid. Lastly, you will use the script that you wrote in the previous section to test Wikipedia’s search bar on both Chrome and Firefox at the same time.
A Selenium Grid has the following two main distinct components: hub and node.
Please note that the standalone Docker images that you used in the previous sections already come with a hub and node combined.
Go back to your terminal window and stop the container that you started in the previous section with the following command:
docker stop container_id
Now, pull the image that will allow you to create a hub:
docker pull selenium/hub
Pull the image that will allow you to create a Chrome browser node:
docker pull selenium/node-chrome
Then, pull the image that will allow you to create a Firefox browser node:
docker pull selenium/node-firefox
After pulling the required Docker images, you will use Docker Compose to create the Selenium Grid.
Create a Docker Compose file named docker-compose.yml and add the following code to it:
version: "3"
services:
  chrome:
    image: selenium/node-chrome
    shm_size: 2gb
    depends_on:
      - selenium-hub
    environment:
      - SE_EVENT_BUS_HOST=selenium-hub
      - SE_EVENT_BUS_PUBLISH_PORT=4442
      - SE_EVENT_BUS_SUBSCRIBE_PORT=4443
  firefox:
    image: selenium/node-firefox
    shm_size: 2gb
    depends_on:
      - selenium-hub
    environment:
      - SE_EVENT_BUS_HOST=selenium-hub
      - SE_EVENT_BUS_PUBLISH_PORT=4442
      - SE_EVENT_BUS_SUBSCRIBE_PORT=4443
  selenium-hub:
    image: selenium/hub
    container_name: selenium-hub
    ports:
      - "4442:4442"
      - "4443:4443"
      - "4444:4444"
With the code above, you specified the images that you want to use to start a Selenium Grid and which ports the node containers should listen to for events. You also mapped the hub container ports 4442, 4443, and 4444 to the same ports on your machine.
Run the following command to start a Selenium Grid:
docker compose up
Before you use the grid to run the tests, replace all the content of your chrome.test.js file with the following:
const webdriver = require('selenium-webdriver');
const { By, until, Builder, Capabilities } = webdriver
let capabilities = Capabilities.chrome();


describe('Test if the search bar is working correctly', () => {
  let driver;

  beforeAll(async () => {
    driver = new Builder()
      .usingServer('http://localhost:4444/')
      .withCapabilities(capabilities)
      .build();
    await driver.get("https://www.wikipedia.org/");
    await driver.wait(until.titleMatches(/Wikipedia/i), 5000);
  }, 30000);

  afterAll(async () => {
    await driver.quit();
  }, 40000);

  it('test', async () => {
    try {
      const searchBar = await driver.wait(until.elementLocated(By.id('searchInput')), 5000);
      await searchBar.click()
      await searchBar.sendKeys("Programming language")
      await searchBar.submit()
      let span = await driver.wait(until.elementLocated(By.className('mw-page-title-main')), 5000)
      let title = await span.getText()
      expect(title).toEqual("Programming language");
    } catch (err) {
      throw err;
    }
  }, 35000);
});
Here, you pasted the contents of the firefox.test.js file in the chrome.test.js file and then you altered the line where you specify the browser to be Chrome instead of Firefox.
Run the tests with the following command:
npm test
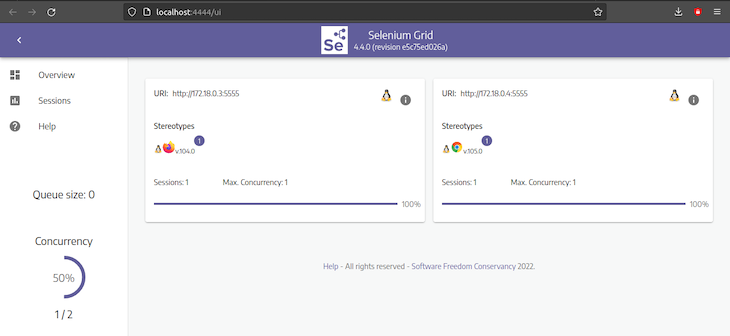
Open your browser and navigate to the URL http://localhost:4444/ui and you should see something similar to:

The image above shows that you are running the tests in both Chrome and Firefox browsers in parallel.
Go back to your terminal window and you should see the following output:
PASS  ./chrome.test.js (18.977 s)
PASS  ./firefox.test.js (23.387 s)

Test Suites: 2 passed, 2 total
Tests:       2 passed, 2 total
Snapshots:   0 total
Time:        23.682 s
Ran all test suites.
The output above shows that the test you wrote for Wikipedia’s search bar passed on both Chrome and Firefox.
In this tutorial, you learned why you should use Selenium with Docker to test a website. You then used these tools to test a website on the Chrome and Firefox browsers separately, and while doing so, you also learned how to visualize the tests running inside a Docker container. Lastly, you learned how to test a website on both Chrome and Firefox browsers at the same time.
Install LogRocket via npm or script tag. LogRocket.init() must be called client-side, not
server-side
$ npm i --save logrocket

// Code:

import LogRocket from 'logrocket';
LogRocket.init('app/id');
// Add to your HTML:

<script src="https://cdn.lr-ingest.com/LogRocket.min.js"></script>
<script>window.LogRocket && window.LogRocket.init('app/id');</script>
Hey there, want to help make our blog better?
Join LogRocket’s Content Advisory Board. You’ll help inform the type of content we create and get access to exclusive meetups, social accreditation, and swag.
Sign up now
This guide walks you through creating a web UI for an AI agent that browses, clicks, and extracts info from websites powered by Stagehand and Gemini.

This guide explores how to use Anthropic’s Claude 4 models, including Opus 4 and Sonnet 4, to build AI-powered applications.

Which AI frontend dev tool reigns supreme in July 2025? Check out our power rankings and use our interactive comparison tool to find out.

Learn how OpenAPI can automate API client generation to save time, reduce bugs, and streamline how your frontend app talks to backend APIs.