The introduction of Blazor into C# development gives developers the power to extend their development into browsers without relying on the conventional JavaScript frameworks like React, Vue.js, and Angular.

While it is easier to set up tests in conventional JavaScript frameworks, Blazor requires bringing some tools and packages together, then understanding how and what to test in your application.
This post will walk through how to set up tests for a simple Blazor counter application, and extend it to include almost everything that a C# developer might want to test in a Blazor app.
First, let’s set up demo project.
In Visual Studio, click on New.
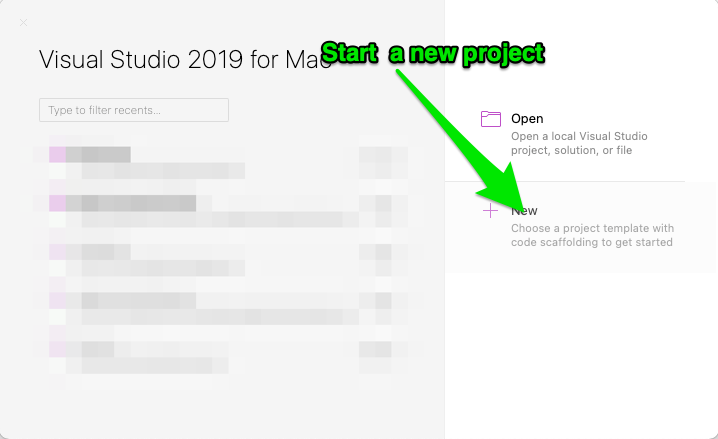
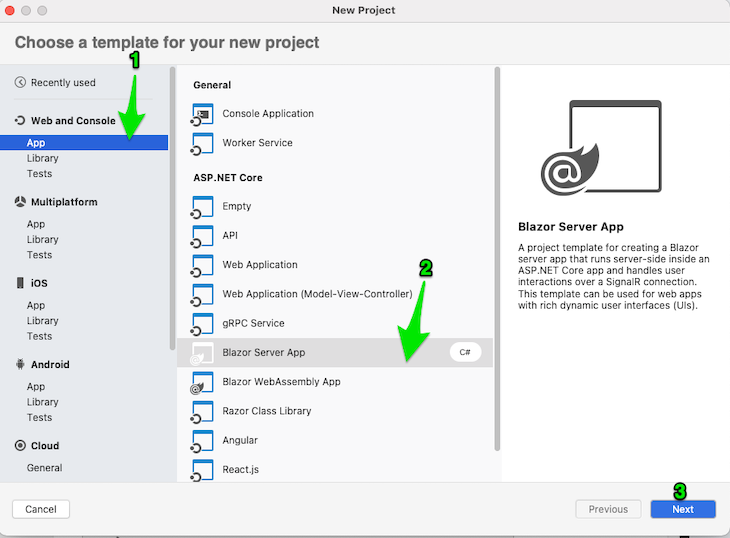
From the Web and Console menu, select App, then choose Blazor Server App.
On the next page, continue without authentication, then set up the Project Name and the Solution Name. Click on Create.
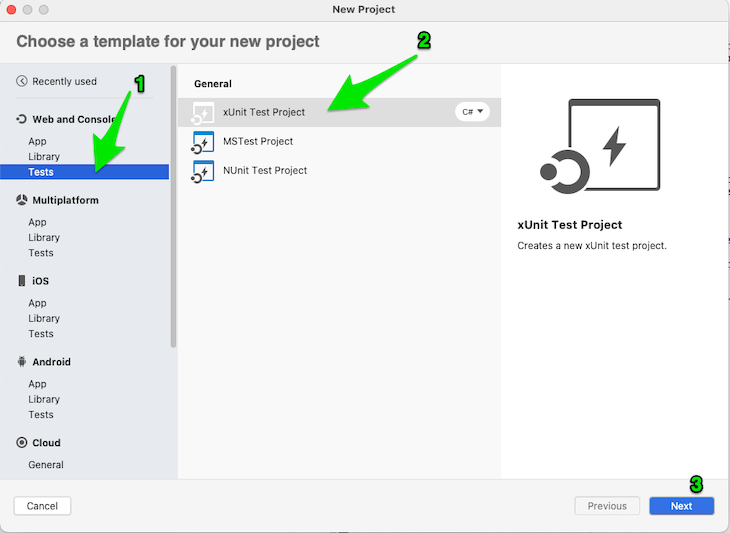
To set up a test project, click on New Solution from the file menu dropdown; a template window should pop up.
From the Web and Console group in the left sidebar, select Tests, choose xUnit Test Project, then click Next.
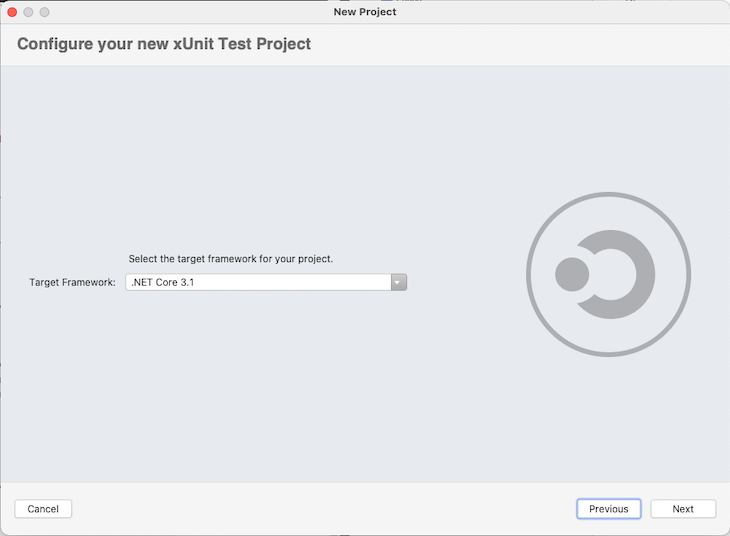
Use the same framework version as the main project, then click Next.
Finally, set up a name for the solution and project and click Create.
Once this is complete, your Visual Studio should have the same sidebar as below:
For the test project to be able to reference and use the main project, we have to create a link inside of the test project so we can import and use components, classes, and interfaces from the main project.
Inside Visual Studio, right click on Test Solution from the left sidebar, select Edit Project File, and add <ProjectReference Include="../path/to/main-project/main-project.csproj" /> inside the same group with the SDK version.
From the Project Menu, click on Manage NuGet Packages, search for bUnit, select bUnit and bUnit.core, click on Add Packages, select both solutions, and click Ok.

This test project was bootstrapped as xUnit project. By default, it comes with xUnit packages.
Moq is an assertion library that is useful to test if an expected result matches the returned result.
We can install Moq the same way we installed bUnit. Simply search for and select Moq, click on Add Packages, select the test project, and click on Ok.
xUnit is a test framework that gives an interface to run Blazor applications outside the browser and still interact with the output through code.
bUnit is the interface through which we can interact with a Blazor component. The interface bUnit provides make it possible to trigger events on a Blazor component, find some elements on the component, and make assertions.
To test a Blazor app with bUnit, a test suite has to have a test case function in a class inside of the test project.
The code inside of the test case should have the following:
Arrange, to set up a TestContext (a virtual environment for rendering a Blazor component)Act, to render a component into the test context, trigger actions, and make network requestsAssert, to check if events are triggered and if the correct text is displayed.As an example, the below setup illustrates the above steps:
using BlazorApp.Pages;
using Bunit;
using Xunit;

namespace BlazorAppTests
{
    public class CounterTest
    {
        [Fact]
        public void RendersSuccessfully()
        {

            using var ctx = new TestContext();

            // Render Counter component.
            var component = ctx.RenderComponent<Counter>();

            // Assert: first, find the parent_name vital element, then verify its content.
            Assert.Equal("Click me", component.Find($".btn").TextContent);
        }

    }
}
From the right sidebar, click on Tests, then click run all to run this test.
Sometimes, components require parameters to render correctly. bUnit provides an interface to work with that.
First, let’s modify the counter component inside of the application solution to look like the following:
@page "/counter/{DefaultCount:int?}"

<h1>Counter</h1>

<p>Current count: <span id="counterVal">@currentCount</span></p>

<button class="btn btn-primary" @onclick="IncrementCount">Click me</button>

@code {
    private int currentCount = 0;


    [Parameter]
    public int DefaultCount { get; set; }

    protected override void OnParametersSet()
    {
        if (DefaultCount != 0)
        {
            currentCount = DefaultCount;
        }
    }

    private void IncrementCount()
    {
        currentCount++;
    }
}
First, notice how we have updated the path to accept a DefaultCount parameter, an integer. The ? tells Blazor that this parameter is optional and not required for the component to run.
Next, notice that the DefaultCount property in the C# code has a [Parameter] attribute. We have hooked the OnParametersSet lifecycle method to notify the component when the parameter is set. This ensures that we use it to update the component currentValue property instead of the component to start counting from zero.
We can render this component in a bUnit test case with the following:
using BlazorApp.Pages;
using Bunit;
using Xunit;

namespace BlazorAppTests
{
    public class CounterTest
    {
        public void RendersSuccessfully()
        {

            using var ctx = new TestContext();

            Action onBtnClickHandler = () => { };

            // Render Counter component.
            var component = ctx.RenderComponent<Counter>(
              parameters =>
                parameters
                      // Add parameters
                  .Add(c => c.DefaultCount, 10)
                  .Add(c => c.OnBtnClick, onBtnClickHandler)
            );


            // Assert: first find the parent_name strong element, then verify its content.
            Assert.Equal("Click me", component.Find($".btn").TextContent);
        }

    }
}
On line 14 in the test above, we render the component, then pass a callback to the component that calls (p => );.
Then, we add the Add method onto the parameter (p => p.Add(c => c.DefaultCount, 10); in order to set the parameter to 10.
We can pass an event callback in the same way with p.Add(c => c.onBtnClickHandler, onBtnClickHandler). This way, we implement the counter increment inside of the onBtnClickHandler action, instead of inside the counter component.
Some components rely on external services to run, while some rely on external fields. We can achieve this with bUnit through the Services.AddSingleton method in a test context.
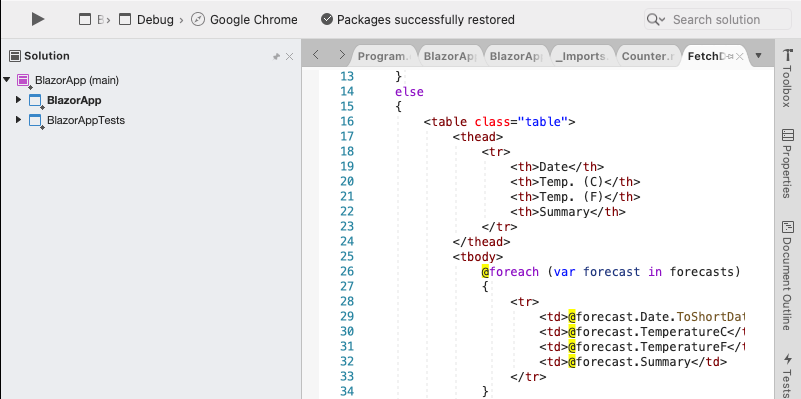
Inside the demo counter app, there is a FetchData.razor file that heavily relies on a WeatherForecastService service. Let’s try to run this file inside of the xUnit test project.
Create a new file named FetchDataTest.cs in the test project and add the below:
using System;
using BlazorApp.Data;
using BlazorApp.Pages;
using Bunit;
using Microsoft.Extensions.DependencyInjection;
using Xunit;

namespace BlazorAppTests
{
    public class FetchDataTest
    {
        [Fact]
        public void RendersSuccessfully()
        {

            using var ctx = new TestContext();

            ctx.Services.AddSingleton<WeatherForecastService>(new WeatherForecastService());

            // Render Counter component.
            var component = ctx.RenderComponent<FetchData>();

            Assert.Equal("Weather forecast", component.Find($"h1").TextContent);
        }

    }
}
Notice how we have used the AddSingleton interface to add a new service to our test runner context. And when we run this test file, we should get a successful result.
Above, we saw how to set a callback for an event inside a test case component. Let’s see how to trigger an event on an element inside of a component.
The counter test file has a button that, when clicked, increments the counter. Let’s test to make sure we can click on that button and see the count updated on the page.
Inside of the CounterTest.cs file in the test project, add the below test case to the CounterTest test suite class:
[Fact]
public void ButtonClickAndUpdatesCount()
{
    // Arrange
    using var ctx = new TestContext();
    var component = ctx.RenderComponent<Counter>();

    // Render
    var counterValue = "0";
    Assert.Equal(counterValue, component.Find($"#counterVal").TextContent);

    counterValue = "1";
    var buttonElement = component.Find("button");

    buttonElement.Click();

    Assert.Equal(counterValue, component.Find($"#counterVal").TextContent);
}
The “Arrange” section sets up the component. As usual, in the “Render” section, we first assert that the component starts from zero.
We then get a reference to the button using the .Find interface of a test context component, and this returns the element reference, which also has some APIs like the Click() method.
And finally, we assert the component value to confirm that the button click does the same action.
Notice that after injecting the service, we did not test if any of the data was rendered. Just like the FetchData.razor component, some components require time before they render the correct data.
We can wait for asynchronous state update through the component.waitForState(fn, duration) method:
[Fact]
public void RendersServiceDataSuccessfully()
{

    using var ctx = new TestContext();

    ctx.Services.AddSingleton<WeatherForecastService>(new WeatherForecastService());

    // Render Counter component.
    var component = ctx.RenderComponent<FetchData>();

    component.WaitForState(() => component.Find(".date").TextContent == "Date");


    Assert.Equal("TABLE", component.Find($".table").NodeName);
}
The example above waits for the async data to load until the anonymous function in WaitForState gets called, which tests to find an element with the date class. Once it does, we can proceed to do some further assertion on the result.
We can also verify if the markup for a component follows the same pattern through the MarkupMatches bUnit interface method.
For example, we can test that the index contains an h1 with the “Hello, World!” text content.
First, create a new file inside the test project, name it IndexTest.cs, and add the below content:
using System;
using BlazorApp.Pages;
using Bunit;
using Xunit;

namespace BlazorAppTests
{
    public class IndexTest
    {
        [Fact]
        public void RendersSuccessfully()
        {

            using var ctx = new TestContext();

            // Act
            var component = ctx.RenderComponent<BlazorApp.Pages.Index>();

            // Assert
            Assert.Equal("Hello, world!", component.Find($"h1").TextContent);
        }

    }
}
Aside from this, we can also verify if a component contains an element through .Find (we have been doing this already), and FindAll, which returns all the features matching the query. These methods take in CSS-like selectors, which makes it easier to traverse the nodes.
IJSRuntime is an interface that makes it possible to interact with JavaScript from a .Net code.
Some components may depend on it; for example, a component can use the jQuery method to make API calls.
If we have the JavaScript function getPageTitle in our project, we can mock that function call such that anywhere in our component, the result will be what we might have specified in our test case:
using var ctx = new TestContext();

ctx.Services.AddSingleton<WeatherForecastService>(new WeatherForecastService());

var theResult = "some result";
ctx.JSInterop.Setup<string>("getPageTitme").SetResult(theResult);

// Render Counter component.
var component = ctx.RenderComponent<FetchData>();


Assert.Equal(theResult, component.Find($".page-title").TextContent);
Some applications rely on data from a remote server to function correctly.
Part of the strategy of unit testing is to make every test case dependency-agnostic. And relying on the HTTP client to reach out to a remote server for a component to render a function could break our test if the result is not static.
We can eliminate this by mocking HTTPClient, a library that makes HTTP requests from inside a Blazor app to the outside world.
bUnit does not ship with this by default, per their documentation, but we can rely on a third party library to make this work.
First, add the RichardSzalay.MockHttp package to the test project:
dotnet add package RichardSzalay.MockHttp --version 6.0.0
Next, create a file named MockHttpClientBunitHelpers in the root of the test project and add the content below:
using Bunit;
using Microsoft.Extensions.DependencyInjection;
using RichardSzalay.MockHttp;
using System;
using System.Net;
using System.Net.Http;
using System.Net.Http.Headers;
using System.Text.Json;

public static class MockHttpClientBunitHelpers
{
    public static MockHttpMessageHandler AddMockHttpClient(this TestServiceProvider services)
    {
        var mockHttpHandler = new MockHttpMessageHandler();
        var httpClient = mockHttpHandler.ToHttpClient();
        httpClient.BaseAddress = new Uri("http://localhost");
        services.AddSingleton<HttpClient>(httpClient);
        return mockHttpHandler;
    }

    public static MockedRequest RespondJson<T>(this MockedRequest request, T content)
    {
        request.Respond(req =>
        {
            var response = new HttpResponseMessage(HttpStatusCode.OK);
            response.Content = new StringContent(JsonSerializer.Serialize(content));
            response.Content.Headers.ContentType = new MediaTypeHeaderValue("application/json");
            return response;
        });
        return request;
    }

    public static MockedRequest RespondJson<T>(this MockedRequest request, Func<T> contentProvider)
    {
        request.Respond(req =>
        {
            var response = new HttpResponseMessage(HttpStatusCode.OK);
            response.Content = new StringContent(JsonSerializer.Serialize(contentProvider()));
            response.Content.Headers.ContentType = new MediaTypeHeaderValue("application/json");
            return response;
        });
        return request;
    }
}
Now, create a new test case, and add the following:
[Fact]
public void FetchResultTest()
{
    var serverTime = "1632114204";
    using var ctx = new TestContext();
    var mock = ctx.Services.AddMockHttpClient();
    mock.When("/getTime").RespondJson<string>(serverTime);

    // Render Counter component.
    var component = ctx.RenderComponent<FetchData>();

    Assert.Equal(serverTime, component.Find($".time").TextContent);

}
Here, we declared a variable that holds what we expect from the server, then added the mocked client to the context services through a bUnit helper method, ctx.Services.AddMockHttpClient, which will look for the MockHttpClientBunitHelpers and inject it into the context.
Then, we use the mock reference to simulate the response we expect from the route. Finally, we assert that a part of our component has the value that we returned from the mock request.
In this article, we have seen how to set up a Blazor project and add another xUnit test project. We also included bUnit as a testing framework and discussed using bUnit to test Blazor components.
Aside xUnit as a test framework, bUnit can also run in the nUnit test framework using similar concepts and APIs.
In this article, we cover the general usage of bUnit. Advanced uses are available on the bUnit documentation website.
Install LogRocket via npm or script tag. LogRocket.init() must be called client-side, not
server-side
$ npm i --save logrocket

// Code:

import LogRocket from 'logrocket';
LogRocket.init('app/id');
// Add to your HTML:

<script src="https://cdn.lr-ingest.com/LogRocket.min.js"></script>
<script>window.LogRocket && window.LogRocket.init('app/id');</script>
Would you be interested in joining LogRocket's developer community?
Join LogRocket’s Content Advisory Board. You’ll help inform the type of content we create and get access to exclusive meetups, social accreditation, and swag.
Sign up now
This guide walks you through creating a web UI for an AI agent that browses, clicks, and extracts info from websites powered by Stagehand and Gemini.

This guide explores how to use Anthropic’s Claude 4 models, including Opus 4 and Sonnet 4, to build AI-powered applications.

Which AI frontend dev tool reigns supreme in July 2025? Check out our power rankings and use our interactive comparison tool to find out.

Learn how OpenAPI can automate API client generation to save time, reduce bugs, and streamline how your frontend app talks to backend APIs.


