Netlify is a web development platform that helps developers automate the tedious task of deploying their static sites to production. With Netlify, we can host our static sites on our own domains or with customizable Netlify domains.

The many features of Netlify include continuous integration and continuous deployment (CI/CD); instant forms, which allow us to collate data from users without building our own backend; analytics; Netlify functions, which allow us to perform backend operations without a server; and many more. Netlify is also commonly used to build JAMstack applications due to its robustness and ease of use.
In this article, we will explain in the simplest terms possible how to host a webpage using Netlify.
This article is not code-intensive, so you won’t need much coding experience. You do need to have a GitHub account and a Netlify account. You can create a Netlify account here and a GitHub account here.
The webpage we will host consists of a single HTML file with minimal CSS. Here’s what the code in our HTML file should look like:
<!DOCTYPE html>
<html lang="en">
<head>
    <meta charset="UTF-8">
    <meta name="viewport" content="width=device-width, initial-scale=1.0">
    <title>Document</title>
    <style>
        div {
            text-align: center;

        }
    </style>
</head>
<body>
    <div>
        <h1>Deploying a basic webpage to netlify</h1>
    </div>
</body>
</html>
Now that we have our code written, we need to put it in a GitHub repository.
A GitHub repository is basically a remote folder that contains our project’s source code, which, in this case, is our HTML and CSS. With our code in a GitHub repository (or repo, as it is colloquially called), we can interact with a lot of services like Netlify. We can also collaborate with other members of our team and contribute to that single codebase.
Although Git and GitHub are essential tools for which every developer should have at least a basic working proficiency, we will not be discussing them in depth in this article. We will, however, walk through putting our code in a GitHub repository.
Firstly, we’ll need to create a GitHub account here. Once that is done, we need to create a new GitHub repository. We can do that by clicking the plus (+) icon in the upper right-hand corner of the GitHub homepage and selecting New Repository.
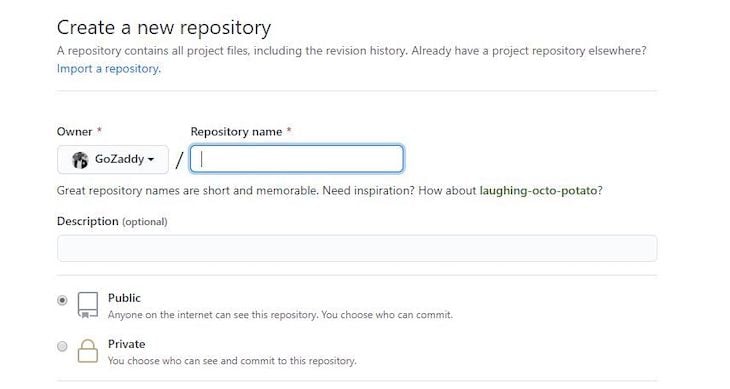
Name the repository, select Public in order to make it a public repository (which allows others to view it), and initialize the repository with a README file by checking the Add a README file checkbox.
We should now have something like this:
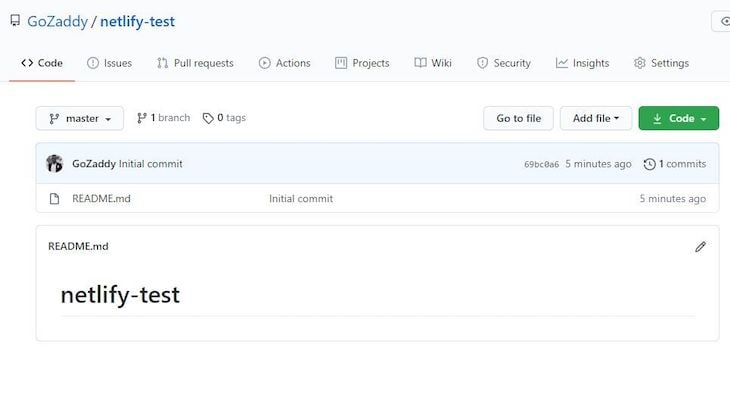
The most common way to add a file to our GitHub repository is via Git commands in the command line, but since this is not a guide focused on just Git/GitHub, we will simply drag and drop our index.html file in our repository.
To do that, toggle the Add file drop-down and select Upload files. This will take us to a new page where we can simply drop in our index.html file:

Once we have dropped in our file, all we have to do is click the Commit changes button and the changes will be added to our GitHub repository. We should now be able to view our index.html file in the repository’s homepage.
Now that we have our webpage’s code in a GitHub repository, we need to create a Netlify account here.
Once we have logged in and created a new team, the Netlify dashboard should look similar to this:
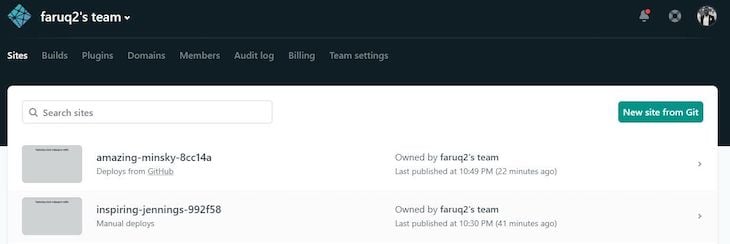
Now, we need to connect our GitHub account to Netlify. To do that, click the New site from Git button and select GitHub as your preferred Git provider. Once our GitHub account has been connected to Netlify, we can then select the repository for our webpage. We should now be greeted with a page that looks like this:
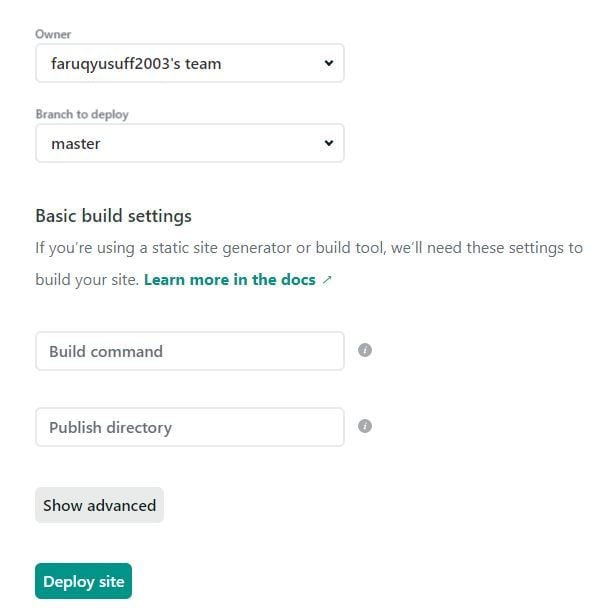
In this page, we can configure the build settings to be used to deploy our app. Since we’re only deploying a simple webpage, we don’t need to do much here. Just set the Branch to deploy option to master (or whatever branch your code resides in) and click Deploy site.
We should now be redirected to the dashboard of our deployed webpage, which should look a lot like this:
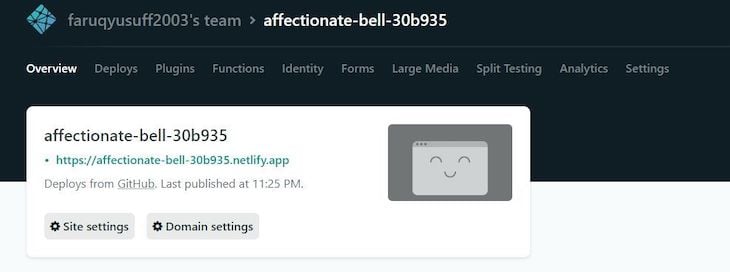
To check out the deployed webpage, simply click on the link highlighted in green.
We should now notice that whenever we push new changes to our repository from the appropriate branch, those changes reflect on our deployed site within minutes.
There is also a quicker, less common method of hosting sites on Netlify called Netlify Drop. Netlify Drop is a Netlify service that allows developers to host their sites by simply dragging and dropping the site’s folders.
To use this, we need to visit the Netlify Drop website here. Once we are on the site, we simply need to drop a folder containing all the files for our static website in the space provided, and we’ll be redirected to a dashboard similar to the one shown earlier in this article. We can then get the link to our newly deployed site or page from there.
Now that we know how to host our webpages on Netlify, let’s have a look at how to customize our domain name. Netlify normally gives us a unique Netlify domain, which can be customized. To customize our current domain name, we need to navigate to our project’s dashboard page on Netlify and click Domain Settings.
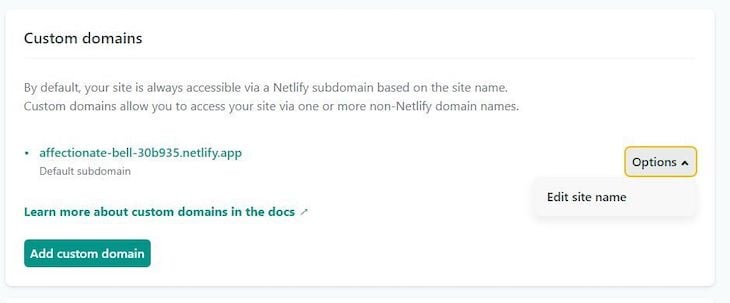
Now, we need to toggle the options drop-down and click on Edit site name. We should now see an input field where we can edit our site’s domain name. This domain name, however, is still a Netlify subdomain, and there are times where we would like to use our own domains for our projects.
To do this, we need our own custom domain, which we can purchase from sites like Namecheap. Once we have our custom domain, we need to go to the Netlify domain settings page for our project and click the Add custom domain button to add our custom domain.
Now, we should see an input field where we have to type our domain name. Type out the custom domain and click Yes, add domain when Netlify asks for confirmation.
We will now be redirected back to the domain settings page, where we can set up Netlify DNS for our domain. We just need to click the Check DNS configuration link on the primary domain and we’ll be redirected to this page:
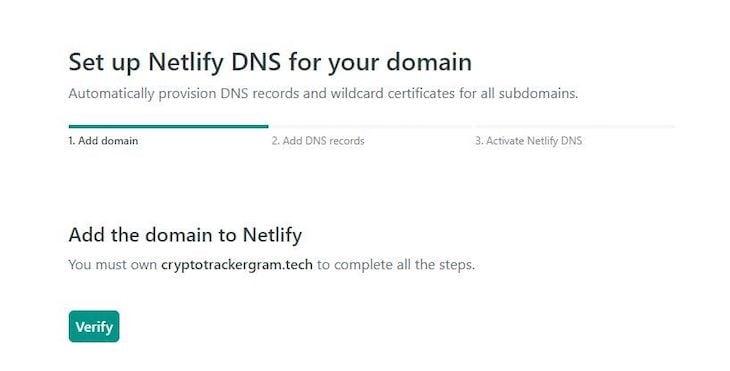
Click on Verify and continue to the last step, where Netlify will ask us to update our domain’s nameservers.
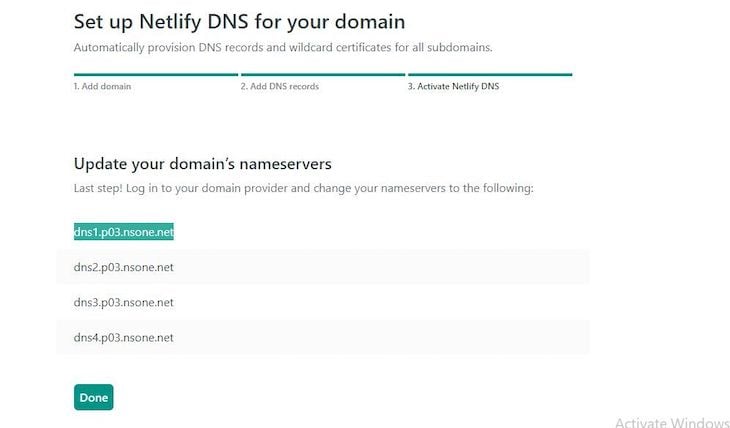
You will have to do this on the dashboard provided by the site from which you purchased your domains. Once that is complete, click Done and you will be redirected back to the homepage. Now you just have to wait (this can take minutes, like in my case, or hours), and your domain name should now point to your webpage.
You can also enable HTTPS in your site/webpage for security in the domain settings page. All you have to do is verify your DNS configuration and HTTPS should be enabled.
Congratulations! We have successfully hosted our simple webpage on Netlify using a custom domain and secured it with HTTPS. I recommend that you also check out the other amazing things that you can accomplish with Netlify. You can always find all the information you need on Netlify’s official website.
Install LogRocket via npm or script tag. LogRocket.init() must be called client-side, not
server-side
$ npm i --save logrocket

// Code:

import LogRocket from 'logrocket';
LogRocket.init('app/id');
// Add to your HTML:

<script src="https://cdn.lr-ingest.com/LogRocket.min.js"></script>
<script>window.LogRocket && window.LogRocket.init('app/id');</script>
Would you be interested in joining LogRocket's developer community?
Join LogRocket’s Content Advisory Board. You’ll help inform the type of content we create and get access to exclusive meetups, social accreditation, and swag.
Sign up now
Get to know RxJS features, benefits, and more to help you understand what it is, how it works, and why you should use it.

Explore how to effectively break down a monolithic application into microservices using feature flags and Flagsmith.

Native dialog and popover elements have their own well-defined roles in modern-day frontend web development. Dialog elements are known to […]

LlamaIndex provides tools for ingesting, processing, and implementing complex query workflows that combine data access with LLM prompting.