
Imagine a UI component library that fits all your specific individual nitty-gritty needs. Of course, this would be too good to be true. However, there is a solution that comes close. In this tutorial, we’ll introduce you to VueTailwind.

The Replay is a weekly newsletter for dev and engineering leaders.
Delivered once a week, it's your curated guide to the most important conversations around frontend dev, emerging AI tools, and the state of modern software.
VueTailwind is a Vue.js components library based on the new Tailwind CSS framework, which makes use of its utility classes. What distinguishes VueTailwind from the other components libraries — unlike Bootstrap, which is quite opinionated and usually provides limited styling options — is that VueTailwind is highly customizable, so you can quickly adapt it to your needs.
In a nutshell, VueTailwind will adapt to your app’s design easily by:
But don’t just take my word for it. Let’s explore VueTailwind together by creating a Vue.js app 👾. Our demo app will display a directory of dance studios, as shown below:
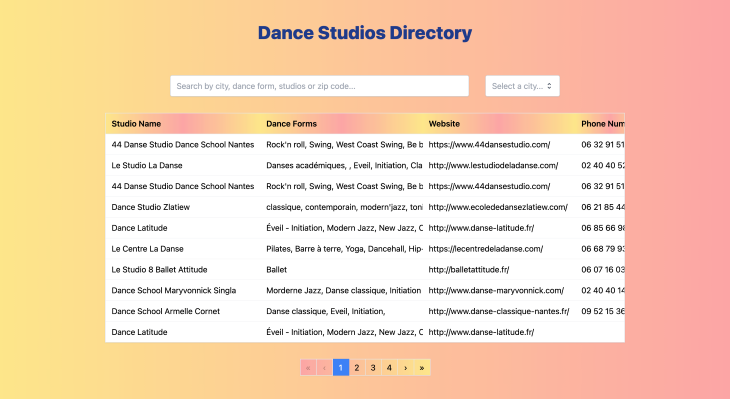
Our simple app will be called dance-directory.com. The code is accessible on GitHub. This app will lists and filter dance studios 💃🕺.
Before we begin, we need to set up our app 👷♀️.
First, install the Vue CLI with npm install -g @vue/cli.
Create the app with vue create dance-directory. Do not opt for Vue 3 because VueTailwind is not yet compatible with this version.
Install Tailwind CSS vue add tailwind. I always generate a tailwind.config.js for the Tailwind CSS IntelliSense VS Code plugin ✨.
Install VueTailwind with npm install vue-tailwind --save.
Install the necessary components by listing them on a file at the root of your project. We’ll call it VueTailwindSettings.js:
// 📜 VueTailwindSettings.js
import { TInput, TButton, TRichSelect, TPagination, TTag, TTable } from "vue-tailwind/dist/components";
const VueTailwindSettings = {
  "t-input": {
    component: TInput,
  },
  "t-button": {
    component: TButton,
  },
  "t-rich-select": {
    component: TRichSelect,
  },
  "t-pagination": {
    component: TPagination,
  },
  "t-tag": {
    component: TTag,
  },
  "t-table": {
    component: TTable,
  },
};
export default VueTailwindSettings;
You can browse the complete list of components in the VueTailwind documentation. However, we only need the input, button, rich select, pagination, tag, and tables components — which, I think, are great representative examples of the library’s capabilities.
To configure our Vue app to use VueTailwind and the components, we must do the following:
// 📜 src/main.js
import Vue from "vue";
import App from "./App.vue";
import router from "./router";
import "./assets/tailwind.css";
// 1️⃣  Import vue-tailwind
import VueTailwind from "vue-tailwind";
// 2️⃣  Import VueTailwind components we will use
import VueTailwindSettings from "/VueTailwindSettings.js";
Vue.config.productionTip = false;
Vue.use(VueTailwind, VueTailwindSettings);
new Vue({
  router,
  render: (h) => h(App),
}).$mount("#app");
```
- We also need to install [tailwindcss forms](https://github.com/tailwindlabs/tailwindcss-forms) using `npm install @tailwindcss/forms` and by adding it to the plugins list in the Tailwind CSS config file. ⬇️
```javascript
// 📜  tailwind.config.js
module.exports = {
  plugins: [require("@tailwindcss/forms")],
};
VueTailwind also requires us to extend Tailwind CSS variants’ configuration to play with an element style based on its state (like when a button is disabled):
// 📜  tailwind.config.js
module.exports = {
  variants: {
    extend: {
      opacity: ["disabled"],
      cursor: ["disabled"],
    },
  },
};
Finally, we’ll configure PurgeCSS to remove unused CSS by modifying the Tailwind CSS config file:
// 📜  tailwind.config.js
module.exports = {
  purge: {
    content: ["./public/**/*.html", "./src/**/*.vue", "./VueTailwindSettings.js", "node_modules/vue-tailwind/dist/*.js"],
  },
};
At this point, your tailwind.config.js file should look like this:
// 📜  tailwind.config.js
module.exports = {
  purge: {
    content: ["./public/**/*.html", "./src/**/*.vue", "./VueTailwindSettings.js", "node_modules/vue-tailwind/dist/*.js"],
  },
  darkMode: false, // or 'media' or 'class'
  theme: {
    extend: {},
  },
  variants: {
    extend: {
      opacity: ["disabled"],
      cursor: ["disabled"],
    },
  },
  plugins: [require("@tailwindcss/forms")],
};
To quickly set up the project, I’ll store the data associated with the dance studios I’ll list in src/static/tableData.json, which you can access in the GitHub repo.
Now that we’ve created our project, let’s remove the default components and style the app’s background to jazz it up a bit before we get our hands dirty 👐.
We’ll use the VueTailwind Tag component and give it the tag-name _div_ to create a <div></div> element to wrap the components in our app and homepage. The Tag component can be used to add other HTML tags such as headings, for example.
// 📜 src/App.vue
<template>
  <t-tag tag-name="div" class="min-h-screen p-10 bg-gradient-to-r from-yellow-200 to-red-300">
    <router-view />
  </t-tag>
</template>
<style></style>
// 📜 src/views/Home.vue
<template>
  <t-tag tag-name="div" class="max-w-screen-lg m-auto"> </t-tag>
</template>
<script>
export default {
  name: "Home",
};
</script>
So far, after running npm run serve, your page will look like this on http://localhost:8081/:

Now let’s display the data we’ve added to our app using the table component:
// 📜 src/views/Home.vue
<template>
  <t-tag tag-name="div" class="max-w-screen-lg m-auto">
    <t-table :headers="tableHeaders" :data="tableData"></t-table>
  </t-tag>
</template>
<script>
import tableDataJson from "@/static/tableData.json";
export default {
  name: "Home",
  data() {
    return {
      tableHeaders: ["Studio Name", "Dance Forms", "Website", "Phone Number", "City", "Zip Code", "Address"],
      tableData: tableDataJson,
    };
  },
};
</script>
First, we added our Table component to the homepage <t-table></t-table>. This component takes two props: data and headers.
Next, we imported the data tableDataJson and made it accessible to the component’s data prop as tableData by defining it in our data function.
Don’t forget to list the headers we’ll use (tableHeaders).
As you can see, it works, but it doesn’t look that great:
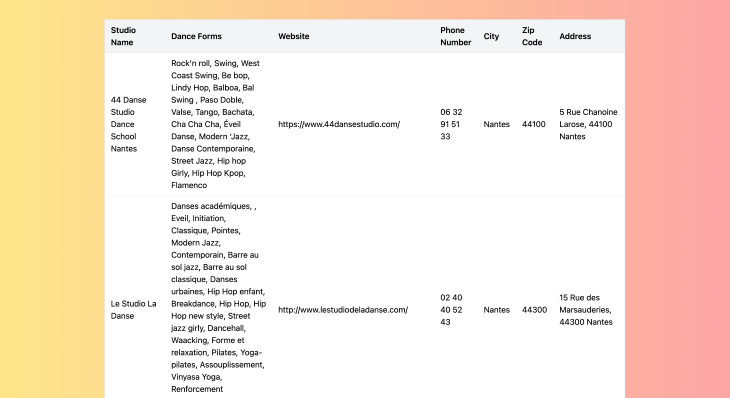
Already, we want to start styling our components. The documentation lists and explains in detail the various ways to configure the library’s theme 📖:
The are three ways to customize our UI library :
classes: as soon as you use this prop, you wipe all the styles applied to the components, and only the Tailwind CSS classes your input will be taken into consideration.fixedClasses: the CSS classes you input here won’t wipe out all the component’s existing styles. this way, we can add more CSS classes or override only one CSS class we want to change.variants: is a prop that expects an object with the variants you want to use and their respective CSS classes (such as error or disabled variants, you name it!).
We’ll add Tailwind CSS classes to make the table more readable (setting width and overflow, for instance) and give the table header a bit of color 🖍:
// 📜 VueTailwindSettings.js
// [...]
const VueTailwindSettings = {
  // [...]
  "t-table": {
    component: TTable,
    props: {
      fixedClasses: {
        table: "min-w-0 block overflow-x-auto whitespace-nowrap",
        td: "max-w-xs overflow-scroll",
        theadTh: "bg-gradient-to-r from-yellow-200 via-red-300 to-yellow-200",
      },
    },
  },
};
//   [...]
Now our table is scrollable and much more readable:
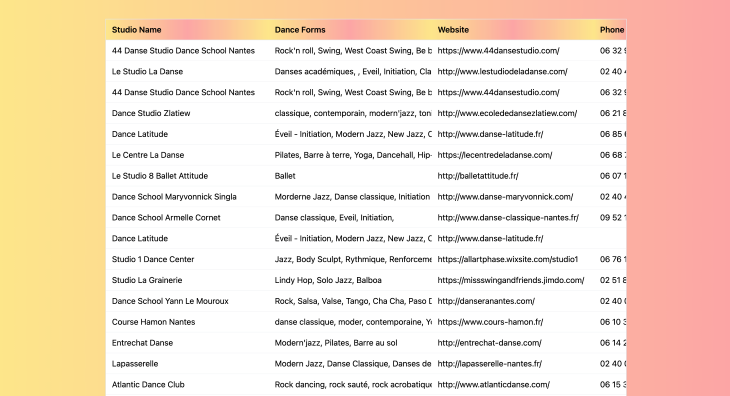
⚠️ Note that, usually, classes and fixedClasses props expect strings. In our case, we’re working with a more complex component. You should always check the component’s documentation to make sure you understand how it is structured.
Although our table is now more readable, it is still too long. It would be helpful to use pagination in case we add more data 🔢:
// 📜 src/views/Home.vue
<template>
  <t-tag tag-name="div" class="max-w-screen-lg m-auto">
    <t-table :headers="tableHeaders" :data="tableData"></t-table>
    <t-pagination class="my-8 bg-gradient-to-l from-yellow-200 to-red-300" :total-items="paginationTotalRows" :per-page="paginationLimitRows" v-model="currentPage"></t-pagination>
  </t-tag>
</template>
<script>
import tableDataJson from "@/static/tableData.json";
export default {
  name: "Home",
  data() {
    return {
      currentPage: 1,
      paginationLimitRows: 10,
      tableHeaders: ["Studio Name", "Dance Forms", "Website", "Phone Number", "City", "Zip Code", "Address"],
      tableData: tableDataJson,
    };
  },
  computed: {
    paginationTotalRows() {
      return tableDataJson.length;
    },
  },
};
</script>
Let’s break down what we did here.
First, we added the <t-pagination></t-pagination> component and styled it as follows: class="my-8 bg-gradient-to-l from-yellow-200 to-red-300".
Of course, you can still style a component directly on a page rather than in the VueTailwind config file. But this should be reserved for exceptional cases. For now, I know that this is the only place where I’ll have pagination in my app, so I went ahead and added style to the pagination component right here.
Any component that you know or even have the slightest inkling will be used more than once should be styled in the config file using classes of fixedClasses. You could also create variant for it. It’s just a clean code issue that will help maintain your app.
Next, we told our pagination component prop total-items how many rows we have. Our paginationTotalRows() computed function will take care of that.
We specified to the per-page prop how many rows per page to allow. I went for paginationLimitRows: 10.
Also, don’t forget to set up the v-model="currentPage" to 1 because that’s the initial state.
If you run this code, the pagination component is there and the number of pages it should have is exact. That said, the table isn’t taking the number of rows per page we’ve specified (10) 😰.
No worries 😃! We just need another computed function to filter the table based on the page we’re currently at:
// 📜 src/views/Home.vue
// [...]
<script>
import tableDataJson from '@/static/tableData.json';]
export default {
  // [...]
  computed: {
    paginationTotalRows() {
      return tableDataJson.length;
    },
    tableData() {
      return tableDataJson.filter((row, rowIndex) => {
        const startRowIndex = (this.currentPage - 1) * this.paginationLimitRows;
        const endRowIndex = this.currentPage * this.paginationLimitRows;
        return rowIndex >= startRowIndex && rowIndex < endRowIndex
      })
    }
  }
}
</script>
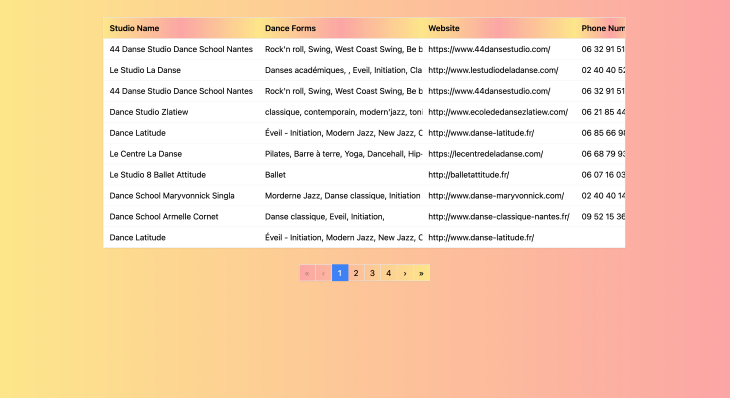
Now our table has pagination 😎!
Let’s dive a bit deeper and add a rich select and a search input to filter the data in our table. Imagine you want to find dance studios in a specific city — say, Paris. To make this possible, we can use the rich select component:
// 📜 src/views/Home.vue
<template>
  <t-tag tag-name="div" class="max-w-screen-lg m-auto">
    <t-rich-select name="select" placeholder="Select a city..." v-model="selectedCity" :options="optionsCity"></t-rich-select>
    <t-tag tag-name="div" class="my-8">
      <t-table :headers="tableHeaders" :data="tableData"></t-table>
      <t-pagination class="my-8 bg-gradient-to-l from-yellow-200 to-red-300" :total-items="paginationTotalRows" :per-page="paginationLimitRows" v-model="currentPage"></t-pagination>
    </t-tag>
  </t-tag>
</template>
<script>
import tableDataJson from '@/static/tableData.json';
export default {
  name: 'Home',
  data() {
    return {
      currentPage: 1,
      optionsCity: ['Nantes', 'Paris'],
      paginationLimitRows: 10,
      selectedCity: '',
      tableHeaders: ['Studio Name', 'Dance Forms', 'Website', 'Phone Number', 'City', 'Zip Code', 'Address']
    }
  },
  computed: {
    paginationTotalRows() {
      return tableDataJson.length;
    },
    tableData() {
      return tableDataJson.filter((row) => {
        const filteredCity = this.selectedCity.toLowerCase();
        if (!filteredCity) {
          return true
        }
        const rowCity = row.City.toLowerCase();
        if (rowCity.includes(filteredCity)) {
          return true
        }
      }).filter((row, rowIndex) => {
        const startRowIndex = (this.currentPage - 1) * this.paginationLimitRows;
        const endRowIndex = this.currentPage * this.paginationLimitRows;
        return rowIndex >= startRowIndex && rowIndex < endRowIndex
      })
    }
  }
</script>
Let’s break down how we implemented the city filter.
First, we added the <t-rich-select></t-rich-select> component.
Next, we gave the component name="select", placeholder="Select a city..." and defined v-model="selectedCity" as an empty string in our data function.
We filled in the options in our filter :options="optionsCity" that we defined as optionsCity: ['Nantes', 'Paris'].
For our table to show the filtered data, we expanded our tableData() computed function to filter through the table based on the city selected.

What if we want to search for dance studios based on the dance forms they offer, or simply by their name? We can add a search input as follows:
// 📜 src/views/Home.vue
<template>
  <t-tag tag-name="div" class="max-w-screen-lg m-auto">
    <t-tag tag-name="div" class="flex max-w-screen-md m-auto my-8 justify-between">
      <t-input class="min-w-50 mr-8" name="search" placeholder="Search by city, dance form, studios or zip code..." v-model="filter"></t-input>
      <t-rich-select name="select" placeholder="Select a city..." v-model="selectedCity" :options="optionsCity"></t-rich-select>
    </t-tag>
    <t-tag tag-name="div" class="my-8">
      <t-table :headers="tableHeaders" :data="tableData"></t-table>
      <t-pagination class="my-8 bg-gradient-to-l from-yellow-200 to-red-300" :total-items="paginationTotalRows" :per-page="paginationLimitRows" v-model="currentPage"></t-pagination>
    </t-tag>
  </t-tag>
</template>
<script>
import tableDataJson from "@/static/tableData.json";
export default {
  name: "Home",
  data() {
    return {
      currentPage: 1,
      filter: "",
      optionsCity: ["Nantes", "Paris"],
      paginationLimitRows: 10,
      selectedCity: "",
      tableHeaders: ["Studio Name", "Dance Forms", "Website", "Phone Number", "City", "Zip Code", "Address"],
    };
  },
  computed: {
    paginationTotalRows() {
      return tableDataJson.length;
    },
    tableData() {
      return tableDataJson
        .filter((row) => {
          const searchTerm = this.filter.toLowerCase();
          if (!searchTerm) {
            return true;
          }
          const rowKeys = Object.keys(row);
          for (const rowKey of rowKeys) {
            const rowValue = row[rowKey].toString().toLowerCase();
            if (rowValue.includes(searchTerm)) {
              return true;
            }
          }
        })
        .filter((row) => {
          const filteredCity = this.selectedCity.toLowerCase();
          if (!filteredCity) {
            return true;
          }
          const rowCity = row.City.toLowerCase();
          if (rowCity.includes(filteredCity)) {
            return true;
          }
        })
        .filter((row, rowIndex) => {
          const startRowIndex = (this.currentPage - 1) * this.paginationLimitRows;
          const endRowIndex = this.currentPage * this.paginationLimitRows;
          return rowIndex >= startRowIndex && rowIndex < endRowIndex;
        });
    },
  },
};
</script>
We’ll do to our search input the same thing we did to the city filter.
First, add the <t-input></t-input> component.
Give it a name="search", placeholder="Search by city, dance form, studios or zip code..." and set v-model="filter" also as an empty string in our data().
We also need to expand a bit more on our tableData() computed function to filter through the table by looping through all the rows and searching for any keyword we choose to input.
And…voilà 🙌!
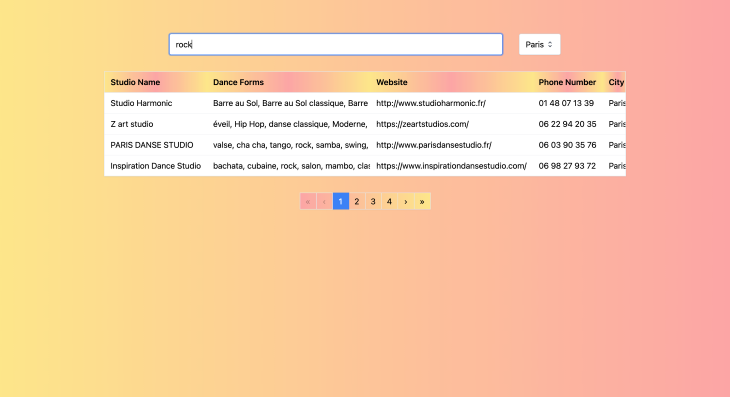
There’s just one little detail left: the title. We’ll use the <t-tag></t-tag> component and define the tag-name as h3:
// 📜 src/views/Home.vue
<template>
  <t-tag tag-name="div" class="max-w-screen-lg m-auto">
    <t-tag tag-name="h3" class="flex justify-center my-8 mb-16 text-4xl text-blue-900 font-extrabold">Dance Studios Directory</t-tag>
    <t-tag tag-name="div" class="flex max-w-screen-md m-auto my-8 justify-between">
      <t-input class="min-w-50 mr-8" name="search" placeholder="Search by city, dance form, studios or zip code..." v-model="filter"></t-input>
      <t-rich-select name="select" placeholder="Select a city..." v-model="selectedCity" :options="optionsCity"></t-rich-select>
    </t-tag>
    <t-tag tag-name="div" class="my-8">
      <t-table :headers="tableHeaders" :data="tableData"></t-table>
      <t-pagination class="my-8 bg-gradient-to-l from-yellow-200 to-red-300" :total-items="paginationTotalRows" :per-page="paginationLimitRows" v-model="currentPage"></t-pagination>
    </t-tag>
  </t-tag>
</template>
<script>
import tableDataJson from "@/static/tableData.json";
export default {
  name: "Home",
  data() {
    return {
      currentPage: 1,
      filter: "",
      optionsCity: ["Nantes", "Paris"],
      paginationLimitRows: 10,
      selectedCity: "",
      tableHeaders: ["Studio Name", "Dance Forms", "Website", "Phone Number", "City", "Zip Code", "Address"],
    };
  },
  computed: {
    paginationTotalRows() {
      return tableDataJson.length;
    },
    tableData() {
      return tableDataJson
        .filter((row) => {
          const searchTerm = this.filter.toLowerCase();
          if (!searchTerm) {
            return true;
          }
          const rowKeys = Object.keys(row);
          for (const rowKey of rowKeys) {
            const rowValue = row[rowKey].toString().toLowerCase();
            if (rowValue.includes(searchTerm)) {
              return true;
            }
          }
        })
        .filter((row) => {
          const filteredCity = this.selectedCity.toLowerCase();
          if (!filteredCity) {
            return true;
          }
          const rowCity = row.City.toLowerCase();
          if (rowCity.includes(filteredCity)) {
            return true;
          }
        })
        .filter((row, rowIndex) => {
          const startRowIndex = (this.currentPage - 1) * this.paginationLimitRows;
          const endRowIndex = this.currentPage * this.paginationLimitRows;
          return rowIndex >= startRowIndex && rowIndex < endRowIndex;
        });
    },
  },
};
</script>
Our app is now up and running and ready to roll, y’all 🚀!
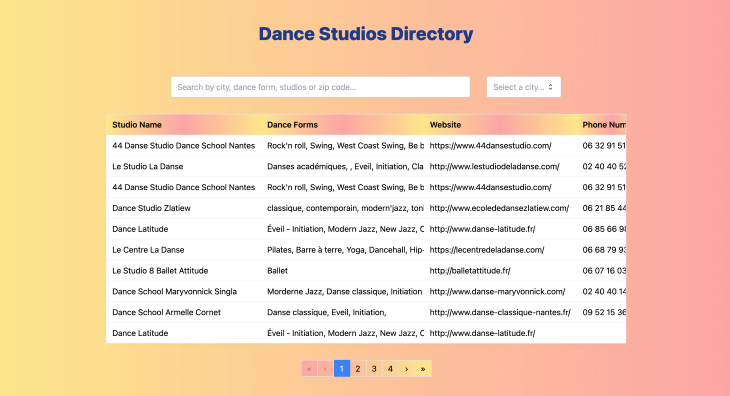
As you can see, when it comes to configuring the theme of your Vue.js components, VueTailwind makes perfect sense if you’re using Tailwind CSS. The time you’ll save up in creating components is considerable 😮.
At the same time, VueTailwind comes with extreme flexibility; you can override and implement the variants you need to these components.
Keep in mind that the library is constantly being updated and improved, so try it out and keep an eye on it. I suspect we’ll hear more about it in the near future 😉.
I am also happy to read your comments and Twitter messages @RifkiNada. If you’re curious about my work or my other articles, feel free to check out my personal website.
Debugging Vue.js applications can be difficult, especially when users experience issues that are difficult to reproduce. If you’re interested in monitoring and tracking Vue mutations and actions for all of your users in production, try LogRocket.

LogRocket lets you replay user sessions, eliminating guesswork by showing exactly what users experienced. It captures console logs, errors, network requests, and pixel-perfect DOM recordings — compatible with all frameworks.
With Galileo AI, you can instantly identify and explain user struggles with automated monitoring of your entire product experience.
Modernize how you debug your Vue apps — start monitoring for free.

@container scroll-state: Replace JS scroll listeners nowCSS @container scroll-state lets you build sticky headers, snapping carousels, and scroll indicators without JavaScript. Here’s how to replace scroll listeners with clean, declarative state queries.

Explore 10 Web APIs that replace common JavaScript libraries and reduce npm dependencies, bundle size, and performance overhead.

Russ Miles, a software development expert and educator, joins the show to unpack why “developer productivity” platforms so often disappoint.

Discover what’s new in The Replay, LogRocket’s newsletter for dev and engineering leaders, in the February 18th issue.
Hey there, want to help make our blog better?
Join LogRocket’s Content Advisory Board. You’ll help inform the type of content we create and get access to exclusive meetups, social accreditation, and swag.
Sign up now