Editor’s note: This splash screen React Native tutorial was last updated on 17 September 2024 by Emmanuel John to include new details on building splash screens using Expo, adjusting image sizes, and addressing potential errors.

In this tutorial, we’ll demonstrate how to build a splash screen in React Native. We’ll walk you through how to build stunning welcome displays for both iOS and Android apps using react-native-splash-screen. Additionally, because Expo is popular and many people often opt to use it instead, we will also be looking at how to build a splash screen in Expo.
The splash screen is the first screen that appears before the user accesses the rest of your app’s functionalities. A splash screen is arguably the best way to make your mobile application’s brand name and icon memorable to your users.
In web applications, we use preloaders for animations that keep users entertained while server operations are being processed. As straightforward as this sounds, it’s a critical tool to build and retain your user base.
There are many benefits to creating a splash screen in React Native. For example, take a scenario where you’re loading data from an API. It is a good user experience to show a loader while the user is waiting. The same instance is applied to a splash screen because showing a loader as soon as the app starts helps you present an organized, well-designed display to your user while they wait for the app to be ready.
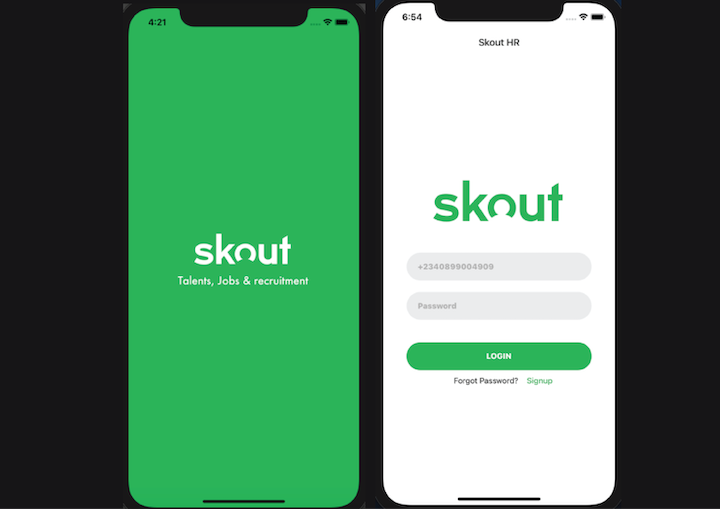
For this react-native-splash-screen demo, we’ll build a splash screen for both Android and iOS. The tutorial will walk you through how to prepare the right image sizes, update the necessary files, and hide the splash screen on the app load. The finished app will look like the screenshot below:
To follow along with this tutorial, it is important you have:
N.B., The easiest way to install Xcode is via the Mac App Store. Installing Xcode will also install the iOS Simulator and all the necessary tools to build your iOS app.
Creating a splash screen for a mobile application can be tricky, and you don’t want to risk having display issues on some devices due to inconsistencies in your splash screen resolutions. For example, the Android device’s requirements are totally different from that of iOS. Most experienced designers can create the required splash screen resolutions for both devices from scratch.
However, there are many available third-party tools available that can help you create a splash screen for both Android and iOS. In this tutorial, we will be using the App Icon Generator, an online platform for creating icons and images for Android and iOS apps.
Before you proceed, make sure you have a high-definition, 2,000-by-2,000px (72 PPI) image ready. You can clone the complete source code for these tutorials on GitHub.
First, run the following command on your terminal to remove a global react-native-cli package if you previously installed it as it may cause unexpected issues:
npm uninstall -g react-native-cli @react-native-community/cli
Next, setup a react native project with the following command:
npx @react-native-community/cli@latest init your-project-name
This will scaffold a React Native project using Kotlin for the main Android classes
Now, head over to Appicon. Drag your image to the box provided, and select 4x as your base size. Check iOS and Android, and click Generate:
![]()
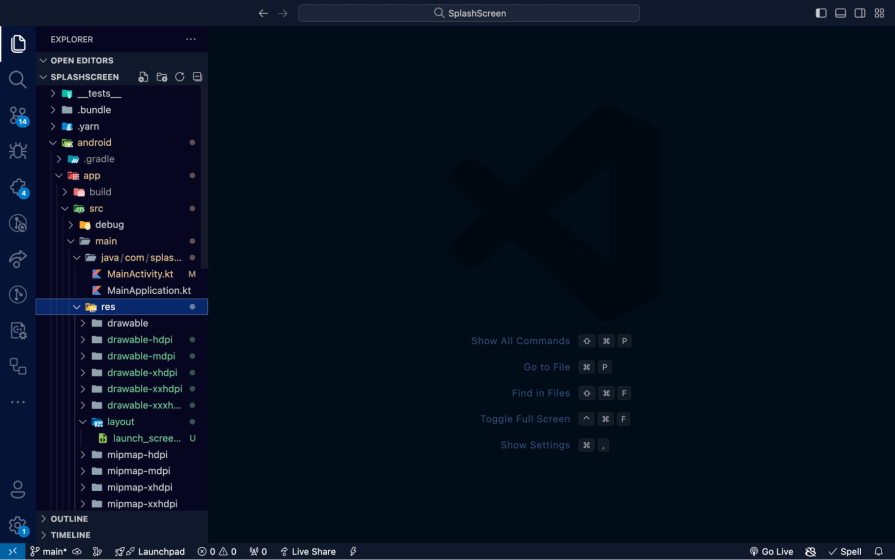
Next, extract the downloaded file, and copy the content in the Android folder and paste it in the android/app/src/main/res folder of your project:
Building a splash screen in React Native requires some fine-tuning. To begin, first install the react-native-splash-screen package using either of the commands below:
/* npm */
npm i react-native-splash-screen --save

/* yarn */
yarn add react-native-splash-screen
Open the project in your terminal, and link the dependencies with the commands below:
cd ios // to enter into IOS directory
pod install
Next, navigate into the AppDelegate.m file and update it with the following code. Add the code #import "RNSplashScreen" (line 6) and set the splash screen to show by default [RNSplashScreen show] (line 41). See the comments in the code below for reference:
/* ios/SplashScreen/AppDelegate.m */

#import "AppDelegate.h"
#import <React/RCTBridge.h>
#import <React/RCTBundleURLProvider.h>
#import <React/RCTRootView.h>
// Import RNSplashScreen
#import "RNSplashScreen.h"
#ifdef FB_SONARKIT_ENABLED
#import <FlipperKit/FlipperClient.h>
#import <FlipperKitLayoutPlugin/FlipperKitLayoutPlugin.h>
#import <FlipperKitUserDefaultsPlugin/FKUserDefaultsPlugin.h>
#import <FlipperKitNetworkPlugin/FlipperKitNetworkPlugin.h>
#import <SKIOSNetworkPlugin/SKIOSNetworkAdapter.h>
#import <FlipperKitReactPlugin/FlipperKitReactPlugin.h>
static void InitializeFlipper(UIApplication *application) {
  FlipperClient *client = [FlipperClient sharedClient];
  SKDescriptorMapper *layoutDescriptorMapper = [[SKDescriptorMapper alloc] initWithDefaults];
  [client addPlugin:[[FlipperKitLayoutPlugin alloc] initWithRootNode:application withDescriptorMapper:layoutDescriptorMapper]];
  [client addPlugin:[[FKUserDefaultsPlugin alloc] initWithSuiteName:nil]];
  [client addPlugin:[FlipperKitReactPlugin new]];
  [client addPlugin:[[FlipperKitNetworkPlugin alloc] initWithNetworkAdapter:[SKIOSNetworkAdapter new]]];
  [client start];
}
#endif
@implementation AppDelegate
- (BOOL)application:(UIApplication *)application didFinishLaunchingWithOptions:(NSDictionary *)launchOptions
{
#ifdef FB_SONARKIT_ENABLED
  InitializeFlipper(application);
#endif
  RCTBridge *bridge = [[RCTBridge alloc] initWithDelegate:self launchOptions:launchOptions];
  RCTRootView *rootView = [[RCTRootView alloc] initWithBridge:bridge
                                                   moduleName:@"MySplashScreen"
                                            initialProperties:nil];
  rootView.backgroundColor = [[UIColor alloc] initWithRed:1.0f green:1.0f blue:1.0f alpha:1];
  self.window = [[UIWindow alloc] initWithFrame:[UIScreen mainScreen].bounds];
  UIViewController *rootViewController = [UIViewController new];
  rootViewController.view = rootView;
  self.window.rootViewController = rootViewController;
  [self.window makeKeyAndVisible];
  // Set the splash screen to show by default.
  [RNSplashScreen show];
  return YES;
}
- (NSURL *)sourceURLForBridge:(RCTBridge *)bridge
{
#if DEBUG
  return [[RCTBundleURLProvider sharedSettings] jsBundleURLForBundleRoot:@"index" fallbackResource:nil];
#else
  return [[NSBundle mainBundle] URLForResource:@"main" withExtension:@"jsbundle"];
#endif
}
@end
In the code above, we made two significant changes to the AppDeligate file. First, we imported the RNSplashScreen we installed earlier into the AppDeligate.m. Next, we set the RNSplashScreen to show by default with the code [RNSplashScreen show].
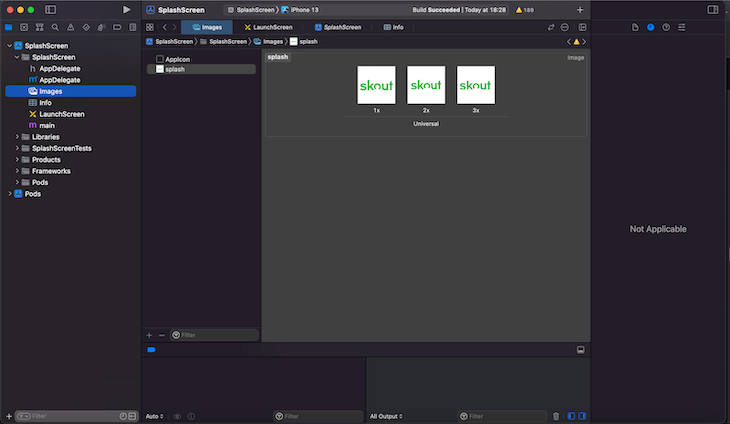
Next, open up the project workspace in Xcode, click Images, right-click anywhere below Appicon, and select New Image Set. Set the image name to “splash,” open the assets folder, and navigate to the iOS folder. Drag the three images in iOS over the three boxes on Xcode named 1x, 2x, and 3x:
Next, select LaunchScreen.storyboard. Select View Controller Scene > View Controller > View, click the SplashScreen and Powered by React Native labels, and press Delete on your keyboard.
Next, select View and click the ruler icon at the top right section of Xcode. Uncheck the Safe Area Layout Guide option, click on the plus icon +, type “image view” in the objects search input field, and then drag the “image view” to the View canvas:
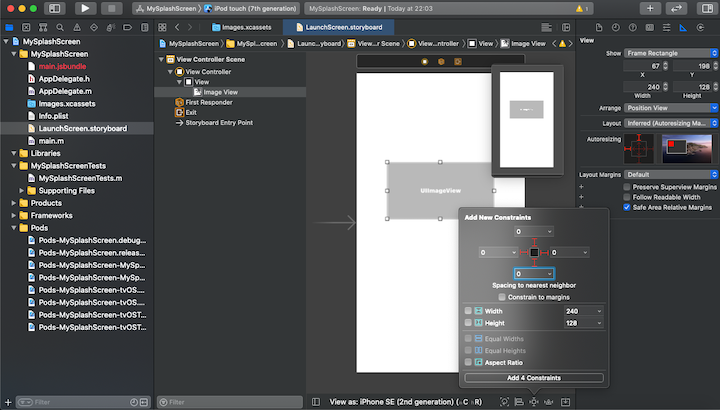
Now that we have our image view set up, click the image property icon and change the image to “splash.” Set the content mod to “aspect fit,” as shown below:
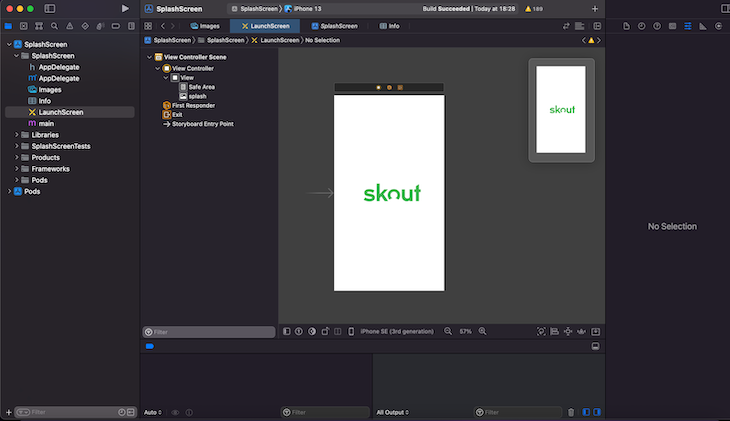
The next question you might ask is “How do I change the splash screen background color in React Native?” To enforce a consistent background for the splash screen in iOS, scroll down to where you have the background and select Custom from the dropdown. On the popup, select the desired color for the splash screen. In our example, we’re selecting white:

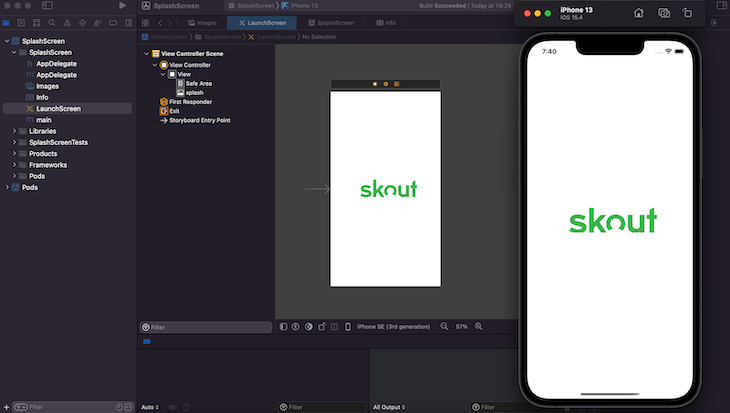
To confirm your application can run successfully, run a build from Xcode. You should see something like this:
For Android, navigate to android/app/src/main/java/com/splashscreen/MainActivity.kt file, and add the following below the import.com.facebook.react.defaults.DefaultReactActivityDelegate line:
    import android.os.Bundle;
    Import org.devio.rn.splashscreen.Splashscreen;
Also, add the following below getMainComponentName():
    override fun onCreate(savedInstanceState: Bundle?) {
        SplashScreen.show(this)
        super.onCreate(savedInstanceState)
    }
Here is the complete version of the code change:
/* android/app/src/main/java/com/splashscreen/MainActivity.kt */
package com.splashscreen
import com.facebook.react.ReactActivity
import com.facebook.react.ReactActivityDelegate
import com.facebook.react.defaults.DefaultNewArchitectureEntryPoint.fabricEnabled
import com.facebook.react.defaults.DefaultReactActivityDelegate

import android.os.Bundle;
import org.devio.rn.splashscreen.SplashScreen;

class MainActivity : ReactActivity() {

  /**
   * Returns the name of the main component registered from JavaScript. This is used to schedule
   * rendering of the component.
   */
  override fun getMainComponentName(): String = "SplashScreen"
override fun onCreate(savedInstanceState: Bundle?) {
    SplashScreen.show(this)
    super.onCreate(savedInstanceState)
}
  /**
   * Returns the instance of the [ReactActivityDelegate]. We use [DefaultReactActivityDelegate]
   * which allows you to enable New Architecture with a single boolean flags [fabricEnabled]
   */
  override fun createReactActivityDelegate(): ReactActivityDelegate =
      DefaultReactActivityDelegate(this, mainComponentName, fabricEnabled)
}
Next, create a layout directory inside the res folder then create a file launch_screen.xml inside the layout directory and add the following:
<?xml version="1.0" encoding="utf-8"?>
<RelativeLayout xmlns:android="http://schemas.android.com/apk/res/android"
    android:orientation="vertical"
    android:layout_width="match_parent"
    android:layout_height="match_parent"
    android:background="#121928">
    <ImageView
        android:layout_width="wrap_content"
        android:layout_height="wrap_content"
        android:src="@drawable/launch_screen"
        android:scaleType="centerCrop"
        android:layout_centerInParent="true" />
</RelativeLayout>
N.B., <ImageView android:src="@drawable/launch_screen" /> is equivalent to <img src="your_image" /> in HTML, so be sure to replace launch_screen with the actual name of your custom image.
However, Android automatically scales drawable, so you do not necessarily need to provide images for different phone sizes. Recall that earlier, we copied two folders (Android and iOS) to our assets directory. These two folders contain our splash images for different phone densities.
You can change the splash screen color for Android by modifying the value of android:background in the launch_screen.xml file.
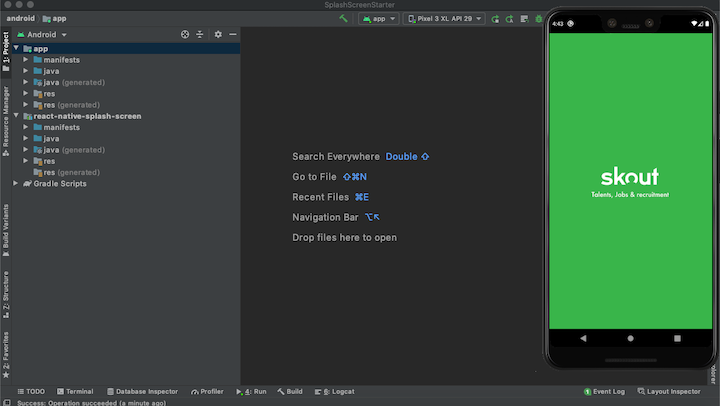
Then, open the Android folder in Android Studio, open AVD, and run your application as shown below. If everything is set up correctly, you should see a result similar to this:
To hide the splash screen on app load, we’ll use the react-native-splash-screen package that we installed earlier. In your App.tsx file, copy the code below:
/* App.tsx */

/**
 * Sample React Native App
 * https://github.com/facebook/react-native
 *
 * @format
 */

import React, { useEffect } from 'react';
import {
  SafeAreaView,
  StatusBar,
  StyleSheet,
  useColorScheme,
} from 'react-native';
import SplashScreen from 'react-native-splash-screen';
import Login from './screens/Login';

import {
  Colors,
} from 'react-native/Libraries/NewAppScreen';

function App(): React.JSX.Element {
  const isDarkMode = useColorScheme() === 'dark';
  useEffect(() => {
    SplashScreen.hide();
  }, []);

  const backgroundStyle = {
    backgroundColor: isDarkMode ? Colors.darker : Colors.lighter,
  };

  return (
    <SafeAreaView style={[styles.container, backgroundStyle]}>
      <StatusBar
        barStyle={isDarkMode ? 'light-content' : 'dark-content'}
        backgroundColor={backgroundStyle.backgroundColor}
      />
      <Login />
    </SafeAreaView>
  );
}

const styles = StyleSheet.create({
  container: {
    flex: 1,
  },
});

export default App;
In our Login.tsx file, we’ll have the following:
/* Login.tsx */

import React, {useState} from 'react';
import {
  StyleSheet,
  View,
  Image,
  Text,
  TextInput,
  TouchableOpacity,
} from 'react-native';

export default function Login() {
  const [email, setEmail] = useState('');
  const [password, setPassword] = useState('');
  return (
    <View style={styles.container}>
      <View style={styles.logoView}>
        <Image source={require('../assets/skout_logo.png')} resizeMode="contain" style={styles.logo} />
      </View>
      <View style={styles.inputView}>
        <TextInput
          value={email}
          style={styles.inputText}
          placeholder="+2340899004909"
          placeholderTextColor="#AFAFAF"
          onChangeText={email => setEmail(email)}
        />
      </View>
      <View style={styles.inputView}>
        <TextInput
          value={password}
          style={styles.inputText}
          placeholder="Password"
          placeholderTextColor="#AFAFAF"
          onChangeText={password => setPassword(password)}
        />
      </View>
      <TouchableOpacity style={styles.loginBtn}>
        <Text style={styles.loginText}>LOGIN</Text>
      </TouchableOpacity>
      <View style={styles.actions}>
        <TouchableOpacity style={{marginHorizontal: 15}}>
          <Text style={styles.forgot}>Forgot Password?</Text>
        </TouchableOpacity>
        <TouchableOpacity>
          <Text style={styles.singUp}>Signup</Text>
        </TouchableOpacity>
      </View>
    </View>
  );
}

const styles = StyleSheet.create({
  container: {
    flex: 1,
    backgroundColor: '#fff',
    alignItems: 'center',
    justifyContent: 'center',
  },
  logo: {
    fontWeight: 'bold',
    fontSize: 50,
    color: '#fb5b5a',
    marginBottom: 40,
    width: 250,
    height: 100,
  },
  inputView: {
    width: '80%',
    backgroundColor: '#EAEAEA',
    borderRadius: 25,
    height: 50,
    marginBottom: 20,
    justifyContent: 'center',
    padding: 20,
  },
  inputText: {
    height: 50,
    color: '#777777',
    fontWeight: '800',
  },
  singUp: {
    color: '#39B54A',
    fontWeight: '500',
  },
  loginBtn: {
    width: '80%',
    backgroundColor: '#39B54A',
    borderRadius: 25,
    height: 50,
    alignItems: 'center',
    justifyContent: 'center',
    marginTop: 20,
    marginBottom: 10,
  },
  loginText: {
    color: '#ffffff',
    fontWeight: '800',
  },
  actions: {
    flexDirection: 'row',
    alignItems: 'flex-start',
    justifyContent: 'flex-start',
  },
  logoView: {
    flexDirection: 'row',
    alignItems: 'flex-start',
    marginBottom: 15,
    marginTop: 0,
  },
  forgot: {
    fontWeight: 'normal',
  },
});
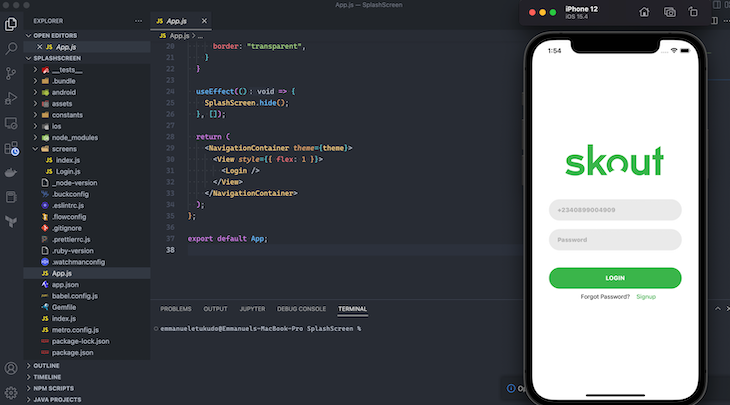
After the app loads, the application will display the login page. See the screenshot below for reference:
N.B., If you’re migrating an older React Native project from Java to the new version using Kotlin, you can easily convert any Java class to its Kotlin equivalent while keeping the same functionality. To do this in Android Studio, simply go to Code then Convert Java File to Kotlin File from the main menu.
Here are possible errors you might encounter while following the react-native splash screen section of this tutorial, along with their solutions:
Error:
FAILURE: Build failed with an exception.

* What went wrong:
Could not determine the dependencies of task ':app:compileDebugJavaWithJavac'.
> SDK location not found. Define a valid SDK location with an ANDROID_HOME environment variable or by setting the sdk.dir path in your project's local properties file.
Solution
Go to the android directory and create a file with the following name: local.properties. Then, open the file, and paste your Android SDK path like below:
For Mac users:
sdk.dir = /Users/USERNAME/Library/Android/sdk
Where USERNAME is your OSX username.
For windows users:
sdk.dir=C:\\Users\\UserName\\AppData\\Local\\Android\\sdk
For Linux (Ubuntu) users:
sdk.dir = /home/USERNAME/Android/Sdk
Error
Execution failed for task ':app:checkDebugDuplicateClasses'.
Solution
Go to gradle.properties(project properties)
Add:
android.enableJetifier=true
So far, we have looked at how to build a splash screen in a bare React Native app. With Expo, we can do this in a simplified and straightforward way because Expo allows us to configure our splash screen and image in the app.json file.
We will be using the App.js and Login.js files we used above. This is what an app.json file looks like when we scaffold a new project:
/* app.json */

{
  "expo": {
    "name": "splash-screen",
    "slug": "splash-screen",
    "version": "1.0.0",
    "orientation": "portrait",
    "icon": "./assets/icon.png",
    "userInterfaceStyle": "light",
    "splash": {
      "image": "./assets/splash.png",
      "resizeMode": "contain",
      "backgroundColor": "#ffffff"
    },
    "assetBundlePatterns": [
      "**/*"
    ],
    "ios": {
      "supportsTablet": true
    },
    "android": {
      "adaptiveIcon": {
        "foregroundImage": "./assets/adaptive-icon.png",
        "backgroundColor": "#ffffff"
      }
    },
    "web": {
      "favicon": "./assets/favicon.png"
    }
  }
}
If you look at the splash value (object) in the code above, you will see our splash image is pointing to our assets folder where the default splash image is located. We can replace it with our custom image. Similarly, we can resize (ie., contain, cover, stretch) the image to better fit our screen and, lastly, we can style the background color to our choice.
For our example, I have replaced the image with our custom image and then changed the background to our styling:
/* app.json */

{
  "expo": {
    ....
    "splash": {
      "image": "./assets/splash.png",
      "resizeMode": "contain",
      "backgroundColor": "#39B54A"
    },
    ....
}
As you can see, the splash screen is hidden as soon as our app loads or is ready. For an optimized user experience, we can choose to show the splash screen for a few seconds before hiding it. To do this, we will use the expo-splash-screen package, which we can install with the following command:
npx expo install expo-splash-screen
Next, in our App.js file, we import and call it:
/* App.js */

import * as SplashScreen from 'expo-splash-screen';

SplashScreen.preventAutoHideAsync();
setTimeout(SplashScreen.hideAsync, 5000);
With this, we will see our splash screen for five seconds before it is hidden. This is the result:

A splash screen is an important addition to any application, as it creates a smooth transition between launching an app and displaying the main contents, thereby improving the user’s experience. Splash screens help reinforce the application’s identity and thus, make it easily recognizable to the user, improving brand building.
Oftentimes, certain configurations and resources like fonts and checking updates are implemented as soon as the app is ready. Splash screens help to keep the users busy while these resources are loading instead of a delay that will impair the user’s experience.
Knowing how to build a splash screen for cross-platform apps is a foundational skill that can help you take a step forward in your mobile development career. All the best!

LogRocket's Galileo AI watches sessions for you and and surfaces the technical and usability issues holding back your React Native apps.
LogRocket also helps you increase conversion rates and product usage by showing you exactly how users are interacting with your app. LogRocket's product analytics features surface the reasons why users don't complete a particular flow or don't adopt a new feature.
Start proactively monitoring your React Native apps — try LogRocket for free.

Learn how to protect full-stack projects from NPM supply chain attacks with a practical security checklist.

Explore 15 essential MCP servers for web developers to enhance AI workflows with tools, data, and automation.

Learn how contrast-color() automatically picks accessible text colors using native CSS, without JavaScript.

Learn how to build a harness-style AI workflow using Claude Code with specialized Dev, QE, and Ops subagents, gated handoffs, MCP telemetry, and LEARNING.md.
Hey there, want to help make our blog better?
Join LogRocket’s Content Advisory Board. You’ll help inform the type of content we create and get access to exclusive meetups, social accreditation, and swag.
Sign up now

