Deno is a simple and secure runtime for JavaScript that supports and configures TypeScript by default. MongoDB is a cross-platform document-oriented database program that is widely used by developers. In this article, we will learn how to integrate MongoDB into our Deno application.

Before we start, make sure you have Deno installed on your local machine. If you’re using a Mac and you don’t yet have it installed, open up your terminal and run this command:
brew install deno
If you are using a Windows machine, you can install it by running this command on your terminal:
iwr https://deno.land/x/install/install.ps1 -useb | iex
Or, if you have Chocolatey installed, you could run:
choco install deno
The Replay is a weekly newsletter for dev and engineering leaders.
Delivered once a week, it's your curated guide to the most important conversations around frontend dev, emerging AI tools, and the state of modern software.
We will start by creating a server.js file and then set up our Deno server. Since there is no package.json file like we have in Node.js, Deno uses modules reference by URLs or file paths.
import { Application, Router } from "https://deno.land/x/oak/mod.ts";
const app = new Application();
const router = new Router();
const PORT = 3000;
router
  .get("/", (ctx) => {
    ctx.response.body = "This is the home route";
  });
app.use(router.routes());
app.use(router.allowedMethods());
app.listen({ port: PORT });
We are using Oak to run our server. Oak is a Deno middleware framework for HTTP servers, and it includes a router middleware as well.
We can now run deno run --allow-net server.ts on our terminal to serve our application. Due to Deno’s security, we need to add the --allow-net to run a server. We can look up the application on our browser on localhost:8000.
Now that our server is up and running, we can start setting up MongoDB in our application. Create a db.js file, which is where we will set up our DB config:
// import the package from url
import { init, MongoClient } from "https://deno.land/x/[email protected]/mod.ts";
// Intialize the plugin
await init();
// Create client
const client = new MongoClient();
// Connect to mongodb
client.connectWithUri("mongodb://localhost:27017");
// Give your database a name
const dbname: string = "denoMongoApp";
const db = client.database(dbname);
// Declare the mongodb collections here. Here we are using only one collection (i.e user).
// Defining schema interface
interface UserSchema {
  _id: { $oid: string };
  name: string;
  email: string;
  phone: string;
}
const User = db.collection<UserSchema>("user");
export { db, User };
Here we import the plugin and then initialize it. We create an instance of the mongoClient and then connect it to MongoDB. We set up a User collection, which we’ll use to test our Mongo config. We also define a TypeScript interface for MongoDB model which will take a name, email, phone, and a generated Mongo ID.
Now that this is set up, we’ll build a simple CRUD application to test it. To make our application more scalable, we need to create a routes.ts and a controller.ts file. Our routes.ts file will handle our routes, and the controller.ts file will handle our MongoDB logic.
Our routes.ts file should look like this:
import { Router } from "https://deno.land/x/oak/mod.ts";
import { getUsers, createUser } from "./controller.ts";
const router = new Router();
router
  .get("/", (ctx) => {
    ctx.response.body = "This is the home route";
  })
  .get("/get-users", getUsers)
  .post("/create-user", createUser);
export default router;
With this new configuration, we need to modify our server.ts file to this:
import { Application } from "https://deno.land/x/oak/mod.ts";
const app = new Application();
import router from "./routes.ts";
const PORT: number = 3000;
//
app.use(router.routes());
app.use(router.allowedMethods());
app.listen({ port: PORT });
Now we need to define our route methods that we called in the router.ts file. We’ll start by creating the getUser method. Remember that we have to bring in the instance of our database that we created in the db.ts file:
import { User } from "./db.ts";

let getUsers = async (ctx: any) => {
  try {
    const data: any = await User.find();
    ctx.response.body = { "status": true, data: data };
    ctx.response.status = 200;
  } catch (err) {
    ctx.response.body = { status: false, data: null };
    ctx.response.status = 500;
    console.log(err);
  }
};
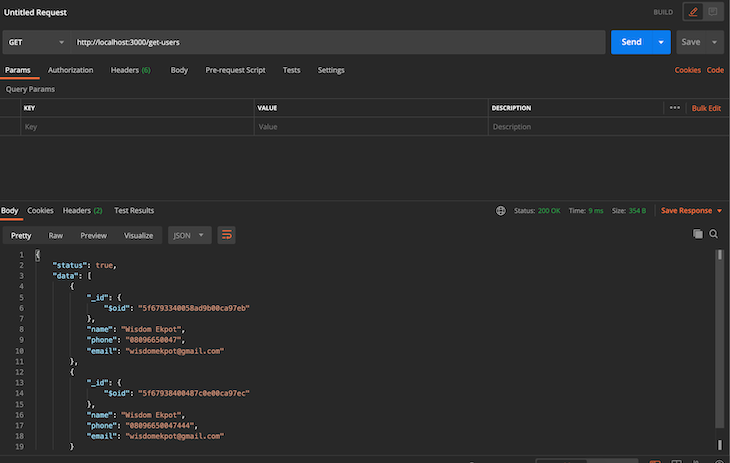
Now we can now call the get-user endpoint, which will return an empty array by default and a status of 200.
We’ll use the same technique to implement the createUser method:
let createUser = async (ctx: any) => {
  try {
    let body: any = await ctx.request.body();
    console.log(await body.value);
    const { name, phone, email } = await body.value;
    const id = await User.insertOne({
      name: name,
      phone: phone,
      email: email,
    });
    ctx.response.body = { status: true, data: id };
    ctx.response.status = 201;
  } catch (err) {
    ctx.response.body = { status: false, data: null };
    ctx.response.status = 500;
    console.log(err);
  }
};
Always remember to await body.value, as this is an asynchronous request. Without doing this, it will just return the object ID.
Let’s run the application:
deno run --allow-all --unstable server.ts
The --allow-all flag will allow all permissions and disable Deno’s security in our application.
Let’s go ahead and test our endpoints using POSTMAN. Here’s the test for getting users:
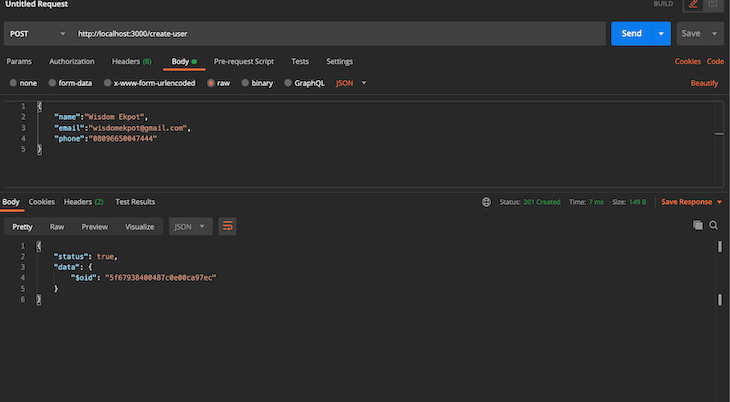
And here’s the test for creating a user:
Setting up an application in Deno is quite easy and more secure. You can use any database of your choice as long as there is a Deno controller for it. Due to the fact that Deno doesn’t have a package.json file, it caches all the modules on our local machine, which is much faster.
Install LogRocket via npm or script tag. LogRocket.init() must be called client-side, not
server-side
$ npm i --save logrocket

// Code:

import LogRocket from 'logrocket';
LogRocket.init('app/id');
// Add to your HTML:

<script src="https://cdn.lr-ingest.com/LogRocket.min.js"></script>
<script>window.LogRocket && window.LogRocket.init('app/id');</script>

TSRX adds first-class control flow, conditional hooks, and scoped styles to React via a TypeScript compiler extension — no new framework required.

Learn how to build a full React Native auth system using Better Auth and Expo — with email/password login, Google OAuth, session persistence, and protected routes.

Compare the top AI development tools and models of June 2026. View updated rankings, feature breakdowns, and find the best fit for you.

Learn how Bloom filters reduce database lookups for username availability checks while preserving correctness at scale.
Would you be interested in joining LogRocket's developer community?
Join LogRocket’s Content Advisory Board. You’ll help inform the type of content we create and get access to exclusive meetups, social accreditation, and swag.
Sign up now
