Phoenix is an excellent web framework that has been making waves in the development community. It’s fast, reliable, and scalable, which are all key factors in determining the success of any framework. But what really sets Phoenix apart is its unique approach to handling requests and its fail-safety mechanism, making it a fantastic choice for mission-critical applications that require high availability. In other words, Phoenix is a solid choice for developers who want a framework that can keep up with the demands of modern web development.

Most websites today exist because of their ability to engage with the average user. A common method to lead this engagement is through email. Fortunately, we can use the Phoenix.Swoosh library to send engaging emails to our customers.
In this article, we’ll pretend we’re setting up a new business called “The Cookie Shop.” Our business isn’t ready just yet, but people can indicate their interest by leaving their details. After doing so, they will receive an email confirming that they have entered their details correctly. It’s a simple example, but a great candidate to review if you are getting started with Phoenix Swoosh to send emails.
Jump ahead:
The Replay is a weekly newsletter for dev and engineering leaders.
Delivered once a week, it's your curated guide to the most important conversations around frontend dev, emerging AI tools, and the state of modern software.
Setting up our Phoenix project (assuming we already have our environment set up), is as easy as typing the following into the terminal. Normally, Phoenix would use a Postgres database, but to get set up quicker in our environment, we’ll use an SQLite database. That’s as simple as specifying the database to use via the database argument, like so. Because it’s a sample project, we’ll just call it hello:
mix phx.new hello --database sqlite3
We’ll also take this time to install the phoenix_swoosh dependency. Add the dependency to your mix.exs file. After adding it, it should look like this:
  # Specifies your project dependencies.
  #
  # Type `mix help deps` for examples and options.
  defp deps do
    [
      {:phoenix, "~> 1.6.15"},
      {:phoenix_ecto, "~> 4.4"},
      {:ecto_sql, "~> 3.6"},
      {:ecto_sqlite3, ">= 0.0.0"},
      {:phoenix_html, "~> 3.0"},
      {:phoenix_live_reload, "~> 1.2", only: :dev},
      {:phoenix_live_view, "~> 0.17.5"},
      {:floki, ">= 0.30.0", only: :test},
      {:phoenix_live_dashboard, "~> 0.6"},
      {:esbuild, "~> 0.4", runtime: Mix.env() == :dev},
      {:swoosh, "~> 1.3"},
      {:telemetry_metrics, "~> 0.6"},
      {:telemetry_poller, "~> 1.0"},
      {:gettext, "~> 0.18"},
      {:jason, "~> 1.2"},
      {:plug_cowboy, "~> 2.5"},
      {:phoenix_swoosh, "~> 1.0"}, # < our added package
    ]
  end
When it comes to sending emails to our customers, we have to think about why we’re sending emails in the first place. Traditionally, emails are sent when a user has signed up to a list, and that’s what we’ll be doing in this example.
Why do we define templates in the first place? It’s true that you can send plain text emails to people, with no styling at all, but they would look very dry and boring and would be easily overlooked. Plus, with the receiving mail client not having any style information, there’s a chance that it could choose a very basic font for our email. In our case, the email could look like this:
We're better than friends.
We're cookie friends.

Hey there,

What can we say. We're super excited to have you here, and we intend to reward you handsomely.

When our cookies are ready, you'll be the first to know.

Best,
Cookie Team
This email looks drab. It wouldn’t excite anyone. However, with some basic styling, it could become something like this:
Hey there, customer_name,
What can we say. We’re super excited to have you here, and we intend to reward you handsomely.
When our cookies are ready, you’ll be the first to know.
Best,
Cookie Team
There’s a few things to note about this updated email:
So, the first step on this journey (after setting up dependencies, like we did above) is to define a template. Let’s do that now.
Within our templates directory (lib/hello_web/templates), we want to create an emails folder, and then a welcome folder within that folder. In the end, the complete path would be lib/hello_web/templates/emails/welcome. For our small example, this may seem like overkill, but in larger applications, splitting our emails out by their topic will lead to a more maintainable app in the long run.
Within the welcome folder, create a welcome.html.eex file. This will be an HTML file with Embedded Elixir, with the following contents:
<h1>We're better than friends.</h1>
<h2>We're cookie friends</h2>
<p>Hey there, <%= @name %>,</p>
<p>What can we say. We're super excited to have you here, and we intend to reward you <i>handsomely</i>.</p>
<br/>
<br/>
<p>When our cookies are ready, you'll be the first to know</p>
<br/>
<p>Best, </p>
<p>Cookie Team</p>
As we can see, this is a basic HTML file with simple formatting. However, it also receives the parameter name. We use this parameter to directly address the user, and it’s easy to see how we could use other parameters within our email.
With our template set up, let’s leverage Phoenix.Swoosh to populate the template and then send the email. To do this, create a useremail.ex file within the lib directory. In this file, we’ll tell Swoosh how to construct the email, and also the template that should be used. The contents of this file will be as follows:
defmodule Hello.UserEmail do
  use Phoenix.Swoosh,
  template_root: "lib/hello_web/templates/emails",
  template_path: "welcome"
  def welcome(user) do
    new()
    |> to({user.name, user.email})
    |> from({"The Cookie Shop", "[email protected]"})
    |> subject("#{user.name}, you've made the list")
    |> render_body("welcome.html", %{name: user.name})
  end
end
Let’s break down what’s happening here, so we can follow how our variables are being passed through to the HTML template.
The welcome function accepts the user parameter. We supply these values via a tuple in the “to” field. We also use string interpolation to supply the users’ name to be used in the subject field. Finally, we render the body of our email via the welcome.html file.
In my case, the email generation would only work if I explicitly specified the template_root and template_path, so make sure to set these to the path where the email template resides.
Now, we need to configure the route that our app should use to send this email. Emails are normally sent in response to an HTTP POST request, which contains the details we need to send an email. To capture the field details in our POST request, our page_controller.ex file would look like this:
defmodule HelloWeb.PageController do
  use HelloWeb, :controller
  alias Hello.UserEmail
  alias Hello.Mailer
  def index(conn, _params) do
    render(conn, "index.html")
  end
  def signup(conn, params) do
    email = Hello.UserEmail.welcome(%{name: params["name"], email: params["email"]})
    Hello.Mailer.deliver(email)
    render(conn, "thanks.html")
  end
end
In this controller, we’ve done the following:
UserEmail (the file that contains our email generation logic) and Mailer (which is responsible for sending the email)signup function, which achieves the following:
email object from the result of the welcome function in UserEmail. We pass the name and email parameters into the welcome functionMailer.deliver(email) function to schedule the sending of this emailthanks.html page to indicate that the details have been received successfullyThe next thing we need to do is create two pages. The first will be the landing page that the customer will see when they navigate to our site, and the second will thank them for registering.
To set up our landing page, we’ll need to add some new fields to our index.html so it accepts the name and email of the user. To do this, modify the index.html.heex file to have the following contents:
<div class="container">
  <h1>Get Ready for the Best Cookies Ever!</h1>
  <p>We're excited to announce the opening of our new cookie business! Our cookies are baked with love and care using only the finest ingredients, and we can't wait to share them with you.</p>
  <p>Be the first to know when we open our doors by signing up below.</p>
  <form action="#" method="post">
    <input name="name" placeholder="Your name" required>
    <input type="email" name="email" placeholder="Your email address">
    <input type="submit" value="Sign up">
    <input type="hidden" value={csrf_token_value()} name="_csrf_token" />
  </form>
</div>
This will create a simple form with the fields that we require. It will also include a hidden field, which will contain the CSRF token, which is important when preventing Cross Site Request Forging attacks.
The second page we will create will be the page that thanks the user for signing up. We’ll call this page thanks.html.heex, and it will be adjacent to our index page, which is located in the page folder. In this case, the contents of this file will be as follows:
<div class="container">
<h1>You're on the list!</h1>
    <p>Keep an eye on your emails for more details 🍪</p>
    <p> - The Cookie Co </p>
</div>
Now our app should be set up to send emails. Granted, we haven’t configured any mail servers just yet, but that’s not a problem yet.
Finally, because our app sends a POST request to our PageController, we need to tell the router to accept an HTTP POST request, and where to route the request to. We can update the router.ex to facilitate this:
  scope "/", HelloWeb do
    pipe_through :browser
    get "/", PageController, :index
    post "/", PageController, :signup # < New line added to route POST to correct location
  end
To recap, the logical flow of our app is as follows:
index.html, with the registration formPageController, the signup action (as configured in our router.ex file
signup action executes the welcome function within the UserEmail module, supplying the name and email fields that it parsed from the POST payload
thanks.html is rendered, so the user receives a thank you message for signing upMaybe you think it’s a bit weird that we’re generating and sending emails without actually having configured any mail providers. By default, Swoosh sends mail to a development mailbox, which we can see at http://localhost:4000/dev/mailbox. If we navigate there now, we can see some of the emails we have sent:
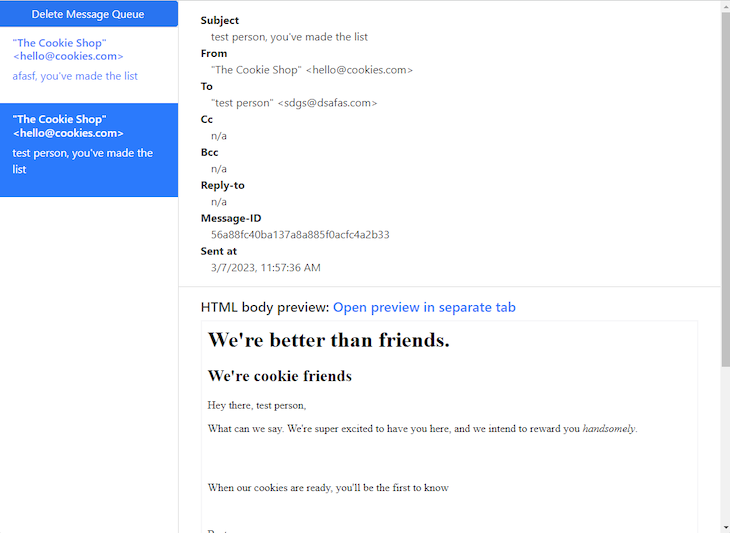
This is helpful to confirm that our mail is being queued for sending by Swoosh, and also helpful to confirm that our HTML styling is working as expected. Once we’re happy with how the emails look, we can continue to configure Swoosh to use an external mail provider.
From here, you can configure Swoosh to use any number of currently supported email providers to send your email to recipients.
In our Phoenix project, we may need to send emails to engage with the people who use our site. Fortunately, using Phoenix Swoosh makes this task fairly easy to accomplish. When it comes time to add emails to your Phoenix project, don’t forget to configure the email systems in the prod.exs file, and don’t check secrets in to source control. If you keep those things in mind, you’ll have email sending functionality added to your project in no time 📨
As usual, you can clone a complete copy of the project in this GitHub repository. Enjoy!
Install LogRocket via npm or script tag. LogRocket.init() must be called client-side, not
server-side
$ npm i --save logrocket

// Code:

import LogRocket from 'logrocket';
LogRocket.init('app/id');
// Add to your HTML:

<script src="https://cdn.lr-ingest.com/LogRocket.min.js"></script>
<script>window.LogRocket && window.LogRocket.init('app/id');</script>
A step-by-step guide to building your first MCP server using Node.js, covering core concepts, tool design, and upgrading from file storage to MySQL.
Using security headers in your Next.js apps is a highly effective way to secure websites from common security threats.

A deep dive into May 2026’s AI model and tool rankings. We break down performance, usability, pricing, and real-world capabilities across 50+ features to help you pick the right tools for your development workflow.
A practical guide to Agent Browser CLI. Learn how AI agents navigate, snapshot, and interact with web pages using stable references, enabling efficient automation and exploratory testing.
Would you be interested in joining LogRocket's developer community?
Join LogRocket’s Content Advisory Board. You’ll help inform the type of content we create and get access to exclusive meetups, social accreditation, and swag.
Sign up now

