Integrating email functionality in your Node.js app can help you automate and customize communications with your users. Whether it’s for account verifications, password resets, or personalized notifications, being able to send emails programmatically is crucial in a modern web application.

Leveraging an email API in Node.js makes your email functionality easy to set up, integrate, customize, and scale. In this article, we will explore how to send emails in Node.js using three different email APIs — Mailgun, MailTrap, and Mailjet. We will cover:
You can check out the source code for the demos in this article in my GitHub repository.
If you’re interested in options other than email APIs for sending emails programmatically in Node.js, check out our guides on using the Nodemailer Simple Mail Transfer Protocol (SMTP) or SendGrid, a third-party email SaaS. Otherwise, let’s jump right in.
The Replay is a weekly newsletter for dev and engineering leaders.
Delivered once a week, it's your curated guide to the most important conversations around frontend dev, emerging AI tools, and the state of modern software.
Using an email API to send emails in Node.js helps abstract the complexities of the conventional way of sending emails, such as email server configuration. This enables developers to focus on the main part of development instead of having to deal with email-related development.
Integrating an email API into your Node.js codebase also helps improve the reusability of code by allowing you to use the same email code configuration in different sections of your codebase.
In addition, email APIs are well-optimized with good deliverability rates. Sending emails through this method helps reduce the chance of them going into spam folders.
Email APIs offer features like analytics and tracking, allowing developers to monitor email deliveries, clickthrough rates, open rates, and other helpful data. They are also built to handle large volumes of email effectively, which makes them suitable for email marketing or operations of any size.
Despite all the advantages of using email APIs to send emails in Node.js, there are also a few considerations to keep in mind.
First, sending a high volume of emails can incur correspondingly high costs, which can be a drawback if you are working on a large project.
Secondly, when using an external email API service, you have to rely on that service’s uptime and performance. This will determine whether your email will be delivered or not, so ensure to always use stable email APIs.
Lastly, there might be a limit to how much you can customize the content of your email as compared to when you set up your email server by yourself.
With all that in mind, let’s take a look at how we can use 3 different email APIs to send emails in our Node.js project.
To get started, open up your terminal and create a new folder using the following command:
mkdir nodejs-mail
This will create a new folder called nodejs-mail. Then, run the command npm init- y to start up your project.
Next, let’s install the dependencies we need in our project using the command below:
npm i express dotenv body-parser nodemon
dotenv is an npm package that allows you to manage and load your environment variables so that sensitive data like the apikey and secretkey are separate from the main codebase.
nodemon is a package that helps to automatically restart the server during development. This allows us to bypass the step of restarting the server every time we make a change to the codebase.
body-parser serves as a middleware that parses the data sent in the request body.
For this tutorial, we will create two folders: controllers and services. We also need to create an app.js file, where we will initialize the server and set up the route for the email API call. Lastly, create a .env file, where the sensitive keys will be stored.
In the app.js file, we can start the server to start on a specific port:
require("dotenv").config();
const express = require("express");

const bodyParser = require("body-parser");

const app = express();

const port = process.env.PORT;

app.use(bodyParser.json());

app.listen(port, () => {
console.log(`Server is running on PORT ${port}`);
});
Here, we are basically setting up the express server and starting it on port 9000. The port number was set in the .env file to 9000, and we are using the dotenv package to load the variable.
Now run the following command:
nodemon app.js
You should see a message like below:

Now that our development environment and folder structure are properly set up, we can start working with our chosen email API. In the following sections, we will explore how to work with the three different email API options mentioned above: Mailgun, MailTrap, and Mailjet.
Mailgun is a popular email service that provides APIs for sending and receiving emails. Let’s take a look at how we can send emails in Node.js with the Mailgun API.
First, we will install the dependencies needed to set up our email functionality using this command:
npm i mailgun.js form-data
Inside the services folder that we set up earlier, create a new file called mailgunServices.js. Copy the following code into this new file:
const formData = require("form-data");
const Mailgun = require("mailgun.js");

const mailgun = new Mailgun(formData);

const mg = mailgun.client({
username: "api",
key: process.env.MAILGUN_API_KEY,
});

exports.sendMail = (req, res) => {
const { toEmail, fromEmail, subject, message } = req.body;

mg.messages.create(process.env.MAILGUN_DOMAIN, {
from: fromEmail,
to: [toEmail],
subject: subject,
text: message,
});
};
Here, we are initializing the Mailgun client instance and passing in the MAILGUN_API_KEY. Then we defined a function sendMail to handle the sending of emails using the mailgun-js library.
Next, in the controllers folder, we’re going to create a file called mailgunController.js. In this file, add the following code:
const { Router } = require("express");

const router = Router();

const mailgunService = require("../services/mailgunService");

router.post("/send-mailgun", async (req, res) => {
try {
const response = await mailgunService.sendMail(req, res);
res.status(200).json({
status: "success",
message: "Email sent successfully",
data: response,
});
} catch (error) {
res.status(400).json({
status: "error",
message: "Email not sent",
});
}
});

module.exports = router;
Inside the mailgunController.js file, we created an instance of the express router and assigned it to the variable router.
We then defined a route that listens to the POST request sent to the /send-mailgun path, or endpoint, along with a try...catch block to catch any errors that occur during the email sending process.
We also called the sendMail function from the mailgunService.js file is called and passed the request req and response res objects.
Inside the app.js file, we will modify the code as shown below:
require("dotenv").config();
const express = require("express");
const mailgunController = require("./controllers/mailgunController");
const bodyParser = require("body-parser");

const app = express();

const port = process.env.PORT;

app.use(bodyParser.json());
app.use("/api", mailgunController);

app.listen(port, () => {
console.log(`Server is running on PORT ${port}`);
});
In the code above, we used the app.use() method to add middleware functions to the request processing pipeline of the application.
We then added the mailgunController middleware to the base path "/api" using the app.use() method. This means is any route defined in the middleware controller will be accessed under the route starting with /api.
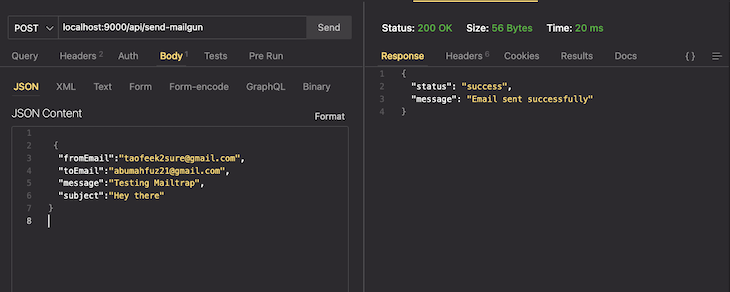
Now, let us test this out by making a request to the api/send-mailgun endpoint. You can either make the request using Postman or the ThunderClient extension if you are working with VSCode:

If everything works as expected, you should then receive your test email at the address you used in your test.
The second email API we will be looking at is MailTrap, an email delivery platform that provides inbuilt tooling for testing your email sending during development without sending it to a real recipient’s email inbox.
MailTrap provides an SMTP server you can configure and integrate into your application. You can send emails to real recipients as well, but you will need to connect your domain — which is usually your website — with MailTrap. Simply follow the MailTrap documentation to do so.
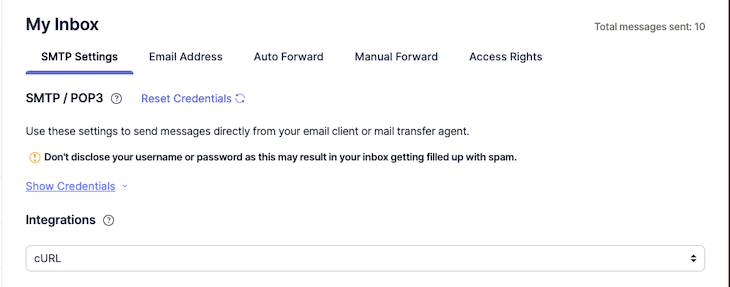
You’ll need a MailTrap account to use the service. You can get your username and password from the dashboard when you create an account by clicking on the Show Credentials button:

Similar to our first steps using Mailgun, we’ll get started with MailTrap by creating two files: mailTrapService.js and mailTrapController.js.
Then, in the mailTrapService.js file, add the following code:
const nodemailer = require("nodemailer");

const transporter = nodemailer.createTransport({
host: "smtp.mailtrap.io",
port: 2525,
auth: {
user: process.env.MAILTRAP_USERNAME,
pass: process.env.MAILTRAP_PASSWORD,
},
});

const mailOptions = {
from: "",
to: "",
subject: "",
text: "",
};

exports.sendMail = async (req, res) => {
const { to, from, subject, text } = req.body;

mailOptions.from = from;
mailOptions.to = to;
mailOptions.subject = subject;
mailOptions.text = text;

try {
const result = await transporter.sendMail(mailOptions);
return result;
} catch (error) {
return error;
}
};
Here, we created a transporter — which we will use to send emails — using the nodemailer.createTransport() method. We also provided the MailTrap SMTP server settings for the transporter to use.
Then, we created a sendMail function where the body of the request is destructured and the values are assigned to the mailOptions object values. Next, we called the sendMail method on the transporter to send the test mail.
Now, the mailTrapController.js file, add the following code:
const express = require("express");

const router = express.Router();

const mailtrapService = require("../services/mailtrapService");

router.post("/send-mailtrap", async (req, res) => {
try {
const response = await mailtrapService.sendMail(req, res);
res.status(200).json({
status: "success",
message: "Email sent successfully",
data: response,
});
} catch (error) {
console.log("error", error);
res.status(400).json({
status: "error",
message: "Email not sent",
});
}
});

module.exports = router;
Here, we added a post route send-mailtrap for MailTrap along with the sendMail function from the mailtrapService file.
Now, we need to add the mailtrapController middleware so we can use it when we call the send-mailtrap route. We’ll do so in the app.js file:
require("dotenv").config();
const express = require("express");
const mailgunController = require("./controllers/mailgunController");
const mailTrapController = require("./controllers/mailtrapController");


const bodyParser = require("body-parser");

const app = express();

const port = process.env.PORT;

app.use(bodyParser.json());

app.use("/api", mailgunController);
app.use("/api", mailTrapController);

app.listen(port, () => {
console.log(`Server is running on PORT ${port}`);
});
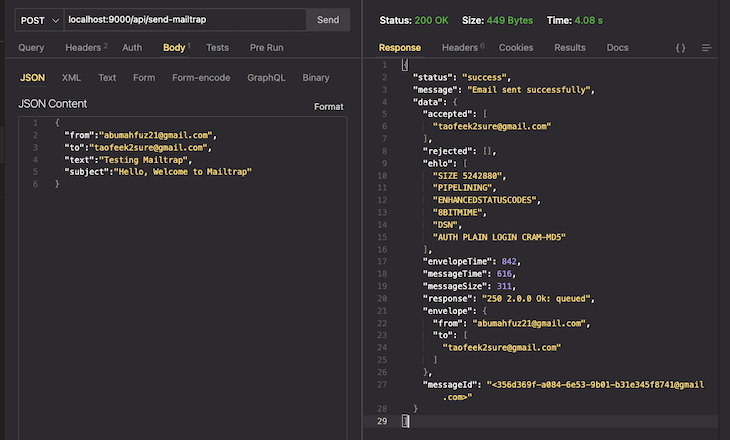
Now, let’s send the request to the route "/api/send-mailtrap":

We should receive the following test email:

The last email API service we will look at is Mailjet, an easy-to-use platform for designing and sending automated emails, email marketing campaigns, newsletters, and more.
As before, create two new files — mailjetControllers.js and mailjetService.js — in the controllers and services folders, respectively. Then, in the mailjetService.js file, add the following code:
const Mailjet = require("node-mailjet");

const mailjet = Mailjet.apiConnect(
process.env.MAILJET_API_KEY,
process.env.MAILJET_SECRET_KEY
);

const mailjetRequest = mailjet.post("send", { version: "v3.1" });

exports.sendMail = async (req, res) => {
const { to, from, subject, text } = req.body;

mailjetRequest.request({
Messages: [
{
From: {
Email: from,
Name: "",
},
To: [
{
Email: to,
Name: "",
},
],
Subject: subject,
TextPart: text,
},
],
});

try {
const result = await mailjetRequest;
return result;
} catch (error) {
console.log(error);
return error;
}
};
In the above code, the node-mailjet library is a required module. We used it to connect to the mailjet instance using API-KEY and SECRET-KEY.
The function sendMail is designed to send an email using the Mailjet API. We destructured the object from the request body and the request method on mailjetRequest to pass in the array of objects for the required data to send mail. We also added try...catch block to send the request and catch any errors that occur.
Next, in the mailjetController.js file, add the following code:
const { Router } = require("express");

const router = Router();

const mailjetService = require("../services/mailjetService");

router.post("/send-mailjet", async (req, res) => {
try {
const response = await mailjetService.sendMail(req, res);
res.status(200).json({
status: "success",
message: "Email sent successfully",
data: response,
});
} catch (error) {
res.status(400).json({
status: "error",
message: "Email not sent",
});
}
});

module.exports = router;
In the code above, we added a new route send-mailjet that calls the sendMail function from mailjetService, where the request and response are passed as arguments.
This entire route is wrapped in a try...catch block to send back the response or error if an error occurs while sending the mail.
Now, we need to add the mailjetController middleware so we can use it when we call the send-mailjet route. In the app.js file, add the following code:
require("dotenv").config();
const express = require("express");
const mailgunController = require("./controllers/mailgunController");
const mailTrapController = require("./controllers/mailtrapController");
const mailjetController = require("./controllers/mailjetController");

const bodyParser = require("body-parser");

const app = express();

const port = process.env.PORT;

app.use(bodyParser.json());

app.get("/", (req, res) => {
res.send("Hello World");
});

app.use("/api", mailgunController);
app.use("/api", mailTrapController);
app.use("/api", mailjetController);

app.listen(port, () => {
console.log(`Server is running on PORT ${port}`);
});
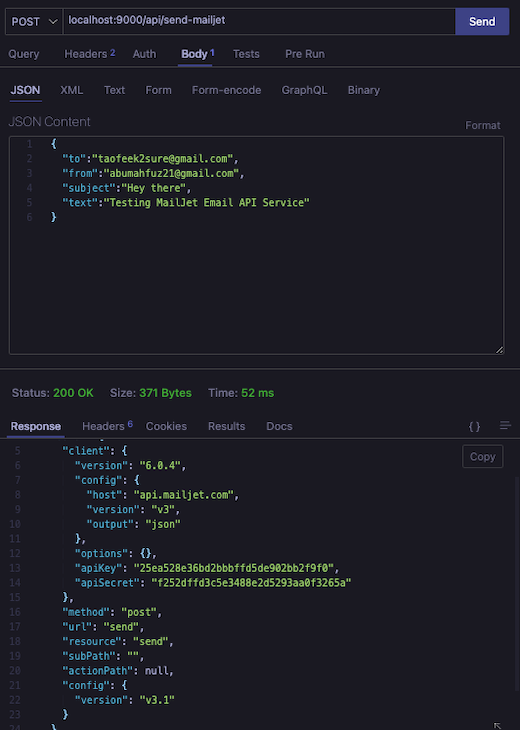
Let’s call the endpoint and see what we have:

As before, if everything works as expected, you should receive the test email at the email address you used.
In this tutorial, we learned about three different email API services you can use to send emails in Node.js.
The best way to send emails with Node.js depends on your preferences and specific project requirements. For example, if you have a small application and are sending a small number of emails, using an SMTP server might be a good option.
However, if you are sending a large number of emails to many users for marketing or other purposes, using an email API service might be a better option. This will give you access to advanced features and benefits such as analytics, template management, and scalability.
You can find this project’s source code in my GitHub repository. If you have any questions about what we discussed here, feel free to comment them below.
 Monitor failed and slow network requests in production
Deploying a Node-based web app or website is the easy part. Making sure your Node instance continues to serve resources to your app is where things get tougher. If you’re interested in ensuring requests to the backend or third-party services are successful, try LogRocket.

LogRocket lets you replay user sessions, eliminating guesswork around why bugs happen by showing exactly what users experienced. It captures console logs, errors, network requests, and pixel-perfect DOM recordings — compatible with all frameworks.
LogRocket's Galileo AI watches sessions for you, instantly identifying and explaining user struggles with automated monitoring of your entire product experience.
LogRocket instruments your app to record baseline performance timings such as page load time, time to first byte, slow network requests, and also logs Redux, NgRx, and Vuex actions/state. Start monitoring for free.

@container scroll-state: Replace JS scroll listeners nowCSS @container scroll-state lets you build sticky headers, snapping carousels, and scroll indicators without JavaScript. Here’s how to replace scroll listeners with clean, declarative state queries.

Explore 10 Web APIs that replace common JavaScript libraries and reduce npm dependencies, bundle size, and performance overhead.

Russ Miles, a software development expert and educator, joins the show to unpack why “developer productivity” platforms so often disappoint.

Discover what’s new in The Replay, LogRocket’s newsletter for dev and engineering leaders, in the February 18th issue.
Would you be interested in joining LogRocket's developer community?
Join LogRocket’s Content Advisory Board. You’ll help inform the type of content we create and get access to exclusive meetups, social accreditation, and swag.
Sign up now