Data has become a new commodity, and an expensive one. With people creating limitless content online, the amount of data has increased on different websites, and many startups are coming forward with ideas that require this data. Unfortunately, they can’t always produce it themselves because of time and money constraints
One popular solution to this problem is web crawling and scraping. With the increasing demand for data in machine learning applications, web crawling has become very popular. Web crawlers read the website’s source (using markup), which makes it easy to find patterns to extract.
However, crawlers are inefficient because they will scrape everything inside an HTML tag, and the developer then has to validate and clean the data. That’s where tools like Scrapy come in. Scrapy is a web scraper, not a crawler, and therefore more discerning about the types of data it will collect.
In the following sections, you will learn about Scrapy, Python’s most popular scraping framework and how to use it.
Scrapy is a fast, high-level web crawling framework written in Python. It is free and open source, and used for large scale web scraping.
Scrapy make use of spiders, which determine how a site (or group of sites) should be scraped for the information you want. Spiders are classes that define how you want to scrape the site, and how to extract the structured data from the set of pages.
Just like any other Python project, it is best to create a separate virtual environment so that the libraries don’t mess up the existing base environment. This article assumes that you have Python 3.3 or a higher version already installed.
This article will use the .venv name as a virtual environment. You are free to change it, however, make sure you use the same name throughout the project.
mkdir web-scraper
cd web-scraper
python3 -m venv .venv
For Windows, use the following:
.venv\Scripts\activate
For Linux and OSX:
source .venv/bin/activate
This command will enable the new virtual environment. It’s new and therefore contains nothing, so you will have to install all the required libraries.
Becase Scrapy is a framework, it will install other required libraries automatically:
pip install scrapy
To install Scrapy, follow the official documentation.
To understand any framework, the best approach is to learn by doing. Having said that, let’s scrape the LogRocket featured articles and their respective comments.
Let’s start by creating a blank project:
scrapy startproject logrocket
Next, create your first spider with the following:
cd logrocket
scrapy genspider feature_article blog.logrocket.com
Let’s see what the directory structure looks like:
web-scraper
├── .venv
└── logrocket
    ├── logrocket
    │   ├── __init__.py
    │   ├── items.py
    │   ├── middlewares.py
    │   ├── pipelines.py
    │   ├── settings.py
    │   └── spiders
    │       ├── __init__.py
    │       └── feature_article.py
    └── scrapy.cfg
Now that project is successfully set up, let’s create our first spider, which will scrape all the featured articles from the LogRocket Blog.
Open the spiders/feature_article.py file.
Let’s go step by step, first by fetching the featured articles from the blog page:
import scrapy

class FeatureArticleSpider(scrapy.Spider):
    name = 'feature_article'
    allowed_domains = ['blog.logrocket.com']
    start_urls = ['https://blog.logrocket.com']

    def parse(self, response):
        feature_articles = response.css("section.featured-posts div.card")
        for article in feature_articles:
            article_dict = {
                "heading": article.css("h2.card-title a::text").extract_first().strip(),
                "url": article.css("h2.card-title a::attr(href)").extract_first(),
                "author": article.css("span.author-meta span.post-name a::text").extract_first(),
                "published_on": article.css("span.author-meta span.post-date::text").extract_first(),
                "read_time": article.css("span.readingtime::text").extract_first(),
            }
            yield article_dict
As you can see in the above code, scrapy.Spider defines some attributes and methods. They are:
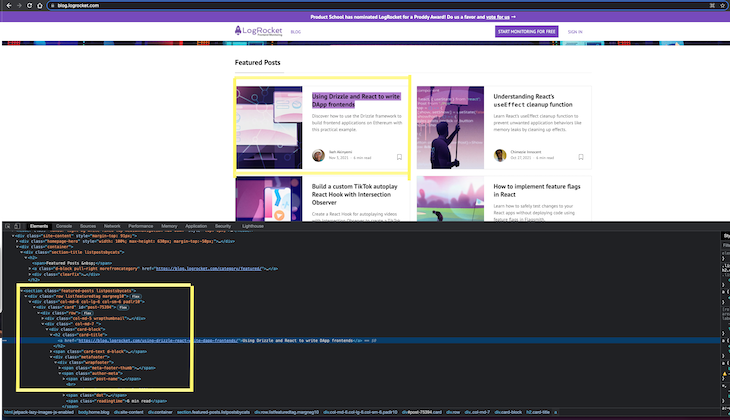
name, which defines the spider, and must be unique within the projectallowed_domains, a list of domains that we are allowed to crawlstart_urls, the list of urls where we begin the crawlparse(), which is called to handle the response of the request. It generally parses the response, extracts the data, and yields it in the form of dictIn the process of scraping, it is important to know the best way to uniquely identify the element you wish to scrape.
The best way is by inspecting the element in the browser. You can easily see the HTML structure in the developer tools menu.
Run the above spider with the following:
scrapy crawl feature_article
It should all the featured articles like so:
...
...
{'heading': 'Understanding React’s ', 'url': 'https://blog.logrocket.com/understanding-react-useeffect-cleanup-function/', 'author': 'Chimezie Innocent', 'published_on': 'Oct 27, 2021', 'read_time': '6 min read'}
2021-11-09 19:00:18 [scrapy.core.scraper] DEBUG: Scraped from <200 https://blog.logrocket.com/>
...
...
The main goal of scraping is to extract unstructured data and convert it to meaningful, structured data. Items provide a dict-like API with some great additional features. You can read more about items here.
Let’s create the first item for specifying the article by its properties. Here we are using dataclass to define it.
Edit items.py with the following:
from dataclasses import dataclass

@dataclass
class LogrocketArticleItem:
    _id: str
    heading: str
    url: str
    author: str
    published_on: str
    read_time: str
Then, update the spiders/feature_article.py file as demonstrated below:
import scrapy
from ..items import LogrocketArticleItem

class FeatureArticleSpider(scrapy.Spider):
    name = 'feature_article'
    allowed_domains = ['blog.logrocket.com']
    start_urls = ['https://blog.logrocket.com']

    def parse(self, response):
        feature_articles = response.css("section.featured-posts div.card")
        for article in feature_articles:
            article_obj = LogrocketArticleItem(
                _id = article.css("::attr('id')").extract_first(),
                heading = article.css("h2.card-title a::text").extract_first(),
                url = article.css("h2.card-title a::attr(href)").extract_first(),
                author = article.css("span.author-meta span.post-name a::text").extract_first(),
                published_on = article.css("span.author-meta span.post-date::text").extract_first(),
                read_time = article.css("span.readingtime::text").extract_first(),
            )
            yield article_obj
Let’s dive deeper into creating spiders. For getting the comments for each article, you need to request each article url, and then fetch the comments.
For that, let’s first create the item (item.py) for comments:
@dataclass
class LogrocketArticleCommentItem:
    _id: str
    author: str
    content: str
    published: str
Now that the comment item is ready, let’s edit spiders/feature_article.py as demonstrated below:
import scrapy
from ..items import (
    LogrocketArticleItem,
    LogrocketArticleCommentItem
)

class FeatureArticleSpider(scrapy.Spider):
    name = 'feature_article'
    allowed_domains = ['blog.logrocket.com']
    start_urls = ['https://blog.logrocket.com']

    def get_comments(self, response):
        """
        The callback method gets the response from each article url.
        It fetches the article comment obj, creates a list of comments, and returns dict with the list of comments and article id.
        """
        article_comments = response.css("ol.comment-list li")
        comments = list()
        for comment in article_comments:
            comment_obj = LogrocketArticleCommentItem(
                _id = comment.css("::attr('id')").extract_first(),
                # special case: author can be inside `a` or `b` tag, so using xpath
                author = comment.xpath("string(//div[@class='comment-author vcard']//b)").get(),
                # special case: there can be multiple p tags, so for fetching all p tag inside content, xpath is used.
                content = comment.xpath("string(//div[@class='comment-content']//p)").get(),
                published = comment.css("div.comment-metadata a time::text").extract_first(),
            )
            comments.append(comment_obj)

        yield {"comments": comments, "article_id": response.meta.get("article_id")}

    def get_article_obj(self, article):
        """
        Creates an ArticleItem by populating the item values.
        """
        article_obj = LogrocketArticleItem(
            _id = article.css("::attr('id')").extract_first(),
            heading = article.css("h2.card-title a::text").extract_first(),
            url = article.css("h2.card-title a::attr(href)").extract_first(),
            author = article.css("span.author-meta span.post-name a::text").extract_first(),
            published_on = article.css("span.author-meta span.post-date::text").extract_first(),
            read_time = article.css("span.readingtime::text").extract_first(),
        )
        return article_obj

    def parse(self, response):
        """
        Main Method: loop through each article and yield the article.
        Also raises a request with the article url and yields the same.
        """
        feature_articles = response.css("section.featured-posts div.card")
        for article in feature_articles:
            article_obj = self.get_article_obj(article)
            # yield the article object
            yield article_obj
            # yield the comments for the article
            yield scrapy.Request(
                url = article_obj.url,
                callback = self.get_comments,
                meta={
                    "article_id": article_obj._id,
                }
            )
Now, run the above spider with the same command:
scrapy crawl feature_article
Now that we have the correct data, let’s now persist the same data in a database. We will be using MongoDB for storing the scraped items.
After installing MongoDB into your system, install PyMongo using pip. PyMongo is a Python library that contains tools to interact with MongoDB.
pip3 install pymongo
Next, add new Mongo-related settings in settings.py. Also, create a database and collection in Mongo itself:
# MONGO DB SETTINGS
MONGO_HOST="localhost"
MONGO_PORT=27017
MONGO_DB_NAME="logrocket"
MONGO_COLLECTION_NAME="featured_articles"
Now that you have set up the spider to crawl and parse the HTML, and database settings are set.
Next, we have to connect the two through a pipeline in pipelines.py:
from itemadapter import ItemAdapter
import pymongo
from scrapy.utils.project import get_project_settings
from .items import (
    LogrocketArticleCommentItem,
    LogrocketArticleItem
)
from dataclasses import asdict

settings = get_project_settings()

class MongoDBPipeline:
    def __init__(self):
        conn = pymongo.MongoClient(
            settings.get('MONGO_HOST'),
            settings.get('MONGO_PORT')
        )
        db = conn[settings.get('MONGO_DB_NAME')]
        self.collection = db[settings['MONGO_COLLECTION_NAME']]

    def process_item(self, item, spider):
        if isinstance(item, LogrocketArticleItem): # article item
            self.collection.update({"_id": item._id}, asdict(item), upsert = True)
        else:
            comments = []
            for comment in item.get("comments"):
                comments.append(asdict(comment))
            self.collection.update({"_id": item.get("article_id")}, {"$set": {"comments": comments} }, upsert=True)

        return item
Add this pipeline in settings.py:
USER_AGENT='Mozilla/5.0 (Windows NT 10.0; Win64; x64) AppleWebKit/537.36 (KHTML, like Gecko) Chrome/61.0.3163.100 Safari/537.36'
ITEM_PIPELINES = {'logrocket.pipelines.MongoDBPipeline': 100}
Run the crawl command one more time, and check if the items are correctly pushed to the database:
scrapy crawl feature_article
In this guide, you have learned how to write basic spiders in Scrapy and persist the scraped data in a database(MongoDB). You have just scratched the surface of Scrapy’s potential as a web scraping tool, and there is much to learn a beyond what we have covered here.
I hope that from this article, you got the basics of Scrapy and are motivated to go deeper with this wonderful scraping tool.
Install LogRocket via npm or script tag. LogRocket.init() must be called client-side, not
server-side
$ npm i --save logrocket

// Code:

import LogRocket from 'logrocket';
LogRocket.init('app/id');
// Add to your HTML:

<script src="https://cdn.lr-ingest.com/LogRocket.min.js"></script>
<script>window.LogRocket && window.LogRocket.init('app/id');</script>
Hey there, want to help make our blog better?
Join LogRocket’s Content Advisory Board. You’ll help inform the type of content we create and get access to exclusive meetups, social accreditation, and swag.
Sign up now
Discover how to use Gemini CLI, Google’s new open-source AI agent that brings Gemini directly to your terminal.

This article explores several proven patterns for writing safer, cleaner, and more readable code in React and TypeScript.

A breakdown of the wrapper and container CSS classes, how they’re used in real-world code, and when it makes sense to use one over the other.

This guide walks you through creating a web UI for an AI agent that browses, clicks, and extracts info from websites powered by Stagehand and Gemini.


One Reply to "Scrape a website with Python, Scrapy, and MongoDB"
good job