Editor’s note: This article was updated in September 2021 to reflect new developments in Vue 3.

Vue 3 provides developers with an alternative and better way to build Vue applications. The introduction of the Composition API and composition functions in Vue 3 has made code organization and reusability a breeze.
In this tutorial, we will explore the new features in Vue 3. We will also use an open source Vue 2 application created by Brad Traversy as our example app for refactoring to Vue 3.
In the process, you will learn how to use the new Vue 3 features, including the Composition API and composition functions, and how to use the new Vuex 4 in a Vue 3 application.
We’ll cover the following sections:
refVue 3 rose out of the existing limitations of Vue 2 and aims to solve them. Some of the issues Vue 3 solves include:
With the Composition API, you can organize component code based on logical concerns, as opposed to component options. This was problematic in Vue 2 because pieces of code could get spread out across multiple component options, which made the code more difficult to maintain.
Let’s start with the Vue 2 sample project we mentioned earlier. The project is a to-do list application where you can perform the following actions:
To keep this project clean, we’ll focus only on adding, fetching, and filtering to-dos, but the end of this article will include some guidance on refactoring the rest of these functions if you’d like some practice.
Within the project, the to-dos are fetched from a Typicode API endpoint. All the actions performed on the data are happening on the backend.
This project will be helpful to expose how Vue 3 offers an alternative approach to building Vue applications.
First, you need to install the latest version of Vue CLI v4.5 with the command below:
yarn global add @vue/cli@next
#OR
npm install -g @vue/cli@next
Next, you need to clone the project repository to your local machine. Do this by opening up your terminal and typing in the following command:
git clone https://github.com/bradtraversy/vuex_todo_manager
>
Now, change your directory to the project folder with the following command:
cd vuex_todo_manager
Now you can open up the project in your code editor.
The Vue team has provided an easy guide to upgrading Vue 2 projects to Vue 3. All we need do is upgrade a bunch of dependencies and we are good to go.
We’ll start with upgrading the Vue CLI. To do this, go back to your terminal with the directory set at the root of our project folder and type in the following command:
vue upgrade

Once the command has run, the following prompt should appear with the list of Vue CLI dependencies that need upgrading. Press Enter to proceed.
Because ESLint was installed in our project, we’ll see another prompt to upgrade it to fit in with the new Vue version. Opt to upgrade it by pressing Enter.
Next, we need to upgrade some of the other dependencies manually such as vue, @vue/compat and replace vue-template-compiler (if present) with @vue/compiler-sfc.
We can do this by running the following commands in the terminal as such:
npm install vue@^3.1.0 @vue/compat@^3.1.0
npm install --save-dev @vue/compiler-sfc@^3.1.0
npm uninstall vue-template-compiler
The only dependency left to upgrade in the project is Vuex and we can do that easily with the following command:
npm install vuex@4
This upgrades the Vuex dependency to the latest version, v4, which is compatible with Vue 3.
Now, all the dependencies in the project have been upgraded and are ready to be used. We just need to enable them by activating compat mode via Vue compiler options.
To do this, create a vue.config.js file in the root of our project folder and paste in the following configuration code:
// vue.config.js
module.exports = {
  chainWebpack: config => {
    config.resolve.alias.set('vue', '@vue/compat')

    config.module
      .rule('vue')
      .use('vue-loader')
      .tap(options => {
        return {
          ...options,
          compilerOptions: {
            compatConfig: {
              MODE: 2
            }
          }
        }
      })
  }
}
Vue 2 uses the new Vue() method to bootstrap new Vue applications, while Vue 3 uses the createApp method. If you are wondering why this change is necessary, it’s because the old syntax made it possible for global configurations to permanently mutate global state, which can be problematic.
Next, we need to update our Vue instance declaration to better suit the new Vue 3 way of initializing Vue in our application. To do this, open up the main.js file in your code editor and then update it with the following code:
//main.js
//import Vue from 'vue';
import { createApp } from 'vue';
import App from './App.vue';
import store from './store';

//Vue.config.productionTip = false;

//new Vue({
//  store,
// render: h => h(App)
//}).$mount('#app');

createApp(App)
  .use(store)
  .mount("#app");
Vuex 4 now has a createStore object declaration that conforms with Vue 3 standards. With the new updates in Vuex 4, you can create a Vuex store in a few lines of code. Here’s the current implementation:
//store/index.js
import { createStore } from 'vuex';

export default createStore({
  state:{},
  mutations:{},
  actions:{},
  modules:{}
});
We’ll make a few changes to the structure of the project, which include deleting the store/modules folder and rewriting the content of the store/modules/todos.js file in the store/index.js file.
Based on the given implementation of the Vue 2 project we’re refactoring, an action is dispatched when the app loads that fetches to-dos from a Typicode endpoint. We’ll update the action in the Vuex store to handle that.
But before we do that, let’s create an action types file. In the root folder, create a src/constants/action-types.js file and update it like so:
// @/constants/action-types.js
export const ACTION_TYPES = {
  fetchTodos: "fetchTodos",
  addTodo: "addTodo",
  deleteTodo: "deleteTodo",
  updateTodo: "updateTodo",
};
The action types we specified in the file above will remain constant across the project and help us maintain naming consistency within the app.
Next, let’s update the Vuex action to handle the fetching of to-dos from the API endpoint:
// @/store/index.js
import { ACTION_TYPES } from "../constants/action-types";
import { createStore } from "vuex";
import Axios from "axios";
export default createStore({
  state: {
    todos: [],
  },
  mutations: {
    [ACTION_TYPES.fetchTodos]: (state, todos) => (state.todos = todos),
  },
  actions: {
    onFetchTodos: async ({ commit }) => {
      const response = await Axios.get(
        "https://jsonplaceholder.typicode.com/todos"
      );
      commit(ACTION_TYPES.fetchTodos, response.data);
    },
  },
});
Here, the onFetchTodos action fetches the list of to-dos from Typicode and commits the fetchTodos mutation. The mutation then updates the todos array in the state object.
Next, we’ll dispatch this action in the Todo.vue component that we’ll create shortly. Create the src/components/Todos.vue file that will dispatch the onFetchTodos action and display the returned todos:
// @/components/Todos.vue
<template>
  <div>
    <div class="todos">
      <div v-for="todo in todos" :key="todo.id" class="todo">
        <p>{{ todo.title }}</p>
      </div>
    </div>
  </div>
</template>
<script>
import { useStore } from "vuex";
import { computed, onMounted } from "vue";
export default {
  name: "Todos",
  setup() {
    const store = useStore();
    const todos = computed(() => store.state.todos);
    onMounted(() => {
      store.dispatch("onFetchTodos");
    });
    return {
      todos,
    };
  },
};
</script>
If this is your first encounter with Vue 3, this component will look unfamiliar. Let’s quickly go over some of the new Vue 3-specific things about this component.
setup() functionAs previously mentioned, Vue 3 uses the Composition API, which makes it possible to organize all our components’ logic inside a setup() function that returns the data required in the template.
This particular feature makes it possible to organize components by logical concerns because we can have lifecycle methods, computed properties, state data, and more, all within the setup() function.
onMounted() HookThe onMounted() Hook in Vue 3 is the equivalent of the mounted() component property in Vue 2. It takes in a callback function that executes when the Hook is called by the component:
onMounted(() => {
  store.dispatch("onFetchTodos");
});
computed() methodThe computed() method in Vue 3 is the equivalent of the computed component property in Vue 2. It takes in a getter function that performs a specific task and returns a reactive reference. The reference is an immutable object for the returned value from the getter:
const todos = computed(() => store.state.todos);
If you’re still uncertain about these changes, I recommend reading the Composition API docs on arguments before continuing with this tutorial.
Now that we’ve regrouped on the new components in Vue 3, let’s proceed with the tutorial.
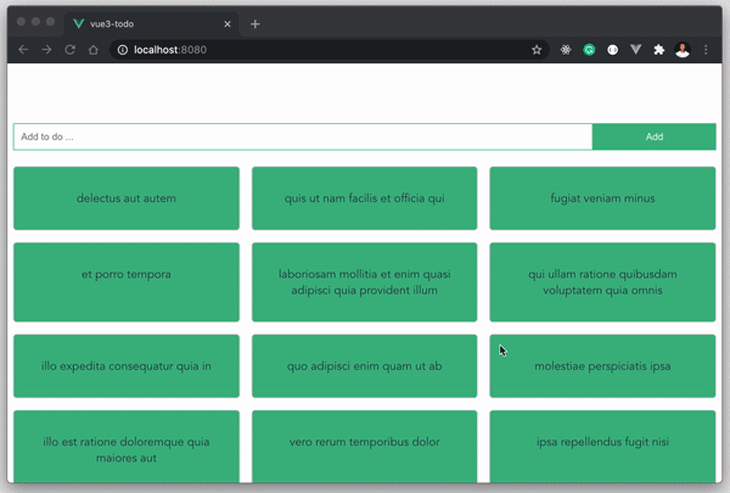
Notice that we returned todos in the setup() function. This is how we expose data in the function that we want to use in the template. At the moment, the app looks like this on the browser:
Since we are doing a refactor, it would’ve been best to capture Vue 2 component side by side. I tried it and it made the tutorial very large and inadvisably lengthy, so I will link the equivalent Vue 2 component instead so you can compare the changes on your own.
Since we are using Vuex, we will need both an action and a mutation that will update a to-do’s state. To implement that, update the store with the snippet below:
// @/store/index.js

import { ACTION_TYPES } from "../constants/action-types";
import { createStore } from "vuex";
export default createStore({
  state: {
    todos: [],
  },
  mutations: {
    // ...
    [ACTION_TYPES.addTodo]: (state, todo) => state.todos.unshift(todo),
  },
  actions: {
    // ...
    onAddTodo: async ({ commit }, title) => {
      const response = await Axios.post(
        "https://jsonplaceholder.typicode.com/todos",
        { title, completed: false }
      );
      commit(ACTION_TYPES.addTodo, response.data);
    }
  },
});
The onAddTodo action takes in the state and content of the new to-do that will be added to the existing to-dos and commits the addTodo mutation. The addTodo mutation updates the to-dos array with the new to-do passed in from the onAddTodo action.
Next, in the components folder, create a components/AddTodo.vue file. This component will render a form that will allow users to add a new to-do to the existing list:
// @/components/AddTodo.vue
<template>
  <div>
    <form>
      <input type="text" v-model="title" placeholder="Add to do ..." />
      <input v-on:click="addNewTodo" type="submit" value="Add" />
    </form>
    <br />
  </div>
</template>
<script>
import { ref } from "vue";
import { useStore } from "vuex";
export default {
  name: "AddTodo",
  setup() {
    const store = useStore();
    const title = ref("");
    const addNewTodo = (e) => {
      e.preventDefault();
      store.dispatch("onAddTodo", {
        title: title.value,
      });
      title.value = "";
    };
    return {
      title,
      addNewTodo,
    };
  },
};
</script>
This component is similar to the Todos component; the only new thing here is the ref function on line 17. Let’s discuss this in our next section.
refVue 2 had its shortcomings when it had to do with reactivity and Vue 3 comes with the advent of a new and improved reactive system. In Vue 3, we can add reactivity to variables anywhere in the component using the new ref and reactive methods.
Read more about reactivity in Vue 3 here
Consider this snippet:
// Declaration
const title = ref("");
The snippet above creates a reactive title variable with an initial value of " ", signifying an empty String. To read the value of the variable, you do title.value.
You can read more about Vue 3 ref functions in the official documentation.
Finally, we return the title variable and the addNewTodo in the setup() function to make it available for use in the template. If you check the app in your browser, you should be able to add to-dos:
Once again, if you appreciate comparing this component directly with the Vue 2 alternative, I encourage you to take a look at it and review the changes.
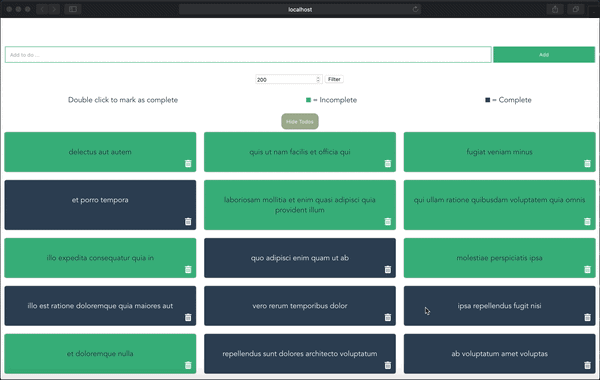
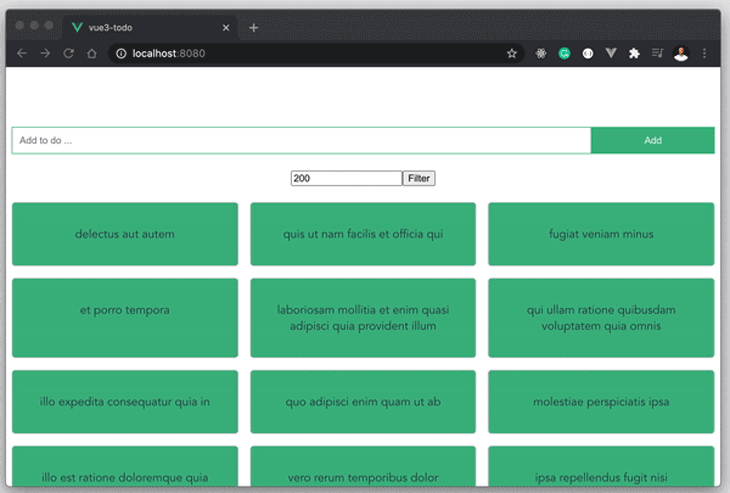
Typicode returns an array of 200 to-dos when you call the fetch to-dos endpoint. Consequently, they provide an endpoint to filter the number of to-dos you can fetch at a time. Let’s create a filter component that allows a user to filter the number of to-dos they want to fetch.
Create a src/components/FilterTodo.vue file in the root and update it with the snippet below:
// @/components/FilterTodo.vue
<template>
  <div>
    <form @submit="filterTodos">
      <input type="number" v-model="limit" placeholder="Add to do ..." />
      <input @click.prevent="filterTodos" type="submit" value="Filter" />
    </form>
    <br />
  </div>
</template>
<script>
import { ref } from "vue";
import { useStore } from "vuex";
export default {
  name: "FilterTodos",
  setup() {
    const limit = ref(200);
    const store = useStore();
    const filterTodos = () => {
      store.dispatch("onFilterTodos", limit.value);
    };
    return {
      limit,
      filterTodos,
    };
  },
};
</script>
This component presents an input form to collect the number of to-dos you want to filter for. When submitted, the onFilterTodos action is dispatched.
This action commits the fetchTodos mutation, which then updates the to-dos state. Let’s update the Vuex store with the onFilterTodos action, like so:
// @/store/index.js

import { ACTION_TYPES } from "../constants/action-types";
import { createStore } from "vuex";
export default createStore({
  state: {
    todos: [],
  },
  mutations: {
    // ...
    [ACTION_TYPES.fetchTodos]: (state, todos) => (state.todos = todos),
  },
  actions: {
    // ...
    onFilterTodos: async ({ commit }, limit) => {
      const response = await Axios.get(
        `https://jsonplaceholder.typicode.com/todos?_limit=${limit}`
      );
      commit(ACTION_TYPES.fetchTodos, response.data);
    },
  },
});
The onFilterTodos action makes an API call to the Typicode filter endpoint with the value passed in from the component. This value determines the number of to-dos we get back from Typicode. Then, we commit the fetchTodos mutation to update the to-dos state with the response data.
Let’s try this out on the browser:
Finally, for comparisons sake, this is the Vue 2 equivalence of these components that we just refactored to Vue 3. We used a form here to handle user input and to keep it simple.
This project is available on Github. While the complete project contains some features that we couldn’t cover in this tutorial, you can certainly try refactoring the other operations on your own. Some ideas include:
For the undone CRUD operations listed above, you can take the concepts we’ve learned in refactoring other operations and components and apply them to finishing up the rest of the operations. Doing this would get you acquainted with the Vue 3 syntax quickly. Remember: practice makes perfect!
In this project, we’ve rebuilt a standard Vue 2 application with Vuex into a brand new Vue 3 app that uses Vuex 4. In the process, we looked at some of Vue 3’s features like the new Composition API, composition functions, and Vuex 4.
Vue 3 is still changing, so I recommend that you keep yourself updated via the official Vue 3 documentation. If you want to practice what you’ve learned here today, you can find the code for the project at this GitHub repository.
Debugging Vue.js applications can be difficult, especially when users experience issues that are difficult to reproduce. If you’re interested in monitoring and tracking Vue mutations and actions for all of your users in production, try LogRocket.

LogRocket lets you replay user sessions, eliminating guesswork by showing exactly what users experienced. It captures console logs, errors, network requests, and pixel-perfect DOM recordings — compatible with all frameworks.
With Galileo AI, you can instantly identify and explain user struggles with automated monitoring of your entire product experience.
Modernize how you debug your Vue apps — start monitoring for free.

Learn how to protect full-stack projects from NPM supply chain attacks with a practical security checklist.

Explore 15 essential MCP servers for web developers to enhance AI workflows with tools, data, and automation.

Learn how contrast-color() automatically picks accessible text colors using native CSS, without JavaScript.

Learn how to build a harness-style AI workflow using Claude Code with specialized Dev, QE, and Ops subagents, gated handoffs, MCP telemetry, and LEARNING.md.
Would you be interested in joining LogRocket's developer community?
Join LogRocket’s Content Advisory Board. You’ll help inform the type of content we create and get access to exclusive meetups, social accreditation, and swag.
Sign up now

