AdonisJs is a Node.js framework built specifically for writing microservices. Like must backend frameworks, AdonisJs supports Redis, which helps to speed up request/response time in applications, making the process seamless and the app lightweight. Redis, which stands for Remote Directory Server, is an open-source, in-memory data structure store.
Redis is a disk-persistent key-value database with support for multiple data structures or data types, which means that while it supports mapped key-value-based strings to store and retrieve data (analogous to the data model supported in traditional kinds of databases), it also supports other complex data structures like lists, sets, etc.
As we proceed, we will look at the data structures supported by Redis. In simple terms, it caches your files so you don’t need to make a request every time to your database.
According to monthly DB-Engines rankings, Redis is often the most popular key-value database and also ranked amongst the top ten most popular databases in the tech world.
N.B., you need to have Redis installed on your local machine as it will not work with AdonisJs if it is not locally installed.
Instructions on how to install Redis on your development machine can be found here:
During the installation, your default port should be set to 6379. This is a dedicated port for Redis, though it also uses port 6380 if the other is in use.
In this tutorial, we will cover how to:
get and set methodsTo proceed with this tutorial, you should have basic knowledge of JavaScript, AdonisJs, and SQL databases since this tutorial will not be covering the fundamentals.
To begin, we need to install the Adonis CLI globally on our local machine so we can use the CLI commands to create and serve our application:
npm -g @adonisjs/cli
Next, we can create a new AdonisJs application and run it using the following code; this will create a new instance of AdonisJs. Then we step into the application folder and run the application:
adonis new adonis_redis

cd adonis_redis

adonis serve --dev
Now that we have our application up and running, we’ll install Redis:
npm install @adonisjs/redis
This will create a a new file called start/redis.js, which will contain our subscribe method. We’ll be addressing that later in the tutorial.
When the installation is complete, we can register our Redis provider inside the start/app.js file:
const providers = [
  '@adonisjs/redis/providers/RedisProvider'
]
Then, we add the below code in our server.js file to start Redis in the application. Without this addition, Redis will not run every time the application is running.
new Ignitor(require('@adonisjs/fold'))
  .preLoad('start/redis')
  .appRoot(__dirname)
Now we’ll add our REDIS_CONNECTION to the .env file, which will point to the local configuration in the config/redis.js file.
REDIS_CONNECTION=local
With that done, we will go ahead and create our controller, routes, and model to fetch data from our database and cache the data using Redis. Then we’ll fetch the data from Redis in Postman to see the difference in response time.
Having a database is fundamental to this tutorial, so let’s go ahead and set one up. To do that, we’ll install the @adonisjs/lucid package in our application using the code below. Lucid is a SQL ORM for Adonis that stores data in an active record pattern:
adonis install @adonisjs/lucid
When the installation is complete, we can then add a Lucid provider to our start/app.js file, which will add the Lucid package to a list of providers in the application:
const providers = [
  '@adonisjs/lucid/providers/LucidProvider'
]

const aceProviders = [
  '@adonisjs/lucid/providers/MigrationsProvider'
]
When that is done, we then install mysql into our application using the below code:
npm install mysql
Then we configure our .env file to connect to our database using the mysql configuration. This is essential because on default, AdonisJs uses SQLite for data storage.
DB_CONNECTION=mysql
DB_USER=root
DB_PASSWORD=
DB_DATABASE=adonis_redis
Now change the connection in config/database.js to the MySQL connection:
connection: Env.get('DB_CONNECTION', 'mysql'),
We will create a User controller that will fetch all users from our database. To do that, we generate a new controller using the below code:
adonis make:controller User --type http
We then import our database package in our UserController.js file to connect to and access the database:
// app/Controllers/UserController.js

const Database = use('Database')
Next, we add an async function that will call on the database and fetch all users and return it as JSON:
// app/Controllers/UserController.js

async index({ response }) {
  let users = await Database.table('users').select('*');
  return response.status(201).json({
      status: true,
      message: 'fetched all users',
      data: users
  });
}
users routeWith our controller set up, we can now configure our routes so we can make API calls to our application. Go to start/routes.js and add:
// start/routes.js

Route.get('users', 'UserController.index');
We created a users route that calls on our index function in the User controller. Now we can use our route in Postman to fetch all our users.
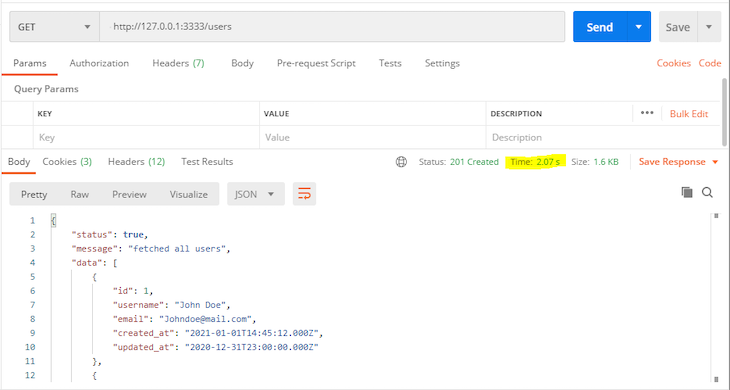
The response time here is 2.07s, which is OK for a low-traffic web application. But when you are running a high-traffic application with many requests happening at the same time , this makes the application really slow in load time.
Now that we have tested the application using Redis to cache data, let’s go ahead and make use of Redis to see the tremendous reduction in response time, which is key to making applications faster and more user-friendly.
get/set methodsThe get method gets the value of a key from Redis and returns a string. The set method holds a key with string values, which overwrites the key value if it already contained a string. We can use these methods in our app/Controllers/Http/UserController.js file to cache users from the database:
// app/controllers/Http/UserController.js

async index() {
  const cachedUsers = await Redis.get('users')
        if (cachedUsers) {
          return JSON.parse(cachedUsers)
        }

        const users = await Database.table('users').select('*');
        await Redis.set('users', JSON.stringify(users))
        return users
      }
}
Above, we are getting a value from the key users, and if it isn’t empty, we are return it as a JSON file. If it is empty, we are fetching from the database and then setting a new key with the data from the database.
Pub/sub implements the messaging system where the senders (called publishers in Redis) sends the messages, while the receivers (subscribers) receive them.
To set up our pub/sub, we will create a sub in start/redis.js. The sub will connect to the database directly and save the data in JSON every time a pub sequence is initiated.
To begin, import both the database and Redis in start/redis.js:
const Database = use('Database')
const Redis = use('Redis')
Then create a new subscribe method that fetches all users from the database. set creates a new key users that contains the values of all users in JSON format and stores it in Redis.
// start/redis.js

Redis.subscribe('users', async () => {
    let users = await Database.table('users').select('*');
    await Redis.set('users', JSON.stringify(users));
})
Now, in our User controller, we import Redis, check whether a users JSON file has been created, and return the file; otherwise, we go to our database, fetch all users, and publish the response.
// app/Controller/Http/UserController.js

const Database = use('Database')
const Redis = use('Redis')

async index({ response }) {
        let cachedUsers = await Redis.get('users');
        if(cachedUsers) {
            let users = JSON.parse(cachedUsers);
            return response.status(201).json({
                status: true,
                message: 'fetched all users',
                data: users
            });
        }else {
            let users = await Database.table('users').select('*');
            Redis.publish('users', '');
            return response.status(201).json({
                status: true,
                message: 'fetched all users',
                data: users
            });
        }
    }
Now run your http://127.0.0.1:3333/users on Postman. Note the difference in response time:
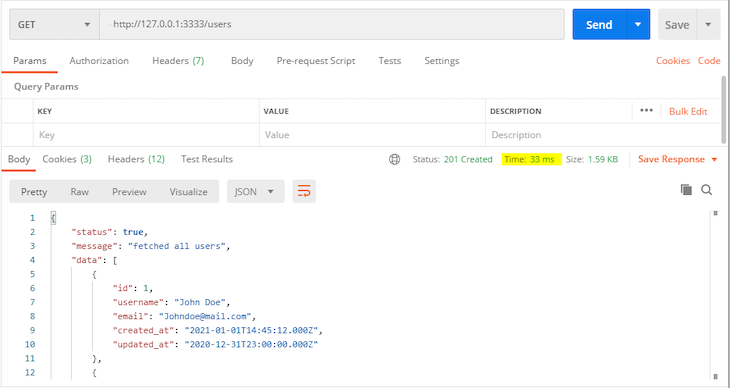
The request/response time was drastically reduced — from 2.07s without Redis to 33ms with Redis!
In this tutorial, we have been able to create a new AdonisJs application and install Redis in it. We then configured Redis to cache data, configured our database, used the Redis get, set, publish, and subscribe methods, and cut down the request/response time in our application.
You can go ahead and clone the repository into your system and adjust it however you’d like. You will have to copy the .env.example file and paste in .env, and then use adonis key:generate to create a new key. Hope this tutorial was helpful. ✌️
Install LogRocket via npm or script tag. LogRocket.init() must be called client-side, not
server-side
$ npm i --save logrocket

// Code:

import LogRocket from 'logrocket';
LogRocket.init('app/id');
// Add to your HTML:

<script src="https://cdn.lr-ingest.com/LogRocket.min.js"></script>
<script>window.LogRocket && window.LogRocket.init('app/id');</script>

A guide for using JWT authentication to prevent basic security issues while understanding the shortcomings of JWTs.

Discover how to build, render, and automate product demo videos with Remotion, replacing traditional screen recordings with reusable React code.

Chrome’s Modern Web Guidance embeds modern web platform skills into AI coding agents, helping them choose native HTML, CSS, and browser APIs over legacy patterns.

Learn how to use Fallow to analyze AI-generated code, detect dead code, duplicate logic, and complexity issues, and integrate automated code quality checks into your AI-assisted development workflow.
Would you be interested in joining LogRocket's developer community?
Join LogRocket’s Content Advisory Board. You’ll help inform the type of content we create and get access to exclusive meetups, social accreditation, and swag.
Sign up now

