
Editor’s Note: This article was updated on 4 December 2021.

The Replay is a weekly newsletter for dev and engineering leaders.
Delivered once a week, it's your curated guide to the most important conversations around frontend dev, emerging AI tools, and the state of modern software.
As per their official documentation page:
react-three-fiber is a React renderer for three.js on the web and react-native
So, what exactly is a renderer? Renderers manage how a React tree turns into the underlying platform calls. That means we can build 3D artifacts in the form of reusable React components (staying in the React paradigm), and react-three-fiber will do the job of converting those components to the corresponding three.js primitives.
Now that we know that react-three-fiber is an abstraction on top of three.js, let’s spend some time getting to know what three.js is and what it does on the browser side that makes it a go-to solution when it comes to client-side 3D rendering.
Three.js is a wrapper that sits on top of WebGL (Web Graphics Library) and obfuscates all the bulk of the code that would be quite difficult to write yourself from scratch. To quote directly from the three.js documentation:
WebGL is a very low-level system that only draws points, lines, and triangles. To do anything useful with WebGL generally requires quite a bit of code and that is where three.js comes in. It handles stuff like scenes, lights, shadows, materials, textures, 3D math, etc.
With that understanding in place, let’s now get into understanding the core concepts of react-three-fiber.
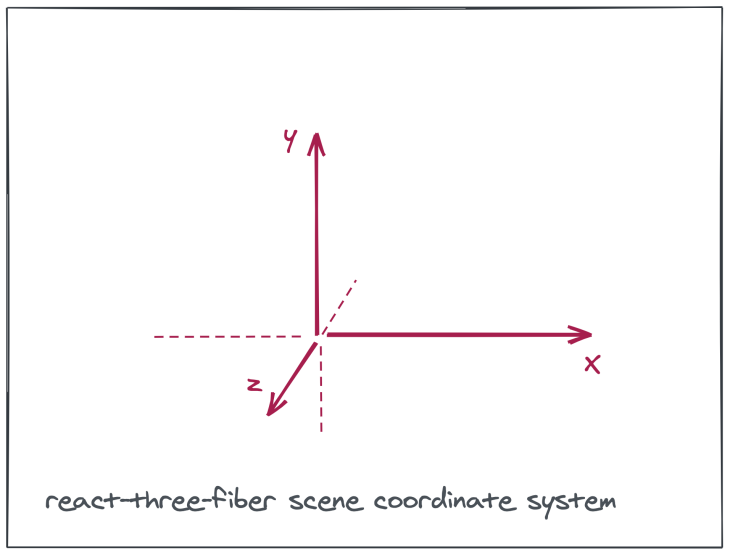
The scene is the environment that we are setting up with the help of different objects. It’s similar to the concept of a scene in a movie and it spans three dimensions as shown in the image below. It’s the place where all the action will take place.
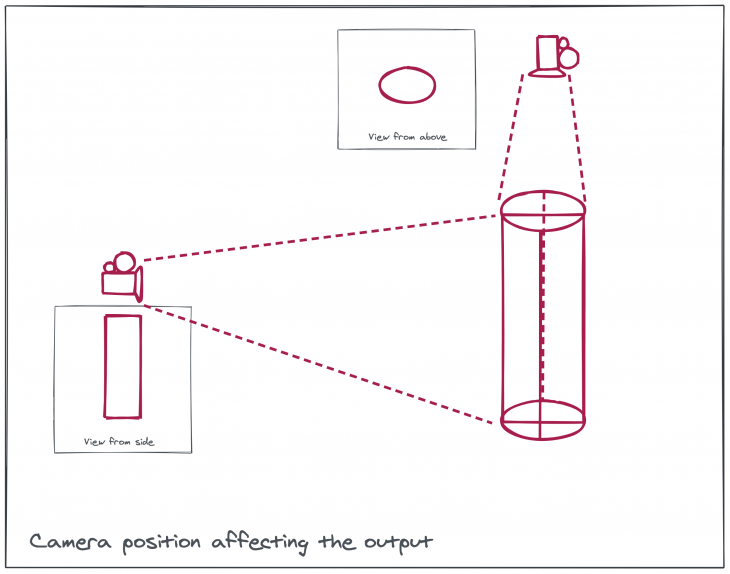
Now that we have a three-dimensional scene and we need to display it in a browser window that is two-dimensional, we need to decide which view of the scene will be displayed. This is where the camera comes into play. We can choose from different types of cameras, with varying lenses.
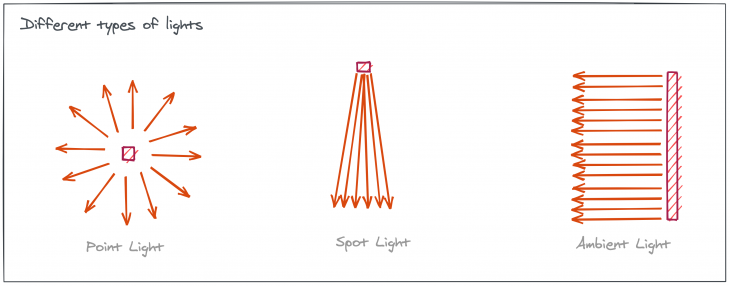
With a scene and a camera in place, we also need to manually place a light source as the scene does not light up by default. We can choose among different types of light sources like ambient (all directions) or point (coming from a particular direction), or spot (similar to a real-world spotlight).
Mesh is the object that we will be placing into our scene. It makes up the actors and things in our movie analogy. A mesh can be placed at a particular point in the coordinate system and accepts event handlers to be attached to it for interactivity. A mesh in itself is just a kind of a placeholder to which we add a geometry and a material so that it becomes visible and gains certain properties.
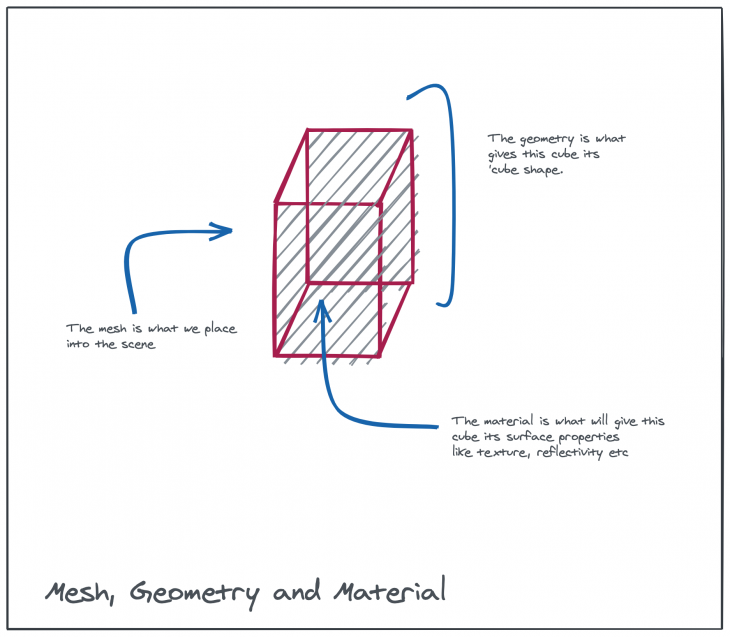
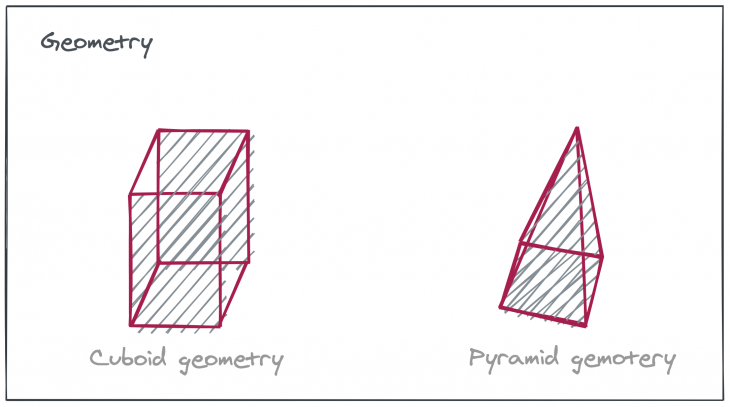
Geometry is how we assign different shapes to the mesh. Geometry enables us to create spheres, cubes, pyramids, etc.
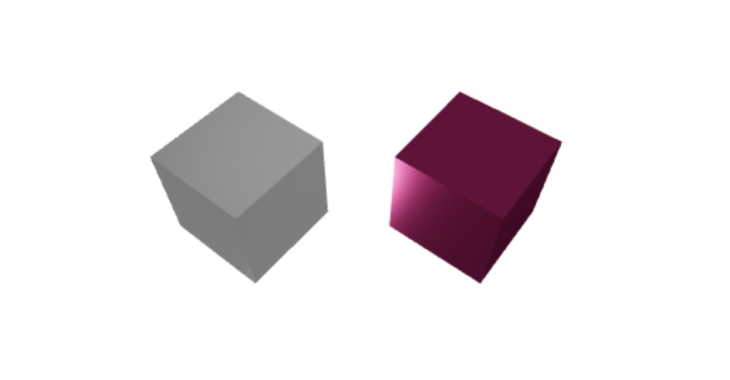
Material is the component that provides material properties to the mesh. Surface-level effects (like shine, luster, colors, etc.) are assigned via material. Below is an example showing a rough, cement-like structure versus a metallic one.
With that understanding in place, let us try to walk through a basic example on the react-three-fiber official GitHub page and try to understand the different components and their usage with respect to actual React code. Here is the link to the CodeSandbox if you would like to play around with it yourself.
Importing the bare minimum required to run React and react-three-fiber, we have:
import React, { useRef, useState } from 'react';
import { Canvas } from 'react-three-fiber';
We’ll be using the useRef and the useState Hooks. Also, the Canvas element that we have imported is the equivalent of the scene that we have come across in the last section.
Moving ahead, we create a functional component and return the scene i.e., the Canvas from it which will be attached to the DOM node that this React component is getting attached to:
export default function App() {
  return (
    <Canvas>
    </Canvas>
  )
}
The next task is to place the lights. We’ll place one ambient light that lights up the entire scene. We’ll also add a spotlight to get some shadow effects and a point light as a secondary light. The camera is not mentioned explicitly and so it remains at its default position. Also, all of the three.js artifacts are available as native HTML elements in react-three-fiber, so there is no need to import them separately:
export default function App() {
  return (
    <Canvas>
      <ambientLight intensity={0.5} />
      <spotLight position={[10, 10, 10]} angle={0.15} penumbra={1} />
      <pointLight position={[-10, -10, -10]} />
    </Canvas>
  )
}
Observe how the spotLight and pointLight take a position attribute that controls where the light will be placed. The three attributes being passed are the x, y, and z position coordinates respectively.
Next, let’s create our main object (a pink cube) and place it into the scene. A cube is a box shape so we will use the boxBufferGeometry. But first, we can create a reusable box component with the expected behavior:
function Box(props) {
  const mesh = useRef()
  const [state, setState] = useState({isHovered: false, isActive: false})

  return (
    <mesh
      {...props}
      ref={mesh}
      scale={state.isHovered ? [1.5, 1.5, 1.5] : [1, 1, 1]}
      onClick={(e) => setState({...state, isActive: !state.isActive, })}
      onPointerOver={(e) => setState({...state, isHovered: true})}
      onPointerOut={(e) => setState({...state, isHovered: false})}>
      <boxBufferGeometry args={[1, 1, 1]} />
      <meshStandardMaterial color={state.isActive ? '#820263' : '#D90368'} />
    </mesh>
  )
}
We’re making use of the useState Hook to keep a track of whether the Box is hovered/clicked. Also, we’re making it expand to 1.5 times its original size when hovered (using the scale attribute) and changing its color to purple when clicked using the color property on the mesh.
Now, we just place two instances of this box in our original scene:
export default function App() {
  return (
    <Canvas>
      <ambientLight intensity={0.5} />
      <spotLight position={[10, 10, 10]} angle={0.15} penumbra={1} />
      <pointLight position={[-10, -10, -10]} />
      <Box position={[-1, 0, 0]} />
      <Box position={[1, 0, 0]} />
    </Canvas>
  )
}
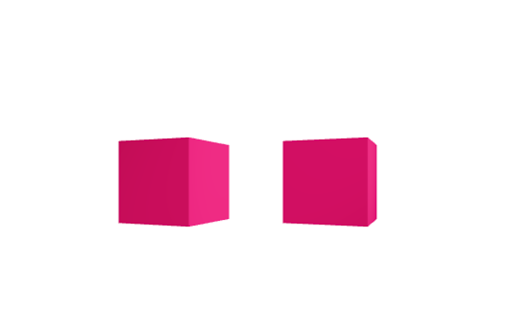
One of the boxes is placed at position 1 on the x-axis and another at position -1 on the negative x-axis. This is how they look:
It’s good, but we can make it a little more interesting by making the cubes rotate continuously and also, move up and down at a certain frequency. For that, we need to import useFrame from react-three-fiber. It’s an important Hook that lets us apply calculations that we want to take place on every frame computation, which is exactly what we want in this case. So we add these lines of code to the Box component that we created earlier:
useFrame(state => {
  const time = state.clock.getElapsedTime();
  mesh.current.position.y = mesh.current.position.y + Math.sin(time*2)/100;
  mesh.current.rotation.y = mesh.current.rotation.x += 0.01;
})
The Hook makes sure that whatever is being changed inside of it is continuously being updated at the frame rate (60 times per second). In this case, it is continuously updating the x-rotation and the y-rotation values, which provides this rotation with a changing direction effect. Also, the boxes are moving in a harmonic manner i.e., bouncing along the vertical axis. Much better!
That was a basic example to help us understand all the concepts necessary to grasp how react-three-fiber functions. Let us now get into something a little more complex and interesting.
With that preliminary knowledge of react-three-fiber components and their basic usage, we can now try to create a more advanced example. We will try to build a crude version of the UI for the popular android game stack. Here is a screenshot of the rendered UI.
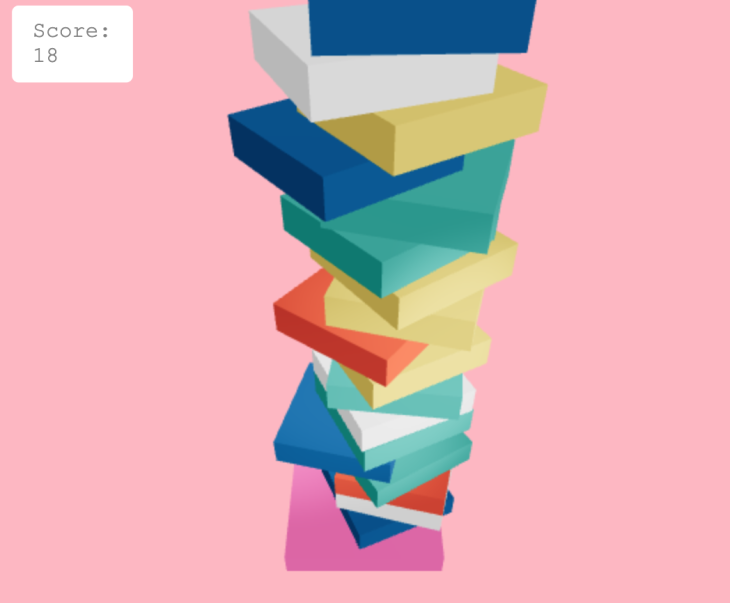
This is just a UI clone of the app. The score gets incremented as and when a tile gets added to the stack (there is no tile balance check). Let’s see how this is being achieved in code. Here is a link to the CodeSandbox.
This is the main JSX code in the App.js file:
<Canvas
  onClick={() => generateNewBlock()}
  camera={{ position: [0, 7, 7], near: 5, far: 15 }}
  onCreated={({ gl }) => gl.setClearColor('lightpink')}>
  <ambientLight intensity={0.5} />
  <pointLight position={[150, 150, 150]} intensity={0.55} />
  <spotLight position={[10, 10, 10]} angle={0.15} penumbra={1} />
  {boxes.map((props) => (
    <Box {...props} />
  ))}
  <Box position={[0, -3.5, 0]} scale={[3, 0.5, 3]} color="hotpink" />
  <Html scaleFactor={15} class="main">
    <div class="content">{`Score: ${boxes.length}`}</div>
  </Html>
</Canvas>
The only major difference from the previous example is that the boxes being rendered are now coming from a boxes array. As and when the canvas is being clicked, props corresponding to the box to be newly added are pushed into the boxes array. Also, we can see an HTML section inside the Canvas that is used to render the score.
The code logic to add the new block and stop all the previous blocks is contained in this function:
function generateNewBlock() {
  const total = boxes.length
  const color = colors[getRandomInt(6)]
  let newBoxes = boxes.map((props) => ({ ...props, move: false }))
  newBoxes.push({ position: [getRandomInt(3), total * 0.5 - 3, 0], color: color, move: true })
  setBoxes([...newBoxes])
}
There is also a change to the way in which useFrame is implemented so that the topmost block moves to and from:
let direction = 0.01
useFrame(() => {
  if (mesh.current.position.x > 1) {
    direction = -0.01
  } else if (mesh.current.position.x < -1) {
    direction = 0.01
  }
  if (props.move) {
    mesh.current.rotation.y = mesh.current.rotation.y += 0.01
    mesh.current.position.x = mesh.current.position.x + direction
  }
})
And that is all the code that is required to get this stacking on top kind of effect with these cuboid blocks, similar to the game.
In both of the examples that we just saw, we are simulating all the movements ourselves manually via the useFrame Hook. But, there are use cases, like in a game for instance, when we need certain attributes of the components to change with respect to time automatically (like accelerating downward under the force of gravity). This is where physics simulation comes into the picture.
By including physics in the canvas, we can enforce certain ground rules under which all the elements present inside the canvas will function. Here is a CodeSandbox illustrating physics with react-three-fiber. We’ll be using the use-cannon library in order to simulate physics inside the Canvas component. We import Physics, useSphere, and useBox from the library:
import { Physics, useSphere, useBox } from 'use-cannon'
In the current example, we are trying to simulate the falling of several balls onto the ground like so:
The ground seen in this example is an instance of boxBufferGeometry and the balls are instances of sphereBufferGeometry that we have already seen before. But, in order to enforce the rules of physics on these, we need to attach equivalent physics elements to these meshes. This is done via the useSphere and the useBox methods.
Here’s how:
function Ball(props) {
  const { args = [0.2, 32, 32], color } = props
  const [ref] = useSphere(() => ({ args: 0.2, mass: 1 }))

  return (
    <mesh ref={ref}>
      <sphereBufferGeometry args={args} />
      <meshStandardMaterial color={color} />
    </mesh>
  )
}
This code snippet is similar to what we did before, except for the one line:
const [ref] = useSphere(() => ({ args: 0.2, mass: 1 }))
This line is creating a sphere in the physics world with a size equivalent to 0.2 and a mass equal to 1. This API returns a ref that needs to be attached to the sphere mesh that we have. A ground is created in the same way:
function Ground(props) {
  const { args = [10, 0.8, 1] } = props
  const [ref, api] = useBox(() => ({ args }))

  useFrame(() => {
    api.position.set(0, -3.5, 0)
    api.rotation.set(0, 0, -0.08)
  })

  return (
    <mesh ref={ref}>
      <boxBufferGeometry args={args} />
      <meshStandardMaterial color={'green'} />
    </mesh>
  )
}
Notice that we are not assigning any mass to the ground so that gravity does not act. We’re also setting a fixed position and rotation (tilt). Once we have the ground and the balls, in order for the laws of physics to act on them, they need to be placed inside the physics provider:
<Physics
  gravity={[0, -26, 0]}
  defaultContactMaterial={{ restitution: 0.6 }}
>
  {balls.map((props) => (
    <Ball {...props} />
  ))}
  <Ground />
</Physics>
Notice how the Physics component takes two props that specify the gravity and restitution. Here:
gravity is a 3D array that determines the amount of acceleration in the x, y, and z-direction. Configured to be negative 26 here simulating a downward force in the y-directionrestitution is a coefficient that determines the amount of energy lost during each collision among objects in the physics worldIn addition to that, we create a generator function that creates a sphere in the canvas upon each click:
function onCanvasClicked(e) {
  let newBalls = [...balls]
  const color = colors[getRandomInt(6)]
  newBalls.push({ color: color })
  setBalls([...newBalls])
}
And that’s the entire setup that is required. With that in place, whenever a click is registered on the canvas, a new sphere is added to the physics world, which then proceeds towards the ground under the acceleration due to the configured gravity, collides with the ground/spheres, and then continues to move along the slope of the ground. That is an example of how real-world physics can be simulated in the browser using the capabilities of react-three-fiber.
The WebGL library has improved hugely as far as performance is concerned in the past few years. Three.js capitalizes on those gains and brings the same speed to its APIs. And react-three-fiber performance is bottlenecked by three.js and the GPU. It means that react-three-fiber by itself does not introduce any bottlenecks as far as the rendering is concerned.
Quoting from the official page:
Rendering performance is up to three.js and the GPU. Components participate in the render loop outside of React, without any additional overhead. React is otherwise very efficient in building and managing component-trees, it could potentially outperform manual/imperative apps at scale.
If you are already building simple web apps with React and are looking to go the 3D way, then react-three-fiber becomes a go-to solution.
The benefits include:
With those benefits in mind, react-three-fiber turns out to be a worthy candidate to at least give a try and explore when it comes to rendering three dimensions inside the two that are made available to us by the browser. If that does not convince you yet, check out more of these awesome examples on CodeSandbox. Cheers!
Install LogRocket via npm or script tag. LogRocket.init() must be called client-side, not
server-side
$ npm i --save logrocket

// Code:

import LogRocket from 'logrocket';
LogRocket.init('app/id');
// Add to your HTML:

<script src="https://cdn.lr-ingest.com/LogRocket.min.js"></script>
<script>window.LogRocket && window.LogRocket.init('app/id');</script>

Russ Miles, a software development expert and educator, joins the show to unpack why “developer productivity” platforms so often disappoint.

Discover what’s new in The Replay, LogRocket’s newsletter for dev and engineering leaders, in the February 18th issue.

Learn how to recreate Claude Skills–style workflows in GitHub Copilot using custom instruction files and smarter context management.

Claude Code is deceptively capable. Point it at a codebase, describe what you need, and it’ll autonomously navigate files, write […]
Hey there, want to help make our blog better?
Join LogRocket’s Content Advisory Board. You’ll help inform the type of content we create and get access to exclusive meetups, social accreditation, and swag.
Sign up now
One Reply to "react-three-fiber: 3D rendering in the browser"
Is there a way to load a PLY in react-three-fiber?