Editor’s note: This article was last updated by Popoola Temitope on 18 September 2024 to discuss techniques for implementing background geolocation in React Native, as well as information about geolocation features such as geofencing.

Geolocation is the ability to detect the geographic position of a device that is connected to the internet. One simple example of geolocation is using a device’s IP address to determine the country, city, or postal code in which it is located. Most of the time, the user must grant permission for an app to access their location data.
You’ve probably wondered how food delivery and ride-sharing apps know where you are at a given point in time. The answer is geolocation!
In this tutorial, we’ll learn how to implement geolocation in React Native. We’ll build an example app that displays the user’s location on a map with longitude and latitude coordinates and enables the user to send their location to another source, like Twitter.
You can access the full source code for this project on GitHub. Let’s get started!
React Native provides the @react-native-community/geolocation API for geolocation. However, Google does not recommend using the React Native API for geolocation because it is less accurate and slower than the recommended Geolocation API.
Thankfully, the React Native community has developed several excellent libraries for implementing geolocation in React Native, including react-native-location and react-native-geolocation-service.
In this React Native geolocation tutorial, we’ll use the react-native-geolocation-service library, which is available as a Node package on npm.
We’ll build an app that:
To get started, run the following command in your terminal:
npx @react-native-community/cli@latest init ReactNativeGeolocation
npx is a Node-based command that you can use to run Node-based dependencies in your terminal without having to install them on your machine.
The init part of the command is the instruction to initialize a new React Native project with ReactNativeLocation as the directory where the project files will be installed.
The npx react-native command works without having to install React Native on your machine. Alternatively, you can install React Native globally on your machine to run React Native commands without using npx.
To install React Native globally, run the following command:
npm install -g react-native-cli
You can then check that React Native is installed using the following command:
react-native -v
This command prints the React Native version installed on your machine to the console. Open up your favorite IDE and go to the ReactNativeGeolocation directory. The command we ran to initialize the project has set up the React Native app for us.
We’ll write all of our code in the App.js file. Make sure you’re in the root directory of your app to run the commands.
The first step is to start Metro, a JavaScript bundler that ships with React Native. Metro takes in an entry file and various options, then returns a single JavaScript file that includes all your code and its dependencies:
npx react-native start
With Metro running in your terminal, open another terminal and run the following command:
npx react-native run-android
To run the app, you’ll need either an Android emulator or a mobile device connected to your PC in debug mode. However, if you’re using Android Studio’s emulator, you may run into an error for the following reasons:
ANDROID_HOME env variable that points to the SDK directoryYou should then see the following screen:
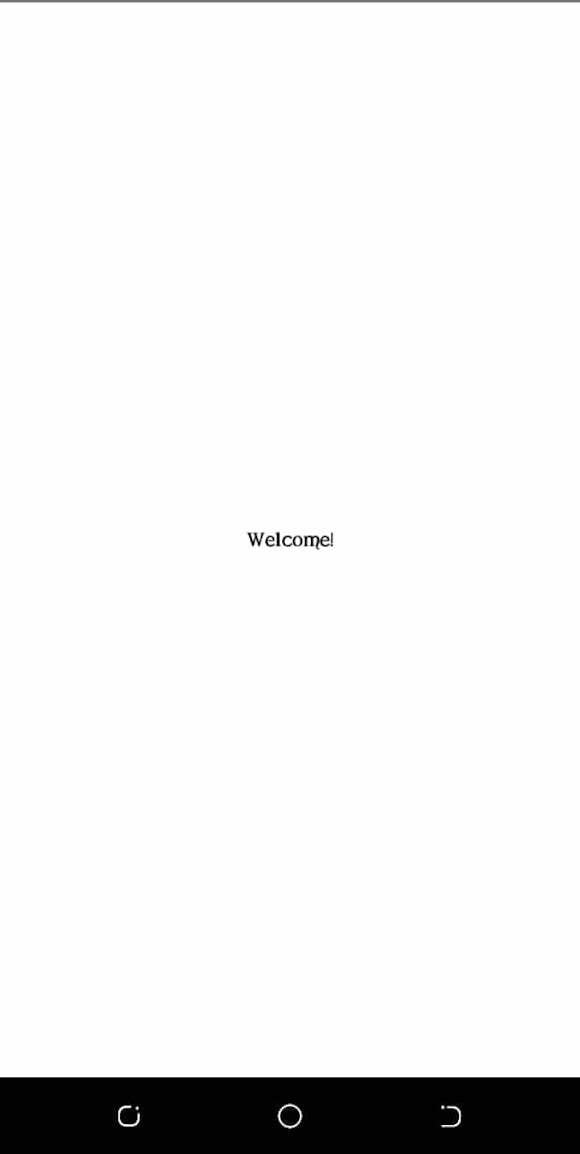
We can start making changes to the app in our App.js folder. Remove all the old code in App.js and replace it with the following:
/**
* Sample React Native App
* https://github.com/facebook/react-native
*
* @format
* @flow strict-local
*/

import React from 'react';
import {StyleSheet, View, Text} from 'react-native';

const App = () => {
 return (
   <View style={styles.container}>
     <Text>Welcome!</Text>
   </View>
 );
};

const styles = StyleSheet.create({
 container: {
   flex: 1,
   backgroundColor: '#fff',
   alignItems: 'center',
   justifyContent: 'center',
 },
});

export default App;
The code above gives us a new screen where we can continue writing our program:
Install the react-native-geolocation-service library using either Yarn or npm with the respective codes below:
yarn add react-native-geolocation-service
npm install react-native-geolocation-service --save
In the past, you’d have to link the library, but in more recent versions of React Native, this is done automatically when running a build with npx react-native run-android or the iOS equivalent.
Previously, you’d use an npx react-native link command, which is no longer part of the React Native CLI. If you are using React Native ≤v0.60, then these linking directions should help you get set up.
We also want to make sure that we enable permissions in the app by adding the following code to android/src/main/AndroidManifest.xml:
    <uses-permission android:name="android.permission.INTERNET" />
    <uses-permission android:name="android.permission.ACCESS_FINE_LOCATION" />
Then, run npx react-native run-android again.
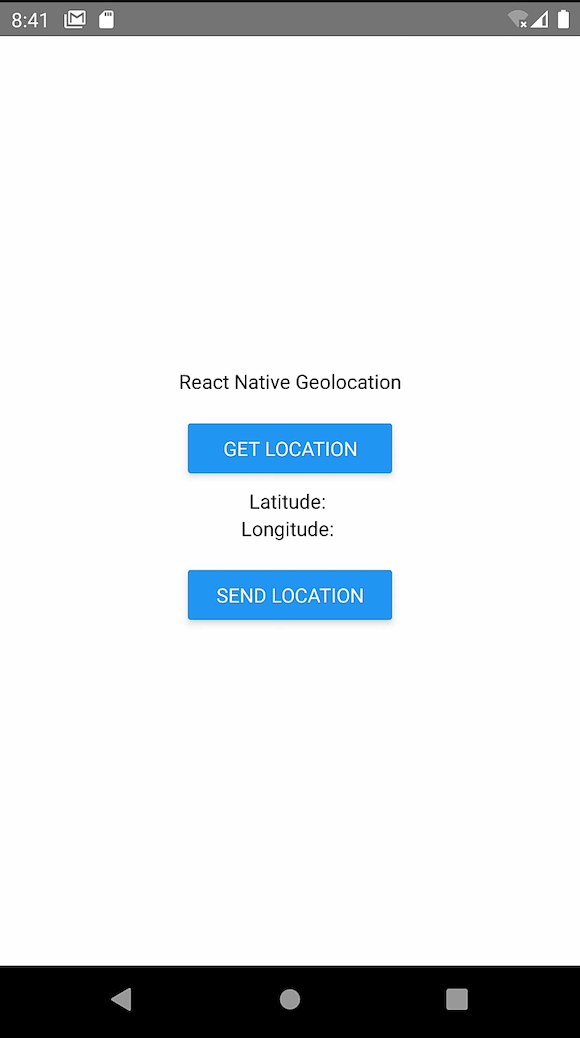
Let’s add two separate buttons to our React Native app, one to get the user’s location, which we’ll store in the app state, and another to send the user’s location to Twitter.
We’ll add two buttons to App.js under the welcome text. Make sure to update the imports from React Native to include Button as import {StyleSheet, View, Text, Button} from 'react-native';:
  return (
    <View style={styles.container}>
      <Text>Welcome!</Text>
      <View
        style={{marginTop: 10, padding: 10, borderRadius: 10, width: '40%'}}>
        <Button title="Get Location" />
      </View>
      <Text>Latitude: </Text>
      <Text>Longitude: </Text>
      <View
        style={{marginTop: 10, padding: 10, borderRadius: 10, width: '40%'}}>
        <Button title="Send Location" />
      </View>
    </View>
  );
};
Now, our app looks like the image below:
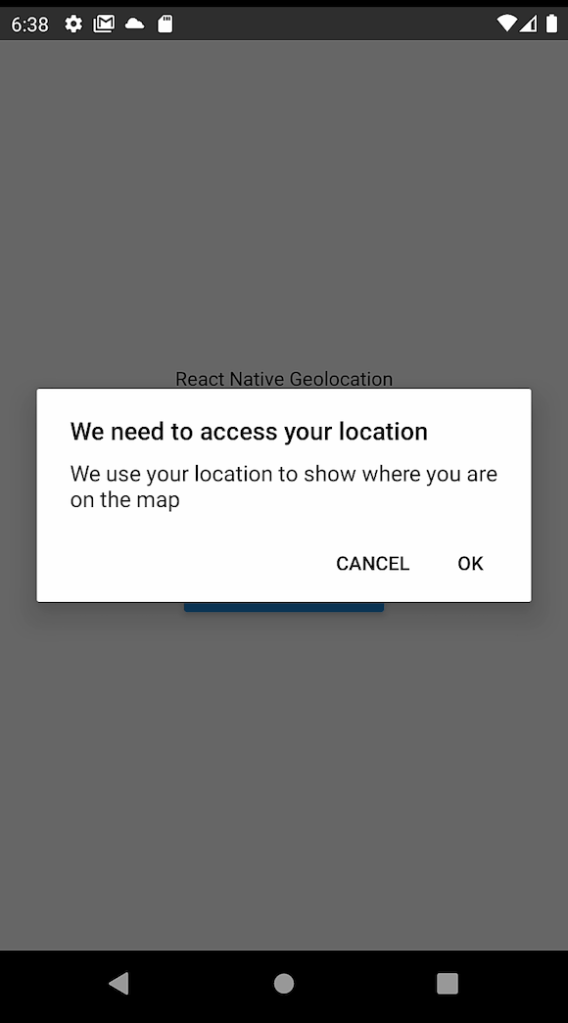
Once we have the react-native-geolocation-service library installed, we can implement the logic to get the latitude and longitude coordinates. Using ES6, we’ll write an async request that the onPress button event will handle, which is triggered by the GET LOCATION button.
Once this event handler is triggered, the user is asked for permission to access their location. Upon granting the request, the location will be returned to the user.
First, we need to import react-native-geolocation-service as follows:
import Geolocation from 'react-native-geolocation-service';
To use the phone’s geolocation feature, we’ll have to ask the user for the proper permissions. In the code below, we have a function to request permission on an Android device.
Make sure to import PermissionsAndroid and add the following code to request permission:
import {StyleSheet, View, Text, Button, PermissionsAndroid} from 'react-native';
// Function to get permission for location
const requestLocationPermission = async () => {
  try {
    const granted = await PermissionsAndroid.request(
      PermissionsAndroid.PERMISSIONS.ACCESS_FINE_LOCATION,
      {
        title: 'Geolocation Permission',
        message: 'Can we access your location?',
        buttonNeutral: 'Ask Me Later',
        buttonNegative: 'Cancel',
        buttonPositive: 'OK',
      },
    );
    console.log('granted', granted);
    if (granted === 'granted') {
      console.log('You can use Geolocation');
      return true;
    } else {
      console.log('You cannot use Geolocation');
      return false;
    }
  } catch (err) {
    return false;
  }
};
For iOS app permissions, you can read this article on iOS permission flow or try this unified iOS/Android permissions library.
In the function above, we make a call to the request function to request permission from the issuer. We specify that we are requesting the ACCESS_FINE_LOCATION permission, which must’ve been added to the Android Manifest earlier and rebuilt.
Then, we pass an object with the details of the prompt. The result of the request is stored in the variable granted, which will store the string granted if successful. If the request was successful, we return true, otherwise, we return false.
Now, from inside our component, we’ll create state to track our users’ location. First, be sure that you imported useState from React:
// state to hold location
const [location, setLocation] = useState(false);
We’ll then write a function so that when the GET LOCATION button is pressed, it’ll request permission. If permission is granted, it will get the user’s current location:
  // function to check permissions and get Location
  const getLocation = () => {
    const result = requestLocationPermission();
    result.then(res => {
      console.log('res is:', res);
      if (res) {
        Geolocation.getCurrentPosition(
          position => {
            console.log(position);
            setLocation(position);
          },
          error => {
            // See error code charts below.
            console.log(error.code, error.message);
            setLocation(false);
          },
          {enableHighAccuracy: true, timeout: 15000, maximumAge: 10000},
        );
      }
    });
    console.log(location);
  };
We see ourselves calling the requestLocationPermission function that we wrote earlier, which will return a promise that will resolve to either true or false. If the promise resolves to true, we use the react-native-geolocation-service library to get the correct position and set the location state to the result. If the promise is false, meaning permission wasn’t given, or if it fails to get the location, it will set the location state to false.
We then add the getLocation function as an onPress event on the GET LOCATION button:
<Button title="Get Location" onPress={getLocation} />
So far, your App.js should look like the code below:
/**
 * Sample React Native App
 * https://github.com/facebook/react-native
 *
 * @format
 * @flow strict-local
 */
import React, {useState, useEffect} from 'react';
import {StyleSheet, View, Text, Button, PermissionsAndroid} from 'react-native';
import Geolocation from 'react-native-geolocation-service';
// Function to get permission for location
const requestLocationPermission = async () => {
  try {
    const granted = await PermissionsAndroid.request(
      PermissionsAndroid.PERMISSIONS.ACCESS_FINE_LOCATION,
      {
        title: 'Geolocation Permission',
        message: 'Can we access your location?',
        buttonNeutral: 'Ask Me Later',
        buttonNegative: 'Cancel',
        buttonPositive: 'OK',
      },
    );
    console.log('granted', granted);
    if (granted === 'granted') {
      console.log('You can use Geolocation');
      return true;
    } else {
      console.log('You cannot use Geolocation');
      return false;
    }
  } catch (err) {
    return false;
  }
};
const App = () => {
  // state to hold location
  const [location, setLocation] = useState(false);
  // function to check permissions and get Location
  const getLocation = () => {
    const result = requestLocationPermission();
    result.then(res => {
      console.log('res is:', res);
      if (res) {
        Geolocation.getCurrentPosition(
          position => {
            console.log(position);
            setLocation(position);
          },
          error => {
            // See error code charts below.
            console.log(error.code, error.message);
            setLocation(false);
          },
          {enableHighAccuracy: true, timeout: 15000, maximumAge: 10000},
        );
      }
    });
    console.log(location);
  };
  return (
    <View style={styles.container}>
      <Text>Welcome!</Text>
      <View
        style={{marginTop: 10, padding: 10, borderRadius: 10, width: '40%'}}>
        <Button title="Get Location" onPress={getLocation} />
      </View>
      <Text>Latitude: {location ? location.coords.latitude : null}</Text>
      <Text>Longitude: {location ? location.coords.longitude : null}</Text>
      <View
        style={{marginTop: 10, padding: 10, borderRadius: 10, width: '40%'}}>
        <Button title="Send Location" />
      </View>
    </View>
  );
};
const styles = StyleSheet.create({
  container: {
    flex: 1,
    backgroundColor: '#fff',
    alignItems: 'center',
    justifyContent: 'center',
  },
});
export default App;
When it runs, and you click the GET LOCATION button, you’ll see a pop-up like the following:

Then, your location should show up on the screen as shown below:
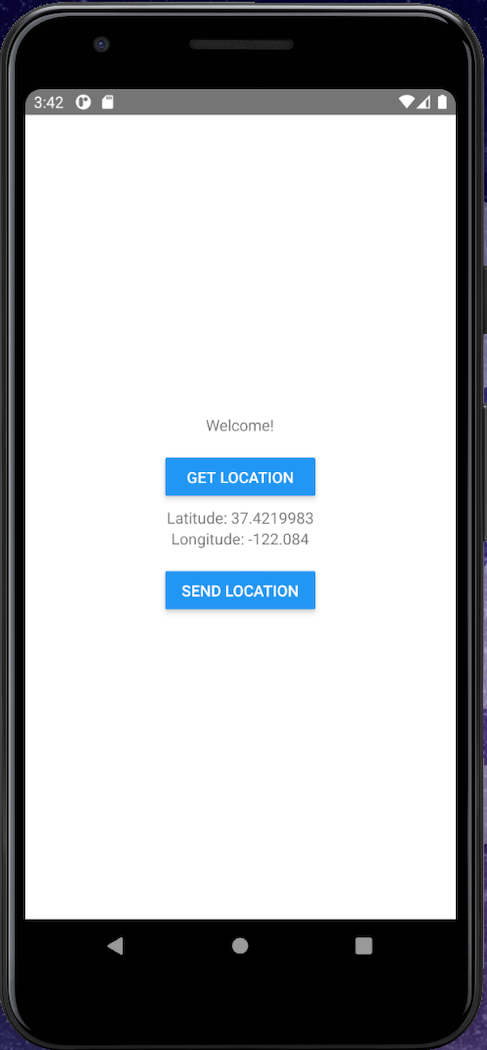
Location objectThe location object you’ll get back from react-native-geolocation-service will look something like the code below:
{
  "coords": {
    "accuracy": 5,
    "altitude": 5,
    "altitudeAccuracy": 0.5,
    "heading": 0,
    "latitude": 37.4219983,
    "longitude": -122.084,
    "speed": 0
  },
  "mocked": false,
  "provider": "fused",
  "timestamp": 1662837540458
}
To send the user’s geolocation data to Twitter, we simply need to turn the SEND LOCATION button into a Tweet button.
Before we send the location to the user, we’ll display the data returned in the example. To do so, we add the useState Hook from React to our app as follows:
import React, { useState } from 'react';
Then, we define a state inside our App function:
[viewLocation, isViewLocation] = useState([])
We update the if statement to call the isViewLocation method and update the viewLocation array with the Location information object returned:
isViewLocation(location)
To view the information returned, update the Location and Longitude text tags:
<Text>Latitude: {viewLocation.latitude} </Text>
<Text>Longitude: {viewLocation.longitude} </Text>
viewLocation.latitude returns the latitude in the object response called by the method isViewLocation. The same goes for the longitude.
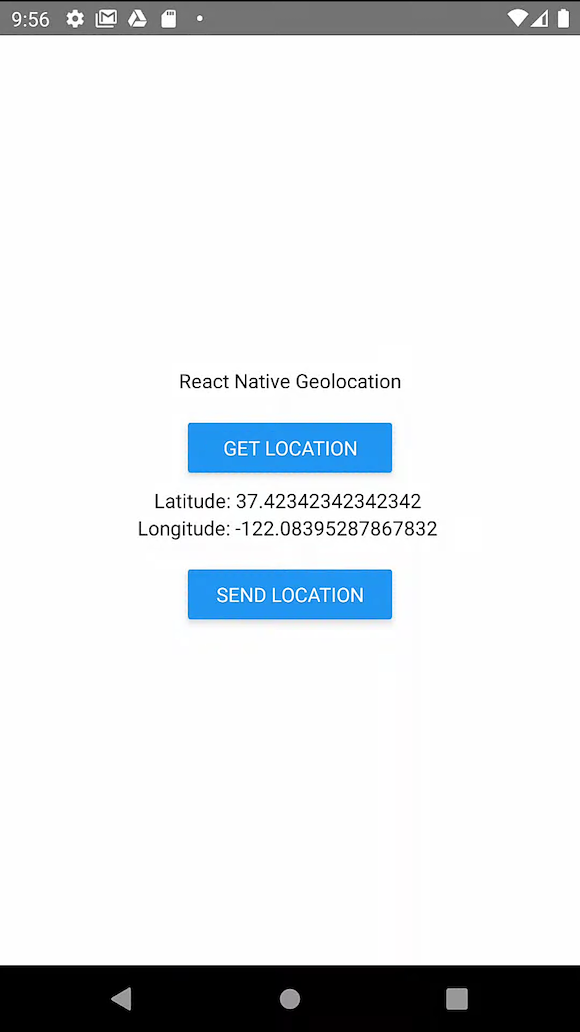
At this point, we can update the button to send the user’s location to Twitter. The image below shows a view of our final example app:
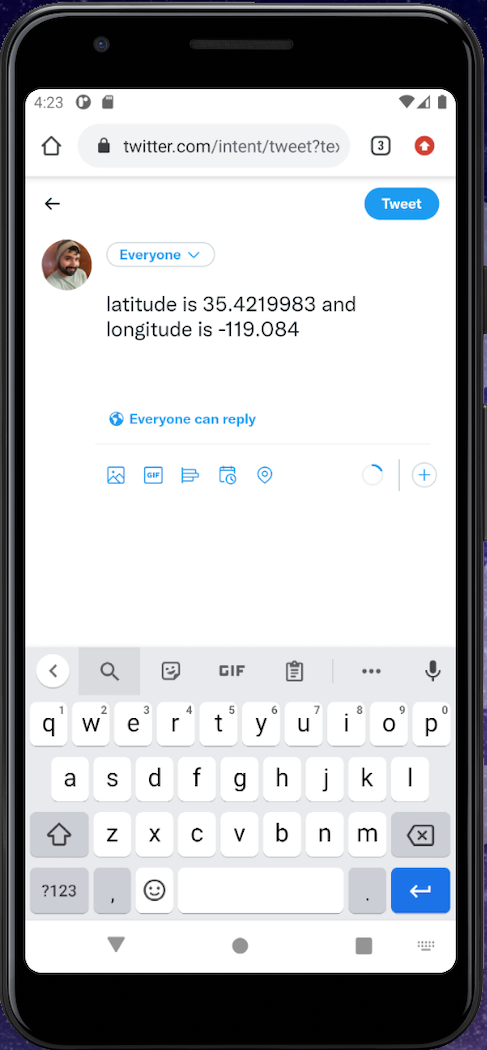
Next, we’ll set up the SEND LOCATION button to add the user’s location to a new Tweet:
  // Function to Send Location to twitter
  const sendLocation = () => {
    try {
      if (location) {
        const tweet = `latitude is ${location.coords.latitude} and longitude is ${location.coords.longitude}`;
        const url = `https://twitter.com/intent/tweet?text=${tweet}`;
        Linking.openURL(url);
      }
    } catch (error) {
      console.log(error);
    }
  };
The function above:
falseLinking object to open the URL. Make sure to import Linking from React NativeNow, when you click on the SEND LOCATION button, you should end up with a browser window that looks like the following image:
The final App.js file should look like the following code:
/**
 * Sample React Native App
 * https://github.com/facebook/react-native
 *
 * @format
 * @flow strict-local
 */
import React, {useState, useEffect} from 'react';
import {
  StyleSheet,
  View,
  Text,
  Button,
  PermissionsAndroid,
  Linking,
} from 'react-native';
import Geolocation from 'react-native-geolocation-service';
// Function to get permission for location
const requestLocationPermission = async () => {
  try {
    const granted = await PermissionsAndroid.request(
      PermissionsAndroid.PERMISSIONS.ACCESS_FINE_LOCATION,
      {
        title: 'Geolocation Permission',
        message: 'Can we access your location?',
        buttonNeutral: 'Ask Me Later',
        buttonNegative: 'Cancel',
        buttonPositive: 'OK',
      },
    );
    console.log('granted', granted);
    if (granted === 'granted') {
      console.log('You can use Geolocation');
      return true;
    } else {
      console.log('You cannot use Geolocation');
      return false;
    }
  } catch (err) {
    return false;
  }
};
const App = () => {
  // state to hold location
  const [location, setLocation] = useState(false);
  // function to check permissions and get Location
  const getLocation = () => {
    const result = requestLocationPermission();
    result.then(res => {
      console.log('res is:', res);
      if (res) {
        Geolocation.getCurrentPosition(
          position => {
            console.log(position);
            setLocation(position);
          },
          error => {
            // See error code charts below.
            console.log(error.code, error.message);
            setLocation(false);
          },
          {enableHighAccuracy: true, timeout: 15000, maximumAge: 10000},
        );
      }
    });
    console.log(location);
  };
  // Function to Send Location to twitter
  const sendLocation = () => {
    try {
      if (location) {
        const tweet = `latitude is ${location.coords.latitude} and longitude is ${location.coords.longitude}`;
        const url = `https://twitter.com/intent/tweet?text=${tweet}`;
        Linking.openURL(url);
      }
    } catch (error) {
      console.log(error);
    }
  };
  return (
    <View style={styles.container}>
      <Text>Welcome!</Text>
      <View
        style={{marginTop: 10, padding: 10, borderRadius: 10, width: '40%'}}>
        <Button title="Get Location" onPress={getLocation} />
      </View>
      <Text>Latitude: {location ? location.coords.latitude : null}</Text>
      <Text>Longitude: {location ? location.coords.longitude : null}</Text>
      <View
        style={{marginTop: 10, padding: 10, borderRadius: 10, width: '40%'}}>
        <Button title="Send Location" onPress={sendLocation} />
      </View>
    </View>
  );
};
const styles = StyleSheet.create({
  container: {
    flex: 1,
    backgroundColor: '#fff',
    alignItems: 'center',
    justifyContent: 'center',
  },
});
export default App;
Implementing geolocation functionalities means enabling dynamic interactions based on a user’s location and providing opportunities for personalized experiences. In the following sections, we’ll explore key functionalities like geofencing and background geolocation, which are essential for creating location-aware apps.
Geofencing allows developers to define virtual boundaries in geographic areas. This geolocation feature is useful for building applications that detect when a user enters a specific area or displays a list of active users within that area.
When a user’s device crosses into or out of the geofenced area, a callback function is triggered, allowing the app to perform actions such as sending notifications or updating user status.
Background geolocation enables an application to track a user’s location even when the app is not actively in use. Expo Location is a library that allows React Native developers to access a device’s location, and it enables background geolocation.
Run the command below to install Expo Location in your application:
npx expo install expo-location
Expo Location uses Expo TaskManager to update the user’s location while the application is not actively in use. Run the command below to install Expo TaskManager:
npx expo install expo-task-manager
After the installation, we need to configure the application’s location permissions for both iOS and Android devices. To set the iOS background geolocation permission, open your application’s app.json file and add the following configurations to the iOS settings:
   "ios": {
      "infoPlist": {
        "UIBackgroundModes": ["location", "fetch", "remote-notification"]
      },
    },
To request background geolocation permission on Android devices, add the following configuration to the app.json file under the plugins section:
[
  "expo-location",
  {
    "locationAlwaysAndWhenInUsePermission": "Allow $(PRODUCT_NAME) to use your location.",
    "isAndroidBackgroundLocationEnabled":true
  }
]
Now, to track the user’s location in your application, open the index.jsx file and add the following code:
import React, { useState, useEffect } from 'react';
import { Button, View, Text, StyleSheet } from 'react-native';
import * as TaskManager from 'expo-task-manager';
import * as Location from 'expo-location';
const LOCATION_TASK_NAME = 'background-location-task';
const requestPermissions = async () => {
  const { status: foregroundStatus } = await Location.requestForegroundPermissionsAsync();
  if (foregroundStatus === 'granted') {
    const { status: backgroundStatus } = await Location.requestBackgroundPermissionsAsync();
    if (backgroundStatus === 'granted') {
      await Location.startLocationUpdatesAsync(LOCATION_TASK_NAME, {
        accuracy: Location.Accuracy.Balanced,
        timeInterval: 1000,
        distanceInterval: 1,
      });
    }
  }
};
const PermissionsButton = () => {
  const [location, setLocation] = useState(null);
  useEffect(() => {
    TaskManager.defineTask(LOCATION_TASK_NAME, ({ data, error }) => {
      if (error) {
        console.error(error);
        return;
      }
      if (data) {
        const { locations } = data;
        if (locations.length) {
          setLocation(locations[0].coords);
        }
      }
    });
  }, []);
  return (
    <View style={styles.container}>
      <Button onPress={requestPermissions} title="Enable background location" />
      {location && (
        <Text>
          Latitude: {location.latitude}, Longitude: {location.longitude}
        </Text>
      )}
    </View>
  );
};
const styles = StyleSheet.create({
  container: {
    flex: 1,
    alignItems: 'center',
    justifyContent: 'center',
  },
});
export default PermissionsButton;
From the code above, the requestPermissions function is used to ask users to grant the application permission to use background geolocation. After permission is granted, the Location.startLocationUpdatesAsync method is used to set the timeInterval and distanceInterval for updating the background location.
Now, refresh your application and click the Enable Background Location button. You will be prompted to grant the application access to background geolocation. Accept the permission as shown in the GIF below:

After users grant the application permission for background location, the current user’s location will continue to update in your application, regardless of whether it is minimized.
Now that you know how to acquire a user’s location, there’s a lot more you can do. You can build a delivery service, track a user, and even build an emergency button alert system. The possibilities are endless. In this tutorial, we just scratched the surface, exploring the react-native-geolocation-service library to build our example application.
Geolocation is a really interesting feature with a wide variety of real-world use cases. Let me know in the comments how you plan to use geolocation in your React Native app. Happy coding!

LogRocket's Galileo AI watches sessions for you and and surfaces the technical and usability issues holding back your React Native apps.
LogRocket also helps you increase conversion rates and product usage by showing you exactly how users are interacting with your app. LogRocket's product analytics features surface the reasons why users don't complete a particular flow or don't adopt a new feature.
Start proactively monitoring your React Native apps — try LogRocket for free.
Would you be interested in joining LogRocket's developer community?
Join LogRocket’s Content Advisory Board. You’ll help inform the type of content we create and get access to exclusive meetups, social accreditation, and swag.
Sign up now
A breakdown of the wrapper and container CSS classes, how they’re used in real-world code, and when it makes sense to use one over the other.

This guide walks you through creating a web UI for an AI agent that browses, clicks, and extracts info from websites powered by Stagehand and Gemini.

This guide explores how to use Anthropic’s Claude 4 models, including Opus 4 and Sonnet 4, to build AI-powered applications.

Which AI frontend dev tool reigns supreme in July 2025? Check out our power rankings and use our interactive comparison tool to find out.


22 Replies to "React Native geolocation: A complete tutorial"
Hello Emmanuel, just to help the other people going through this article. I noticed a small ‘possible modification’.
When you mention the “getLocation” function in the finishing paragraph I found myself in a state of minute confusion. After checking the source code it makes sense that you have replaced that function with “permissionHandle”
Thank you for reading the article Mushtaq! I do hope you found it useful. Thank you much more for pointing that out.
So cool! I had no idea you could build an emergency button feature. This is super useful. Thank you so much for sharing.
You are welcome brother! Thank you for the kind words! Please, do kindly share across your social media platforms so that others can find the article. Thank you for reading!
Thanks brother it was a great help for me.
You are welcome brother! Thank you for the kind words! Please, do kindly share across your social media platforms so that others can find the article. Thank you for reading!
The variable viewLocation.longitude and viewLocation.latitude are empty or not an object
Same error, what is your solution?
same error, if you have found a solution kindly share at [email protected]
there is no problem, the example is working!!!
This might be due for an update given react-native-location hasn’t been updated in over 3 years.
Hi. The timestamp is of the cellular network or from the telephone’s clock? Thanks
The timestamp is based on the user location and returned from the `react-native-geolocation` library. It is calculated using the Date Time object. It is returned using `location.getTime()`. It is therefore not based on the telephone clock or cellular network.
How do i display the result of the longitude and latitude on a mapview and marker
Hello Confidennce. You can read this guide here: https://blog.logrocket.com/react-native-maps-introduction/ to understand how to use the React Native Map View. You then use the guides in the article to pull the Longitude and Latititude information into the Map View.
TypeError: null is not an object (evaluating ‘RNFusedLocation.getCurrentPosition’)
Get This Error
Hello Abdullah. Rebuilding your android project fixes this error. Kindly refenrence this SO answer: https://stackoverflow.com/questions/66278802/im-getting-typeerror-null-is-not-an-object-evaluating-rnfusedlocation-getcur Thank you.
after init I only had 3 files, I couldn’t run the project. As a beginner I don’t know what to do now
Hello Kai. This article assumes that a reader has basic knowledge of React Native. Please, kindly reference the React Native docs: https://reactnative.dev/docs/getting-started Thank you.
That’s because you need to do this before the npx command:
npm install -g react-native
npm install -g react-native-cli
After these two commands you can do:
npx react-native init ReactNativeGeolocation
And you’ll be able to see a bunch of files and folders.
Credits to:
https://stackoverflow.com/questions/72768245/typeerror-cli-init-is-not-a-function-for-react-native
Thank you for this info! It runs on my device (via IntelliJ project ), but I keep receiving an error for the line:
setLocation(posotion);
It apparently only takes a boolean. But, more importantly, I cannot seem to find this function anywhere in the APIs I’ve searched.
Any help with information on this function is very much appreciated.
Solved. New to REACT (coming from low-level coding background and new to JS world). I located the setLocation reference. Though, I’m still confused on the initial boolean value instead of a position as the parm. Seems that the initial condition/default parm is taken as the type and IntelliJ gives a warning (yet all runs fine). I select option to ignore that warning but may be able to simply provide a position as default and then immediately set it to false once the initial function setup is complete.