Editor’s note: This guide to Node.js rate limiting was updated on 2 January 2024 to explain key terms such as throttle and the common global rate limit exceeded error.

Rate limiting is a powerful feature for securing backend APIs from malicious attacks and for handling unwanted streams of requests from users. In general terms, rate limiting allows us to control the rate at which user requests are processed by our server.
In this article, we will examine the different approaches to implementing rate limiting, exploring the pros and cons of each, and demonstrating them in a Node.js project.
To effectively follow along as you read through this article, you should have the following:
If you’re lacking some or all of these, don’t feel intimidated. We will make sure to break things down as much as possible so that you can easily understand the concepts we cover.
Rate limiting is a technique used to control the amount of incoming or outgoing traffic within a network. In this context, a network refers to the line of communication between a client (e.g., a web browser) and our server (e.g., an API).
Thus, rate limiting is a technique that allows us to handle user requests based on some specified constraint such that:
For example, we might want to limit the number of requests an unsubscribed user can make to a public API to 1,000 requests per month. Once the user exceeds that number, we’d ignore their request and throw an error indicating that the user has exceeded their limit.
Bear in mind that in order for rate limiting to be implemented, there must be a clearly defined constraint (limit), which can be based on any of the following:
Rate limit and throttle are core concepts used to manage and control the flow of requests to an API or service. While both are used to prevent the misuse of an API and ensure that servers remain stable, there are some significant differences.
As we explored above, the rate limit controls the number of requests that are sent to the server or an API. It protects the server against user misuse to maintain stability.
On the other hand, throttle is a more rigid method that stops the clients from requesting the server for a certain period, which allows the API to effectively manage incoming traffic.
The key difference between rate limit and throttle lies in the level at which these techniques operate and their responses when limits are reached. Rate limiting gently slows down clients, reminding them of the specified request limits, while throttling takes a more rigid approach, temporarily halting clients from making requests for a set period.
As with most engineering problems, there are different algorithms for implementing rate limiting, each with its pros and cons. We will now examine five well-known techniques and determine when they are most efficient and when we should look for another solution.
This is probably the most obvious approach to implementing rate limiting. In this approach, we track the number of requests a user makes in each window.
In this context, “window” refers to the space of time under consideration. For instance, if I want my API to allow ten requests per minute, we have a 60 second window. So, starting at 00:00:00, one window will be 00:00:00 to 00:01:00.
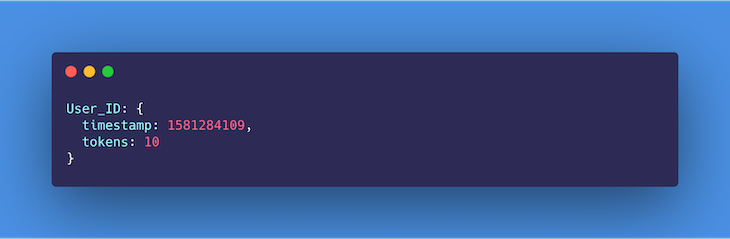
Thus, for the first request a user makes in the minute, using an optimized key-value store like a HashMap or Redis, we can store the user’s ID against a count (now 1 because this is the first request). See the format below:

On subsequent requests within the same window, we check to see that the user has not exceeded the limit (i.e., the count is not greater than ten). If the user hasn’t, we increment the count by one; otherwise, the request is dropped and an error is triggered.
At the end of the window, we reset every user’s record to count 0 and repeat the process for the current window.
This approach is relatively easy to implement.
This approach isn’t entirely accurate, as it is unfair to impose a general window start time on all users; in reality, a user’s window should start counting from the time of their first request.
Second, when there is a burst of traffic towards the end of a window, e.g., at the 55th second, the server ends up doing much more work than is planned per minute. For example, we may have ten requests from a user between 55s to 60s, and another ten from the same user in the next window between 0s to 5s. Thus, the server ends up processing 20 requests in ten seconds for this user.
Finally, in especially larger window cycles (e.g., 50 requests per hour, or 3,600s), the user may end up waiting for a very long time if they reach the limit in the first ten minutes (600s). That means it takes the user ten minutes to make 50 requests, but one hour to make 51. This may result in a stampeding of the API immediately after a new window opens up.
The sliding logs algorithm keeps track of the timestamp for each request a user makes. Requests here can be logged using a HashMap or Redis. In both cases, the requests may be sorted according to time in order to improve operations.
The process of logging the requests is as follows:
This approach attempts to optimize some of the inefficiencies of both the fixed window counter and sliding logs technique. In this technique, the user’s requests are grouped by timestamp, and rather than log each request, we keep a counter for each group.
It keeps track of each user’s request count while grouping them by fixed time windows (usually a fraction of the limit’s window size). Here’s how it works.
When a user’s request is received, we check whether the user’s record already exists and whether there is already an entry for that timestamp. If both cases are true, we simply increment the counter on the timestamp.
In determining whether the user has exceeded their limit, we retrieve all groups created in the last window and then add the counters to them. If the sum equals the limit, then the user has reached their limit, and the incoming request is dropped. Otherwise, the timestamp is inserted or updated and the request is processed.
As an addition, the timestamp groups can be set to expire after the window time is exhausted to control the rate at which memory is consumed.
This approach saves more memory because instead of creating a new entry for every request, we group requests by timestamp and increment the counter.
This algorithm works only when the lookback window time is not strict.
In the token bucket algorithm, we simply keep a counter indicating how many tokens a user has left and a timestamp showing when it was last updated. This concept originates from packet-switched computer networks and telecom networks in which there is a fixed-capacity bucket to hold tokens that are added at a fixed rate (window interval).
When the packet is tested for conformity, the bucket is checked to see whether it contains a sufficient number of tokens as required. If it does, the appropriate number of tokens are removed, and the packet passes for transmission; otherwise, it is handled differently.
In our case, when the first request is received, we log the timestamp and then create a new bucket of tokens for the user:
On subsequent requests, we test whether the window has elapsed since the last timestamp was created. If it hasn’t, we check whether the bucket still contains tokens for that particular window. If it does, we will decrement the tokens by 1 and continue to process the request; otherwise, the request is dropped and an error is triggered.
In a situation where the window has elapsed since the last timestamp, we update the timestamp to that of the current request and reset the number of tokens to the allowed limit.
There are no disadvantages to the token bucket algorithm that might affect its usage. Moreover, if the bucket gets full, the tokens are discarded, which is still a good thing when it comes to saving memory.
The leaky bucket algorithm makes use of a queue that accepts and processes requests in a first-in, first-out (FIFO) manner. The limit is enforced on the queue size. If, for example, the limit is ten requests per minute, then the queue would only be able to hold ten requests at a time.
As requests get queued up, they are processed at a relatively constant rate. This means that even when the server is hit with a burst of traffic, the outgoing responses are still sent out at the same rate.
Once the queue is filled up, the server will drop any more incoming requests until space is freed up for more.
This technique smooths out traffic, thus preventing server overload.
Traffic shaping may result in a perceived overall slowness for users, because requests are being throttled, affecting your application’s UX.
Now that we have explored rate limiting from a theoretical perspective, it is time for us to get practical. Below, we have identified certain scenarios in which a rate limiting algorithm is required to achieve the expected outcome. Take your time to review them and, in each case, try to identify what algorithm you are inclined to use and why.
In this tutorial, we will be implementing scenario two in Node.js. However, now we need to decide what algorithm is most appropriate for our use case.
If you are feeling up to the challenge, feel free to download the tutorial boilerplate here and try to implement any of the algorithms yourself.
Which algorithm should we stick with for our use case? As explained above, the fixed window counter and sliding logs are the most inefficient ways to implement rate limiting. That leaves us with the sliding window counter, leaky bucket, and token bucket.
The leaky bucket algorithm is most applicable in scenarios where, along with rate limiting, we are trying to do some traffic shaping.
Traffic shaping (also known as packet shaping) is a bandwidth management technique that delays the flow of certain types of network packets to ensure network performance for higher-priority applications. In this context, it describes the ability to manage server resources to process and respond to requests at a certain rate, no matter the amount of traffic it receives.
As that is not a major concern in this case, it leaves us with the sliding window counter and token bucket algorithms. Either approach will work just fine, but for the sake of this article, we will go with the sliding window counter.
We will use this algorithm to keep track of each user’s request count per day (24 hours) while grouping them by a fixed one-hour window. Let’s get started!
To get started, clone this repository on your computer, navigate into the project directory on your terminal, and install the project’s dependencies using the command below:
npm i
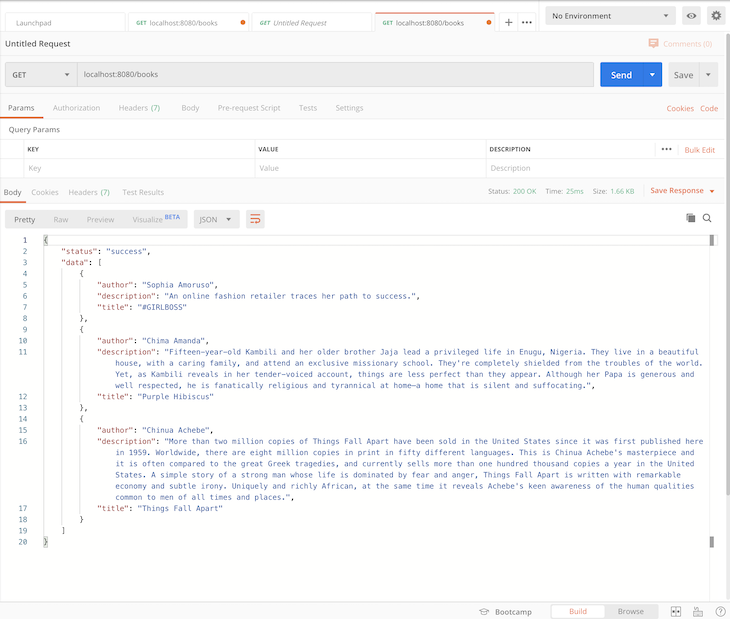
The boilerplate code contains a simple API that allows us to retrieve a list of books using a GET request to the /books endpoint. Therefore, we will be implementing rate limiting using a middleware layer, which will enforce the limits for each user.
All the code for the API lives within the src directory. There is no user authentication in this case, therefore we will identify users using their IP addresses. This is available as a property on the request object for every request made i.e., req.ip.
Finally, rename the .env.example file to .env as it contains the project’s environment variables. You can now start the server by running the command below:
npm run dev
To the code!
We will implement our sliding window counter rate limiter algorithm in two ways. In the first, we will use a third-party library, Express Rate Limit, and in the other, we will be doing a custom implementation.
Express Rate Limit is an npm package commonly used as a basic rate limiting middleware for Node. To make use of this plugin, we will have to first install it.
Run the command below from your terminal, within the project directory, to do so:
npm i express-rate-limit --save
Next, proceed to the middlewares folder within the project and create a file named rateLimiter.js. This is where we will be writing the rate limiting middleware for our API.
Copy and paste the following code inside this file:
// src/middlewares/rateLimiter.js
import rateLimit from 'express-rate-limit';
export const rateLimiterUsingThirdParty = rateLimit({
windowMs: 24 * 60 * 60 * 1000, // 24 hrs in milliseconds
max: 100,
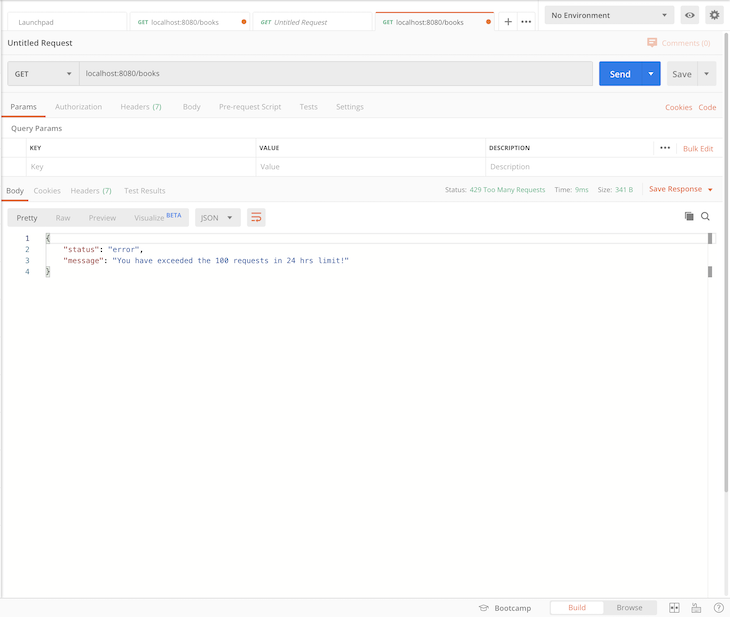
message: 'You have exceeded the 100 requests in 24 hrs limit!',
standardHeaders: true,
legacyHeaders: false,
});
In the code snippet above, we imported the npm package into the project. Using the package, we create a middleware that enforces rate limiting based on the options we have passed in, including the following:
windowMs, the window size (24 hours in our case) in millisecondsmax, which represents the number of allowed requests per window per usermessage, which specifies the response message users get when they have exceeded the allowed limitstandardHeaders, which specifies whether the appropriate headers should be added to the response showing the enforced limit (X-RateLimit-Limit), current usage (X-RateLimit-Remaining), and time to wait before retrying (Retry-After) when the limit is reachedNow that we have created the middleware, we need to configure our application to use this middleware when handling requests.
First, export the middleware from our middleware module by updating the index.js file in the middlewares folder as shown below:
// src/middlewares/index.js

export { default as errorHandler } from './errorHandler';
export { rateLimiterUsingThirdParty } from './rateLimiter';
Next, import the rateLimiterUsingThirdParty middleware and apply it to all application routes:
// src/index.js
// ...Some code here

import { rateLimiterUsingThirdParty } from './middlewares';

// ...Some code here

app.use(rateLimiterUsingThirdParty);

// ...Some more code goes here
Voilà! We are done. Notice that we didn’t have to specify the identifier for each user manually. If you go through the docs for this package, as found here on npm, you will notice that this package identifies users by their IP addresses using req.ip by default.
Pretty straightforward, right? Now let’s try a slightly more complex approach.
For this implementation, we will be making use of Redis to keep track of each user’s request count and timestamp using their IP addresses. If you do not have Redis installed on your machine, follow the instructions here to do so.
Using the command below, install the following packages, which allow us to connect to Redis and manipulate time easily within our application:
npm i redis moment --save
Next, update your rateLimiter.js file as shown below. The code below is a middleware that handles rate limiting for our API using Redis.
Copy and paste it inside rateLimiter.js:
import moment from 'moment';
import redis from 'redis';

const redisClient = redis.createClient();
redisClient.on('error', (err) => console.log('Redis Client Error', err));

const WINDOW_SIZE_IN_HOURS = 24;
const MAX_WINDOW_REQUEST_COUNT = 100;
const WINDOW_LOG_INTERVAL_IN_HOURS = 1;

export const customRedisRateLimiter = async (req, res, next) => {
  await redisClient.connect();
  try {
    // check that redis client exists
    if (!redisClient) {
      throw new Error('Redis client does not exist!');
      process.exit(1);
    }
    // fetch records of current user using IP address, returns null when no record is found
    const record = await redisClient.get(req.ip);
    const currentRequestTime = moment();
    console.log(record);
    //  if no record is found , create a new record for user and store to redis
    if (record == null) {
      let newRecord = [];
      let requestLog = {
        requestTimeStamp: currentRequestTime.unix(),
        requestCount: 1,
      };
      newRecord.push(requestLog);
      await redisClient.set(req.ip, JSON.stringify(newRecord));
      next();
    }
    // if record is found, parse it's value and calculate number of requests users has made within the last window
    let data = JSON.parse(record);
    let windowStartTimestamp = moment().subtract(WINDOW_SIZE_IN_HOURS, 'hours').unix();
    let requestsWithinWindow = data.filter((entry) => {
      return entry.requestTimeStamp > windowStartTimestamp;
    });
    console.log('requestsWithinWindow', requestsWithinWindow);
    let totalWindowRequestsCount = requestsWithinWindow.reduce((accumulator, entry) => {
      return accumulator + entry.requestCount;
    }, 0);
    // if number of requests made is greater than or equal to the desired maximum, return error
    if (totalWindowRequestsCount >= MAX_WINDOW_REQUEST_COUNT) {
      res.status(429).jsend.error(`You have exceeded the ${MAX_WINDOW_REQUEST_COUNT} requests in ${WINDOW_SIZE_IN_HOURS} hrs limit!`);
    } else {
      // if number of requests made is less than allowed maximum, log new entry
      let lastRequestLog = data[data.length - 1];
      let potentialCurrentWindowIntervalStartTimeStamp = currentRequestTime.subtract(WINDOW_LOG_INTERVAL_IN_HOURS, 'hours').unix();
      //  if interval has not passed since last request log, increment counter
      if (lastRequestLog.requestTimeStamp > potentialCurrentWindowIntervalStartTimeStamp) {
        lastRequestLog.requestCount++;
        data[data.length - 1] = lastRequestLog;
      } else {
        //  if interval has passed, log new entry for current user and timestamp
        data.push({
          requestTimeStamp: currentRequestTime.unix(),
          requestCount: 1,
        });
      }
      await redisClient.set(req.ip, JSON.stringify(data));
      next();
    }
  } catch (error) {
    next(error);
  }
};
There’s quite a lot going on here, so let’s do a step-by-step walkthrough.
First, we installed and imported Redis and Moment.js from npm and initialized all useful constants. We use Redis as in-memory storage for keeping track of user activity, while Moment helps us accurately parse, validate, manipulate, and display dates and times in JavaScript.
Next, we create a middleware, customRedisRateLimiter, within which we will implement the rate limiting logic. Inside the middleware function’s try block, we check that the Redis client exists and throw an error if it doesn’t.
Using the user’s IP address req.ip, we fetch the user’s record from Redis. If null is returned, this indicates that no record has been created yet for the user in question. Thus, we create a new record for this user and store it in Redis by calling the set() method on the Redis client.
If a record is found, the value is returned. So, we parse that value to JSON and proceed to calculate if the user is eligible to get a response. In order to determine this, we calculate the cumulative sum of requests made by the user in the last window by retrieving all logs with timestamps that are within the last 24 hours and adding up their corresponding requestCounts.
If the number of requests in the last window (i.e., totalWindowRequestsCount) is equal to the permitted maximum, we send a response to the user with a constructed error message indicating that the user has exceeded their limit.
However, if totalWindowRequestsCount is less than the permitted limit, the request is eligible for a response. So, we perform some checks to see whether it’s been up to one hour since the last log was made. If it has been up to one hour, we create a new log for the current timestamp. Otherwise, we increment the requestCount on the last timestamp and store (update) the user’s record on Redis.
Make sure to export and apply the middleware to our Express app as we did in the third-party library implementation.
Whew! That’s it. Does this work as desired? Let’s see!
global rate limit exceeded errorsBefore we test our API, let’s consider some strategies for effectively managing the common global rate limit exceeded error.
When you encounter this error message, it simply means that the total number of requests from all users has exceeded the globally allowed limit specified in the server or API. In response, the server rejects any other requests until the rate limit resets. This is considered a protective measure to ensure fair use of an API and prevent server degradation due to excessive requests.
Handling global rate limits and managing global rate limit exceeded errors is important for maintaining the stability and reliability of servers, especially in distributed environments and services that serve a large number of users. Let’s look at some strategies to effectively manage global rate limit exceeded errors:
global rate limit exceeded error occurs. For example, instead of showing users a generic error message, provide details on why the rate limit was exceeded and provide potential solutions or next stepsRetry-After HTTP header in the response. This header should indicate the amount of time that the client should wait before retrying the request. The clients can use this information to implement an intelligent retry mechanismWhen you test our API from Postman, you get the following response:
localhost:8080/books
When you have exceeded the permitted limit (i.e., 100 requests per hour), the server returns the message below:
rate-limiter-flexible is a versatile Node.js library designed to count and limit the number of actions based on a key, providing robust protection against distributed denial-of-service (DDoS) attacks and brute force attacks at any scale.
It also works with Redis, process memory, DynamoDB, MySQL, MongoDB, and PostgreSQL. rate-limiter-flexible has support for memory limiting even in the browser and extends its rate limiting capabilities to client-side applications.
Let’s update our rate limiter middleware to use the rate-limiter-flexible dependency. First, install the package by running the following command:
npm i rate-limiter-flexible
Then, update the middlewares/rateLimiter.js with the following code snippets:
import { RateLimiterRedis } from 'rate-limiter-flexible';
import moment from 'moment';
import redis from 'redis';
import { promisify } from 'util';
const redisClient = redis.createClient();
const getAsync = promisify(redisClient.get).bind(redisClient);
const setAsync = promisify(redisClient.set).bind(redisClient);
const WINDOW_SIZE_IN_HOURS = 24;
const MAX_WINDOW_REQUEST_COUNT = 110;
const WINDOW_LOG_INTERVAL_IN_HOURS = 1;
const opts = {
  storeClient: redisClient,
  keyPrefix: 'rateLimiter',
  points: MAX_WINDOW_REQUEST_COUNT,
  duration: WINDOW_SIZE_IN_HOURS * 60 * 60,
  blockDuration: WINDOW_SIZE_IN_HOURS * 60 * 60,
};
const rateLimiter = new RateLimiterRedis(opts);
export const rateLimiterUsingThirdParty = async (req, res, next) => {
  try {
    await rateLimiter.consume(req.ip);
    return next();
  } catch (error) {
    return res.status(429).jsend.error(`You have exceeded the ${MAX_WINDOW_REQUEST_COUNT} requests in ${WINDOW_SIZE_IN_HOURS} hrs limit!`);
  }
};
export const customRedisRateLimiter = async (req, res, next) => {
  try {
    const currentRequestTime = moment();
    // fetch records of the current user using IP address
    const record = await getAsync(req.ip);
    // if no record is found, create a new record for the user and store it in Redis
    if (record == null) {
      const newRecord = [{
        requestTimeStamp: currentRequestTime.unix(),
        requestCount: 1,
      }];
      await setAsync(req.ip, JSON.stringify(newRecord));
      return next();
    }
    // if a record is found, parse its value and calculate the number of requests the user has made within the last window
    const data = JSON.parse(record);
    const windowStartTimestamp = moment().subtract(WINDOW_SIZE_IN_HOURS, 'hours').unix();
    const requestsWithinWindow = data.filter(entry => entry.requestTimeStamp > windowStartTimestamp);
    console.log('requestsWithinWindow', requestsWithinWindow);
    const totalWindowRequestsCount = requestsWithinWindow.reduce((accumulator, entry) => accumulator + entry.requestCount, 0);
    // if the number of requests made is greater than or equal to the desired maximum, return an error
    if (totalWindowRequestsCount >= MAX_WINDOW_REQUEST_COUNT) {
      return res.status(429).jsend.error(`You have exceeded the ${MAX_WINDOW_REQUEST_COUNT} requests in ${WINDOW_SIZE_IN_HOURS} hrs limit!`);
    }
    // if the number of requests made is less than the allowed maximum, log a new entry
    const lastRequestLog = data[data.length - 1];
    const potentialCurrentWindowIntervalStartTimeStamp = currentRequestTime.subtract(WINDOW_LOG_INTERVAL_IN_HOURS, 'hours').unix();
    // if the interval has not passed since the last request log, increment the counter
    if (lastRequestLog.requestTimeStamp > potentialCurrentWindowIntervalStartTimeStamp) {
      lastRequestLog.requestCount++;
      data[data.length - 1] = lastRequestLog;
    } else {
      // if the interval has passed, log a new entry for the current user and timestamp
      data.push({
        requestTimeStamp: currentRequestTime.unix(),
        requestCount: 1,
      });
    }
    await setAsync(req.ip, JSON.stringify(data));
    return next();
  } catch (error) {
    return next(error);
  }
};
Now if you make over 100 API calls to the server per hour, you’ll get the same response as was shown in the previous image.
We made it! 🎊
In this article, we successfully explored the concept of rate limiting — what it is, how it works, various ways to implement it, and practical scenarios in which it is applicable.
We have also done our very own implementation in Node.js, first using a simple third-party library that handles all the heavy lifting for us, then a custom implementation using Redis.
 Monitor failed and slow network requests in production
Deploying a Node-based web app or website is the easy part. Making sure your Node instance continues to serve resources to your app is where things get tougher. If you’re interested in ensuring requests to the backend or third-party services are successful, try LogRocket.

LogRocket lets you replay user sessions, eliminating guesswork around why bugs happen by showing exactly what users experienced. It captures console logs, errors, network requests, and pixel-perfect DOM recordings — compatible with all frameworks.
LogRocket's Galileo AI watches sessions for you, instantly identifying and explaining user struggles with automated monitoring of your entire product experience.
LogRocket instruments your app to record baseline performance timings such as page load time, time to first byte, slow network requests, and also logs Redux, NgRx, and Vuex actions/state. Start monitoring for free.
Would you be interested in joining LogRocket's developer community?
Join LogRocket’s Content Advisory Board. You’ll help inform the type of content we create and get access to exclusive meetups, social accreditation, and swag.
Sign up now
Discover how to use Gemini CLI, Google’s new open-source AI agent that brings Gemini directly to your terminal.

This article explores several proven patterns for writing safer, cleaner, and more readable code in React and TypeScript.

A breakdown of the wrapper and container CSS classes, how they’re used in real-world code, and when it makes sense to use one over the other.

This guide walks you through creating a web UI for an AI agent that browses, clicks, and extracts info from websites powered by Stagehand and Gemini.


11 Replies to "Understanding and implementing rate limiting in Node.js"
2 of 3 cons of fixed window counter are not fair:
– “user’s window should start counting from the time of their first request” -> this is easy to implement.
– “burst traffic towards the end of a window” -> it may be issue, if your service is for one customer. It is unlikely, that all your thousands users would make all requests at once.
Hi,
It looks like using app.use() would limit the rate to the whole API. How would you go about applying rate limit to only a particular POST request while letting users do unlimited GET requests?
Michal,
You can do this by applying the middleware to the POST route directly instead of `app.use`
e.g.
`app.post(‘/limitedRoute’, customRedisRateLimiter, (req, res, next) => {})`
i have this error :Uncaught Exception: 500 – listen EACCES: permission denied development
When the record is null in the Redis store, you create the record, store it and then go to the next middleware. Shouldn’t there be a return statement after the next() instruction to prevent the middleware from executing the rest of the code ?
does this work on heroku as well with a running redis add on ? not sure !
One should never use moment.js instead of Date.now
you should wrap “await redisClient.connect()” in if statement with condition “!redisClient.isReady” or “!redisClient.isOpen” so it doesn’t throw “Socket already opened” error.
this line get time of 24 hours ago from now ‘const windowStartTimestamp = moment().subtract(WINDOW_SIZE_IN_HOURS, ‘hours’).unix();’ and the record in redis already deleted after 24 hours , so how it comes?
I tested the first implementation. I noticed that requestCount is only incremented when you call a different endpoint. But I want the rate to be per request, no matter the endpoints.
I don’t think throttling is more rigid than rate limiting as you defined.