uniforms are React libraries for building form-based web UIs from every schema. A schema is a formal representation of data, data types, allowable values, default values, required values, etc. These web UIs are designed for accepting, modifying, and presenting data and are usually embedded within an application.

In this tutorial, we’ll demonstrate how you can use uniforms to efficiently build schema-based forms in React.
The Replay is a weekly newsletter for dev and engineering leaders.
Delivered once a week, it's your curated guide to the most important conversations around frontend dev, emerging AI tools, and the state of modern software.
Manually writing HTML templates and the logic for data binding is hard, especially in a relatively large application. Forms are even trickier because they usually involve functionalities that are more advanced than data binding, such as validation and submission.
uniforms eliminate the stress of writing templates and the JavaScript logic for data binding. They facilitates form rendering and take care of state management, validation, and submission.
Below are the core features of uniforms, according to the official documentation.
uniforms are defined by the following.
uniforms-bridge-simple-schema, and uniforms-bridge-simple-schema-2uniforms-bridge-json-schema, that can be used to create a schema bridgeLet’s say the marketing team at your company wants to collect lead information and you’ve agreed to help. Your task is to use uniforms to create a form for users to contact to the marketing team.
To use uniforms, you must first install the dependent packages. We’ll use JSON Schema to specify the data format, Bootstrap 4 as our UI theme, and Ajv for schema validation.
To install the required packages run the command below.
npm install uniforms uniforms-bridge-json-schema uniforms-bootstrap4 [email protected] ajv
Define the shape of the form by defining a plain JSON, which is a valid part of a JSON Schema.
// schema.js

const schema = {
  title: 'Lead Form',
  type: 'object',
  properties: {
    name: { type: 'string' },
    email: { type: 'string' },
    phone: {
      type: 'integer',
      minimum: 0,
      maximum: 100
    },
    reason: {
      type: 'string',
      options: [
        {
          label: 'Product Questions',
          value: 'product-questions'
        },
        {
          label: 'Online Order Support',
          value: 'online-order-support'
        },
        {
          label: 'Sales-support',
          value: 'sales-support'
        },
        {
          label: 'Events',
          value: 'events'
        }
      ]
    },
    message: {
      type: 'string',
      uniforms: {
        component: LongTextField
      }
    }
  },
  required: ['firstName', 'email', 'message']
};
For uniforms to make use of any schema, you must create a bridge of the schemas.
The following schemas are compatible with uniforms.
GraphQLBridge in uniforms-bridge-graphqlJSONSchemaBridge in uniforms-bridge-json-schemaSimpleSchema2Bridge in uniforms-bridge-simple-schema-2SimpleSchemaBridge in uniforms-bridge-simple-schemaimport { JSONSchemaBridge } from 'uniforms-bridge-json-schema';
const bridge = new JSONSchemaBridge(schema);
Though JSON Schema is easy to use with uniforms, it doesn’t come with validation out of the box. You must manually define a validator to use on your contact form.
Let’s use Ajv for validation:
import Ajv from 'ajv';

const ajv = new Ajv({ allErrors: true, useDefaults: true });

function createValidator(schema) {
  const validator = ajv.compile(schema);

  return model => {
    validator(model);

    if (validator.errors && validator.errors.length) {
      throw { details: validator.errors };
    }
  };
}

const schemaValidator = createValidator(schema);
Now that you have a validator, you can include it as part of the bridge.
const bridge = new JSONSchemaBridge(schema, schemaValidator);
At this point, the schema.js file should look like this:
import Ajv from 'ajv';
import { JSONSchemaBridge } from 'uniforms-bridge-json-schema';
const ajv = new Ajv({ allErrors: true, useDefaults: true });
const schema = {
  title: 'Lead Form',
  type: 'object',
  properties: {
    name: { type: 'string' },
    email: { type: 'string' },
    phone: {
      type: 'integer',
      minimum: 0,
      maximum: 100
    },
    reason: {
      type: 'string',
      options: [
        {
          label: 'Product Questions',
          value: 'product-questions'
        },
        {
          label: 'Online Order Support',
          value: 'online-order-support'
        },
        {
          label: 'Sales-support',
          value: 'sales-support'
        },
        {
          label: 'Events',
          value: 'events'
        }
      ]
    },
    message: {
      type: 'string',
      uniforms: {
        component: LongTextField
      }
    }
  },
  required: ['firstName', 'email', 'message']
};

function createValidator(schema) {
  const validator = ajv.compile(schema);
  return model => {
    validator(model);
    if (validator.errors && validator.errors.length) {
      throw { details: validator.errors };
    }
  };
}
const schemaValidator = createValidator(schema);
const bridge = new JSONSchemaBridge(schema, schemaValidator);
export default bridge;
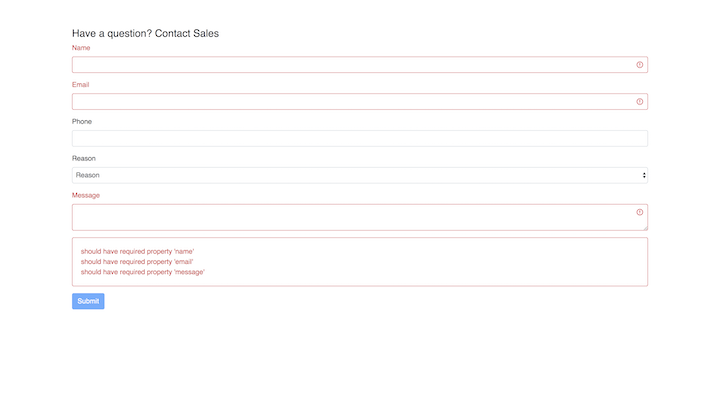
Uniforms’ theme packages include a component called AutoForm that generates a form from the schema.
Pass the schema to AutoForm to generate a form.
import React from "react";
import "./styles.css";
import { AutoForm, AutoFields, ErrorsField, SubmitField } from 'uniforms-bootstrap4';

import LeadSchema from './schema';
export default function App() {
  return (
    <div className="App">
      <div className="uniforms">
        <AutoForm schema={LeadSchema} onSubmit={(e) => {console.log(e)}}>
          <h4>Have a question? Contact Sales</h4>
          <AutoFields />
          <ErrorsField />
          <SubmitField />
        </AutoForm>
      </div>
    </div>
  );
}

Now you have the basic knowledge you need to create schema-based forms in React using uniforms. The library comes with myriad other prebuilt form elements you can explore in the uniforms documentation.
The snippets used in this tutorial come from an example app. You’re welcome to clone it and play with it yourself.
Install LogRocket via npm or script tag. LogRocket.init() must be called client-side, not
server-side
$ npm i --save logrocket

// Code:

import LogRocket from 'logrocket';
LogRocket.init('app/id');
// Add to your HTML:

<script src="https://cdn.lr-ingest.com/LogRocket.min.js"></script>
<script>window.LogRocket && window.LogRocket.init('app/id');</script>

CSS wasn’t built for dynamic UIs. Pretext flips the model by measuring text before rendering, enabling accurate layouts, faster performance, and better control in React apps.

Why do real-time frontends break at scale? Learn how event-driven patterns reduce drift, race conditions, and inconsistent UI state.

Test out Auth.js, Clerk, WorkOS, and Better Auth in Next.js 16 to see which auth library fits your app in 2026.

When should you move API logic out of Next.js? Learn when Route Handlers stop scaling and how ElysiaJS helps.
Hey there, want to help make our blog better?
Join LogRocket’s Content Advisory Board. You’ll help inform the type of content we create and get access to exclusive meetups, social accreditation, and swag.
Sign up now

