According to current research, 37 percent of adults in the United States have shared their online passwords with others and two of three reuse their passwords across multiple accounts. Giving others access to your login credentials for email, online shopping, social media, or streaming media creates a vulnerability, increasing the chances of the accounts being hacked. Password management remains an ongoing issue for consumers as well as businesses.

It’s a bit ironic how something as simple as a password can cause so much trouble. Remember the days when a simple password like “logrocket123” was all the rage? Well, those days are long gone, and for good reason. Traditional passwords that are easy to forget, share, or confuse have become a weak link in our online security chain.
Still, it’s easy to understand why people gravitate toward traditional passwords. There are so many platforms that require a password, and it can be difficult to remember a unique, secure password for each one. This is where Passwordless authentication steps in. It’s like having a digital handshake, where your device or even your fingerprint says, “Hey, it’s me!” No more typing, and no more forgetting.
In this article, we’ll explore how passwordless authentication integrates with Firebase and React, highlighting its benefits for online security and user experience. We’ll leverage React and Firebase to demo four options for passwordless authentication: Google Authentication, email link authentication, one-time-password (OTP) authentication, and Facebook authentication.
Jump ahead:
Imagine you’re throwing a huge dinner party, and you’ve got this amazing caterer handling all the food. Now, the old way of doing things would be like handing out special meal tickets to everyone. But you know how it goes, some folks misplace their tickets just like we sometimes forget our passwords. There’s also that who’s always trying to crash the party with a stolen or fake ticket — kind of like how hackers try to break into accounts!
Okay, here’s where things get interesting. Instead of those tickets, your caterer has a brilliant idea: every guest gets a personal call or message when they arrive. It’s like the caterer saying, “Hey, I recognize you! Come on in.” If the caterer is unsure, they might double-check by asking something that only the real guest would know. This method is super personal and efficient, just like when you get a code on your phone or use your fingerprint to log in online.
At this party, no one is stressed about lost tickets or party crashers. Everyone is just having a good time, knowing they’re in safe hands and letting the caterer take care of everything. That’s what passwordless authentication feels like. It’s like swapping out old meal tickets for a trusted caterer who knows every guest by name. It’s all about making things simpler, safer, and a whole lot more personal.
Firebase is a platform developed by Google that offers a variety of tools and services for building web and mobile applications. It provides functionalities like real-time databases, authentication, cloud storage, and hosting, making it easier and faster for developers to create and scale apps without managing the backend.
Using Firebase is beneficial because it offers an inbuilt authentication service that supports passwordless methods. This means developers can implement secure, passwordless login systems without building from scratch.
To demonstrate the passwordless authentication options, we first need to set up a demo project. Here’s a brief guide on how to create a Firebase project, add a React app to the project, integrate the Firebase SDK, and add the Firebase script to the React app.
To create a project in Firebase, follow these three steps:
emailauth, and follow the instructions to create the project: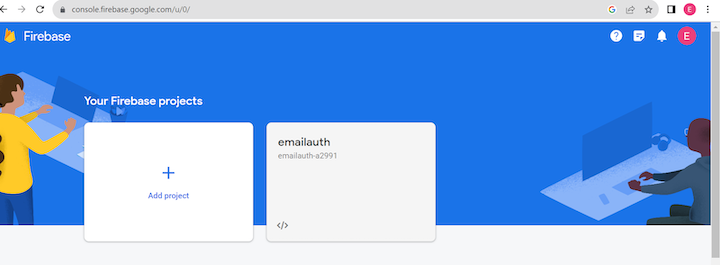
Adding a React app to your Firebase project is very straightforward:
After registering your app, Firebase will provide you with a configuration object containing the keys and URLs that your app will use to initialize Firebase. You’ll get a script for web apps to include in your React Project; here’s an example of the code:
const firebaseConfig = {
apiKey: "YOUR_API_KEY",
  authDomain: "YOUR_AUTH_DOMAIN",
  projectId: "YOUR_PROJECT_ID",
  storageBucket: "YOUR_STORAGE_BUCKET",
  messagingSenderId: "YOUR_MESSAGING_SENDER_ID",
  appId: "YOUR_APP_ID"
};
To create the React project, use the following command:
npx create-react-app Auth
For this tutorial, we’ll create multiple projects to demo the four different passwordless authentication samples.
To add the Firebase script, simply create a file in the source folder, name it FirebaseConfig.js and paste in the following code:
import { initializeApp } from "firebase/app";
 import { getAuth } from "firebase/auth";
 const firebaseConfig = {
 apiKey: "YOUR_API_KEY",
  authDomain: "YOUR_AUTH_DOMAIN",
  projectId: "YOUR_PROJECT_ID",
  storageBucket: "YOUR_STORAGE_BUCKET",
  messagingSenderId: "YOUR_MESSAGING_SENDER_ID",
  appId: "YOUR_APP_ID"
};
const app = initializeApp(firebaseConfig);
export const auth = getAuth(app);
Now that the demo project is set up, we can review the different passwordless authentication options.
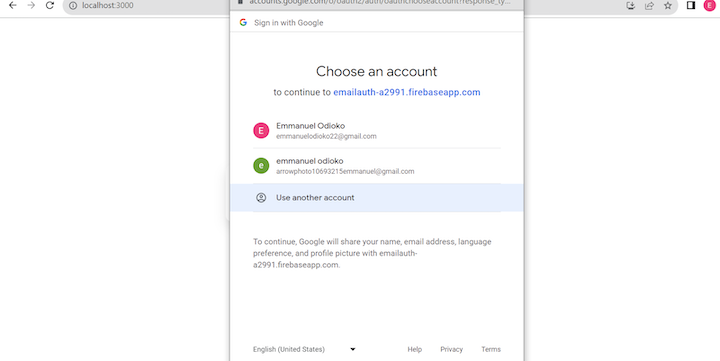
Google Authentication is like flashing your ID at a cafe to get a special members-only coffee. Instead of filling out a form every time you want to join a new website, you simply use your Google account that you’re already logged into on your device. When you click Sign up with Google on a site, it’s like the website and Google give each other a quick nod, saying, “Yep, they’re cool.” And, just like that, you’re in.
To follow along with this tutorial, clone with GitHub repo.
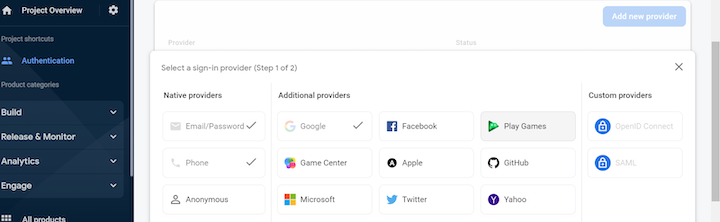
To implement Google Authentication, head over to the Firebase console. Inside your project, click on Authentication on the left. Next, click the Sign-in method tab and select Google from the listed options.
Now, we’ll install the dependencies needed for this demo: firebase, react-router-dom, and react-firebase-hooks. To do so, run the following command in the terminal:
npm i firebase react-router-dom react-firebase-hooks
Next, create a FirebaseConfig.js component code as usual:
FirebaseConfig.js
  import { initializeApp } from "firebase/app";
import { getAuth, GoogleAuthProvider } from 'firebase/auth';
const firebaseConfig = {
 apiKey: "YOUR_API_KEY",
  authDomain: "YOUR_AUTH_DOMAIN",
  projectId: "YOUR_PROJECT_ID",
  storageBucket: "YOUR_STORAGE_BUCKET",
  messagingSenderId: "YOUR_MESSAGING_SENDER_ID",
  appId: "YOUR_APP_ID"
};
// Initialize Firebase
const app = initializeApp(firebaseConfig);
const auth = getAuth(app);
const provider = new GoogleAuthProvider();
export {auth, provider}
You will also need an App.js component. Create, copy, and paste the code below, then run npm start to display the result in your browser:
App.js
  import { auth, provider } from './FirebaseConfig';
import { useState } from 'react';
import { signInWithPopup } from 'firebase/auth';
const App = () => {
  const [user, setUser] = useState(null);
  const [error, setError] = useState(null);
  const handleGoogleSignIn = async () => {
    try {
      const result = await signInWithPopup(auth, provider);
      const { user } = result;
      setUser(user);
    } catch (err) {
      console.error(err);
      setError(err.message);
    }
  };
  const handleLogout = () => {
    setUser(null);
  };
  const renderUserDetails = () => (
    <>
      <button className='btn btn-secondary btn-md' onClick={handleLogout}>
        Log Me Out
      </button>
      <h3>Welcome Esteemed User {user.displayName}</h3>
      <p>{user.email}</p>
      <div className='photo'>
        <img src={user.photoURL} alt="User Display Picture" referrerPolicy='no-referrer' />
      </div>
    </>
  );
  const renderLoginButton = () => (
    <button className='btn btn-danger btn-md' onClick={handleGoogleSignIn}>
      Sign In With Google Account
    </button>
  );
  return (
    <div className="wrapper">
      <div className='box'>
        {user ? renderUserDetails() : renderLoginButton()}
        {error && <p className="error">{error}</p>}
      </div>
    </div>
  );
};
export default App;
In the above code, we pull in some tools and configurations:
./FirebaseConfig: This is where we get the auth and provider. Think of auth as our connection to Firebase’s authentication system, and provider as the specific way we’re choosing to authenticate (in this case, with Google)useState: This React Hook enables us to keep track of things that might change while our app is running, like whether a user is logged insignInWithPopup: This is a handy function from Firebase that will allow your users to sign in with a pop-up windowNow, let’s dive into the main component, App.js. Inside, we set up two pieces of state: user and error. Initially, no one is logged in, so the user is null. And, since nothing is gone wrong (yet!), the error is also null.
The handleGoogleSignIn function is where the magic happens. When called, it tries to authenticate the user with that pop-up window. If it succeeds, it updates the user state with the user’s info. If something goes wrong, it logs the error and updates the error state. We also have a simple handleLogout function. All it does is reset the user to null, effectively logging them out.
The next two functions, renderUserDetails and renderLoginButton, are about what the user sees. If a user is logged in, renderUserDetails shows their name, email, profile picture, and a logout button. Otherwise, renderLoginButton gives them a button to start the login process.
You should see the following in the browser when you try to log in:


The email link authentication method is straightforward. When you want to sign up or log in to a website, instead of creating a password, the site sends a unique link to your email. Clicking on this link confirms your identity and logs you in. It’s a secure method because only the person with access to the email can use the link. It simplifies the process, ensuring that the right person is accessing the account without the need for passwords.
Clone the GitHub repo to follow along. To Implement passwordless email authentication, go to the Firebase console, and select your project. Navigate to the Authentication section, select the Sign-in method tab, and click Email/Password. Ensure that “Enable Email Link (passwordless sign-in)” is checked:
You will need to install the dependencies needed for this demo by running this in your terminal: npm i firebase react-router-dom react-firebase-hooks . You’ll need App.js, Home.js, Loggedin.js, and FirebaseConfig.js components. Create them and copy the code blocks below. When you’re done, run npm start:
//FirebaseConfig.js
  import { initializeApp } from "firebase/app";
import {getAuth} from 'firebase/auth';
const firebaseConfig = {
  apiKey: "YOUR_API_KEY",
  authDomain: "YOUR_AUTH_DOMAIN",
  projectId: "YOUR_PROJECT_ID",
  storageBucket: "YOUR_STORAGE_BUCKET",
  messagingSenderId: "YOUR_MESSAGING_SENDER_ID",
  appId: "YOUR_APP_ID"
  };
// Initialize Firebase
const app = initializeApp(firebaseConfig);
const auth = getAuth(app);
export {auth}
//App.js
import { BrowserRouter as Router, Routes, Route } from "react-router-dom";
import { Home } from "./Home";
import { Logedin } from "./Logedin";
function App() {
  return (
    <div className="wrapper">
      <Router>
        <Routes>
          <Route exact path="/" element={<Home/>}/>
          <Route path="/login" element={<Logedin/>}/>
        </Routes>
      </Router>
    </div>
  );
}
export default App;
The App.js component is our main stage. This is where we decide what the user sees based on the website’s URL. There are two main routes:
/, which shows the Home component/login, which shows the Loggedin componentHome.js
import React from 'react';
import { useAuthState } from 'react-firebase-hooks/auth';
import { auth } from './FirebaseConfig';
import { useNavigate } from 'react-router-dom';
export const Home = () => {
const [user, loading, error] = useAuthState(auth);
const navigate = useNavigate();
const handleLogout = async () => {
try {
await auth.signOut();
console.log('Successfully logged out');
navigate('/');
} catch (err) {
console.error('Error logging out:', err);
}
};
const UserContent = () => (
<>
<button className='btn btn-secondary btn-md' onClick={handleLogout}>
LOGOUT
</button>
<h3>Welcome {user.displayName}</h3>
<p>{user.email}</p>
<div className='photo'>
<img src={user.photoURL} alt="User Display Picture" referrerPolicy='no-referrer' />
</div>
</>
);
const LoginButton = () => (
<button className='btn btn-primary btn-md' onClick={() => navigate('/login')}>
LOGIN
</button>
);
if (loading) {
return <div>Loading...</div>;
}
if (error) {
return <div>Error: {error.message}</div>;
}
return (
<div className='box'>
{user ? <UserContent /> : <LoginButton />}
</div>
);
};
The Home.js component is our homepage. In the above code, we first check if someone’s logged in using useAuthState. If they are, we get their details. Next, we have a handy handleLogout button. If you click it, it will log you out and take you back to the main page. If the user is logged in, they will see a warm welcome with their name, email, a profile picture, and a logout button.
LoggedIn.js
import React, { useState, useEffect } from 'react';
import { useAuthState } from 'react-firebase-hooks/auth';
import { auth } from './FirebaseConfig';
import { useNavigate, useLocation } from 'react-router-dom';
import { isSignInWithEmailLink, sendSignInLinkToEmail, signInWithEmailLink } from 'firebase/auth';
export const Logedin = () => {
  const [user] = useAuthState(auth);
  const navigate = useNavigate();
  const { search } = useLocation();
  const [userEmail, setUserEmail] = useState('');
  const [isLoading, setIsLoading] = useState(false);
  const [errorMessage, setErrorMessage] = useState('');
  const [infoMessage, setInfoMessage] = useState('');
  useEffect(() => {
    const authenticateUser = async () => {
      if (user) {
        navigate('/');
        return;
      }
      if (isSignInWithEmailLink(auth, window.location.href)) {
        let emailFromStorage = localStorage.getItem('email');
        if (!emailFromStorage) {
          emailFromStorage = window.prompt('Please provide your email');
        }
        setIsLoading(true);
        try {
          await signInWithEmailLink(auth, emailFromStorage, window.location.href);
          localStorage.removeItem('email');
          navigate('/');
        } catch (error) {
          setErrorMessage(error.message);
          navigate('/login');
        } finally {
          setIsLoading(false);
        }
      }
    };
    authenticateUser();
  }, [user, search, navigate]);
  const handleLogin = async (event) => {
    event.preventDefault();
    setIsLoading(true);
    try {
      await sendSignInLinkToEmail(auth, userEmail, {
        url: 'http://localhost:3000/login',
        handleCodeInApp: true,
      });
      localStorage.setItem('email', userEmail);
      setInfoMessage('We have sent you an email with a link to sign in');
    } catch (error) {
      setErrorMessage(error.message);
    } finally {
      setIsLoading(false);
    }
  };
  const LoginForm = () => (
    <form className='form-group custom-form' onSubmit={handleLogin}>
      <label>Email</label>
      <input
        type='email'
        required
        placeholder='Enter Email'
        className='form-control'
        value={userEmail}
        onChange={(e) => setUserEmail(e.target.value)}
      />
      <button type='submit' className='btn btn-success btn-md'>
        {isLoading ? 'Logging you in' : 'Login'}
      </button>
      {errorMessage && <div className='error-msg'>{errorMessage}</div>}
      {infoMessage && <div className='info-msg'>{infoMessage}</div>}
    </form>
  );
  if (isLoading) {
    return <div>Loading...</div>;
  }
  return (
    <div className='box'>
      {user ? <div>Please wait...</div> : <LoginForm />}
    </div>
  );
};
The Loggedin.js component is our login page, where the email magic happens. Just like the home page, we first check if the user is already logged in. Here’s the cool part — If the user has clicked on a link from their email to log in, the code inside the useEffect Hook handles that and logs them in.
If a user would like to log in, they supply their email and click the LOGIN button. The handleLogin function takes care of sending them that special email link. If the user is already logged in, they will see a “Please wait…” message. Otherwise, they will get the login form where they can enter their email.
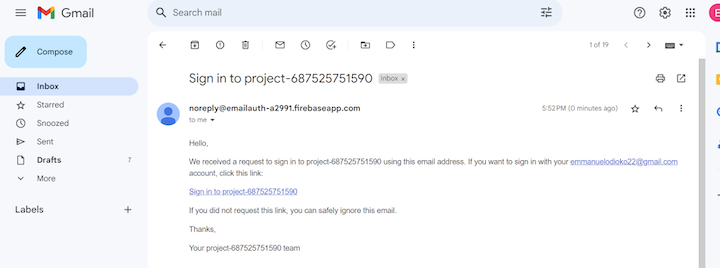
Here’s what the email link authentication app looks like in the browser:


One-time password, or OTP, authentication is like a special code that’s only good for one use. Imagine you’re trying to log in to a website or make a transaction, but instead of just requesting your regular password, the system sends a unique code to your phone or email. You provide the code to authenticate our identity. It’s like the system is double-checking with you.
This authentication method is very useful because even if someone sneaky gets hold of your main password, they’d still need this one-time code to get in. It’s a bit like having a second lock on your door. So, if you’re doing something sensitive, like transferring money from your bank, the bank might send you this code to make sure it’s you making the transfer.
There are a few ways you can get the verification code. The most common is through a text message on your phone, but you can also receive it via email, or use special apps that generate these codes for you.
Next, you’ll need to install the following dependencies:
react-icons (CgSpinner): This library provides a collection of popular icons that can be used in React applicationsotp-input-react: A component to take input of OTPsreact-phone-input-2: A customizable phone input component with country flagsfirebase: The Firebase JavaScript SDK to access Firebase servicesreact-hot-toast: A library to show toast notifications in React applicationsTo install all of these dependencies, run the following commands in your terminal:
npm install react-icons otp-input-react react-phone-input-2 firebase react-hot-toast
Next, head back over to the Firebase console, and select your project. Navigate to the Authentication section, select the Sign-in method tab, and click Phone to enable the phone option:
Now, create a firebaseConfig.js file in your React project and add the following code:
firebaseConfig.js
import { initializeApp } from "firebase/app";
import { getAuth } from "firebase/auth";
const firebaseConfig = {
  apiKey: "YOUR_API_KEY",
  authDomain: "YOUR_AUTH_DOMAIN",
  projectId: "YOUR_PROJECT_ID",
  storageBucket: "YOUR_STORAGE_BUCKET",
  messagingSenderId: "YOUR_MESSAGING_SENDER_ID",
  appId: "YOUR_APP_ID"
};
const app = initializeApp(firebaseConfig);
export const auth = getAuth(app);
To implement OTP in React, copy the code below:
App.js
import React, { useState } from 'react';
import { CgSpinner } from "react-icons/cg";
import OtpInput from "otp-input-react";
import PhoneInput from "react-phone-input-2";
import "react-phone-input-2/lib/style.css";
import { auth } from "./firebase.config";
import { getAuth, RecaptchaVerifier, signInWithPhoneNumber } from 'firebase/auth';
import { toast, Toaster } from "react-hot-toast";
function App() {
    const [otpCode, setOtpCode] = useState("");
    const [phoneNumber, setPhoneNumber] = useState("");
    const [isLoading, setIsLoading] = useState(false);
    const [isOtpVisible, setIsOtpVisible] = useState(false);
    const [authenticatedUser, setAuthenticatedUser] = useState(null);
    const firebaseAuth = getAuth();
    const initiateSignup = () => {
        setIsLoading(true);
        const recaptchaVerifier = new RecaptchaVerifier('recaptcha-container', {
            size: "invisible",
            callback: () => initiateSignup(),
            "expired-callback": () => {},
        }, firebaseAuth);
        const formattedPhoneNumber = "+" + phoneNumber;
        signInWithPhoneNumber(firebaseAuth, formattedPhoneNumber, recaptchaVerifier)
            .then((confirmationResult) => {
                window.confirmationResult = confirmationResult;
                setIsLoading(false);
                setIsOtpVisible(true);
                toast.success("OTP dispatched!");
            })
            .catch((error) => {
                console.error("Error dispatching OTP:", error.message);
                setIsLoading(false);
            });
    };
    const confirmOtp = () => {
        setIsLoading(true);
        window.confirmationResult
            .confirm(otpCode)
            .then((result) => {
                setAuthenticatedUser(result.user);
                setIsLoading(false);
            })
            .catch((error) => {
                console.error("Error confirming OTP:", error.message);
                setIsLoading(false);
            });
    };
    return (
        <div className="min-h-screen flex items-center justify-center bg-gray-100">
            <div className="bg-white p-8 rounded-lg shadow-md w-96">
                <Toaster toastOptions={{ duration: 4000 }} />
                <div id="recaptcha-container"></div>
                {authenticatedUser ? <WelcomeMessage /> : <AuthForm isOtpVisible={isOtpVisible} otpCode={otpCode} setOtpCode={setOtpCode} phoneNumber={phoneNumber} setPhoneNumber={setPhoneNumber} isLoading={isLoading} initiateSignup={initiateSignup} confirmOtp={confirmOtp} />}
            </div>
        </div>
    );
}
const WelcomeMessage = () => (
    <div className="text-center">
        <h2 className="text-2xl font-bold mb-4">Welcome!</h2>
        <p>You've successfully logged in.</p>
    </div>
);
const AuthForm = ({ isOtpVisible, otpCode, setOtpCode, phoneNumber, setPhoneNumber, isLoading, initiateSignup, confirmOtp }) => (
    <div>
        <h1 className="text-xl font-bold mb-4 text-center">Authenticate</h1>
        {isOtpVisible ? <OtpEntry otpCode={otpCode} setOtpCode={setOtpCode} confirmOtp={confirmOtp} isLoading={isLoading} /> : <PhoneVerification phoneNumber={phoneNumber} setPhoneNumber={setPhoneNumber} initiateSignup={initiateSignup} isLoading={isLoading} />}
    </div>
);
const OtpEntry = ({ otpCode, setOtpCode, confirmOtp, isLoading }) => (
    <div>
        <label className="block text-sm font-medium mb-2">Enter OTP:</label>
        <OtpInput value={otpCode} onChange={setOtpCode} OTPLength={6} otpType="number" disabled={false} autoFocus className="mb-4" />
        <button onClick={confirmOtp} className="w-full bg-blue-500 text-white p-2 rounded hover:bg-blue-600">
            {isLoading ? <CgSpinner size={20} className="animate-spin" /> : "Confirm"}
        </button>
    </div>
);
const PhoneVerification = ({ phoneNumber, setPhoneNumber, initiateSignup, isLoading }) => (
    <div>
        <label className="block text-sm font-medium mb-2">Phone Number:</label>
        <PhoneInput country={"ng"} value={phoneNumber} onChange={setPhoneNumber} className="mb-4" />
        <button onClick={initiateSignup} className="w-full bg-blue-500 text-white p-2 rounded hover:bg-blue-600">
            {isLoading ? <CgSpinner size={20} className="animate-spin" /> : "Send OTP"}
        </button>
    </div>
);
export default App;
Let’s take a closer look at the bulky code above. At the heart of our app, is the App.js component. Inside, we have the following variables:
otpCode: This is where we’ll store the OTP entered by the userphoneNumber: The phone number provided by the userisLoading: A little flag to check if our app is doing some background workisOtpVisible: This helps us decide when to show the OTP inputauthenticatedUser: This is where we store the user’s details, once the user is verifiedNow, let’s move on to the important part: the initiateSignup function. This is where the journey begins. When a user decides they’re ready to get that OTP, this function sets up a reCAPTCHA and then politely asks Firebase to send an OTP to the user’s phone. If it all goes well, an input box pops up, waiting for the OTP, and a friendly notification asks the user to check their phone.
At this point, the confirmOtp function starts its work. It checks with Firebase to see if the OTP is a match. A correct OTP gets a green light, and the user is in!
If the user is already logged in, they’ll see a cheerful Welcome!” message on their screen. Otherwise, they’ll be presented with our authentication form. The form initially requests a phone number. Once the OTP is sent, the form changes gears and asks for the OTP.
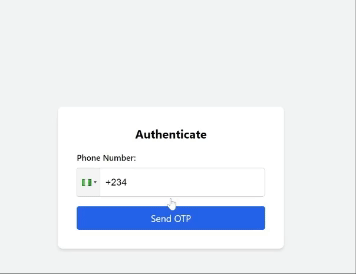
Here’s the functional OTP authentication in action:
Facebook authentication is like using your Facebook login as a key to enter other websites and apps. Instead of creating a new account everywhere, you just click Log in with Facebook, and you’re in. It’s quick and easy. But be aware that when you do this, the website can access some of your Facebook data. Also, if you lose access to your Facebook account or if it becomes compromised, that could affect your access to other sites. This option is very convenient, but it’s important to be aware of what you’re sharing and where you’re sharing it.
Implementing Facebook authentication in an application is quite easy. To start, we’ll need to install these dependencies:
npm i firebase react-router-dom react-firebase-hooks
We’ll also need the App.js and FirebaseConfig.js components.
We’ll use the instructions from the Firebase docs to integrate Facebook authentication with Firebase. Just follow these steps:

APP ID and App Secret; copy both so you’ll have them handy for the next step.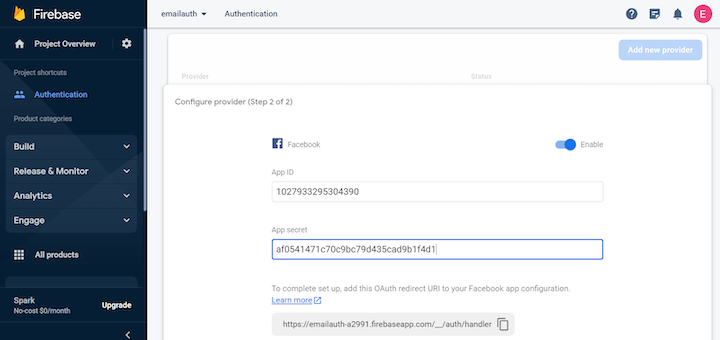
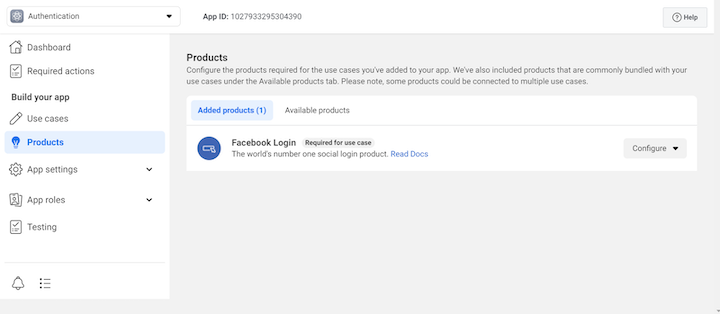

my-app-12345.firebaseapp.com/__/auth/handler) is listed under the OAuth redirects links, like it is in the image below: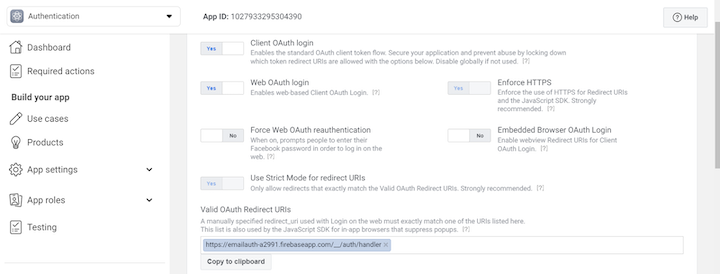
FirebaseConfig.Js component file by copying and pasting the below code or cloning this GitHub repo:
import { initializeApp } from "firebase/app";
import {getAuth} from 'firebase/auth';
import { FacebookAuthProvider } from "firebase/auth";
const firebaseConfig = {
  apiKey: "YOURAPIKEY",
  authDomain: "YOURAUTHDOMAIN",
  projectId: "YOURPROJECTID",
  storageBucket: "YOURSTORAGEBUCKET",
  messagingSenderId: "YOURMESSAGINGSENDERID",
  appId: "YOURAPP_ID"
  };
// Initialize Firebase
const app = initializeApp(firebaseConfig);
const auth = getAuth(app);
const provider = new FacebookAuthProvider();
export {auth, provider}
App.js component file:
//App.js
import React, { useState, useEffect } from 'react';
import {auth, provider} from './FirebaseConfig';
import { signInWithPopup, signOut, onAuthStateChanged } from 'firebase/auth';
import './App.css';
function App() {
  const [user, setUser] = useState(null);
  useEffect(() => {
    const unsubscribe = onAuthStateChanged(auth, (authUser) => {
      if (authUser) {
        setUser(authUser);
      } else {
        setUser(null);
      }
    });
    return () => {
      unsubscribe();
    };
  }, []);
  const handleSignIn = async () => {
    try {
      const result = await signInWithPopup(auth, provider);
      const user = result.user;
      setUser(user);
    } catch (error) {
      console.error("Error signing in with Facebook:", error);
    }
  };
  const handleSignOut = async () => {
    try {
      await signOut(auth);
      setUser(null);
    } catch (error) {
      console.error("Error signing out:", error);
    }
  };
  return (
    <div className="App">
      <header className="App-header">
        {user ? (
          <div>
            <img src={user.photoURL} alt={user.displayName} />
            <p>Welcome, {user.displayName}!</p>
            <button onClick={handleSignOut}>Sign Out</button>
          </div>
        ) : (
          <button onClick={handleSignIn}>Sign In with Facebook</button>
        )}
      </header>
    </div>
  );
}
export default App;
Above we have a piece of code that helps users sign in with their Facebook account. We pull in some tools from React, and we also grab Firebase tools from the FirebaseConfig component or file. Let’s walk through what’s going on in the code:
user variable that will keep track of who’s signed in. If no one’s signed in, this variable will be nulluser variable accordingly. When we’re done listening (like if the user leaves the page), we stop to save resourceshandleSignIn, that pops up the Facebook sign-in window when called. If everything goes smoothly and the user signs in, we update the user variable with their info. If something goes wrong, we print out an error messagehandleSignOut function that signs the user out when called. If there’s a hiccup, we print an error message. If the user is signed in, they’ll see their profile picture, a warm welcome message, and a button to sign outNext, let’s add some styling for our sign-in page:
CSS
.App {
    text-align: center;
    font-family: 'Arial', sans-serif;
    background-color: #f4f4f4;
    height: 100vh;
    display: flex;
    flex-direction: column;
    justify-content: center;
  }

  .App-header {
    background-color: #282c34;
    padding: 20px;
    color: white;
    border-radius: 10px;
    box-shadow: 0 4px 8px rgba(0, 0, 0, 0.1);
  }

  button {
    padding: 10px 20px;
    margin-top: 20px;
    border: none;
    border-radius: 5px;
    cursor: pointer;
    background-color: #007bff;
    color: white;
    font-size: 16px;
    transition: background-color 0.3s;
  }

  button:hover {
    background-color: #0056b3;
  }

  img {
    width: 100px;
    height: 100px;
    border-radius: 50%;
    margin-top: 20px;
  }
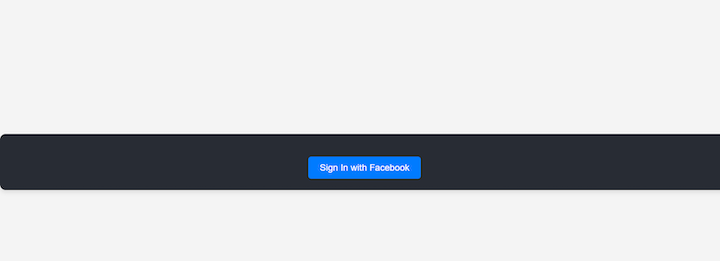
If we run this program using npm start we should see the following:
Let’s try to authenticate a user :
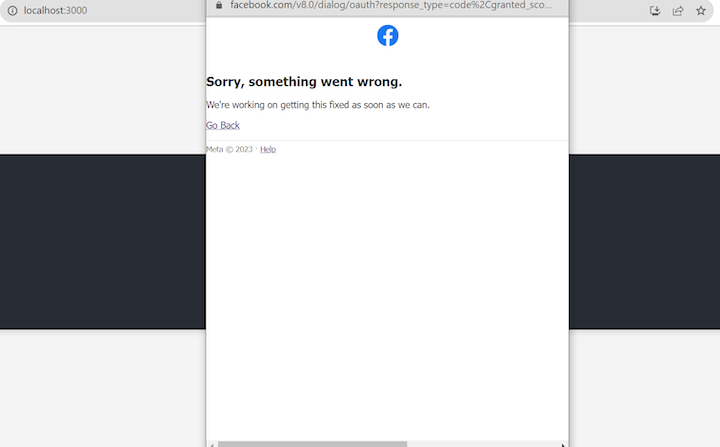
For some reason we keep getting errors; it turns out that Facebook authentication isn’t as straightforward as it should be! These errors are most certainly Facebook’s fault and not ours.
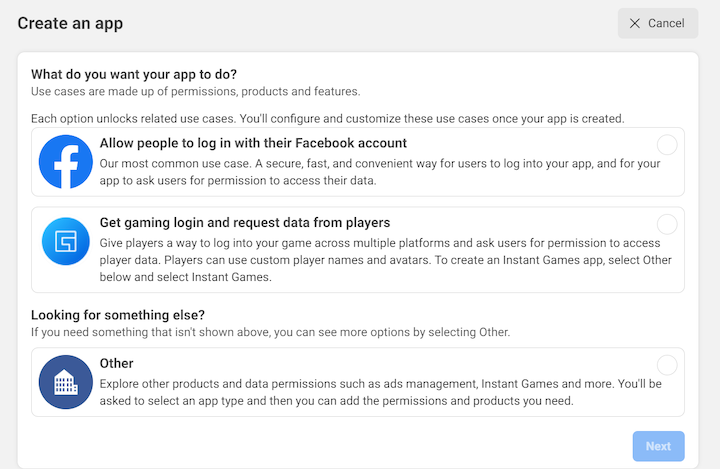
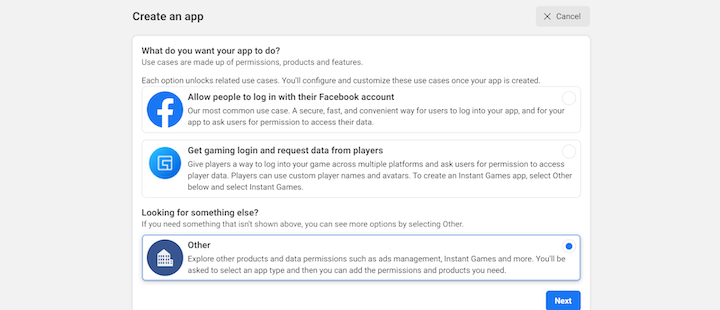
To fix this, let’s create a new app. Select Other from the Create an app page of the Facebook Developers dashboard and then click Next:
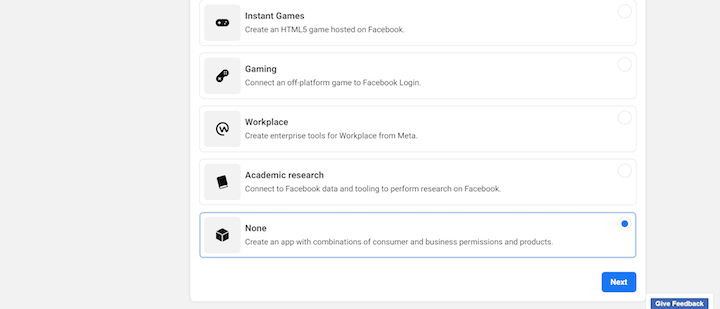
For the next option, we select None:
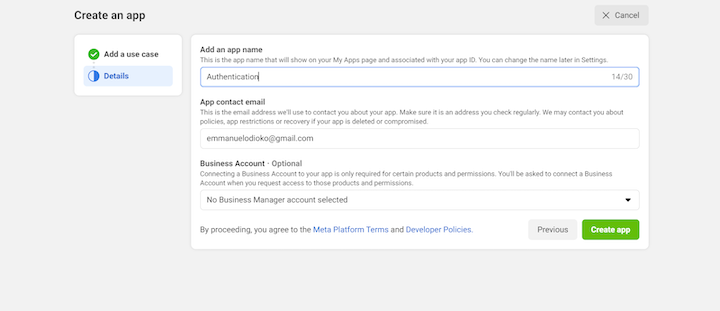
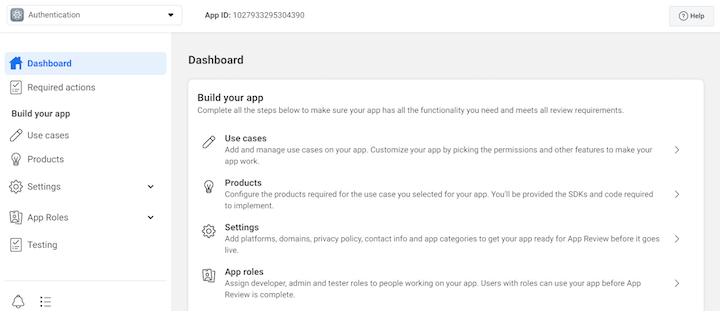
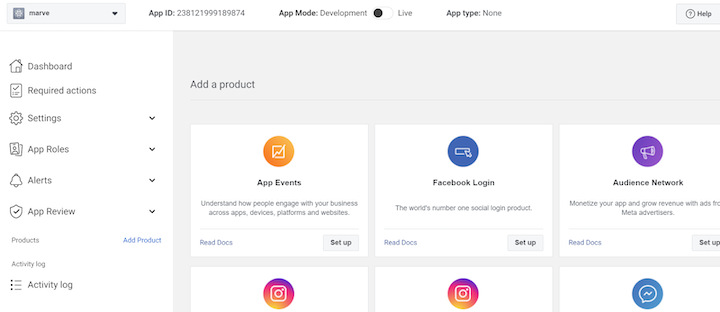
Following the same process we used before, we add the application name, our email and password, and select Create an app. From the following page, select Facebook Login, click on the settings, and repeat the process:
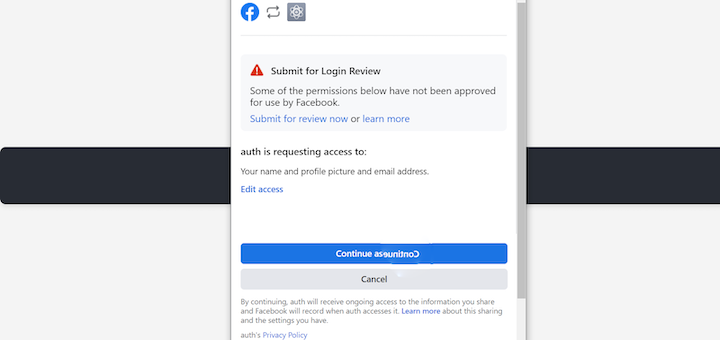
Next, click Continue:
Now when we try to authenticate a user, it works perfectly without any errors:

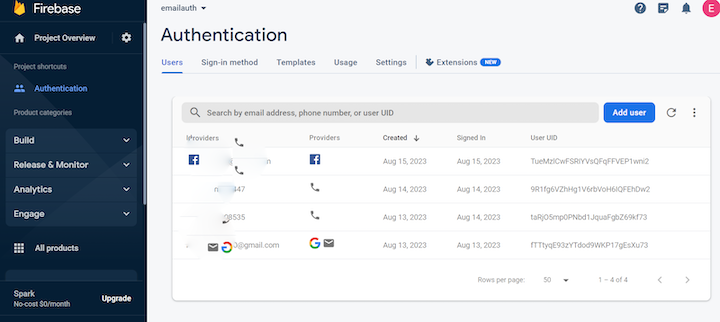
We can also see the sign-in recorded in Firebase:
As technology continues to evolve and improve, we must prioritize both security and user convenience. Passwordless authentication can pave the way for a safer and more stress-free digital environment.
In this article, we reviewed four approaches for passwordless authentication: Google Authentication, email link authentication, one-time-password (OTP) authentication, and Facebook authentication. By removing a traditional password approach or merging it with passwordless authentication, we reduce the risk of being hacked due to compromised credentials and also offer users an easier login experience.
A big thank you to all of you who journeyed through this article. Your curiosity and dedication to learning are truly commendable.
Install LogRocket via npm or script tag. LogRocket.init() must be called client-side, not
server-side
$ npm i --save logrocket

// Code:

import LogRocket from 'logrocket';
LogRocket.init('app/id');
// Add to your HTML:

<script src="https://cdn.lr-ingest.com/LogRocket.min.js"></script>
<script>window.LogRocket && window.LogRocket.init('app/id');</script>

Learn how to protect full-stack projects from NPM supply chain attacks with a practical security checklist.

Explore 15 essential MCP servers for web developers to enhance AI workflows with tools, data, and automation.

Learn how contrast-color() automatically picks accessible text colors using native CSS, without JavaScript.

Learn how to build a harness-style AI workflow using Claude Code with specialized Dev, QE, and Ops subagents, gated handoffs, MCP telemetry, and LEARNING.md.
Hey there, want to help make our blog better?
Join LogRocket’s Content Advisory Board. You’ll help inform the type of content we create and get access to exclusive meetups, social accreditation, and swag.
Sign up now

