Slow React apps can kill user experience. More often than not, it’s the image assets in the app that cause the slowdown. Optimizing images can give a big boost to the performance of any application. In this post, we’ll walk through a complete image optimization strategy and bring LCP down from ~8s to ~1s.
If you want to watch this blog in a video format, you can follow along above.
The starting point of the code for this app is found on GitHub here.
Before changing anything, we need to know what we’re working with. Let’s find the images that are causing the most slowdown. Here’s how to find them:
Throttling is important because it simulates real user conditions. Most users are not using the fastest internet possible.
To find the slowest images, look for:
In our example app, the hero background image is a locally bundled JPEG at 380 KB. That’s our starting point: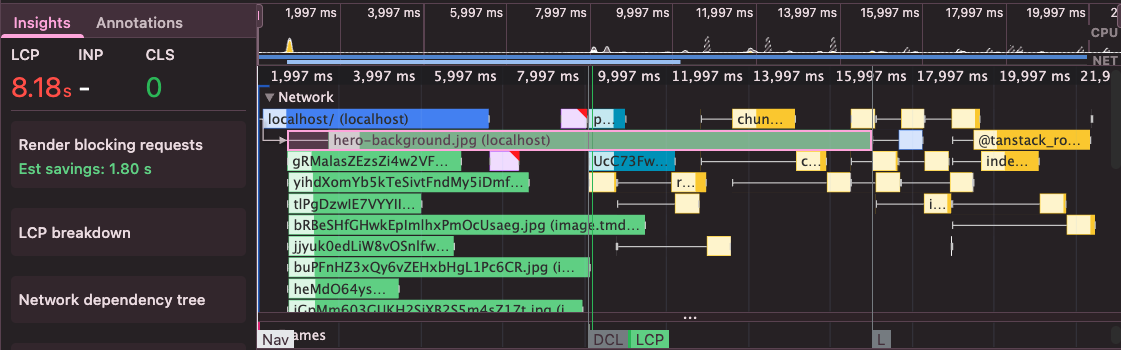
We are starting off with an LCP of 8.18s.
The first and quickest fix is to compress image sizes. It requires no infrastructure changes, no configuration, and no code. Using the right tools, you can cut image sizes in half without any noticeable loss in quality.
Some tools for image compression:
imageoptim-cliimageminImageMagickCompressing the hero image from 380 KB to 180 KB produced a noticeably smaller bundle with zero perceptible difference in visual quality:

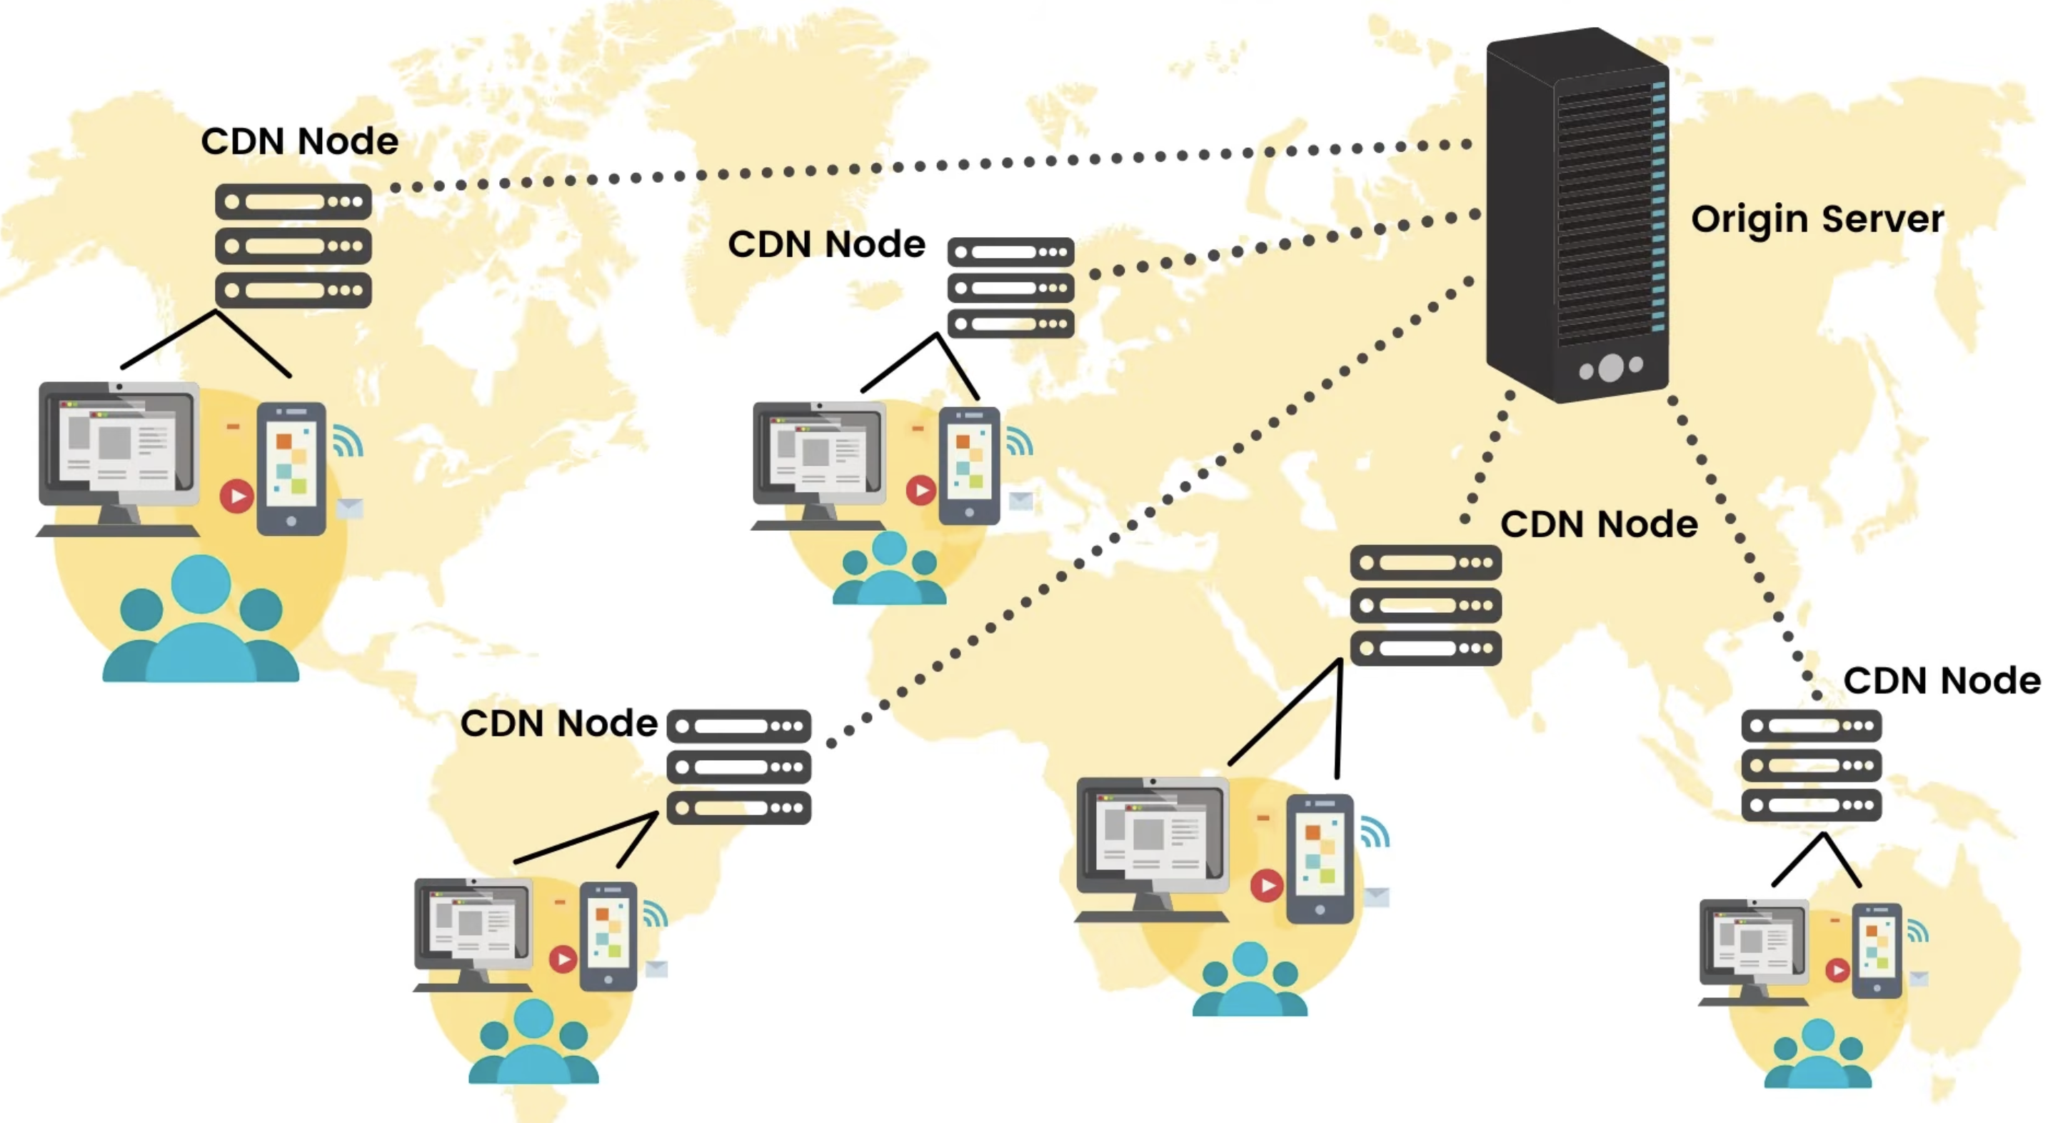
Serving images directly from your app bundle is one of the most common performance mistakes in React apps. When an image is bundled locally, every user downloads it from the same origin server, regardless of where they are in the world, therefore having images as part of the local bundle is an antipattern.
A Content Delivery Network (CDN) solves this by:
A popular CDN for image delivery is Cloudinary. It offers a generous free tier and powerful URL-based image transformation API on the fly. It is perfect for our use case. To upload an image in Cloudinary:
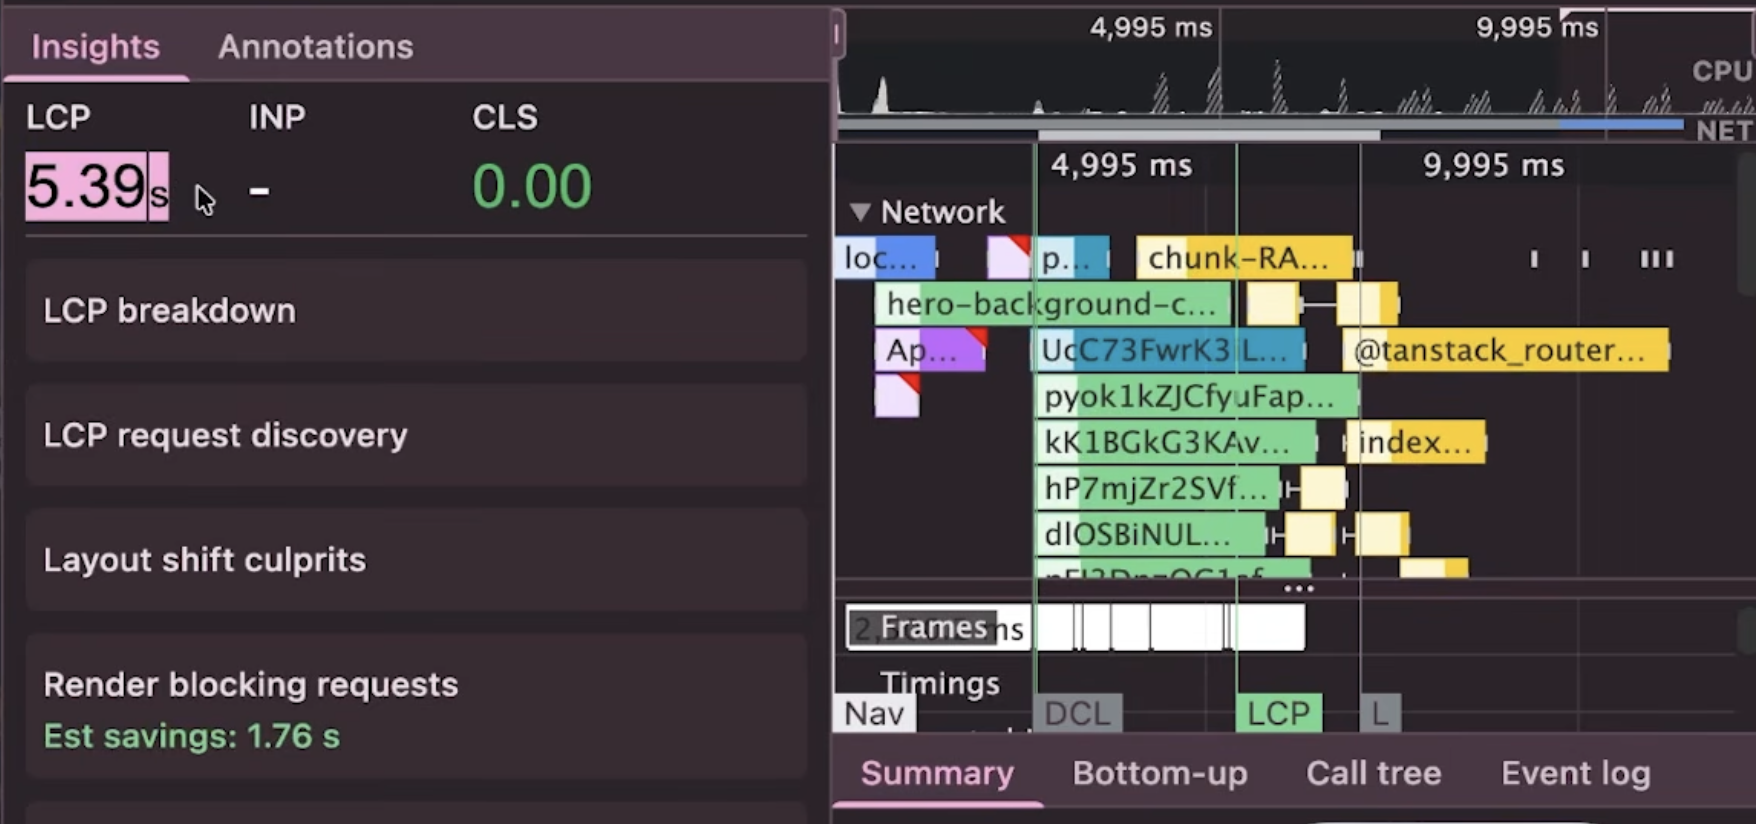
After moving to Cloudinary, LCP reduced from 8.8s → 5.39s.
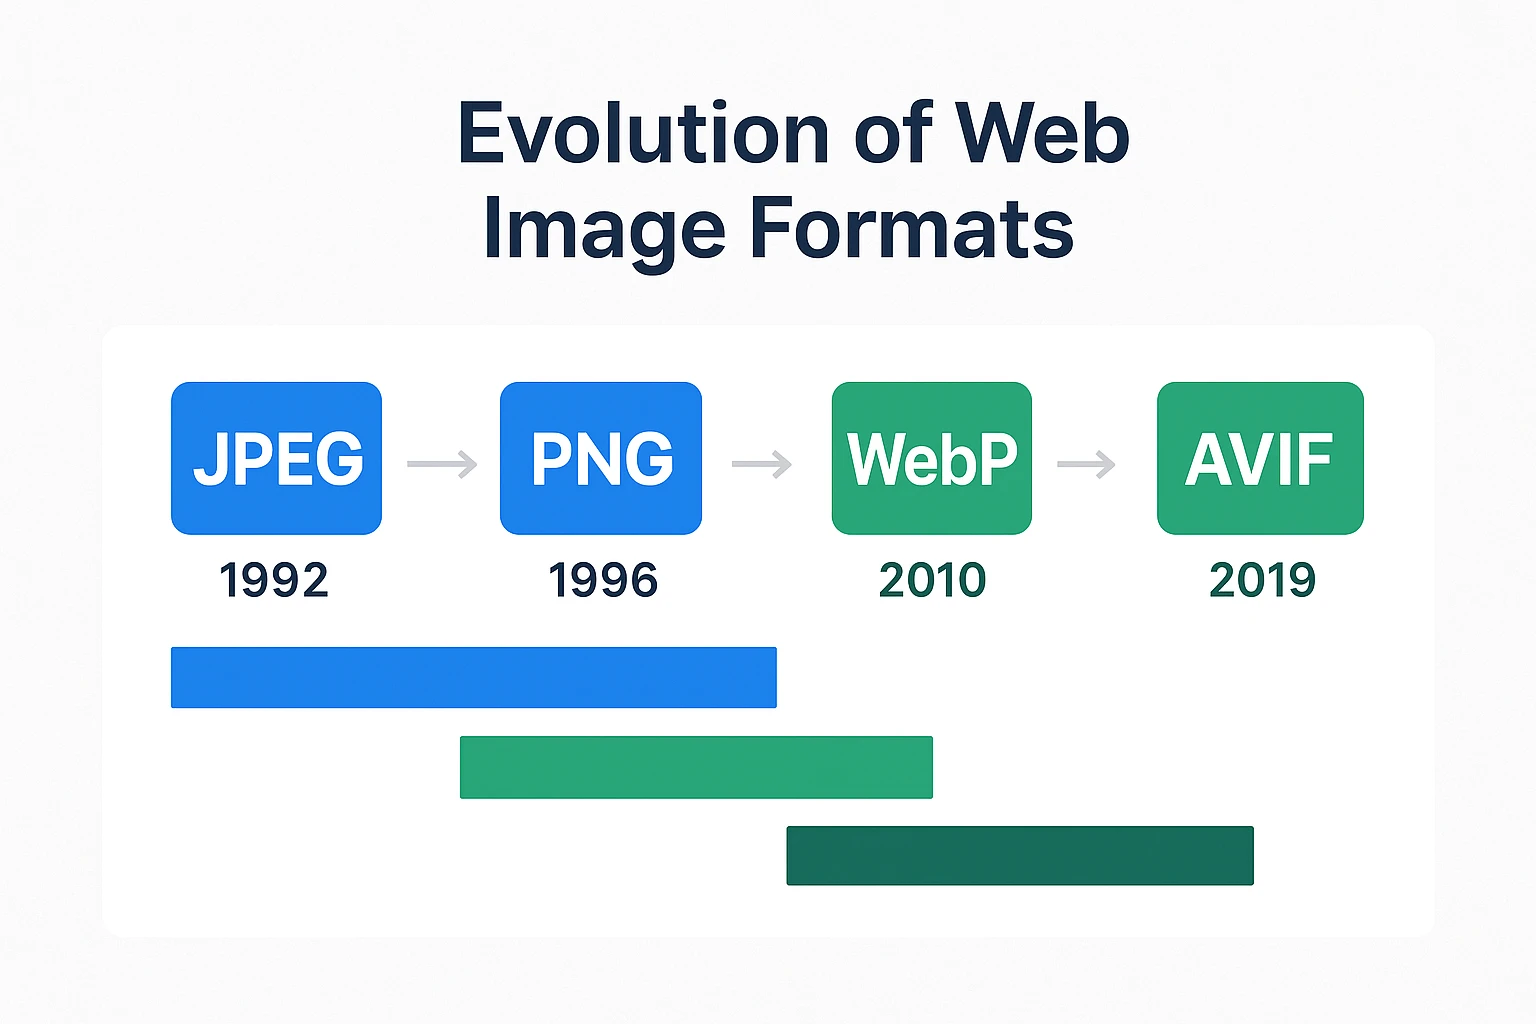
Image formats like JPEG and PNG are not designed for the modern web. Newer formats like WebP and AVIF offer significantly better compression at the same visual quality:
Here is a table that talks about the different image formats available today and which are preferred for which use case:
| Type | File format | MIME Type | Usage |
|---|---|---|---|
| AVIF | AV1 Image File Format (.avif) | image/avif | 1. Offers much better compression than PNG or JPEG.
2. Good choice for images and animated images. 3. Check browser support before using. |
| WEBP | Web Picture format (.webp) | image/webp | 1. Slightly less as good as compared to AVIF but still offers great compression than PNG or JPEG.
2. Excellent choice for both images and animated images. 3. Well supported in all browsers. |
| JPEG | Joint Photographic Expert Group image (.jpeg, .jpg) | image/jpeg | 1. Lossy compression.
2. Works well for still images. |
| PNG | Portable Network Graphics (.png) | image/png | 1. More precise compression of source images. Works better than JPEG.
2. Preferred choice when using transparent images. |
| SVG | Scalable Vector Graphics (.svg) | image/svg+xml | 1. Vector image format.
2. Preferred for elements such as icons, diagrams, etc., that must be scaled accurately at different sizes. |
Source: https://developer.mozilla.org/en-US/docs/Web/Media/Guides/Formats/Image_types
In short, avif and webp image formats offer superior compression as compared to jpeg and png. While AVIF offers better compression as compared to WebP, it is supported in the latest version of all major browsers. WebP has a broader browser support currently.
1. Switching on the fly using CDNs such as Cloudinary
One of Cloudinary’s most useful features is on-the-fly format conversion via URL parameters. You can switch formats without re-uploading the image:
// Original JPEG
https://res.cloudinary.com/your-account/image/upload/hero.jpg

// Convert to WebP — just change the extension
https://res.cloudinary.com/your-account/image/upload/hero.webp

// Convert to AVIF
https://res.cloudinary.com/your-account/image/upload/hero.avif
Even better, use f_auto to let Cloudinary automatically serve the best format the browser supports:
// f_auto picks WebP, AVIF, or JPEG depending on the browser
https://res.cloudinary.com/your-account/image/upload/f_auto/hero.jpg
You can chain it with q_auto for automatic quality optimization too:
// Best format + optimal quality — the most common production setup
https://res.cloudinary.com/your-account/image/upload/f_auto,q_auto/hero.jpg
This means a Chrome user gets AVIF, a Safari user gets WebP, and an older browser gets the original JPEG, all from a single URL, zero extra code.
2. Using command-line tools
For anything beyond a few images, build pipelines, CI, scripted workflows and CLI tools are the right approach. The most useful ones are cwebp / avifenc — the reference encoders for WebP and AVIF respectively. Installed via Homebrew, they give you direct codec control:
# Convert to WebP at quality 80
cwebp -q 80 hero.png -o hero.webp

# Convert to AVIF
avifenc --min 20 --max 40 hero.png hero.avif
sharp-cli: Node-based, built on libvips. Fast, actively maintained, good for batch processing:
npm i -g sharp-cli

# Convert a folder of images to WebP
sharp -i ./images/*.jpg -o ./dist/ --webp-quality 80
Switching from JPEG to WebP dropped our LCP from 5.39s → 2.87s: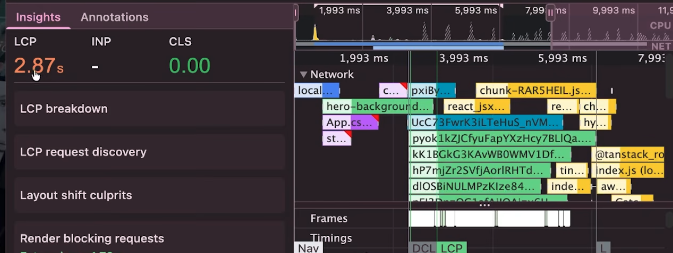
Users view apps on different devices. It’s important to deliver appropriate image sizes and quality based on the user’s device. For example, a user viewing media on a retina display will need a higher quality image as opposed to a user viewing the same media on a standard-resolution display. This is because retina displays have a higher pixel density (typically 2x the standard), which means they require images with twice the resolution to appear sharp and crisp. Serving the same low-resolution image to all devices results in blurry or pixelated visuals on high-DPI screens:
<picture> element allows developers to conditionally serve optimized images based on the device’s screen resolution and viewport size, all natively in the browser with no JavaScript required.q_auto parameter analyzes the image content and selects a quality setting that balances file size and visual fidelity. It has four sub-variants – q_auto:best, q_auto:good (the default), q_auto:eco, and q_auto:low, each targeting a different point on the quality/file-size tradeoff.Combining these two techniques, we can use the <picture> element along with q_auto to provide an optimal quality image appropriate to the user’s viewport:
<picture>
  {/* Small screens — phones under 640px */}
  <source
    media="(max-width: 640px)"
    srcSet="https://res.cloudinary.com/your-account/image/upload/w_640,q_auto:low,f_auto/hero.jpg"
  />

  {/* Medium screens — tablets up to 1024px */}
  <source
    media="(max-width: 1024px)"
    srcSet="https://res.cloudinary.com/your-account/image/upload/w_1024,q_auto:good,f_auto/hero.jpg"
  />

  {/* Large screens — desktops and above */}
  <source
    media="(min-width: 1920px)"
    srcSet="https://res.cloudinary.com/your-account/image/upload/w_1920,q_auto:best,f_auto/hero.jpg"
  />

  {/* Fallback img — always required */}
  <img
    src="https://res.cloudinary.com/your-account/image/upload/f_auto,q_auto/hero.jpg"
    alt="Hero background"
  />
</picture>
The browser evaluates each <source> element in order and uses the first one whose media condition matches. If none match, or if the browser doesn’t support <picture>, it falls back to the <img> tag — which is why the fallback <img> is always required.
Responsive images ensure mobile users download a fraction of the data compared to desktop. Combined with the previous steps, our LCP improved to 2.33s: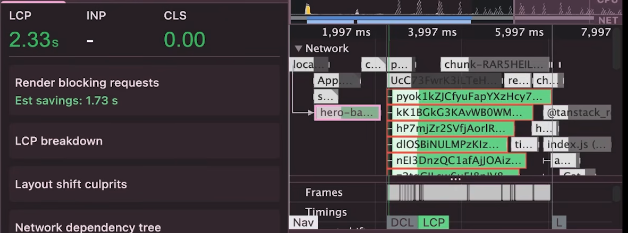
Not all images are made the same. Some images need to be shown to the user right away, such as the hero image, and some can be lazy loaded until the user has actually scrolled down to the page. Therefore, it is necessary to set the priority of images accordingly.
We are going to set the fetchPriority of the our LCP image: the hero banner. In order to set the fetchPriority with a <picture> element, we can use a two step process:
1. Set the fetchPriority of the default img –
<img
  src="https://res.cloudinary.com/your-account/image/upload/f_auto,q_auto/hero.jpg"
  alt="Hero background"
  fetchpriority="high"
/>
2. Preload image asset for the most common viewport size so the browser starts fetching the image before it even parses your component tree:
<head>
  <link
    rel="preload"
    as="image"
    href="https://res.cloudinary.com/your-account/image/upload/f_auto,q_auto/hero.jpg"
  />
</head>
For images below the fold, defer loading until the user scrolls near them:
<img
  src="https://res.cloudinary.com/your-account/image/upload/f_auto,q_auto/thumbnail.jpg"
  alt="Video thumbnail"
  loading="lazy"
/>
Setting fetchpriority="high" and preloading the hero image gave us a small but meaningful improvement, bringing LCP to 2.30s on first load: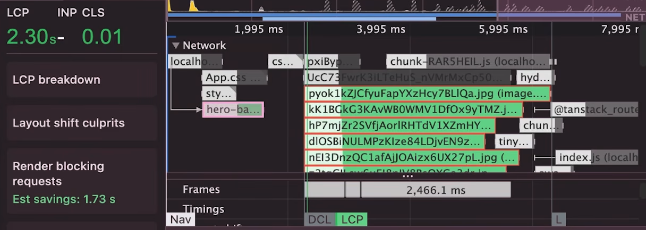
Everything we’ve done so far speeds up the first visit. Caching speeds up every visit after that.
When a CDN serves an image, it can attach cache headers that tell the browser to store the image locally. On repeat visits, the browser serves the image from its local cache instead of making a network request at all.
Cloudinary automatically sets Cache-Control headers on its responses. For maximum caching, configure a long max-age:
Cache-Control: public, max-age=31536000, immutable
A max-age of 31536000 caches the image for one year. This is safe to do because Cloudinary URLs include version identifiers, so if you update an image, the URL changes, and users always get the latest version.
You can also configure cache headers in your own server or edge config if you’re self-hosting:
// Express.js example
app.use('/images', express.static('public/images', {
  maxAge: '1y',
  immutable: true,
}));
With caching enabled, repeat visitors loaded the hero image instantly from their local cache, dropping LCP to 1.22s!: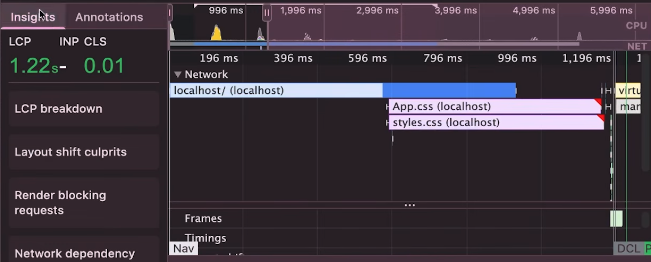
Here’s how each optimization step performed:
| Step | Action | LCP |
|---|---|---|
| Baseline | Local 380 KB JPEG | 8.8s |
| Step 1 | Image compression | ~7s |
| Step 2 | Move to CDN | 5.39s |
| Step 3 | Convert to webp / avif formats | 2.88s |
| Step 4 | Add q_auto quality optimization and responsive images with <picture> |
2.33s |
| Step 5 | Preload + fetchpriority="high" |
2.30s |
| Step 6 | CDN caching enabled | 1.22s |
Images are often the single largest contributor to slow React app load times, and they’re also one of the easiest things to fix. With the steps given in this blog post, you can incrementally optimize your images, focusing on the LCP image first, and observe an improvement in the performance.
The Replay is a weekly newsletter for dev and engineering leaders.
Delivered once a week, it's your curated guide to the most important conversations around frontend dev, emerging AI tools, and the state of modern software.
Install LogRocket via npm or script tag. LogRocket.init() must be called client-side, not
server-side
$ npm i --save logrocket

// Code:

import LogRocket from 'logrocket';
LogRocket.init('app/id');
// Add to your HTML:

<script src="https://cdn.lr-ingest.com/LogRocket.min.js"></script>
<script>window.LogRocket && window.LogRocket.init('app/id');</script>

Learn what vinext is, how Cloudflare rebuilt Next.js on Vite, and whether this experimental framework is worth watching.

Memory leaks in React don’t crash your app instantly, they quietly slow it down. Learn how to spot them, what causes them, and how to fix them before they impact performance.
Build agent-ready websites with Google Web MCP. Learn how to expose reliable site actions for AI agents with HTML and JavaScript.
Build a CRUD REST API with Node.js, Express, and PostgreSQL, then modernize it with ES modules, async/await, built-in Express middleware, and safer config handling.
Would you be interested in joining LogRocket's developer community?
Join LogRocket’s Content Advisory Board. You’ll help inform the type of content we create and get access to exclusive meetups, social accreditation, and swag.
Sign up now
