In this post, we’ll build vector search functionality into a Next.js-powered site using a Supabase vector database for storage and the OpenAI Embeddings API. We’ll also explore the difference between regular and vector search vs. semantic search patterns.

The full code for the project we’ll build is available on GitHub. Before we dive in, let’s talk more about vector search and why it’s important today.
The Replay is a weekly newsletter for dev and engineering leaders.
Delivered once a week, it's your curated guide to the most important conversations around frontend dev, emerging AI tools, and the state of modern software.
Vector search uses machine learning models, or encoders, to transform data like text, audio, and images into high-dimensional vectors. These vectors capture necessary information about the data in a numerical format.
To implement vector search, we can create vector representations using techniques like word embeddings or document embeddings to map words or documents, to high-dimensional vectors in a way that captures their semantic relationships.
Then, to perform vector searches, we calculate the similarity between vectors using metrics like cosine similarity. This allows us to efficiently compare and retrieve similar items based on their vector representations.
Vector search is widely used in natural language processing, recommendation systems, and image retrieval tools. Capturing semantic meaning is crucial in these use cases which makes vector search an ideal solution.
In comparison, semantic search aims to understand the meaning behind your search query and interpret the contents of whatever you’re searching through. This technique uses natural language processing and understanding to enable more contextually relevant results.
Instead of relying solely on keyword matching, semantic search considers the context, synonyms, and relationships between words to provide more accurate and contextually relevant results.
Some popular use cases for semantic search include search engines, CMSs, and information retrieval systems. In these scenarios, understanding the user’s intent can help with delivering relevant information.
Here are some key differences to understand when comparing vector search and semantic search:
Prior to AI, we mostly relied on keyword searches to query databases for exact results. As long as we knew what we were searching for, that approach worked pretty well and gave us what we asked for.
But what happens when you don’t know exactly what you want to search for? Or maybe you remember tiny details about something, but don’t have the exact keywords to perform a search — like when you know some characters in a movie but don’t quite remember the movie’s name.
The ability to perform contextual searches based on what you know about the thing becomes key. With vector embeddings, storage, and search, developers can improve the user experience of web applications by offering contextually relevant search results based on a provided search query instead of exact keyword matches.
Additionally, learning how to integrate AI technologies like vector search into your frontend apps gives you a competitive edge as an engineer. It demonstrates your commitment to staying up to date with emerging technologies, a skill your potential employer or client will appreciate about you.
Vector search offers what I consider to be the next evolution of frontend data storage and retrieval.
Storing data as vectors allows for better scalability of databases. Vectors are more compact and homogenous, representing diverse data types including images, text, audio, and more. This allows you to pack more data into fewer resources.
Vectors also capture semantic relationships between data in a high-dimensional space, making features like contextual and semantic search possible for frontend apps. With these capabilities, regular frontend projects can immediately offer complex features like custom AI agents and search engines to users with little extra effort.
The usefulness of vector search is already evident by the rate of generative AI adoption. Almost every mainstream documentation site now has an Ask AI button, including Supabase, Netlify, Prisma, and many more.
As opposed to keyword search alone, users are relying more on contextual and semantic search, case in point Chat GPT. Beyond mainstream tech, other industries like ecommerce stores and media streaming sites are also adopting this functionality to offer better experiences to their users.
Let’s demonstrate the benefits of vector search by building a Next.js project that stores data as vector embeddings in a Supabase vector database. When a user provides a search query, it’ll respond with contextually relevant results based on the similarity threshold we set.
Let’s get started!
First, we need to set up a dataset. You can use any custom or public dataset for this, it won’t matter as it’ll work the same either way. The dataset I’m going to use for this demo is available in this gist. It’s a JSON file containing information about 10 different celebrities.
Next, let’s set up a Next.js application. Run the following command:
npx create-next-app@latest vector-search-demo
Accept all the default prompts to create a new Next.js project in your root folder called vector-search-demo.
From a user journey POV, the first thing I want to set up is the page that renders the content. Based on our dataset, this will be a list of celebrities. Following the Next.js 14 pattern, open up the src/app/pages.tsx file and update it with this code:
'use client';
import React, { useState, useEffect } from 'react';
const celebrities = [
  {
    first_name: 'Elon',
    last_name: 'Musk',
    image:
      'Elon Musk image',
    age: 50,
    email: '[email protected]',
    hobbies: ['Inventing', 'Space Exploration', 'Twitter'],
    bio: 'Entrepreneur, Inventor, and CEO known for founding SpaceX and Tesla.',
    occupation: 'CEO',
    relationship_status: 'Divorced',
    // ... 9 more
  },
];

export default function Home() {
  const [searchTerm, setSearchTerm] = useState('');
  const [searchResults, setSearchResults] = useState([]);

const handleChange = (event) => {
    setSearchTerm(event.target.value);
  };
  const handleSubmit = async (event) => {
    event.preventDefault();
    }
  const CelebrityProfileCard = ({ profile }) => (
    <div>
      <img
        src={profile.image}
        alt={profile.first_name}
        className="w-full h-64 object-cover"
      />
      <div>
        <div>{`${profile.first_name} ${profile.last_name}`}</div>
        <p>{`Age: ${profile.age}`}</p>
      </div>
    </div>
  );
  return (
    <div>
      <form
        onSubmit={handleSubmit}>
        <input
          type="text"
          placeholder="Search..."
          value={searchTerm}
          onChange={handleChange}
        />
        <button type="submit"> Search </button>
      </form>
      <div>
        {celebrities.map((profile, index) => (
          <CelebrityProfileCard key={index} profile={profile} />
        ))}
      </div>
      <button>Setup</button>
    </div>
  );
}
With this implementation, you should have a simple UI that lists all the celebrities from the dataset we provided, as shown in the screenshot below:

Something to note is that the celebrities data is still local. We are simply iterating over the celebrities array in the project and displaying the items.
Later, we’ll vectorize and upload the data to Supabase to perform vector search on them. In the meantime, let’s set up the search input to implement regular search on the data. This is important because it’ll make the distinction between regular search and vector search much more obvious.
To set up our search input to show relevant results based on a provided query, we’ll search against a particular field in each celebrity object e.g, name.
Let’s update the handleSubmit event handler like so:
  const handleSubmit = async (event) => {
    event.preventDefault();
    // search the celebrities array for the search term
    const searchResults = celebrities.filter((profile) => {
      const fullName = `${profile.first_name} ${profile.last_name}`;
      return fullName.toLowerCase().includes(searchTerm.toLowerCase());
    });
    setSearchResults(searchResults);
    console.log(searchResults);
  };
Lastly, we map over the searchResults variable in the template to display all the celebrities by default and only show the celebrities from the search results:
  const [searchResults, setSearchResults] = useState(celebrities);
  return (
    // ...
      <div>
        {searchResults.map((profile, index) => (
          <CelebrityProfileCard key={index} profile={profile} />
        ))}
      </div>
    // ....
)
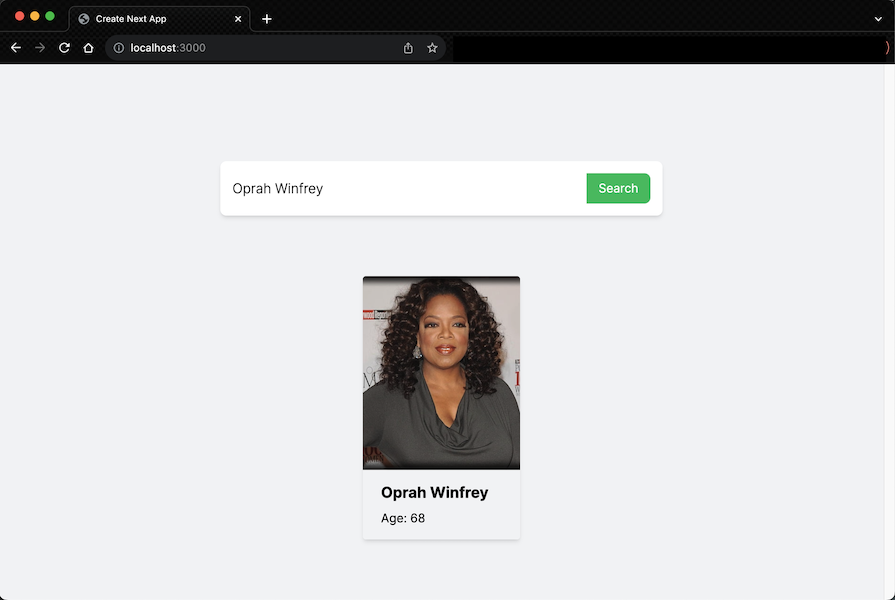
With these updates, we should now get any celebrity we search for when we provide their name in the search input:

With the regular search feature we’ve set up just now, we filter the celebrities array and return the resulting object that matches the search query — nothing new there. Let’s take it up a notch and implement vector search.
Here are the necessary steps we will take to achieve the desired result for this project:
Let’s begin.
Let’s start with the first step. We need to convert our existing data (array of celebrities) into vectors using OpenAI Embeddings. This is a one-time operation, so I’ll add a button on the page to trigger the operation:
<button onClick={vectorizeAndStore}> Setup </button>
This button will send our celebrities array to the /api/load route, where it will be vectorized and stored in Supabase. Let’s set up the vectorizeAndStore function:
  const vectorizeAndStore = async () => {
    const res = await fetch('/api/config-table', {
      method: 'POST',
      headers: {
        'Content-Type': 'application/json',
      },
      body: JSON.stringify({
        celebrities: celebrities,
      }),
    });
    const data = await res.json();
    return data
  };
This function simply makes a POST request to our /api/config route. It sends the Celebrities array data as the body of the request and returns a response from the API route. Before we go further, create a .env file and define these variables with your personal credentials there:
//.env
NEXT_PUBLIC_OPENAI_API_KEY="YOUR_OPENAI_API_KEY"
NEXT_PUBLIC_SUPABASE_KEY="YOUR_SUPABASE_KEY"
NEXT_PUBLIC_SUPABASE_URL="YOUR_SUPABASE_URL"
Next, let’s set up that API route. In the app directory of your Next.js project, create a new api folder. Inside the api folder, create a config-table/route.ts file. Update it with the code below:
// src/pages/api/config-table/route.ts
import { NextRequest, NextResponse } from 'next/server';
import { createClient } from '@supabase/supabase-js';
import OpenAI from 'openai';
import { supabaseClient } from '../../../../utils/supabaseClient';
export async function POST(req: NextRequest) {
  const body = await req.json();
  const { celebrities } = body;
  const openai = new OpenAI({
    apiKey: process.env.NEXT_PUBLIC_OPENAI_API_KEY,
  });
  // Function to generate OpenAI embeddings for a given query
  async function generateOpenAIEmbeddings(profile) {
    const textToEmbed = Object.values(profile).join(' ');
    const response = await openai.embeddings.create({
      model: 'text-embedding-ada-002',
      input: textToEmbed,
    });
    return response.data[0].embedding;
  }
  try {
    // Map over the array and process each item
    const processedDataArray = await Promise.all(
      celebrities.map(async (item) => {
        // Generate OpenAI embeddings for each celebrity object
        const embeddings = await generateOpenAIEmbeddings(item);
        // Modify the item to add an 'embeddings' property
        const modifiedItem = { ...item, embeddings };
        // Post the modified item to the 'profiles' table in Supabase
        const { data, error } = await supabaseClient
          .from('celebrities')
          .upsert([modifiedItem]);
        // Check for errors
        if (error) {
          console.error('Error inserting data into Supabase:', error.message);
          return NextResponse.json({
            success: false,
            status: 500,
            result: error,
          });
        }
        return NextResponse.json({success: true, status: 200, result: data,
        });
      })
    );
    // Check if any insertions failed
    const hasError = processedDataArray.some((result) => !result.success);
    if (hasError) {
      return NextResponse.json({
        error: 'One or more insertions failed',
        status: 500,
      });
    }
    // Data successfully inserted for all items
    return NextResponse.json({status: 200, success: true, results: processedDataArray,
    });
  } catch (error) {
    return NextResponse.json({ status: 500, success: false, results: error, message: 'Internal Server Error',
    });
  }
}
Let’s walk through the code. First, we get the celebrities data sent by the client from the body of the request. This is the data we want to vectorize and store. Afterwards, we create an OpenAI instance using our OpenAI API key stored as an environment variable.
Next, we define a generateOpenAIEmbeddings function that takes a profile object, converts its values to a single text string, and uses the OpenAI API to generate and return embeddings for that text.
In our try...catch block, the main function uses Promise.all to asynchronously process each celebrity in the celebrities array. For each celebrity:
generateOpenAIEmbeddings functionitem is modified to include the generated embeddingscelebrities table in our Supabase databaseNext we do an error check to see if any of the data insertions into the database failed. If all operations are successful, a response is returned with a status of 200 and details of the successfully processed data.
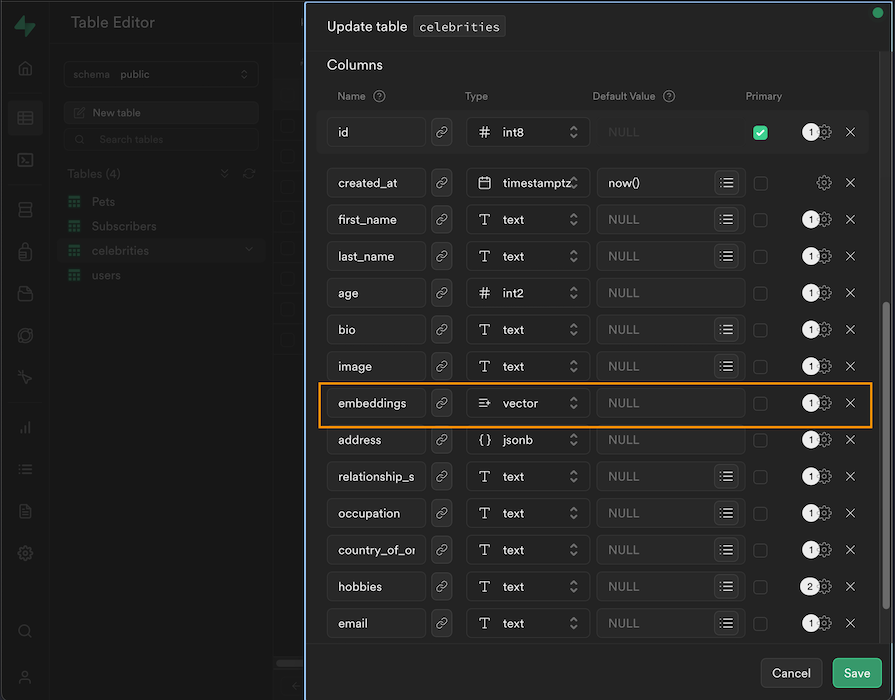
I already set up a celebrities table on Supabase. To do that, go onto your Supabase dashboard and create a new table. Set up the table’s columns to match the structure of the celebrities array we have locally.
Then, add an extra embeddings column to store the vector embeddings for each celebrity. The special vector type allows you to store vectors in the column:

Lastly, notice that we have an undefined supabaseClient utility file in the code snippet. Simply create a utils/supabaseClient.ts file in the root of your Next.js project and update it with this code:
// src/utils/supabaseClient
import { createClient } from '@supabase/supabase-js';
export const supabaseClient = createClient(
  process.env.NEXT_PUBLIC_SUPABASE_URL!,
  process.env.NEXT_PUBLIC_SUPABASE_KEY!
);
With that, when we click the button we added to the UI, it should upload our celebrities data to Supabase, along with the corresponding vector embeddings for each celebrity. We can check back on our Supabase table to confirm:

Now that we have the data safely vectorized and stored in Supabase, we can update our frontend to read data from the DB instead of our local array. First, define a fetchCelebrities function to fetch the data from Supabase:
 useEffect(() => {
    fetchCelebrities();
  }, []);
  // fetch celebrities from supabase
  const fetchCelebrities = async () => {
    const { data, error } = await supabase
      .from('celebrities')
      .select('*')
      .order('first_name', { ascending: true });
    if (error) {
      console.log(error);
    }
    setSearchResults(data);
  };
This function will fetch our celebrities data from Supabase every time the application loads. Next, let’s update our search input to implement vector search, instead of the regular array filtration we had before:
  const handleSubmit = async (event) => {
    event.preventDefault();
    if (searchTerm.trim() === '') {
      // If the search term is empty, fetch the original list from Supabase
      await fetchCelebrities();
    } else {
      const semanticSearrch = await fetch('/api/search', {
        method: 'POST',
        headers: {
          'Content-Type': 'application/json',
        },
        body: JSON.stringify({
          searchTerm: searchTerm,
        }),
      });
      const semanticSearrchResponse = await semanticSearrch.json();
      console.log(semanticSearrchResponse.data);
      setSearchResults(semanticSearrchResponse.data);
    }
}
With this update, when a user types in the search input, the input text is sent to our api/search route where the vector search functionality is implemented. The result of that call is sent back to the client to update the UI.
Let’s set up that API route. Create a new src/pages/api/search/route.ts file and update it like this:
// src/pages/api/search/route.ts
import { NextRequest, NextResponse } from 'next/server';
import { createClient } from '@supabase/supabase-js';
import OpenAI from 'openai';
import { supabaseClient } from '../../../../utils/supabaseClient';
// Initialize the OpenAI client with your API key
const openai = new OpenAI({
  apiKey: process.env.NEXT_PUBLIC_OPENAI_API_KEY,
});
export async function POST(request: Request) {
  const body = await request.json();
  const query = body.searchTerm;
  if (!query) {
    return NextResponse.json({ error: 'Empty query' });
  }
  // Create Embedding
  const openAiEmbeddings = await openai.embeddings.create({
    model: 'text-embedding-ada-002',
    input: query,
  });
  const [{ embedding }] = openAiEmbeddings.data;
  // Search Supabase
  const { data, error } = await supabaseClient.rpc('vector_search', {
    query_embedding: embedding,
    similarity_threshold: 0.7,
    match_count: 3,
  });
  if (data) {
    return NextResponse.json({ data });
  }
  return NextResponse.json({ error });
}
Here, we receive the search query from the client and perform the following operations on it:
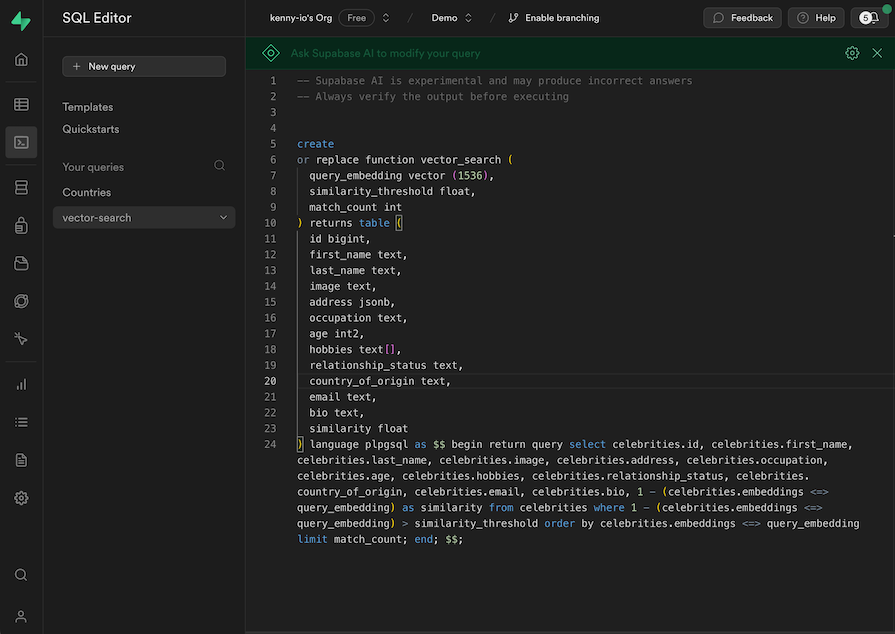
vector_search — Our Supabase SQL search function, which we’ll create soonquery_embedding — The vector embeddings we generated from the search querysimilarity_threshold — The level of similarity we want to allow in the resultsmatch-count — How many results we want to return for the searchWith that, we can now head over to our Supabase dashboard to create our vector-search SQL function. In the SQL Editor tab on Supabase, click New query, name it vector-search, and update it with this snippet:

This PostgreSQL stored procedure performs a vector similarity search in our celebrities table. The purpose is to find the celebrities whose embeddings are similar to the query embedding — which we passed in as a parameter from our project — based on the similarity threshold we’ve specified.
This is SQL, and it’s completely okay if you don’t understand it. I have saved a copy of the snippet in this gist if you’d like to poke around.
The function returns an array of matched celebrities along with their details and similarity scores. We should receive it in our project’s UI when we make that API call to the api/search route. When we receive it, we update our searchResults variable and that updates the results we seen on screen.
Now all we need to do is run the project to confirm that it all works as expected! Check it out:

In the demo above, we perform contextual search on the data. As you can see, we can find relevant celebrities simply by typing any detail about them, like country, occupation, age, and more. You can play around with this demo yourself on this site.
In this post, I used a Supabase vector to store the vector embeddings we generated via OpenAI. However, there are other noteworthy vector database providers in the business. Here are some others for your consideration:
I chose to use Supabase for this project out of convenience — I haven’t used all these other providers yet, so I can’t recommend which one you should go for. However, they all offer very similar features with minor batching and pricing differences.
What I would recommend is that you opt for any providers you’re familiar with so you can move fast in development. If you want to build something more complex for production, it’s necessary to do your own research to decide which of the providers best support your specific use case.
In this post, we’ve gone over vector search in detail. We looked at why vector search is important for frontend developers and how we can leverage it to offer better search experiences in our projects.
We also built a Next.js application that implements vector search using a Supabase vector database and the OpenAI Embeddings API. You can access the full project code on GitHub. Let me know if you have any preferred vector DB you’d like me to check out next.
Debugging Next applications can be difficult, especially when users experience issues that are difficult to reproduce. If you’re interested in monitoring and tracking state, automatically surfacing JavaScript errors, and tracking slow network requests and component load time, try LogRocket.
LogRocket captures console logs, errors, network requests, and pixel-perfect DOM recordings from user sessions and lets you replay them as users saw it, eliminating guesswork around why bugs happen — compatible with all frameworks.
LogRocket's Galileo AI watches sessions for you, instantly identifying and explaining user struggles with automated monitoring of your entire product experience.
The LogRocket Redux middleware package adds an extra layer of visibility into your user sessions. LogRocket logs all actions and state from your Redux stores.


Modernize how you debug your Next.js apps — start monitoring for free.

@container scroll-state: Replace JS scroll listeners nowCSS @container scroll-state lets you build sticky headers, snapping carousels, and scroll indicators without JavaScript. Here’s how to replace scroll listeners with clean, declarative state queries.

Russ Miles, a software development expert and educator, joins the show to unpack why “developer productivity” platforms so often disappoint.

Discover what’s new in The Replay, LogRocket’s newsletter for dev and engineering leaders, in the February 18th issue.

Learn how to recreate Claude Skills–style workflows in GitHub Copilot using custom instruction files and smarter context management.
Hey there, want to help make our blog better?
Join LogRocket’s Content Advisory Board. You’ll help inform the type of content we create and get access to exclusive meetups, social accreditation, and swag.
Sign up now