Most Python frameworks typically fall into one of two categories: minimalist frameworks like Flask and FastAPI or more robust frameworks that have batteries included, like the popular Django framework.
Django, however, has a pretty steep learning curve, primarily because its patterns are very different from almost all other Python frameworks. For example, what other frameworks would call controller actions are known as views in Django.
Django projects are organized into apps, which can sometimes muddle the typical MVC organization but provides benefits in modularity. Out of the box, it can be quite complicated to build a REST API without using a library like the DjangoRestFramework. Django’s folder structure often results in multiple folders and subfolders with the same name, causing confusion among teams.
While many developers still use and love Django, there is a recognized need for a framework that follows more conventional framework patterns, similar to those used by Ruby’s Rails, PHP’s Laravel, or NestJS. The Masonite framework allows us to use Python with a more robust, familiar convention.
In this tutorial, we’ll become familiar with Masonite by building a simple to-do list. To follow along with this tutorial, you’ll need to have Python ≥v3.6 installed. First, let’s review some of Masonite’s features and perks.
MailProvider, SMTP, and MailgunDriverBroadcast Provider, pusher, ably, and pubnub driversMasonite’s terminology is familiar to that of Rails, Laravel, and most other MVC web frameworks:
First, let’s create a new virtual environment:
python -m venv venv
To activate your virtual environment, run source ./venv/bin/activate. To deactivate, use the command deactivate. Next, install Masonite as follows:
pip install masonite
Create a new project with the command below:
craft new firstproject
Next, navigate to the firstproject directory. Run the following code to install additional dependencies:
craft install
In essence, craft is a command that acts as a prefix when working in Masonite, similar to the rails and artisan commands in Rails and Laravel.
Now, we’ll create our first controller:
craft controller First
The command above will create the app/http/FirstController.py file, which contains the following code:
"""A FirstController Module."""

from masonite.request import Request
from masonite.view import View
from masonite.controllers import Controller


class FirstController(Controller):
    """FirstController Controller Class."""

    def __init__(self, request: Request):
        """FirstController Initializer

        Arguments:
            request {masonite.request.Request} -- The Masonite Request class.
        """
        self.request = request

    def show(self, view: View):
        pass
In the __init__ function definition, we declare a parameter called request. request uses dependency injection to make the request object, which contains URL params, queries, etc., available to all our routes. Alternately, you could declare parameters on an action by action basis, like the view parameter on the show method.
Let’s say you’re building a full-stack application that will render a template; we’ll use the view parameter that we passed into the show method, rendering the desired template:
def show(self, view: View):
return view.render("helloworld", {"phrase": "Hello World"})
The code above tells Masonite to look in /resources/templates for a template called helloworld.html and render it using the data in the dictionary that is passed as the second argument.
To create the accompanying view, run the command craft view helloworld. Finally, add the code below to the newly created resources/templates/helloworld.html:
<!DOCTYPE html>
<html lang="en">
<head>
    <meta charset="UTF-8">
    <meta http-equiv="X-UA-Compatible" content="IE=edge">
    <meta name="viewport" content="width=device-width, initial-scale=1.0">
    <title>Hello World</title>
</head>
<body>
    <h1>{{ phrase }}</h1>
</body>
</html>
To see the code above at work, we just need to connect the controller to a route so that it can render the view. Open up routes/web.py, and let’s add our route as follows:
"""Web Routes."""

from masonite.routes import Get, Post

ROUTES = [
    Get("/", "WelcomeController@show").name("welcome"),
    Get("/first", "FirstController@show").name("first")
]
We use the Get function to declare a route for a GET request. The first string denotes the URL of the route, and the second string denotes the action from the controller that should be invoked. In our case, we invoke show from FirstController. The name method allows us to give our route a name, which we’ll use to refer to it in links within our templates.
Now, you can run the server with the command craft serve. We can see our page rendered on localhost:8000/first. That was pretty easy!
Sending JSON data is quite straightforward. We’ll return either a dictionary or an array in our action. If we modify our show action in FirstController as follows, when you check the page in the browser, you’ll be greeted by JSON data:
def show(self, view: View):
return {"Hello": "World"}
To set up our application for migrations, first, we’ll configure the database details in the .env file:
DB_CONNECTION=mysql
DB_HOST=127.0.0.1
DB_PORT=3306
DB_DATABASE=masonite
DB_USERNAME=root
DB_PASSWORD=root
DB_LOG=True
The DB_CONNECTION field corresponds with the different presets in config/database.py. For now, let’s comment all of these out, causing Masonite to default to SQLite3:
#DB_CONNECTION=mysql
#DB_HOST=127.0.0.1
#DB_PORT=3306
#DB_DATABASE=masonite
#DB_USERNAME=root
#DB_PASSWORD=root
#DB_LOG=True
Now, let’s run a migration to migrate out the default user auth migration that comes out of the box and create our sqlite3 database:
craft migrate
Next, let’s create a migration to create a todos table:
craft migration create_todos_table --create todos
The code above generates a new file in databases/migrations that looks like the code below:
"""CreatePostsTable Migration."""

from masoniteorm.migrations import Migration


class CreatePostsTable(Migration):
    def up(self):
        """
        Run the migrations.
        """
        with self.schema.create("todos") as table:
            table.increments("id")

            table.timestamps()

    def down(self):
        """
        Revert the migrations.
        """
        self.schema.drop("todos")
The up function represents what happens when we run the migration, while the down migration represents what happens when we rollback the migration or drop the table. Next, let’s add some fields for the todo table in the up function:
    def up(self):
        """
        Run the migrations.
        """
        with self.schema.create("todos") as table:
            table.increments("id")

            table.string("detail")
            table.boolean("completed")

            table.timestamps()
In the code block above, we added a string field called detail and a boolean field called completed. Now, let’s run the migration and create the table in our database:
craft migrate
Now, we have a table for our Todos. All we need now is a model that allows us to interact with the data:
craft model Todo
Let’s create the file app/Todo.py with our model class:
"""Todo Model."""

from masoniteorm.models import Model


class Todo(Model):
    """Todo Model."""
    pass
Currently, all of our model methods are attained in the Todo class by inheriting them from Masonite’s Model class.
Usually, the table name is the plural version of the class name, ie. Dog and Dogs. While the table should work automatically in our case, let’s explicitly declare the database table that it should connect to:
"""Todo Model."""

from masoniteorm.models import Model


class Todo(Model):
    """Todo Model."""
    __table__ = 'todos'
Run the command below to open up a Python shell with a preloaded Masonite container:
craft tinker
Then, we’ll import our todo model as follows:
from app.Todo import Todo
Now, let’s create a few to-do list items by adding the following code snippet several times:
Todo.create(detail="Hello", completed=False)
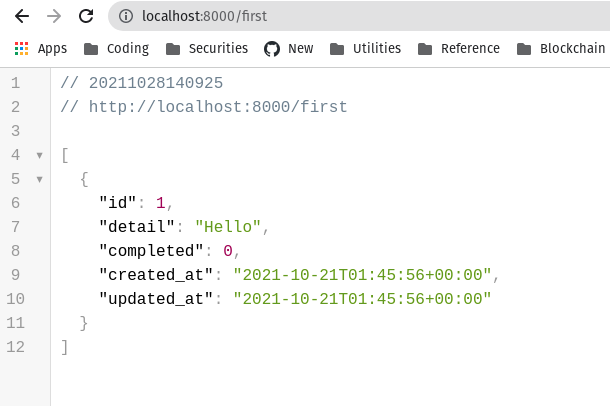
After you’ve added a few to-do list items, exit the Python shell with quit(). Now, let’s import the model into our controller and send back all those to-do list items as JSON. Add the code below in your app/http/controllers/FirstController.py file:
"""A FirstController Module."""

from masonite.request import Request
from masonite.view import View
from masonite.controllers import Controller
from app.Todo import Todo


class FirstController(Controller):
    """FirstController Controller Class."""

    def __init__(self, request: Request):
        """FirstController Initializer

        Arguments:
            request {masonite.request.Request} -- The Masonite Request class.
        """
        self.request = request

    def show(self, view: View):
        return Todo.all()
Turn on the server with craft serve and check out the result on localhost:8000/first.
Before we deploy our application, we need to set up our CORS headers in case we receive external requests to our application.
Let’s import and add the CORSProvider, a built-in provider that helps configure the CORS middleware, into the Providers array. Add the following code block to /config/providers.py:
"""Providers Configuration File."""

from masonite.providers import (
    AppProvider,
    CorsProvider, # ADD THIS
    RequestHelpersProvider,
    AuthenticationProvider,
    BroadcastProvider,
    CacheProvider,
    CsrfProvider,
    HelpersProvider,
    MailProvider,
    QueueProvider,
    RouteProvider,
    SessionProvider,
    StatusCodeProvider,
    UploadProvider,
    ViewProvider,
    WhitenoiseProvider,

)
from masonite.logging.providers import LoggingProvider
from masonite.validation.providers import ValidationProvider
from masoniteorm.providers import ORMProvider

"""Providers List
Providers are a simple way to remove or add functionality for Masonite
The providers in this list are either ran on server start or when a
request is made depending on the provider. Take some time to can
learn more more about Service Providers in our documentation
"""

PROVIDERS = [
    # Framework Providers
    AppProvider,
    CorsProvider, # ADD THIS
    RequestHelpersProvider,
    CsrfProvider,
    AuthenticationProvider,
    SessionProvider,
    RouteProvider,
    StatusCodeProvider,
    WhitenoiseProvider,
    ViewProvider,
    # Optional Framework Providers
    MailProvider,
    UploadProvider,
    QueueProvider,
    CacheProvider,
    BroadcastProvider,
    HelpersProvider,
    ValidationProvider,
    # Third Party Providers
    LoggingProvider,
    ValidationProvider,
    ORMProvider,
    # Application Providers
]
To configure our CORS middleware, first, let’s declare a CORS variable and assign it a dictionary of our cors headers. Add the code below to your /config/middleware.py file:
"""Middleware Configuration Settings."""

from masonite.middleware import (
    ResponseMiddleware,
    MaintenanceModeMiddleware,
    GuardMiddleware,
)

from app.http.middleware.AuthenticationMiddleware import AuthenticationMiddleware
from app.http.middleware.CsrfMiddleware import CsrfMiddleware
from app.http.middleware.LoadUserMiddleware import LoadUserMiddleware
from app.http.middleware.VerifyEmailMiddleware import VerifyEmailMiddleware

"""HTTP Middleware
HTTP middleware is middleware that will be ran on every request. Middleware
is only ran when a HTTP call is successful (a 200 response). This list
should contain a simple aggregate of middleware classes.
"""

HTTP_MIDDLEWARE = [
    LoadUserMiddleware,
    CsrfMiddleware,
    ResponseMiddleware,
    MaintenanceModeMiddleware,
]

"""Route Middleware
Specify a dictionary of middleware to be used on a per route basis here. The key will
be the alias to use on routes and the value can be any middleware class or a list
of middleware (middleware stacks).
"""

ROUTE_MIDDLEWARE = {
    "auth": AuthenticationMiddleware,
    "verified": VerifyEmailMiddleware,
    "guard": GuardMiddleware,
}


## ADD THIS
CORS = {
    'Access-Control-Allow-Origin': "*",
    "Access-Control-Allow-Methods": "*",
    "Access-Control-Allow-Headers": "*",
    "Access-Control-Max-Age": "3600",
    "Access-Control-Allow-Credentials": "true"
}
To deploy our Masonite to-do list application to Heroku, let’s install Gunicorn and Psycopg2. If you’re aren’t using Heroku Postgres, be sure to install the right drivers for your deployment platform:
pip install psycopg2
pip install gunicorn
Create a file called Procfile in the project root and run the following command:
web: gunicorn wsgi
Next, create a runtime.txt file:
python-3.9.0
To create list of current dependencies, run pip freeze > requirements.txt:
backpack==0.1
bcrypt==3.1.7
certifi==2021.5.30
cffi==1.14.6
charset-normalizer==2.0.5
cleo==0.8.1
clikit==0.6.2
crashtest==0.3.1
cryptography==3.4.8
exceptionite==1.0.1
Faker==4.18.0
gunicorn==20.1.0
hfilesize==0.1.0
hupper==1.9.1
idna==3.2
inflection==0.3.1
Jinja2==2.11.3
MarkupSafe==2.0.1
masonite==3.0.12
masonite-dot==0.0.5
masonite-logging==1.0.1
masonite-orm==1.0.55
masonite-validation==3.0.14
passlib==1.7.4
pastel==0.2.1
pendulum==2.1.2
psutil==5.6.7
psycopg2==2.9.1
pycparser==2.20
pylev==1.4.0
python-dateutil==2.8.2
python-dotenv==0.10.5
pytzdata==2020.1
requests==2.26.0
requests-file==1.5.1
simplejson==3.17.5
six==1.16.0
tabulate==0.8.9
text-unidecode==1.3
tldextract==2.2.3
urllib3==1.26.6
whitenoise==4.1.4
If you’re missing any of the dependencies above, or you run into issues with Psycopg2, you can easily copy the missing dependency to your requirements.txt file.
Next, we’ll push our project up to GitHub and deploy to a new Heroku project. Go to the Resources tab and provision a Heroku Postgres database. Get the credentials for the database and add the following variables to Heroku config vars:
DB_CONNECTION=postgres
DB_HOST=<get value from herok>
DB_PORT=<get value from herok>
DB_DATABASE=<get value from herok>
DB_USERNAME=<get value from herok>
DB_PASSWORD=<get value from herok>
DB_LOG=True
Finally, copy the key variable from your local .env to your Heroku config vars and set a variable. The code for our final application looks like the image below:
In this tutorial, we built a simple to-do list application with Masonite, a web framework for Python that uses the MVC model. Masonite offers many of the best features of modern frameworks like PHP, Ruby, and NestJS, bringing them to Python in a slick package.
The CLI is powerful by helping you generate the components of your application while still providing a simple enough workflow to maximize productivity. Now that you are familiar with the fundamentals of Masonite, you should be able to build your own, complex applications. Happy coding!
Install LogRocket via npm or script tag. LogRocket.init() must be called client-side, not
server-side
$ npm i --save logrocket

// Code:

import LogRocket from 'logrocket';
LogRocket.init('app/id');
// Add to your HTML:

<script src="https://cdn.lr-ingest.com/LogRocket.min.js"></script>
<script>window.LogRocket && window.LogRocket.init('app/id');</script>

Learn how to protect full-stack projects from NPM supply chain attacks with a practical security checklist.

Explore 15 essential MCP servers for web developers to enhance AI workflows with tools, data, and automation.

Learn how contrast-color() automatically picks accessible text colors using native CSS, without JavaScript.

Learn how to build a harness-style AI workflow using Claude Code with specialized Dev, QE, and Ops subagents, gated handoffs, MCP telemetry, and LEARNING.md.
Hey there, want to help make our blog better?
Join LogRocket’s Content Advisory Board. You’ll help inform the type of content we create and get access to exclusive meetups, social accreditation, and swag.
Sign up now

