Using motion sensors in game development is a great way to enhance a player’s experience. In one of the most classic use cases, motion sensors detect the orientation of a player’s device and use it to move the player around.

In this post, we’ll go over the basics of using motion sensors in a Unity application. This can be applied to any app, whether it’s a casual mobile game, AR or VR experience, or one that includes features relying on a sense of movement.
In this article, we’re going to create a set of two examples. The first one will be simple, you’ll learn to read values from a gyroscope, accelerometer, and other sensors, and then output them to a text field.
The second example will be a bit more interesting. We’ll build a PlayerController prototype for a first-person game where a player can move and look around just by tilting and orienting a mobile device.
In both examples, we’ll be using the newer InputSystem. There’s also a legacy way of working with gyroscopes and accelerometers in Unity, but I’m not going to cover that today. I assume you have at least a basic understanding of the Unity engine, though I will unfold the tutorial in small steps.
As a big fan of learning by doing, I encourage you to follow along. I also recommend experimenting with these examples on your own to solidify your new knowledge!
But before we jump into action, let’s briefly talk about gyroscopes and accelerometers.
Gyroscopes and accelerometers — how do these sensors differ from each other? And how are they useful?
You probably already know that smartphones come equipped with different modules and sensors. Among them, you can often find both a gyroscope and an accelerometer. The concrete implementation of these sensors differs from device to device, but almost all mobile devices have them these days.
While an accelerometer measures acceleration (hence its name), a gyroscope determines a change in orientation or angular velocity. Seeing actual values from each sensor is the best way to illustrate what this all means.
Look at the following picture of phones lying in various ways and compare the values from both sensors.
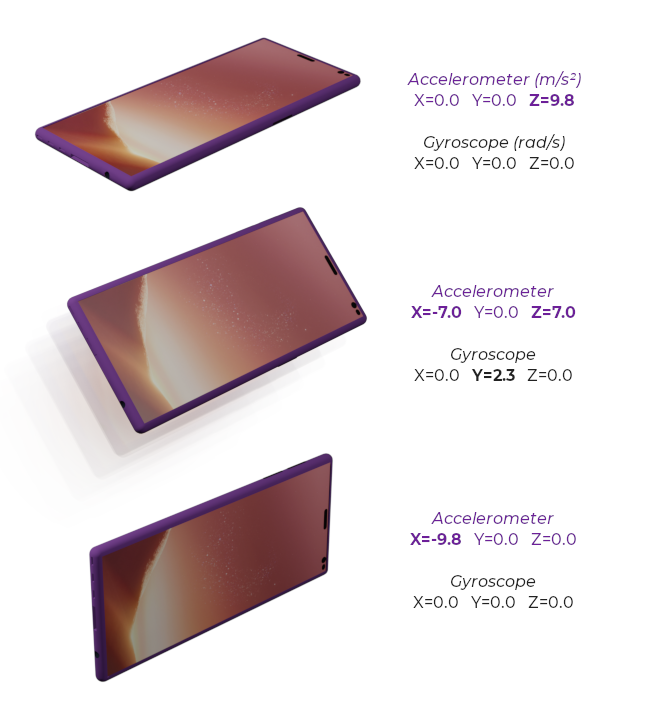
I got these values from my phone using the CPU-Z Android app. As you can see, values from the gyroscope are angular velocities in radians per second along each axis. These values are 0.0 when the device is not rotating at the moment.
The acceleration is in a standard acceleration unit, meters per second squared. When my phone lies still in the first photo, its acceleration sensor reports a 9.8 meters per second squared acceleration along the z-axis, while the x- and y-axis are 0. That’s because the only acceleration that acts on the device is the Earth’s gravity. In theory, the value would be 1.62 meters per second squared if you had the device placed like that on the moon.
Now let’s get building!
We’ll start by building a simple Unity application that we can use to read values from different sensors in real-time. Apart from the accelerometer and gyroscope, we’ll be reading values from attitude and gravity sensors.
If you want to follow along, I recommend using Unity 2021.3.4f1 and connecting your device to your computer with a USB cable. It’s important to also have USB debugging enabled, it will allow you to deploy your mobile application directly from the Unity editor.
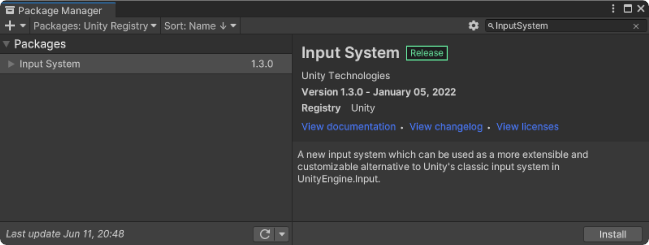
First, after creating a new project in Unity, we have to import the InputSystem package. Open Window → Package Manager. Select Unity Registry from Package repositories, type InputSystem in the search field, select the package, and hit install.
Then, in the Hierarchy tab, add a new game object to our scene with a Text component. You can do this by right-clicking and selecting from the context menu UI → Legacy → Text. For this example, we don’t need all the bells and whistles of Text Mesh Pro.
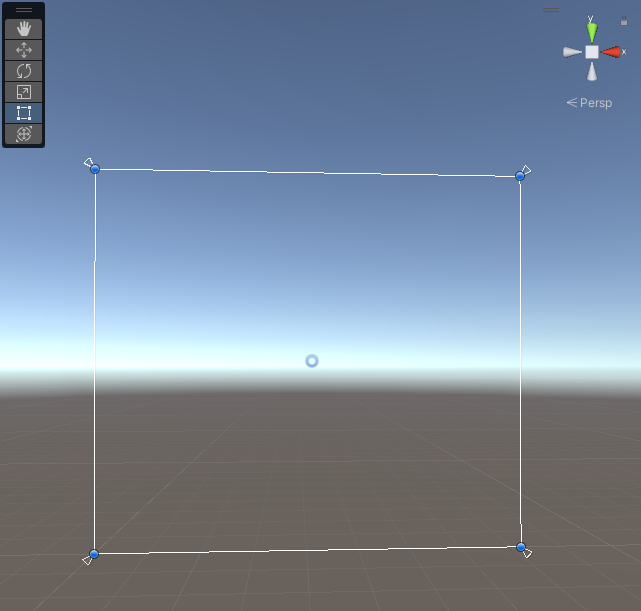
When we added a Text, the Unity editor also added a Canvas. Text is now the child object of this Canvas. In the Scene tab, use the Rect Tool to resize the Text object until it covers the entire Canvas. It should snap on corners.
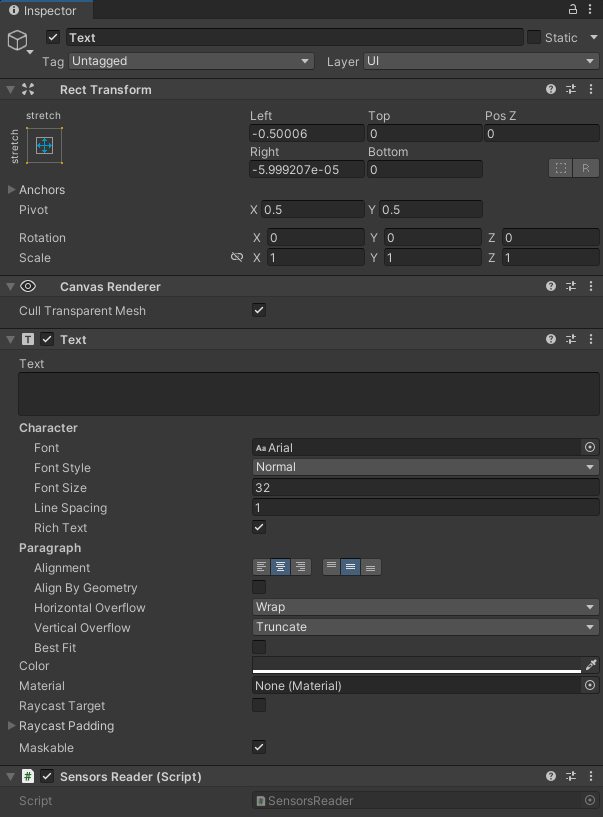
Now, in the inspector, change the Anchor Preset to stretch along both axes and the properties of the Text component to have the actual text centered both vertically and horizontally. Then, add a new script. Let’s call it SensorsReader.
After we type the following C# code, we’re ready to build and run the application on our mobile device.
using UnityEngine;
using UnityEngine.InputSystem;
using UnityEngine.UI;

using Gyroscope = UnityEngine.InputSystem.Gyroscope;

[RequireComponent(typeof(Text))]
public class SensorsReader : MonoBehaviour
{
    private Text text;

    void Start()
    {
        text = GetComponent<Text>();

        InputSystem.EnableDevice(Gyroscope.current);
        InputSystem.EnableDevice(Accelerometer.current);
        InputSystem.EnableDevice(AttitudeSensor.current);
        InputSystem.EnableDevice(GravitySensor.current);
    }

    void Update()
    {
        Vector3 angularVelocity = Gyroscope.current.angularVelocity.ReadValue();
        Vector3 acceleration = Accelerometer.current.acceleration.ReadValue();
        Vector3 attitude = AttitudeSensor.current.attitude.ReadValue().eulerAngles; // ReadValue() returns a Quaternion
        Vector3 gravity = GravitySensor.current.gravity.ReadValue();

        text.text = $"Angular Velocity\nX={angularVelocity.x:#0.00} Y={angularVelocity.y:#0.00} Z={angularVelocity.z:#0.00}\n\n" +
                        $"Acceleration\nX={acceleration.x:#0.00} Y={acceleration.y:#0.00} Z={acceleration.z:#0.00}\n\n" +
                            $"Attitude\nX={attitude.x:#0.00} Y={attitude.y:#0.00} Z={attitude.z:#0.00}\n\n" +
                             $"Gravity\nX={gravity.x:#0.00} Y={gravity.y:#0.00} Z={gravity.z:#0.00}";
    }
}
At the top, you can see we’re using the UnityEngine.InputSystem namespace. That’s the one we got from the InputSystem package we installed before. We’re using UnityEngine.UI so we can work with the Text component. We also want to use the Gyroscope class from the UnityEngine.InputSystem namespace, not the legacy one.
SensorsReader is a MonoBehaviour and we decorated the class with the [RequireComponent(typeof(Text))] attribute. It is not mandatory, but using this attribute is a good practice. Our custom SensorsReader component depends on Text in runtime, and not having one would result in a runtime error. With this attribute, we can catch the issue already in compile time which is generally better.
The class has only one member, the text of type Text. We assigned a reference to the Text component on the same object in the Start method. We did that using the GetComponent. We also enabled Gyroscope, Accelerometer, Attitude, and Gravity sensors.
We’re not going to use all of them in the second example, but I highly recommend experimenting and trying to come up with some use cases for all of them. Be curious and creative!
Finally, in the Update method, we assign values we read from sensors to Vector3 structs and display these values in our Text component.
And that’s pretty much it for the first example. Now, switch back to Unity Editor, go to File → Build Settings and switch to the platform your mobile device runs on.
In Player Settings, change the default orientation to either portrait or landscape. Then, back in the Build Settings, select which device you’d like to run the application, assuming you have a device connected as specified earlier. Hit Build And Run.

In a few moments, you should see real-time values from motion sensors in your app. If everything works, rotate and move your device while watching the values. Try to build a sense of orientation along the x-, y-, and z-axis before moving to the final example.
Getting values from motion sensors in Unity, as you just saw, is pretty straightforward. Let’s proceed to a bit more advanced example.
PlayerControllerA PlayerController allows us to look around and move in space based on values from Accelerometer and AttitudeSensor.
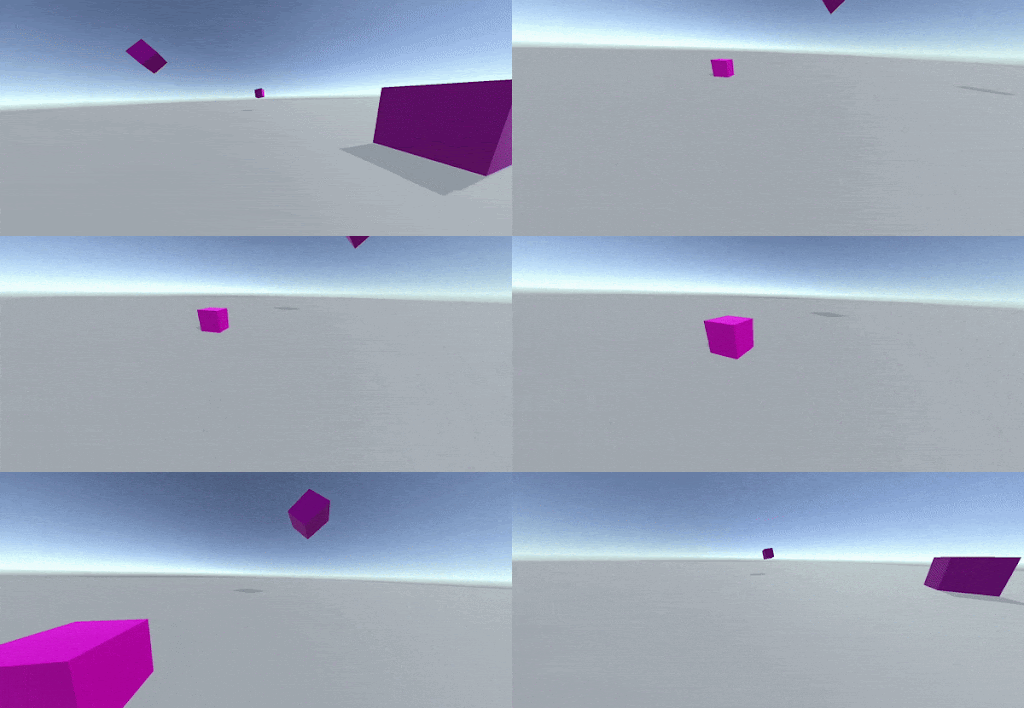
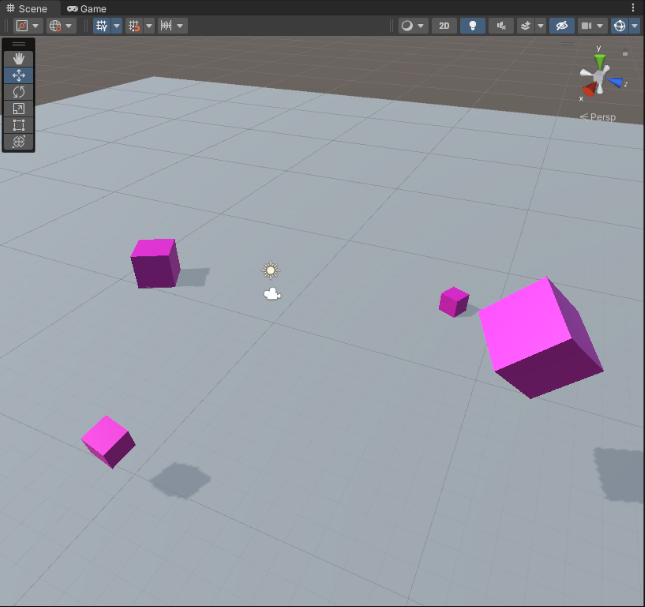
Create a new Unity scene and a new Plane in the Hierarchy tab. Move it to the world’s origin and place a few cubes around. The plane represents the ground, and the cubes will serve as orientation points.
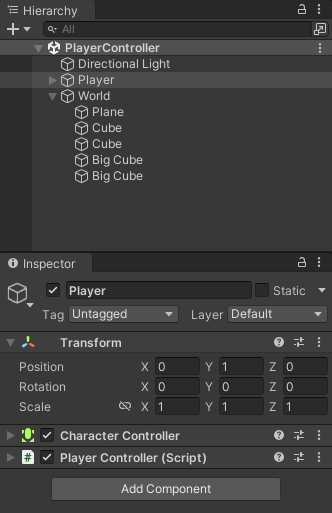
Now, add a new empty GameObject on the plane, rename it to Player, and drag the MainCamera onto it. MainCamera becomes its child object. Then, add a CharacterController component to the Player and a new custom script. Let’s call it PlayerController.
The scene is ready! Now, we can start writing the PlayerController script. First, we need an additional using statement, and, even though this is not mandatory, we’ll decorate the class with the RequireComponent attribute.
using UnityEngine;
using UnityEngine.InputSystem;

[RequireComponent(typeof(CharacterController))]
public class PlayerController : MonoBehaviour
The PlayerController class needs just a few members.
private CharacterController characterController;

[SerializeField]
private float movementSpeed = 3.0f;

private Transform rotator;

[SerializeField]
private float smoothing = 0.1f;
The SerializeField attribute allows us to edit variables in the Inspector tab while keeping their access modifiers private. However, be aware that the compiler ignores the default value in the code once Unity serializes the field. Unity serializes public fields by default.
In the Start method, we assign a reference to CharacterController, enable both Accelerometer and AttitudeSensor, and create a new GameObject. We name this object Rotator. Soon, we will use this object to store intermediate rotation in its Transform component.
private void Start()
{
characterController = GetComponent<CharacterController>();

InputSystem.EnableDevice(Accelerometer.current);
    InputSystem.EnableDevice(AttitudeSensor.current);

rotator = new GameObject("Rotator").transform;
rotator.SetPositionAndRotation(transform.position, transform.rotation);
}
In the Update method, we call the Move and then the LookAround methods in every frame. These methods, which we’ll write right after Update, are the essence of our PlayerController.
private void Update()
{
Move();
LookAround();
}
Let’s start with the Move method. We read values from Accelerometer and use the acceleration along the x and z axes to create a movement direction. Our move direction will be a Vector3, and this 3D vector will tell the CharacterController how fast and in which direction the Player should be moving.
We do not want to move along the y-axis (up and down), so we keep y as 0. Along the z-axis (forward and backward), we instigate the movement by tilting the device forward and backward. Along the x-axis (left and right), we want to strafe. However, we need to inverse the z value because the coordinate system orientation corresponds with the device’s point of view.
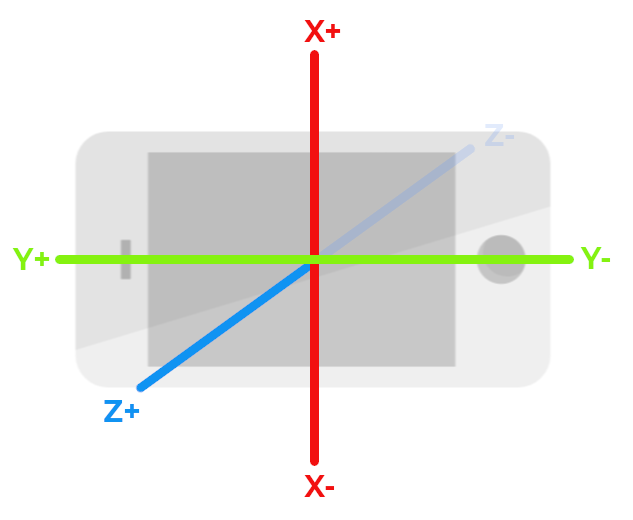
We multiply acceleration by moveSpeed and by Time.deltaTime to have the movement speed independent of the frame rate. How this works is outside the scope of this post, but if you don’t know, I highly recommend getting familiarized! You can start here in the Unity documentation.
Before applying the move direction to CharacterController, we need to transform it from the local space to the world space. The difference between local and world space is omnipresent in game development. But, again, that’s outside the scope of this post.
private void Move()
{
Vector3 acceleration = Accelerometer.current.acceleration.ReadValue();

Vector3 moveDirection = new(acceleration.x * movementSpeed * Time.deltaTime, 0, -acceleration.z * movementSpeed * Time.deltaTime);
Vector3 transformedDirection = transform.TransformDirection(moveDirection);

characterController.Move(transformedDirection);
}
The final piece of code in this example is the LookAround method. In this method, we read the attitude from AttitudeSensor. This value is a quaternion. If this term is new to you, take it from here that they are commonly used in games to represent a rotation.
We assign attitude as the rotation of our rotator. We rotate the rotator 180 degrees along the z-axis in its local space in one step, 90 degrees along the x-axis, and 180 degrees in the y-axis in the world space in the second step.
We do this because we want the final rotation to match the orientation when we hold the device in the Landscape Left position. This occurs when the left in the portrait position is now the bottom.
In the end, we apply the rotation from the rotator to this object, though not directly. It’s applied via spherical interpolation, also known as Slerp. Unity has us covered and provides a static method of the Quaternion class. As a t value, we use the smoothing factor.
>private void LookAround()
{
Quaternion attitude = AttitudeSensor.current.attitude.ReadValue();

rotator.rotation = attitude;
rotator.Rotate(0f, 0f, 180f, Space.Self);
rotator.Rotate(90f, 180f, 0f, Space.World);

transform.rotation = Quaternion.Slerp(transform.rotation, rotator.rotation, smoothing);
}
Almost there! The last thing you need to do before testing is to switch the Default Orientation in Player Settings from Portrait to Landscape Left and replace the scene from the previous example with the current one in Build Settings.

And that’s it! You now have a motion sensor-based PlayerController for your Unity projects!
A Unity project that contains both examples is available for you in this GitHub repository.
Install LogRocket via npm or script tag. LogRocket.init() must be called client-side, not
server-side
$ npm i --save logrocket

// Code:

import LogRocket from 'logrocket';
LogRocket.init('app/id');
// Add to your HTML:

<script src="https://cdn.lr-ingest.com/LogRocket.min.js"></script>
<script>window.LogRocket && window.LogRocket.init('app/id');</script>
Would you be interested in joining LogRocket's developer community?
Join LogRocket’s Content Advisory Board. You’ll help inform the type of content we create and get access to exclusive meetups, social accreditation, and swag.
Sign up now
Get to know RxJS features, benefits, and more to help you understand what it is, how it works, and why you should use it.

Explore how to effectively break down a monolithic application into microservices using feature flags and Flagsmith.

Native dialog and popover elements have their own well-defined roles in modern-day frontend web development. Dialog elements are known to […]

LlamaIndex provides tools for ingesting, processing, and implementing complex query workflows that combine data access with LLM prompting.
One Reply to "Making a mobile game with motion sensors in Unity"
Ty so much, I was trying with Input.gyro.enable = true that didn’t work, then I found this post, you help me a lot 😀