The URL Launcher is a Flutter plugin that allows your applications to launch web browsers, map applications, dialer applications, mail applications, and so on. The URL Launcher plugin works by creating intents to open applications using different URL schemes.
In this article, we’ll build a simple project to demonstrate how the URL Launcher plugin can be used to open a web browser and dialer, mail, and map apps.
The Replay is a weekly newsletter for dev and engineering leaders.
Delivered once a week, it's your curated guide to the most important conversations around frontend dev, emerging AI tools, and the state of modern software.
You must have the following set up before you can complete this tutorial:
This tutorial was verified with Flutter v2.5.1 and Android Studio v3.5.
So, with everything out of the way, let’s get started.
Create a new Flutter project by running the following command in your terminal:
$ flutter create url_launcher_example
Next, we need to add the url_launcher plugin as a dependency to our project. You can do that by running the following command in your terminal:
$ flutter pub add url_launcher
The url_launcher plugin will be added as a dependency to our pubspec.yaml file as a result.
Next, we need to build the UI of our application. Copy and paste the code below in your main.dart file.
import 'package:flutter/material.dart';
import 'package:url_launcher_example/custom_button.dart';
import 'package:url_launcher/url_launcher.dart';
void main() {
  runApp(const MyApp());
}
class MyApp extends StatelessWidget {
  const MyApp({Key? key}) : super(key: key);
  @override
  Widget build(BuildContext context) {
    return MaterialApp(
      title: 'Flutter Demo',
      debugShowCheckedModeBanner: false,
      theme: ThemeData(
        primarySwatch: Colors.blue,
      ),
      home: const MyHomePage(),
    );
  }
}
class MyHomePage extends StatelessWidget {
  const MyHomePage({Key? key}) : super(key: key);
  @override
  Widget build(BuildContext context) {
    return Scaffold(
        backgroundColor: const Color(0xFF3E1F92),
        body: SafeArea(
          child: Padding(
            padding: const EdgeInsets.all(20.0),
            child: Column(
              mainAxisAlignment: MainAxisAlignment.start,
              crossAxisAlignment: CrossAxisAlignment.start,
              children: [
                const Text('Get in touch',
                    style: TextStyle(
                        color: Colors.white,
                        fontSize: 30.0,
                        fontWeight: FontWeight.bold)),
                const SizedBox(height: 10.0),
                const Text(
                    "We'd love to hear from you. Our friendly team is always here to chat.",
                    style: TextStyle(
                        color: Color(0xFFA895D1),
                        fontSize: 15.0,
                        fontWeight: FontWeight.normal)),
                const SizedBox(height: 30.0),
                TextButton(
                  onPressed: () {
                    //logic  goes here
                  },
                  style: TextButton.styleFrom(
                    padding: const EdgeInsets.all(15),
                  ),
                  child: Row(
                    mainAxisSize: MainAxisSize.min,
                    children: const [
                      Icon(Icons.phone, color: Color(0xFFED92A2)),
                      SizedBox(width: 20.0),
                      Text('+0123 4567 8910',
                          style: TextStyle(
                              color: Color(0xFFA294C2),
                              fontSize: 16.0,
                              fontWeight: FontWeight.w500)),
                    ],
                  ),
                ),
                TextButton(
                  onPressed: () {
                    //logic  goes here
                  },
                  style: TextButton.styleFrom(
                    padding: const EdgeInsets.all(15),
                  ),
                  child: Row(
                    mainAxisSize: MainAxisSize.min,
                    children: const [
                      Icon(Icons.sms, color: Color(0xFFED92A2)),
                      SizedBox(width: 20.0),
                      Text('+0123 4567 8910',
                          style: TextStyle(
                              color: Color(0xFFA294C2),
                              fontSize: 16.0,
                              fontWeight: FontWeight.w500)),
                    ],
                  ),
                ),
                TextButton(
                  onPressed: () {
                    //logic  goes here
                  },
                  style: TextButton.styleFrom(
                    padding: const EdgeInsets.all(15),
                  ),
                  child: Row(
                    mainAxisSize: MainAxisSize.min,
                    children: const [
                      Icon(Icons.mail, color: Color(0xFFED92A2)),
                      SizedBox(width: 20.0),
                      Text('[email protected]',
                          style: TextStyle(
                              color: Color(0xFFA294C2),
                              fontSize: 16.0,
                              fontWeight: FontWeight.w500)),
                    ],
                  ),
                ),
                TextButton(
                  onPressed: () {
                    //logic  goes here
                  },
                  style: TextButton.styleFrom(
                    padding: const EdgeInsets.all(15),
                  ),
                  child: Row(
                    mainAxisSize: MainAxisSize.min,
                    children: const [
                      Icon(Icons.location_pin, color: Color(0xFFED92A2)),
                      SizedBox(width: 20.0),
                      Text('87 Summer St., Boston, MA 02110',
                          style: TextStyle(
                              color: Color(0xFFA294C2),
                              fontSize: 16.0,
                              fontWeight: FontWeight.w500)),
                    ],
                  ),
                ),
                TextButton(
                  onPressed: () {
                    //logic  goes here
                  },
                  style: TextButton.styleFrom(
                    padding: const EdgeInsets.all(15),
                  ),
                  child: Row(
                    mainAxisSize: MainAxisSize.min,
                    children: const [
                      Icon(Icons.language, color: Color(0xFFED92A2)),
                      SizedBox(width: 20.0),
                      Text('blog.logrocket.com',
                          style: TextStyle(
                              color: Color(0xFFA294C2),
                              fontSize: 16.0,
                              fontWeight: FontWeight.w500)),
                    ],
                  ),
                ),
              ],
            ),
          ),
        ));
  }
}
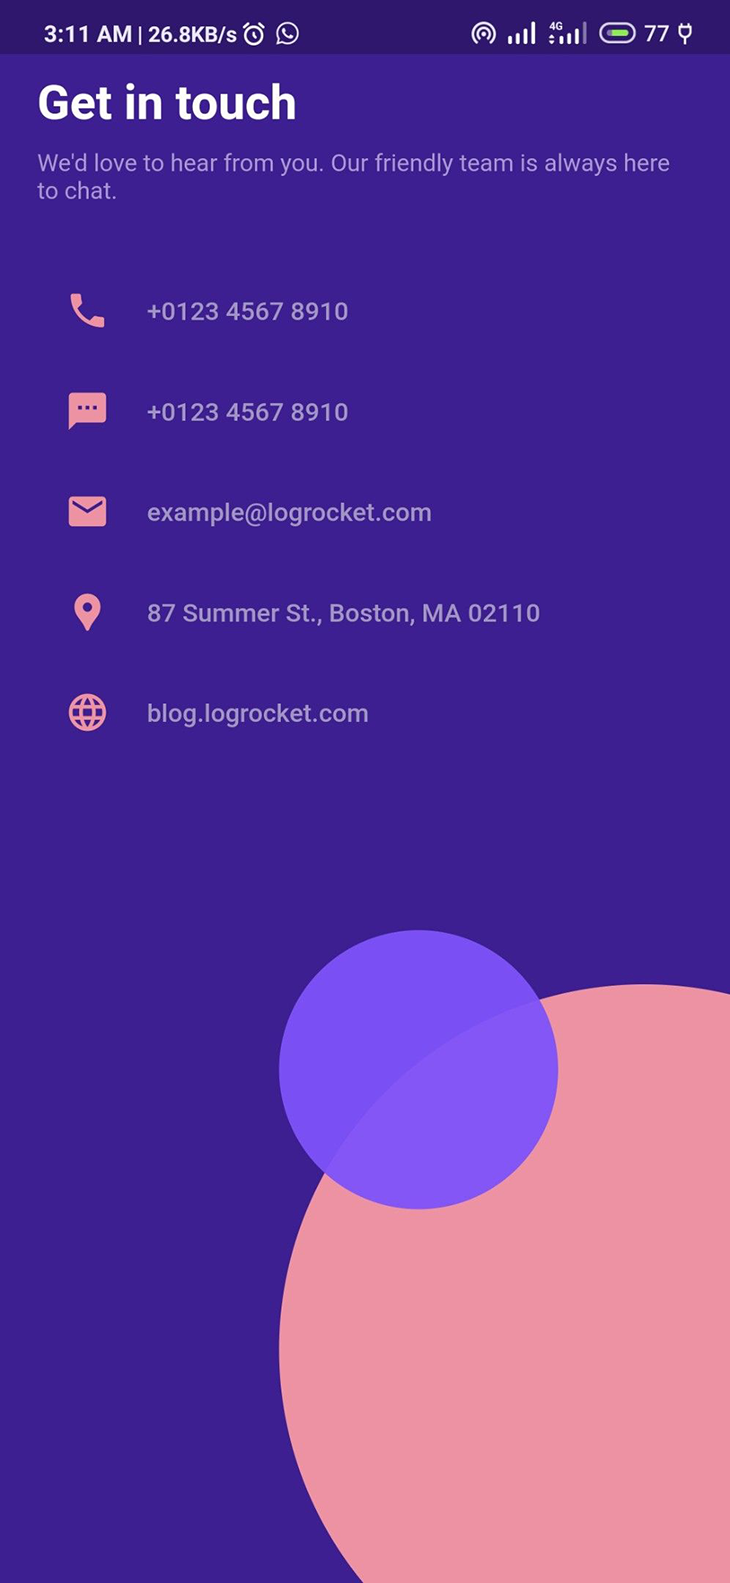
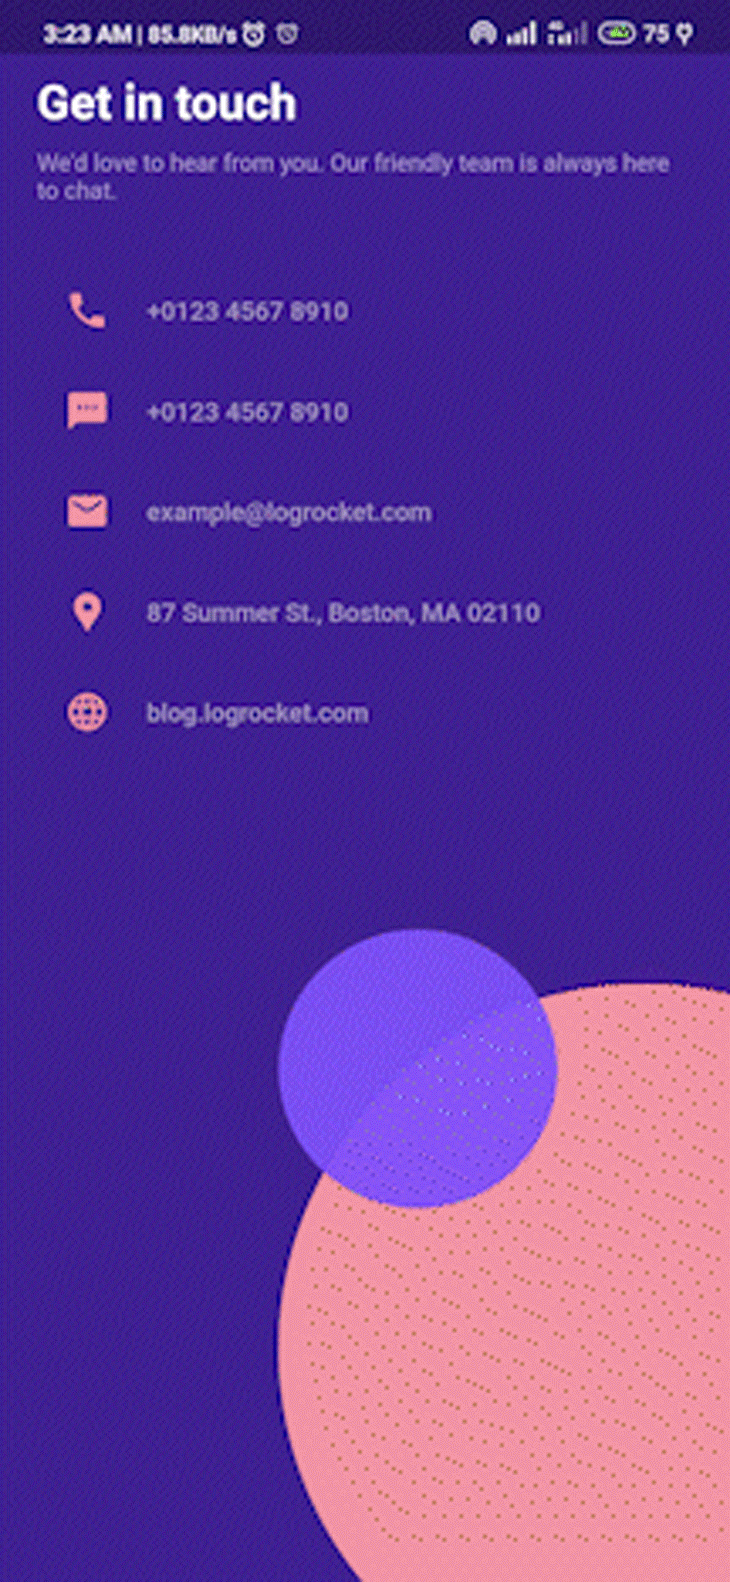
Now that we have created a basic UI for our application, we can run the code on either an emulator or a physical device. When the execution is complete, your device or emulator should display a screen similar to this:
The URL Launcher plugin provides two asynchronous functions: canLaunch and launch. The canLaunch function returns a boolean value that indicates whether or not a device can handle a certain URL scheme. For example, if a device does not have an email app installed, it will be unable to launch a URL using the mailto scheme.
The launch function, on the other hand, requires a String as an argument that serves as the URL; it parses the given URL string and passes it to the underlying platform for processing. The launch function also has other named optional parameters that can be used to change specific settings on both Android and iOS platforms, some of which are as follows:
forceWebView – If set to null or false, the URL is opened in the device’s default browser; otherwise, the URL is launched in a WebViewenableJavaScript – If set to true, JavaScript is enabled in WebViewenableDomStorage – When the value is set to true, WebView enables DOM storageforceSafariVC – If set to true, it opens the URL in the Safari View Controller; otherwise, it uses the device’s default handlerstatusBarBrightness – collects an enum value which can be either Brightness.dark or Brightness.light to set the status bar brightness of the application after opening a link on iOS devicesNow that we understand how the URL Launcher plugin works and what it provides, let’s look at some examples of how we can implement it in our application.
The code below is quite self-explanatory; notice that we use the canLaunch function to check whether the device can launch a particular URL scheme before invoking the launch function.
TextButton(
  onPressed: () async {
      const url = 'https://blog.logrocket.com';
      if(await canLaunch(url)){
        await launch(url);
      }else {
        throw 'Could not launch $url';
      }
    },
    child: const CustomWidget(
      icon: Icons.language,
      label: 'Open a URL',
    ),
),
Run the code on your device and tap the Open a URL card in our original UI to launch the webpage.

In a case where we want the browser to be embedded in our application, we set forceWebView to be true.
TextButton(
   onPressed: () async {
      const url = 'https://blog.logrocket.com';
      if(await canLaunch(url)){
        await launch(url, forceWebView = true);  //forceWebView is true now
      }else {
        throw 'Could not launch $url';
      }
    },
...//

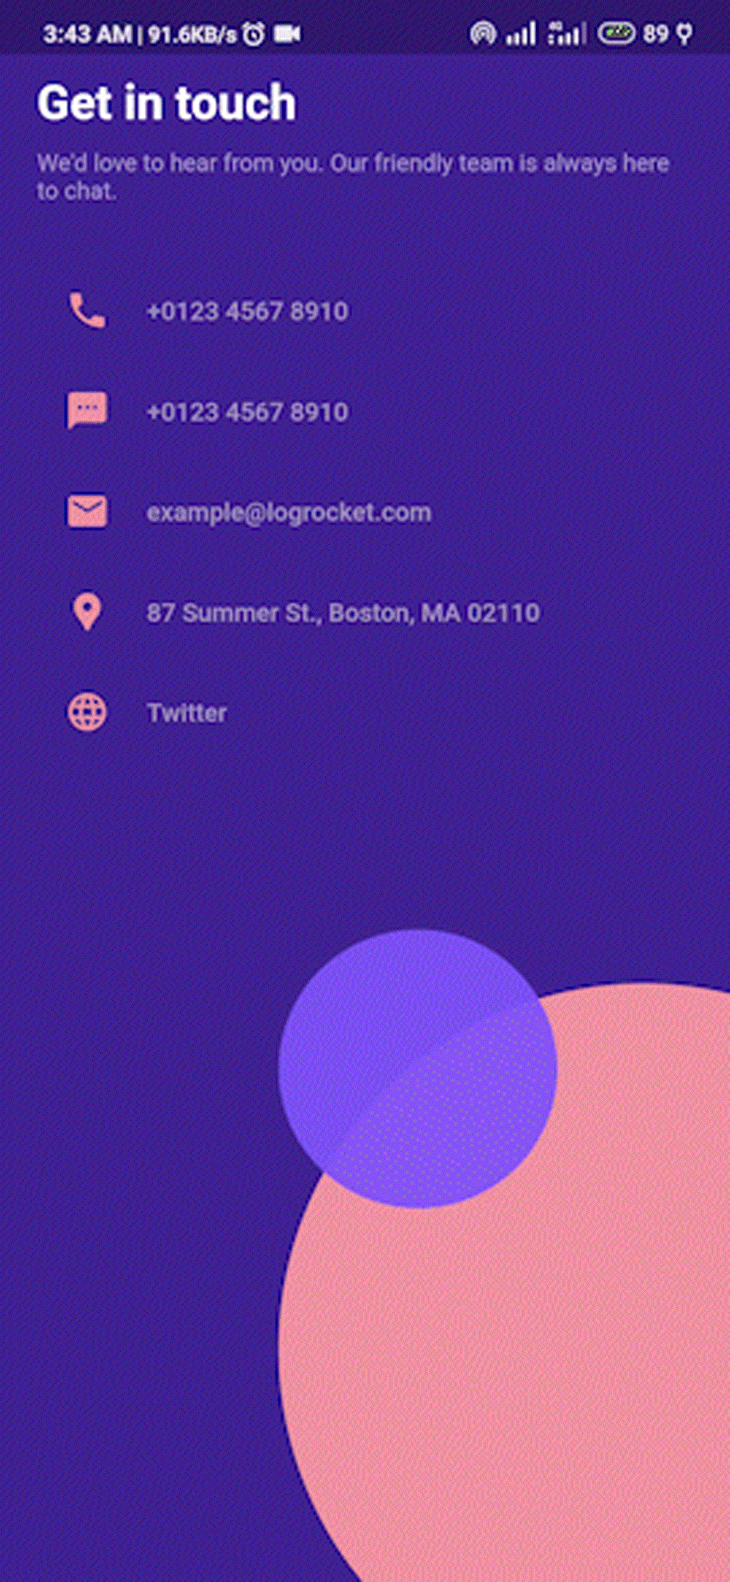
We may choose to disable JavaScript on a website in order to increase our browsing speed and online activity; however, this comes with a disadvantage in that you may be unable to access certain features on a website if we set enableJavaScript to false. Consider Twitter’s official website, which is heavily reliant on JavaScript:
TextButton(
   onPressed: () async {
      const url = 'https://www.twitter.com';  //Twitter's URL
      if(await canLaunch(url)){
        await launch(
          url,
          forceWebView = true,       //enables WebView
          enableJavaScript = false  //disables JavaScript
        );
      }else {
        throw 'Could not launch $url';
      }
    },
...//
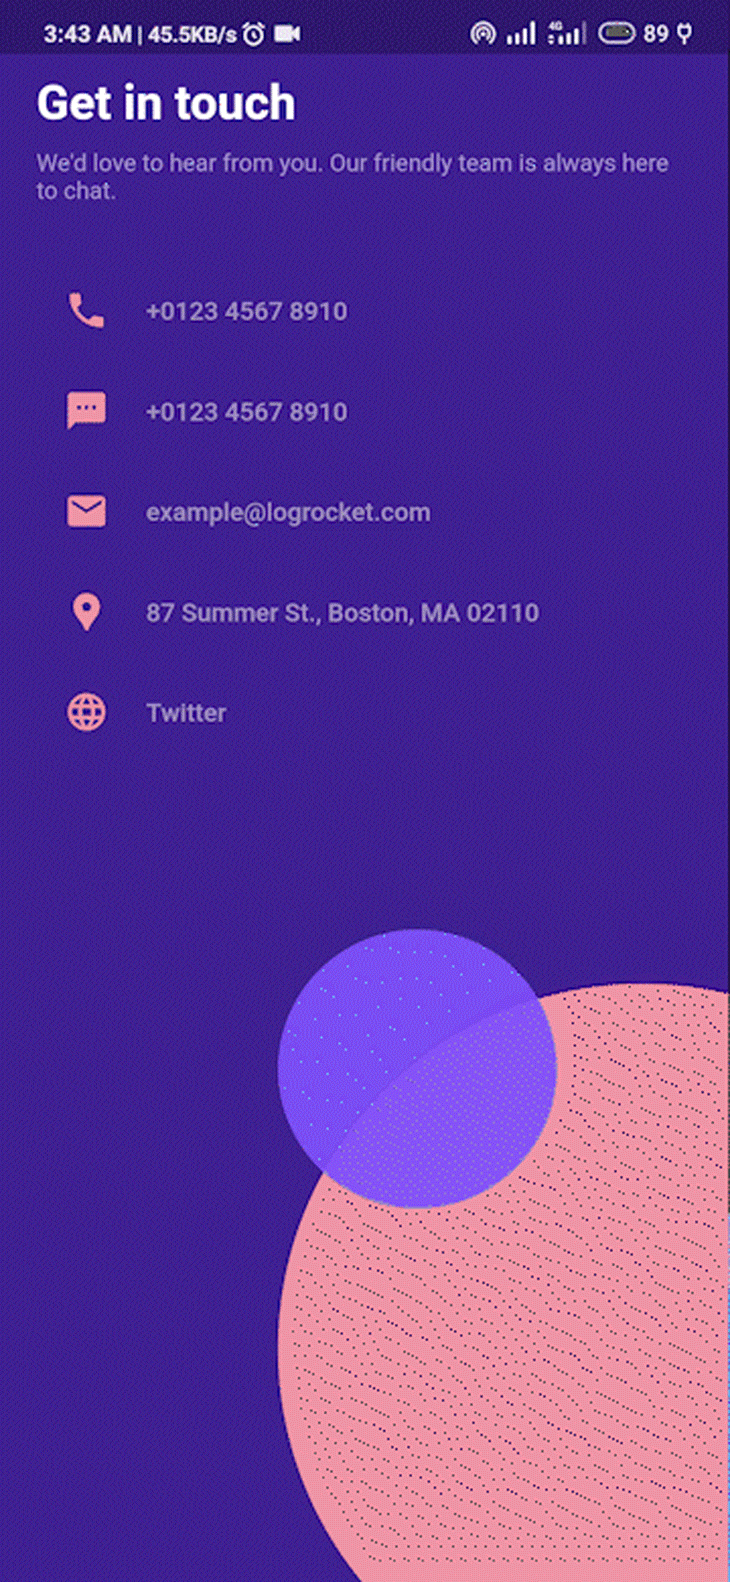
With JavaScript enabled enableJavaScript = true, we get the following:
To initiate a phone call, we use the tel: URL scheme followed by a telephone number, as shown in the code below.
TextButton(
  onPressed: () async {
    String telephoneNumber = '+2347012345678';
    String telephoneUrl = "tel:$telephoneNumber";
    if (await canLaunch(telephoneUrl)) {
      await launch(telephoneUrl);
    } else {
      throw "Error occured trying to call that number.";
    }
    child: const CustomWidget(
      icon: Icons.call,
      label: 'Call a phone\nnumber',
    ),
),

To send an SMS message, we use the sms: URL scheme and a similar implementation as above.
TextButton(
  onPressed: () async {
    String telephoneNumber = '+2347012345678';
    String smsUrl = "sms:$telephoneNumber";
    if (await canLaunch(smsUrl)) {
        await launch(smsUrl);
    } else {
        throw "Error occured trying to send a message that number.";
    }
    child: const CustomWidget(
      icon: Icons.textsms,
      label: 'Send an SMS',
    ),
),

To send an email, we need to pass in the recipient’s email address, a subject line, the body of our email, and the mailto: URL scheme to the emailUrl widget in addition to the mailto: URL scheme. See below:
TextButton(
    onPressed: () async {
    String email = '[email protected]';
    String subject = 'This is a test email';
    String body = 'This is a test email body';

    String emailUrl = "mailto:$email?subject=$subject&body=$body";

    if (await canLaunch(emailUrl)) {
      await launch(emailUrl);
    } else {
      throw "Error occured sending an email";
    }
  },
  child: const CustomWidget(
    icon: Icons.forward_to_inbox,
    label: 'Send an email',
  ),
),
To view a location on a map, we need to pass the location’s latitude and longitude values to the mapUrl along with the geo: URL scheme.
TextButton(
  onPressed: () async {
    const String lat = "42.3540";
    const String lng = "71.0586";
    const String mapUrl = "geo:$lat,$lng";
    if (await canLaunch(mapUrl)) {
      await launch(mapUrl);
    } else {
      throw "Couldn't launch Map";
    }
  },
  child: const CustomWidget(
    icon: Icons.near_me,
    label: 'Check location',
  ),
),
The URL Launcher plugin is incredibly handy when you need to interface with other applications from your application. We’ve learned what the URL Launcher plugin’s use-cases are and how to implement the plugin to fit each use-case.
The complete code of this project is available on GitHub. Thank you for reading.
Install LogRocket via npm or script tag. LogRocket.init() must be called client-side, not
server-side
$ npm i --save logrocket

// Code:

import LogRocket from 'logrocket';
LogRocket.init('app/id');
// Add to your HTML:

<script src="https://cdn.lr-ingest.com/LogRocket.min.js"></script>
<script>window.LogRocket && window.LogRocket.init('app/id');</script>

Learn how to build a full React Native auth system using Better Auth and Expo — with email/password login, Google OAuth, session persistence, and protected routes.

Compare the top AI development tools and models of June 2026. View updated rankings, feature breakdowns, and find the best fit for you.

Learn how Bloom filters reduce database lookups for username availability checks while preserving correctness at scale.

Learn how to test Nuxt apps with Vitest, @nuxt/test-utils, runtime mocks, server route mocks, and Playwright e2e tests.
Would you be interested in joining LogRocket's developer community?
Join LogRocket’s Content Advisory Board. You’ll help inform the type of content we create and get access to exclusive meetups, social accreditation, and swag.
Sign up now

