As an open source PHP framework, Laravel was created to build applications while also prioritizing testing, aided by the out-of-the-box testing package called PHPUnit. However, while PHPUnit is one of the most popular and highly efficient packages for performing unit tests in PHP, PHPUnit cannot test JavaScript functionalities, driving the need for a JavaScript-specific testing package.
Normally, developers can use Selenium for JavaScript testing, but setting it up and learning to use it can be quite challenging. So, Laravel developers decided to provide an easier alternative: Dusk.
Dusk is a Laravel package that performs end-to-end (E2E) tests on Laravel applications. Providing client-side testing by running tests in a browser, Dusk allows developers to see client-side features tested in real time, mimicking how a user would use them.
Built on ChromeDriver and the PHP WebDriver, Dusk also provides browser automation for applications while eliminating the complex steps required by ChromeDriver and PHP WebDriver individually.
Tailored specifically for Laravel users, Dusk’s support of JavaScript and AJAX provides the JavaScript functionality the Symfony BrowserKit component can’t support, and it is easier to use than Selenium. And with Dusk, repeating tasks within applications can now be automated.
In this post, we will install Laravel Dusk in an application and run some browser tests with it to see how it works and the benefits it provides.
After building an application, and before shipping, developers must run various tests to ensure an app’s features are functioning as expected. But even after shipping, new features that are added to improve the application must also be tested.
By running E2E tests, developers can ensure newly added features don’t break the pre-existing ones by simulating users using the application.
To begin using Dusk, create a new Laravel project in your preferred directory:
laravel new project-name
Next, move into the directory of your new project:
cd project-name
You can add Dusk to it with Composer by running the following command:
composer require --dev laravel/dusk
Note that Dusk is a development tool and must never be added to your production environment.
Register the service provider in app\Providers\AppServiceProvider.php using an if statement that only makes it available for development:
use Laravel\Dusk\DuskServiceProvider;
class AppServiceProvider extends ServiceProvider
{
    /**
     * Register any application services.
     *
     * @return void
     */
    public function register()
    {
        if ($this->app->environment('local', 'testing')) {
            $this->app->register(DuskServiceProvider::class);
         }
    }

}
By importing DuskServiceProvider and implementing it inside an if statement, this ensures that DuskServiceProvider is only available in your local environment for testing purposes.
Complete the Dusk installation in your project by running the following:
php artisan dusk:install
This creates a Browser folder in your tests directory. The ExampleTest.php file inside the folder contains an example test that you can run or edit.
You must also specify the browser URL that Dusk can test your application with. Usually, http://localhost:8000 is used in local environments. Navigate to your .env file and ensure that your APP_URL key points to your specified URL.
If you don’t want to mess with your main database, you can create a replica of it for testing; simply create a file named .env.dusk.local in your root directory.
Whenever you run a test, your main .env file will be backed up, and .env.dusk.local will be renamed .env and used. After the test, this process reverses so you can access your main .env file.
First, let’s check out the example test that came with the Dusk installation, ExampleTest.php:
<?php

namespace Tests\Browser;

use Tests\DuskTestCase;
use Laravel\Dusk\Browser;
use Illuminate\Foundation\Testing\DatabaseMigrations;

class ExampleTest extends DuskTestCase
{
    /**
     * A basic browser test example.
     *
     * @return void
     */
    public function testBasicExample()
    {
        $this->browse(function (Browser $browser) {
            $browser->visit('/')
                    ->assertSee('Laravel');
        });
    }
}
Run php artisan serve in another command window. Your application must be running and accessible at localhost:8000 for Dusk to carry out tests on it.
To execute ExampleTest.php, run the following command:
php artisan dusk
Here, the Browser class imports and creates an instance of it.
The Browser class contains many useful methods to carry out various actions in the web browser. For example, the visit method opens the URL that it is provided within a browser. Since http://localhost:8000 is the default URL of your application, if nothing is passed as an argument to visit, it opens this default URL.
Next, the assertSee method checks if the text on a page is the same as the supplied reference text.
In ExampleTest.php, visit opens the homepage of your application, assertSee checks to see whether the word “Laravel” appears on your homepage, and the browse method calls the function that carries out these tasks.
Think of assertions as simple checks that you can run on your application to see what’s present in it and what’s absent. Check out the complete list of Laravel Dusk assertions here.
When the test is successful, your CLI shows a simple “OK” message.
Dusk also comes with a useful debugging feature. If you run a test and it fails, a picture of the failed test saves to the screenshots folder. For example, try checking for a piece of text that’s not on your homepage:
public function testBasicExample()
    {
        $this->browse(function (Browser $browser) {
            $browser->visit('/')
                    ->assertSee('exampleText');
        });
    }
Here, you see whether the text supplied to assertSee is somewhere on the page. Since it isn’t, the test fails and a screenshot of it is saved to the tests\Browser\screenshots directory.
With your understanding of how a basic test works with Dusk, you can now test Laravel’s built-in authentication system.
Since you’ll need a database to save new user information, create one and add its details to your .env file:
DB_CONNECTION=mysql
DB_HOST=127.0.0.1
DB_PORT=3306
DB_DATABASE=testDB
DB_USERNAME=root
DB_PASSWORD=
Using Laravel Jetstream’s authentication scaffolding, add Jetstream to your application by running the following command:
composer require laravel/jetstream
Jetstream offers two frontend stack options to pick from: Inertia.js and Livewire. In this example, use Livewire because it’s based on Vue.js and provides registration, login, and dashboard features:
php artisan jetstream:install livewire
To complete your Livewire setup, run the following:
npm install && npm run dev
After creating some migration files that contain table designs for your authentication system, generate the required tables in your database by running the following:
php artisan migrate
Now, with the register, login, and dashboard features, run your application and check them out:
php artisan serve
Next, test these features with Dusk by running the following command to create a new Dusk test:
php artisan dusk:make AuthTest
Navigate to the newly created AuthTest.php file inside your tests\Browser directory. You must test both your register and login features.
Create a test that registers a new user, navigates to the dashboard, logs out, and logs back in with the following:
public function testExample()
    {
        $this->browse(function ($browser) {
            //We'll test the register feature here
            $browser->visit('/')
                    ->clickLink('Register')
                    ->value('#name', 'Samson')
                    ->value('#email', '[email protected]')
                    ->value('#password', '00000000')
                    ->value('#password_confirmation', '00000000')
                    ->click('button[type="submit"]')

            //We'll test the login feature here
                    ->press('Samson');
                    if ($browser->seeLink('Log Out')) {
                        $browser->clickLink('Log Out')

                        ->clickLink('Login')
                        ->value('#email', '[email protected]')
                        ->value('#password', '00000000')
                        ->click('button[type="submit"]');
                    }

        });
    }
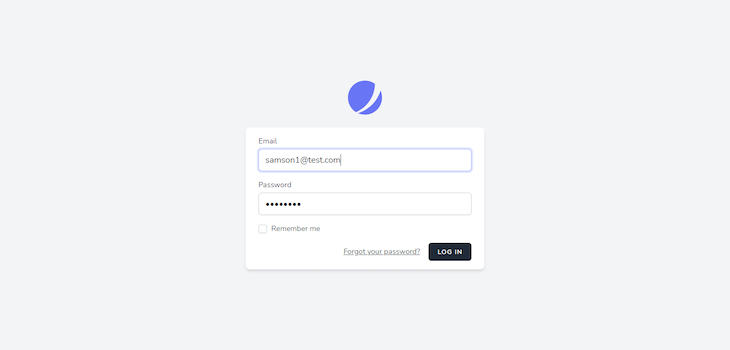
Here, you are instructing Dusk to visit your application’s homepage, search for a link with the display text Register, and then click on it. This takes you to the Register page that Jetstream provided.
The value() function is provided with CSS selectors for the different text boxes as the first argument. The second argument is to fill the values into the text boxes.
click('button[type="submit"]') clicks the Register button and submits the values you supplied to the database. After this, you are redirected to the dashboard.
With that, the registration works! Now it’s time to log out and test the login feature.
On the top right side of your dashboard, there’s a dropdown list with a Log Out link. Jetstream uses a button for the dropdown; to click on this button using the Dusk method, use press().
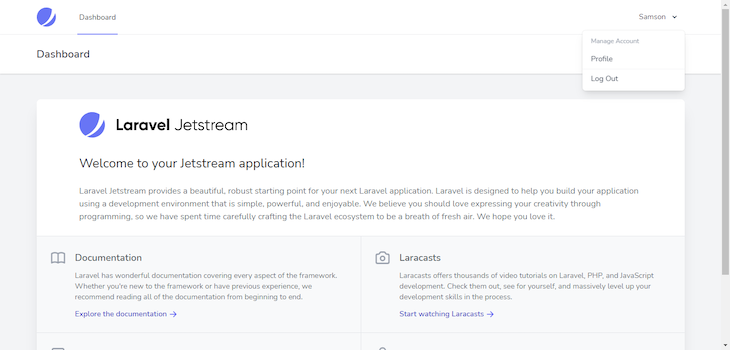
First, instruct Dusk to find the button with your name as display text and click on it. Next, use an if statement to check whether there’s a Log Out link on the dropdown list or not. clickLink clicks the link and redirects to the Welcome page.
clickLink('Login') selects the Log In link and redirects to the login page. Similar to the register process, use value() to fill the form. click('button[type="submit"]') clicks on the LOG IN button and logs back in to the dashboard.
To execute the test, run the following command:
php artisan dusk
Note that Dusk uses headless mode to run automation tests in Google Chrome by default, meaning it works through a CLI rather than a GUI. This means that Dusk runs browser tests, but you don’t see them being executed.
An advantage of using headless mode is that it runs tests faster than using GUI browsers. However, if you want to see your tests being executed in your Chrome browser, you can disable headless mode. Navigate to tests/DuskTestCase.php and comment out the following lines:
'--disable-gpu',
'--headless',
Now if you run Dusk tests, you’ll see them executed on your Chrome browser.
Finally, you’ve come to the end of this tutorial! If you need the code for the test you created, you can find it on GitHub. To know more about Dusk and the kind of tests you can use it for, check out Dusk’s official documentation.
Install LogRocket via npm or script tag. LogRocket.init() must be called client-side, not
server-side
$ npm i --save logrocket

// Code:

import LogRocket from 'logrocket';
LogRocket.init('app/id');
// Add to your HTML:

<script src="https://cdn.lr-ingest.com/LogRocket.min.js"></script>
<script>window.LogRocket && window.LogRocket.init('app/id');</script>
Would you be interested in joining LogRocket's developer community?
Join LogRocket’s Content Advisory Board. You’ll help inform the type of content we create and get access to exclusive meetups, social accreditation, and swag.
Sign up now
Not sure if low-code is right for your next project? This guide breaks down when to use it, when to avoid it, and how to make the right call.

Compare Firebase Studio, Lovable, and Replit for AI-powered app building. Find the best tool for your project needs.

Discover how to use Gemini CLI, Google’s new open-source AI agent that brings Gemini directly to your terminal.

This article explores several proven patterns for writing safer, cleaner, and more readable code in React and TypeScript.


