JavaScript modules are individual parts of a JavaScript program that can be tested on their own and reused in other projects. They’re used to improve the organization of code.

In this article, you’ll learn how to create and use modules in your JavaScript applications using the module systems available in the JavaScript ecosystem.
In its early days, JavaScript was used mainly to add interactivity to a webpage. However, JavaScript evolved and was used by developers to create complex web applications running on the server-side and client side (thanks to projects like Helma and Jaxer).
As many of us who have worked on server-side code know, this code in particular can be difficult to maintain, test, and debug if not structured well because of the amount of interaction that takes place among the code itself.
This was a problem for JavaScript as the application grew because it did not have a standard way to structure code into distinct, functional parts that could be tested and maintained single-handedly, nor did it include other JavaScript code in projects.
That is, of course, until modules came along.
However, even though modules separate and structure code, there was still a need for an ecosystem within which to share these modules.
The inspiration to create such an ecosystem was further fueled by the fact that programming languages like Python, Java, and Ruby all have ecosystems for sharing software packages, which can range from small-scale to full-blown applications.
To that end, Kevin Dangoor created the ServerJS group in hopes of making the collection of publicly available JavaScript code more valuable. Today, ServerJS is known as CommonJS.
When your application contains a few lines of code, you might not need modules, but if the Line of Code (LOC) starts reading in the hundreds spanning multiple files, it’s best to split your code base into modules. The benefits are enormous among which are:
When your application is organized into modules, it makes it convenient to reuse these modules in other projects eliminating the need for a full rewrite, thereby speeding up your development workflow.
Your application will definitely have multiple functionalities. If you design all the application functionality in a single file, there is a high possibility that your future self will find it difficult to read.
When you design your application using modules, each functionality can reside in a module therefore, when an error occurs, you’ll know the root cause of the problem, and you can trace and fix it in complete isolation from the remaining code base.
Among the beauty of software is evolution. In the long run, your application will need certain features which you think is necessary or your users asked for it, when the architecture of your application is structured into modules, you can easily add or remove features.
In addition, we humans are not perfect and our application will have bugs. Fixing bugs is also part of software maintenance. With modules, you’ll know where to look in your code base.
The following are the module systems available in JavaScript at the time of writing:
CommonJS is a module system that aims to provide a standard way of writing your JavaScript applications, especially server-side applications. It is the module format used in Node.js; a JavaScript runtime environment written (mostly) in C++.
In CommonJS, you can create and use modules, thanks to two keyword exports and require. The exports keyword is used when you want to expose specific code of the module, then require is used by files which use such a module.
Furthermore, Node.js has a module.exports property that you can assign a new value such as a function or object (discussed later).
Now that you know CommonJS uses export and require when managing modules, it’s best to see a practical way of how these keywords play out in an application. To do this, we’ll simulate a prototype shopping cart that we’ll test on Node.js which, luckily for us, implements CommonJS module format.
You’ll find a shopping cart on most e-commerce websites, we can not implement the full functionality of a shopping cart in this article, that is beyond the scope of this article, but instead, we’ll demonstrate one popular thing related to shopping carts: adding an item to a cart.
Before we proceed, you’ll need the following:
If you need help installing Node.js, kindly check the following resources depending on your Operating System:
In addition, if you are on Windows, after installing Node.js, you can install GitBash which provides color highlighting on its command line compared to Windows Command Prompt..
With that out of the way, let’s proceed. Open your code editor, and type the following code:
// Save as cart.js

/**
 * Define an array of items.
 * Mind you this variable is private to this
 * module.
 */
var items = [];
// The function to add item to the cart
function addItem (name, price)
    item.push({
    name: name,
    price: price
  });
}
// This ensures that the function is usable
// outside this module
exports.total = function () {
    return items.reduce(function (a, b) {
    return a + b.price;
  }, 0);
};
// This also expose the addItem function
// outside this module
exports.addItem = addItem;
Take a look at the code above, the first indication that it is a module is the exports keyword. As stated in the code comments, the exports keyword allows you to expose part of the code outside the module.
The shopping cart module is set up nicely. If you need to test it, you’ll need another JavaScript file, or you can use Node.js command line. For now, we’ll use the latter.
Now, do the following:
cart.js.Launch a Node console by type the following:
node
After that, type the following:
let cart = require('./cart');
This will require the cart.js file. For a moment, let’s explain how it works.
When you read the previous code block, you’ll observe two things:
./ before the file name.Why? If you might ask. Well, cart.js is a module that you’ve created locally and is available somewhere on your system, you have to pass a relative path so that Node.js knows it’s not looking for a module inside a folder called node_modulesthat is the job of ./.
Secondly, you leave off the file extension and require() will look for a file named cart.js, which is the name of our file.
Now, back to the command line, let’s check the cart object:
cart
#Expected output: { total: [Function], addItem: [Function: addItem] }
Next, add some items:
cart.addItem('Intro to TypeScript', 50);
#Expected output: undefined
You can check the total:
cart.total()
#Expected output: 50
Go ahead and add another item:
cart.addItem('Intro to CSS', 45);
The total is now up to 95:
cart.total();
#Expected output: 95
This is how to create a basic module: you can create your functionality, and you can only expose the part of the code that you want other files (that require this file) to consume. The part is called an API (Application Programming Interface).
This is good, but we have a problem: there is only one shopping cart.
This is because you can’t require the cart again to get a second cart because when you later require an already-required file, the exports object is cached and reused meaning there is only one instance of the module, therefore, you only get one copy.
Let me show you what I mean. Switch back to your terminal and type the following:
second_cart = require('./cart');
Now you might think this will create a new shopping cart, but that is not the case. When you check the total, it’s still 95:
second_cart.total();
#Expected output: 95
When you need multiple instances of the shopping cart, you’ll need to create a constructor function inside the module. Why a constructor function?
That’s because it’s a function that’s created when you invoke a function with the new keyword in JavaScript, this means we’ll get a new shopping cart instance every time we create a shopping cart with new.
Create another file or re-write cart.js file to match the following:
// cart.js

// Create the constructor function
function Cart () {
    this.items = [];
}
// Add the functions to its property
Cart.prototype.addItem = function (name, price) {
    this.items.push({
        name: name,
        price: price
    });
}

Cart.prototype.total = function () {
    return this.items.reduce(function(a, b) {
        return a + b.price;
    }, 0);
};
// Export the function
module.export = Cart;
Now, when you require this module, the cart function is what gets returned instead of an object with the cart function as a property. Awesome!
Switch back to your console, then type the following:
Cart = require('./second_cart');
#Expected output: [Function: Cart]
Next, create two shopping carts by entering the command one after the other:
new_shopping_cart = new Cart();
#Expected output: { items: [] }

new_shopping_cart_2 = new Cart();
#Expected output: { items: [] }
Then add an item to new_shopping_cart as such:
new_shopping_cart.addItem('', 50);
new_shopping_cart.total(); #Expected output: 50
When you check the other shopping cart, the total remains zero.
new_shopping_cart_2.total();
#Expected output: 0
To recap:
exports to expose the necessary functionality from a module, which is basically a JavaScript filemodules.export, which, is also used for exporting module functionalityrequire() function to read the fileexports can only be required onceOne of the downsides of CommonJS is that it is synchronous. AMD aims to solve this by allowing the module and its dependencies to be loaded asynchronously via an API defined in the specification.
The AMD API is defined below:
define(id?, dependencies?, factory);
Where:
id: An optional argument which specifies the id of the module being defined. This is the path of the moduledependencies: This is an array of the modules that are dependencies required by the module being definedfactory: A function that is executed to instantiate the module or object. It creates a JavaScript closure, and it’s called once per moduleFurthermore, when you want to use this defined module, you would need the require function defined in the specification as:
require(dependencies?, callback);
Where:
dependencies: An array of dependenciescallback: A callback function that’s executed when the modules are loadedFor a more detailed explanation of the AMD API, kindly check the AMD API specification on GitHub.
Now, this is all theory (including the specs), but I’ll like you to get a good understanding of how this theory works in code. The best way to do this is to explore actual implementations of AMD of which there are various, and it would be impractical to discuss them all.
Instead, we’ll explain a popular one among them: RequireJS; which describes itself as a “JavaScript file and module loader”.
Therefore, we will set up RequireJS, and I’ll show you (in code) how to use AMD with RequireJS.
Here is a quick rundown of what you’ll learn in subsequent sections:
require() and CommonJS require().require() work in AMD?The set-up for RequireJS is hassle-free, all you have to do is navigate to RequireJS website and download it, then perform the following steps:
js.js. folder.index.html. file in root directory.Then type the following code in index.html:
<!DOCTYPE html>
<html lang="en">
    <head>
     <meta charset="utf-8" />
     <title>Introduction to RequireJS</title>
    </head>
    <body>
        <!-- Your HTML code for the page -->

     <!-- include config and RequireJS file from the js folder-->
     <script data-main="js/config" src="js/require.js"></script>
    </body>
</html>
Where:
data-main="js/config": This is the entry point to RequireJS. It’s also where we configure it, in this case the config file resides in a folder named jssrc="js/require.js": The normal way you load a script on a page here, it will load require.jsAt this point, we have not created the config.js file, so, perform the following steps to create the config file:
config.js inside the js folderIn the previous code block, you’ll notice we did not include the file extension of the config file that is because in RequireJS we do not include the file extension of the JavaScript files because it’s designed to work with JavaScript files.
Therefore, when it sees config (and other JavaScript files) it knows it’s a JavaScript file.
Finally, we initialize the RequireJS by writing the following below the <script> tag which included the require.js (check previous code block):
<!-- index.html -->

<!-- Previous code remains the same -->
<script>
    require(['config'], function() {
        // Your code here.
    })
</script>
After your page loads the configuration file, the code in require() would run.
When you read the code above, I think you might ask the following questions:
require() here; How is it different from CommonJS require()?require() work with the config file?Let’s answer these questions.
require() and CommonJS require()The differences are given below:
require() accepts an array of dependencies and a callback function, CommonJS require() accepts a module ID.require() is asynchronous while CommonJS require() is synchronousAre we good? Let’s proceed.
require() work in AMD?Before that, it’s best to explain the tag that loads RequireJS, here is it again:
<script data-main="js/config" src="js/require.js"></script>
This script tag is an asynchronous call, this means when RequireJS loads via src="js/require.js, it will asynchronously load the config file specified in the data-main attribute therefore, any JavaScript code below this tag can execute while RequireJS fetches the config file.
To see this in action, switch back to your code editor, open index.html, and perform the following actions:
require() functionalert(); within the script tagNow, your index.html should look like the following
<!-- index.html -->
<!-- Other code remains the same -->
<script data-main="js/config" src="js/require.js"></script>
<script>
    alert();
</script>
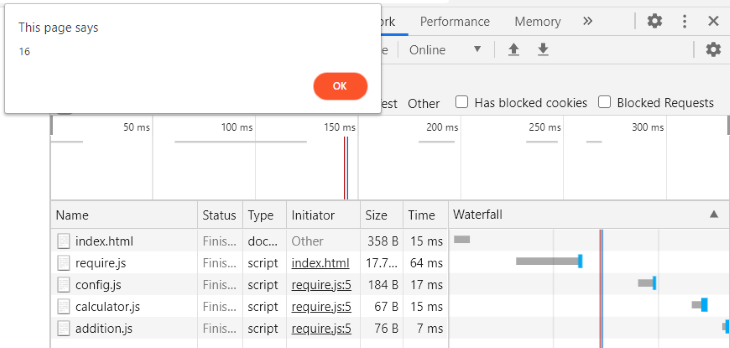
When you load the file in your browser, the alert() function declared in the second <script> tag will execute on initial page load, this is before the config file is loaded.
Now before you click OK, please confirm the config file has not loaded by launching the browser Developer tools and switch to the Network tab. You’ll observe that the config file is yet to load, when you click OK, the config file gets loaded.
All this is depicted in the GIF image below:
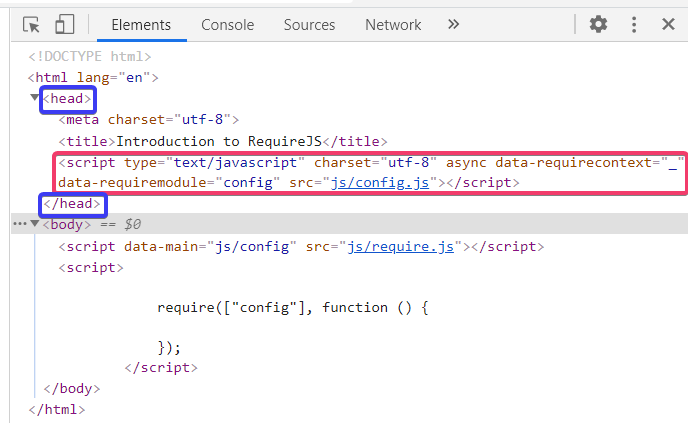
With that out of the way, here is how require() works with the config file (and other JavaScript code) behind the scenes:
<script> block with the src set to the file path of config.js as defined in the data-main attribute<script> block in the HTML <head> sectionYou can confirm this by saving your file; load it in your browser; then check the browser developer tools:
And you can verify that the function in require() is a callback function by modifying our code as such:
<!-- index.html -->
<!-- Remaining code remains the same -->

<script data-main="js/config" src="js/require.js"></script>

<!-- Add this script tag-->
<script>
    alert("Before config loads");
</script>

<!-- Add this script tag-->
<script>
    require(["config"], function () {
     alert("After config loads")
    });
</script>
Save your file, and load it in your browser. You’ll observe the following:
alert(); function before require() will execute first.alert(); function within require() will execute after the config file has loaded.This is shown in the GIF image below:
The following is a basic module definition in AMD:
define(['dependency1', 'dependency2'], function() {
    // Your module code goes here
});
This module definition clearly shows two dependencies and a function.
These dependencies are modules themselves that were created with the define() function, and they can also have dependencies themselves.
While the function is the factory function, and if it returns anything, that will be the exported value of the module. Mind you, as you’ll learn later, it does not have to return anything.
I know this might be confusing, so, here is what we will do:
Before that, you need to do some housekeeping. Please, do the following:
js folder named customScripts and librequire.js into lib folderindex.html file and update the script tag src attribute value to point to the new location of require.js. Now it should be: src="js/lib/require.js"Switch to your code editor, and type the following code and save it in your customScripts directory:
// js/customScripts/addition.js
/**
 * The module returns a function which
 * adds two numbers.
 */
define(function() {
    return function(a, b) {
        alert(a+b);
    }
});
Next, create another file in your customScripts directory and type the code below, save it as calculator.js.
// js/customScripts/calculator.js
/**
 * This module depends on the addition.js
 * module.
 */
define(['addition'], function(addition) {
    addition(7, 9);
});
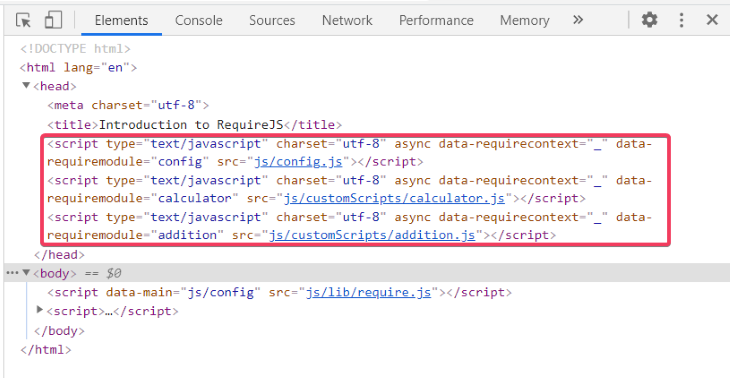
When RequireJS sees the previous code block, it will go and look for the dependency and automatically inject it into your module by passing them as arguments into the function.
Behind the scenes, it creates a <script> tag for the addition.js and calculator.js file and places it in the HTML <head> element, waits for them to load, and it will run the function, this is similar to the behavior of require(). If you’d like to confirm, check the browser developer tools.
Now, save your files, navigate to the index.html file, and update the require() function to match the following:
// index.html
require(['config'], function() {
    require(['calculator']);
});
Now, load your index.html file in your browser, nothing happens. How come? Well, this is what happened:
calculator.js moduleHow do we fix this? We have to tell RequireJS where to find calculator.js (and other modules) via the config file because it is the entry point of your application.
Before we write the code that’ll make our application work, it’s best if we explain the basic structure of the config file as shown in the code block below:
requirejs.config({
    baseURL: "string",
    paths: {},
    shim: {},
});
Where:
baseURL : This tells RequireJS where to find your modulespaths : These are names of the modules that’ll be used with define(). Inside the paths , you can also use a CDN version of the file, when you do this RequireJS will attempt to load the CDN version of your module before the one available locallyshim: This allows you to load libraries that are not written as AMD modules and lets you load them in the correct orderWe’ll use the baseURL and paths in our application and no shim.
Armed with the knowledge on what to write in the config file, switch to your config file and update it as such:
// js/config.js
requirejs.config({
    // The folder which contains your js scripts and modules.
    baseURL: "js",
    paths: {
        /**
        * Location of your modules, In this case,
        * these modules are in the customScripts folder. Note,
        * there is no need for the "js" extension.
        */
        addition: "customScripts/addition",
        calculator: "customScripts/calculator",
        /**
        * If the "addition" module (or any module) is being
        * retrieved from a CDN (Content Delivery Network,
        * and also, you have a local copy, you'll write
        * it as such. Don't forget to leave off the "js"
        * extension
        addition: [
            "https://your-cdn-domain/addition",
            "customScripts/addition"
            ],
        */
    },
});
That’s it. Now, reload your browser, you should get an alert of the result.
Well, that’s how you define and work with modules in AMD with RequireJS, but it’s one of the ways to define modules in AMD with RequireJS, there are others. Read on.
You can also define modules by specifying its path name, which is the location of the module file in your project(s) directory. An example is giving below:
/**
 * The "path/to/module" is the direct location
 * that tells RequireJS where to find the module.
 */
define("path/to/module", function() {
    // Your module code here.
})
This approach is discouraged by RequireJS because when you move your module to another location in your project you need to go back and change the path name in the module by hand.
In AMD, you can write your modules in a syntax similar to CommonJS using the require() function as a dependency therefore, we can rewrite the previous calculator.js as:
/**
 * This is known as dynamic loading, which
 * means the code executes at runtime.
 */
define(function (require) {
    const additionModule = require("addition");

    additionModule(7, 9);
});
In previous paragraphs you’ve learned how CommonJS modules expose their code via the exports object. You might find it surprising that it’s possible to use this syntax to define your AMD modules. RequireJS describes this technique as “simplified CommonJS wrapper“.
The syntax of the wrapper is:
define(function(require, exports, module) {
    // CommonJS code.
})
RequireJS docs states that exports and module can be omitted if they are not used, but, if you’ll use them, they should be written in this same order otherwise “trouble will ensue“. On the other hand, require can not be omitted.
As an example, let’s take the shopping cart example implemented earlier in this article, and we’ll rewrite it to work as an AMD module.
// customScripts/AMDShoppingCart.js

// Define AMD module with CommonJS code.
define(function (require, exports, module) {
    // CommonJS code.
    var items = [];

    function addItem(name, price) {
            items.push({
              name: name,
              price: price,
            });
    }

    function total() {
            return items.reduce(function (a, b) {
             return a + b.price;
          }, 0);
    }

    exports.addItem = addItem;
    exports.total = total;

    /**
    * In RequireJS, you can also use the following
    * to export the module functionality. It works the
    * same.

    return {
            addItem,
            total,
    }; */

});
Then, you can use AMDShoppingCart as such:
// customScripts/UseShoppingCart.js

// Use AMD module with CommonJS code.
define(function(require) {
    // CommonJS code.
    const shoppingCart = require("AMDShoppingCart");

    // Add items to the shopping cart
    shoppingCart.addItem("first", 20);
    shoppingCart.addItem("second", 90);
    shoppingCart.addItem("third", 5);

    alert(shoppingCart.total()); // 115
});
At this stage of the article, I believe you already know how to set up RequireJS to use and work with these files, if not, please refer to the section: How to define a module.
Moving on, save your files and launch your browser, you’ll get an alert of 115 as the total of the items in the shopping cart.
You should know there is only one instance of the shoppingCart. If you would like to see this in action, modify UseShoppingCart.js as such:
// customScripts/UseShoppingCart.js

// Use AMD module with CommonJS code.
define(function(require) {
    // Add this below shoppingCart
    const shoppingCart2 = require("AMDShoppingCart");

    // Code truncated, check previous code block

    // check its total
    alert(shoppingCart2.total()); // 115
});
As demonstrated earlier, if you need multiple instances of the shopping cart, you can use constructor functions.
Modify AMDShoppingCart.js to use constructor functions.
// customScripts/AMDShoppingCart.js

// Define AMD module with CommonJS code using
// constructor functions.
define(function (require, exports, module) {
   function Cart() {
        this.items = [];
    }

    Cart.prototype.addItem = function (name, price) {
        this.items.push({
            name: name,
            price: price,
        });
    };

    Cart.prototype.total = function () {
        return this.items.reduce(function (a, b) {
            return a + b.price;
        }, 0);
    };

    module.exports = Cart;
});
Then modify UseShoppingCart.js:
// customScripts/UseShoppingCart.js

// Use AMD module with CommonJS code.
define(function(require) {
    // CommonJS code.
    const shoppingCart = require("AMDShoppingCart");

    let a = new shoppingCart();
    let b = new shoppingCart();

      a.addItem("first", 20);
      a.addItem("second", 90);

    // Check the carts total
      alert(a.total()); // 110
    alert(b.total()); // 0
});
In the last two sections, you learned how the factory function was leveraged to mimic and create CommonJS code, well, it does not end there.
Here are other things you can do with the factory function:
Humans are not perfect, but still, we strive to be, which, in reality does not prevent us from making mistakes. When you are defining modules in AMD, please be aware of the following:
index.htmlEverything created by man has its good and bad, let’s have a look at some of AMDs.
We did not cover everything related to AMD with RequireJS, but what we’ve covered is enough to give you a strong foundation. If you would like to learn more about RequireJS, I’ll only point you to one place: RequireJS official documentation.
CommonJS was designed for server-side JavaScript therefore, its code does not play nice in Web browsers without some tooling or bundling. On the other hand, AMD was designed to work on the client side (Web browsers) with no tooling involved. In addition, some implementations of AMD notably RequireJS allow you to convert your CommonJS code to AMD code using a tool like r.js.
Hence, the need arises for a “universal” approach to get everyone on board, so UMD was born. UMD stands for Universal Module Definition.
UMD is a set of patterns that supports both AMD and CommonJS, it is designed to make your code work irrespective of the environment executing the code. This could be on the client side with RequireJS or the server side with Node.js.
At first sight, you might find UMD’s syntax overwhelming or as someone called it “ugly”, but still, as you’ll learn later, you can take a UMD module and run it successfully in the browser, RequireJS and Node.js (with no tooling or bundling).
UMD achieves this feat by checking the environment that is implementing (or calling) the module before deploying the module functionality, in Web browsers, it makes the module functionality available as a global variable.
As I mentioned earlier, reading a UMD module can be overwhelming, therefore, I won’t throw a complete UMD module at you, so that you’ll go figure it out yourself, instead, I’ll break it down to show you what makes it tick, and how to use it.
A UMD module consists of two parts:
root and factory. root is a this reference to the global scope and factory is the function where we define your moduleIn code:
// The Immediately Invoked Function Expression
(function(root, factory) {
    // Here, you check the environment that want's
    // to use the module, and you'll write
    // the necessary code that will make the code
    // work in that environment.

    // In this case the environment could be Node.js
    // RequireJS (AMD) or a Web browser.
}(this, function() { // The anonymous function, It'll take arguments which are dependencies of the module being defined.
    // Your module code will reside here
}));
There you go, that’s the structure of a UMD module, but still, it does nothing. Let’s fix that.
The code block below defines a UMD module which simply returns the phrase A UMD module.
// The IIFE
(function(root, factory) {
    // The module made available as a global variable.
    // Here, the module name is myUMDModule
    root.myUMDModule = factory();
}(this, function() { // The anonymous function.
    // Our module code
    return {
            name: 'A UMD module'
    }
}));
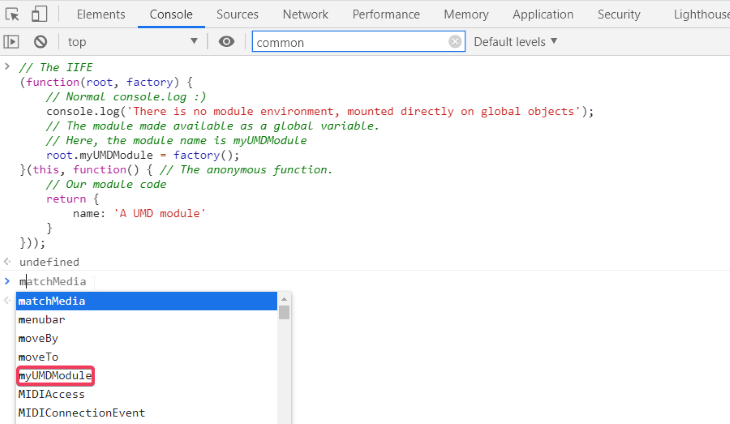
Please, the module takes no environment into consideration hence, at this stage, it will work only in a web browser.
The next challenge you might face is: How do I use this module? Please, do the following:
Ctrl + Shift + I on Windows, Cmd + Shift + I on Mac) and navigate to ConsoleNext, start typing the module name, i.e., myUMDModule in the browser console, you’ll see it’s available as a global variable as seen in the screenshot below:
The next question: How do I use it in an environment that supports AMD e.g. RequireJS?
You can do that by adding a few lines of code that performs some checks for an AMD environment.
// Save as UMDwithAMD.js
(function (root, factory) {

    // Add the following
    if (typeof define === "function" && define.amd) { // checks for an AMD environment

            // If true, create the module using the define
            // function, and use the function passed as an
            // argument to this IIFE as the factory function.
            define(factory);

    } else { // We are in the browser
            // Create the module as a global object
            // which is useful for web browsers
            // without the need for RequireJS.
            root.myUMDModule = factory();
    }

})(this, function () { // The anonymous function.
    // Our module code
    return {
            name: "A UMD module",
    };
});
If you want to test this code in RequireJS, you can take two routes. Route 1: create a file that uses this module as a dependency. Route 2: use this module on the index.html page via require(). Let’s see the second route before the first.
Once again, if you’ve read this article up to this point, I believe you can set up your AMD modules in RequireJS. For revision purposes, here is how you’ll set up UMDwithAMD.js:
customScripts directory created earlierconfig file and specify the location of UMDwithAMD.jsNow, on index.html, modify the require() function to match the following:
// Part of index.html

// The script tag to use RequireJS should come
// before this code.
require(["config"], function () {
    require(['UMDwithAMD'], function(UMDwithAMD) {
            alert(UMDwithAMD.name); // A UMD module
    });
});
Save your files, launch (or refresh) your browser and the output should be: A UMD module.
The second route: Create a UMD module that will depend on UMDwithAMD . Switch to your code editor and save the next code block as UseAMDwithAMD.js.
// Save as UseUMDwithAMD.js
(function (root, factory) {
    if (typeof define === "function" && define.amd) { // checks for an AMD environment
        // Note: The define function now uses
        // the UMDwithAMD as a dependency
     define(["UMDwithAMD"], factory);
    } else { // we are in the browser (root is window)
     root.myUMDModule = factory();
    }
})(this, function (UMDwithAMD) {
    // Use UMDwithAMD
    alert(UMDwithAMD.name);
});
Next, modify the require() function on the index.html to match the following:
require(["config"], function () {
    require(['UseUMDwithAMD']);
});
Save your files and refresh your browser. Take note of output. Still, it should read: A UMD module.
Now, you might ask: Will UseUMDwithAMD.js and its dependency UMDwithAMD.js work in a web browser without RequireJS? Yes! it would. Perform the following actions:
learningUMDindex.html file with the structure of an HTML5 document and save it in this folderUseAMDwithAMD.js and UMDwithAMD.js into this folder. (Now, you have 3 files in your project folder)head section of index.htmlsrc attribute of the first script tag must point to UMDwithAMD.js because UseUMDwithAMD.js depends on it, so it needs to load firstsrc attribute of the second script tag must point to UseUMDwithAMD.js because it is the dependentUseUMDwithAMD.js, you’ll need to change alert(UMDwithAMD.name) to alert(myUMDModule.name) because we want to test the dependent module in a Web browser environment hence, the name property will only be available in the global variable myUMDModule. We can’t use alert(UMDwithAMD.name) because we are not testing in an AMD environment. If you do, you’ll get undefinedIn the end, your new HTML file should like such:
<!DOCTYPE html>
<html lang="en">
    <head>
     <meta charset="utf-8" />
     <title>Introduction to UMD</title>
     <script src="UMDwithAMD.js"></script>
     <script src="UseAMDwithAMD.js"></script>
    </head>
    <body></body>
</html>
And UseUMDwithAMD.js will look like:
/**
 * Save as UseUMDwithAMD.js (modified to display an
 * alert in a Web browser environment)
 */
(function (root, factory) {
    // Code truncated
})(this, function (UMDwithAMD) { // You can leave the argument, it does no harm.
    // Use UMDwithAMD
    alert(myUMDModule.name); // Note, we are using myUMDModule and not UMDwithAMD
});
Now, launch your browser and watch the alert display the phrase: A UMD module.
So far we’ve shown how a single module: UMDwithAMD.js works in the browser, and in AMD with RequireJS with no modifications whatsoever. What is next is to see if it will work in Node.js with no modifications. Are you ready? Let’s find out.
Before that we need to add one more check to UMDwithAMD.js to see if we are in a Node.js environment. Update UMDwithAMD.js to match the following:
// Save as UMDwithAMD.js
(function (root, factory) {
    // Add the following
    if (typeof define === "function" && define.amd) {
            define([], factory);
    } else if (typeof module === "object" && module.exports) { // Check for Node.js environment
        // Does not work with strict CommonJS, but
        // only CommonJS-like environments that support
        // module.exports, like Node.
            module.exports = factory();
    } else {// We are in the browser
            // Create the module as a global object (root is window)
            root.myUMDModule = factory();
    }
})(this, function () {
    // The anonymous function.
    // Our module code
    return {
            name: "A UMD module",
    };
});
Now, switch to the command line and perform the following steps:
UMDwithAMD.jsnode to launch the Node.js consolemyModule = require('./UMDWithAMD.js')name propertyThe previous steps (and the result) is shown in the image below:
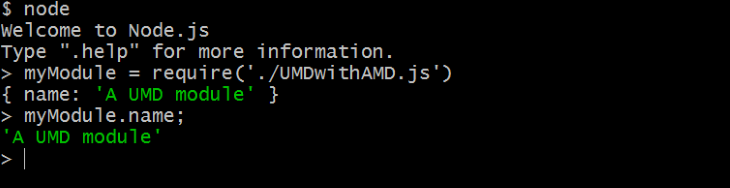
There you have it, one UMD module successfully worked in Node.js, AMD with RequireJS, and the web browser which solidifies the word “universal” in the pattern name.
You should know I did not make up the way we checked for multiple environments in the module code. The UMD GitHub repo has some UMD templates you can use depending on the environments and what you are trying to achieve.
Here is a quick rundown of the templates and recommended usage as stated in their code comments:
| UMD template | Recommended usage |
| amdWeb.js | Useful when you want to create a UMD module with AMD or browser globals |
| amdWebGlobal.js | This is useful if you have some scripts that are loaded by an AMD loader, but they still want access to globals |
| commonjsAdapter.js | This can be used as a common boilerplate for a library module that you only want to expose to CommonJS and AMD loaders. It will not work well for defining browser globals |
| commonjsStrict.js | Used to create a module with CommonJS, AMD or browser globals |
| commonjsStrictGlobal.js | This is useful if you have some scripts that are loaded by an AMD loader, but they still want access to globals |
| jqueryPlugin.js | To create some jQuery plugin |
| nodeAdapter.js | This can be used as a common boilerplate for a library module that you only want to expose to Node and AMD loaders |
| returnExports.js | Create a module with Node, AMD or browser globals |
| returnExportsGlobal.js | Uses Node, AMD or browser globals to create a module. This example creates a global even when AMD is used. This is useful if you have some scripts that are loaded by an AMD loader, but they still want access to globals |
When you observe the code for any of the templates listed above, you’ll notice they all support web workers by checking the existence of the self variable else it defaults to this variable. Therefore, we can also include this check in our UMDwithAMD.js code as such:
// UMDwithAMD.js (without comments).
(function (root, factory) {
    if (typeof define === "function" && define.amd) {
            define([], factory);
    } else if (typeof module === "object" && module.exports) {
            module.exports = factory();
    } else {
            root.myUMDModule = factory();
    }
})(typeof self !== "undefined" ? self : this, function () { // Notice the modification on this line
    return {
            name: "A UMD module",
    };
});
To cap it all off, here is the shopping cart implemented earlier in this article, but this time it is written in UMD.
// ShoppingCartAMD.js
(function (root, factory) {
    if (typeof define === "function" && define.amd) {
            define([], factory);
    } else if (typeof module === "object" && module.exports) {
            // Node. Does not work with strict CommonJS, but
            // only CommonJS-like environments that support module.exports,
            // like Node.
            module.exports = factory();
    } else {
            // Browser globals (root is window)
            root.shoppingCartUMD = factory();
    }
})(typeof self !== "undefined" ? self : this, function () {

    var items = [];

    function addItem(name, price) {
            items.push({
             name: name,
             price: price,
          });
    }

    function total() {
            return items.reduce(function (a, b) {
              return a + b.price;
          }, 0);
    }

    // Return the addItem and total functions.
    return {
            addItem,
            total,
    };

    // If you like to create multiple instance of the
    // shopping cart, you can use a constructor function.
    // function Cart() {
    //  this.items = [];
    // }
    // Cart.prototype.addItem = function (name, price) {
    //  this.items.push({
    //      name: name,
    //      price: price,
    //  });
    // };
    // Cart.prototype.total = function () {
    //  return this.items.reduce(function (a, b) {
    //      return a + b.price;
    //  }, 0);
    // };
    // return Cart;
});
You can test the code in the browser, and Node.js to confirm it works, and if you’d like to use it in RequireJS, use directly with require() function on the index.html file (created earlier in this article), or create another UMD module that will use it as a dependency. An example is given below:
// UseShoppingCartAMD.js

// Please note, this file use shoppingCartUMD.js
// as a dependency.
(function (root, factory) {
    if (typeof define === "function" && define.amd) {
     // AMD. Register as an anonymous module.
     define(["shoppingCartUMD"], factory);
    } else if (typeof module === "object" && module.exports) {
     // Node. Does not work with strict CommonJS, but
     // only CommonJS-like environments that support module.exports,
     // like Node.
     module.exports = factory(require("shoppingCartUMD"));
    } else {
     // Browser globals (root is window)
     root.returnExports = factory(root.shoppingCartUMD);
    }
})(typeof self !== "undefined" ? self : this, function (shoppingCartUMD) {

    shoppingCartUMD.addItem("computer", 20);
    shoppingCartUMD.addItem("mouse", 5);
    shoppingCartUMD.addItem("USB drive", 10);
    alert(shoppingCartUMD.total()); // 35

    // If you did use constructor functions in
    // calculator.js, you'd use the shopping cart
    // as such.

    // let a = new shoppingCartUMD();

    // a.addItem("computer", 20);
    // a.addItem("mouse", 5);
    // a.addItem("USB drive", 10);
    // alert(a.total()); 35
});
That’s UMD for you, JavaScript modules that work everywhere.
If you are a frontend developer or just getting started with modules in JavaScript, you might find the code of UMD or AMD (with RequireJS) difficult to work with or understand.
Fortunately, TC39, the committee in charge of ECMAScript specification has got you covered. In 2015, the committee added modules as a built-in feature in JavaScript. Today, these modules are called ES modules short for ECMAScript modules, and if you hear anyone saying modules, there is a high chance they are talking about ES modules.
I’m pretty sure they took the syntax of UMD and AMD module systems into consideration, hence, the syntax of ES modules are approachable. Moreover, if you’ve worked with a programming language like PHP or Python, I think you’ll understand ES modules quickly, and if not, when you read ES module code, you can guess the outcome of the code.
Moving forward, I’ll refer to ES module simply as module.
The export keyword is the bedrock for defining a module, and any file that intends to use this module will import the exported module code using the import statement (discussed later). Therefore, a module is nothing more than a JavaScript code that exports its own code.
When you want to export part of your module code, you need to add the word export before it. This part could be a variable, function, or a class. You should know, any part of the code that’s not exported is private to the module and can not be accessed outside that module.
As an example, here is a module which exports a function called getMyName:
// getMyName.js

// Remains private
let myName = "Habdul Hazeez";

// Exposed to the world, or anyone
// who uses this file.
export function getMyName() {
    return myName;
}
Consequently, any JavaScript file that intends to use this module will use it as such:
import { getMyName } from './getMyName.js'

console.log(getMyName); // Habdul Hazeez
Now, for a moment, think of how you’ll define and use this module in UMD or AMD (trust me, I know that feeling). That’s the beauty of a module, the syntax is leaner and easy to learn.
I say “easy”, but we need not get too far ahead of ourselves. The last two code blocks show you how to define a module and how to use it, but as it stands, I’ll like to ask you two questions:
Maybe, but I am not taking any chances. I’ll break it down and explain the following:
In order to use modules in your web applications, you’ll need the normal script tag in your HTML file with an additional attribute. But before that, let’s set up a project folder by performing the following actions:
js in this folder.index.html file.Now, type the following in index.html:
<!DOCTYPE html>
<html>
<head>
    <meta charset="utf-8">
    <meta name="viewport" content="width=device-width, initial-scale=1.0" >
    <title>Introduction to ES modules</title>
</head>
<body>
</body>
</html>
Still in your code editor, create a new JavaScript file in the js folder, save it as addition.js and type the following code.
// js/addition.js

// A function that adds two numbers
export function addition(a, b) {
    return a + b;
}
The key thing to observe is the export keyword before the function declaration. This means two things:
In addition, this style of export is called an inline export. When I said “this style,” that means there is another “style”. We’ll discuss that later.
The module is ready, but we’ll need another JavaScript file to use this module, therefore, create another JavaScript file and save it as useaddition.js, then type the following code:
// useaddition.js
import { addition } from './addition.js';

alert(addition(2, 5));
Switch back to the index.html file, and add a script tag towards the end of the file:
<!-- Code truncated -->
<body>
    <script src="js/useaddition.js"></script>
</body>
<!-- Code truncated -->
At this stage, useaddition.js is the entry point of your application. Save all files, and launch your browser and open index.html. On a normal day, you should get an alert message, reality is: You won’t get any alert message.
When you encounter an error in your JavaScript apps, the first place you should look is the web browser console located in the developer tools, you should see an error similar to the one in the image below, it’ll read Uncaught SyntaxError: Cannot use import statement outside a module.
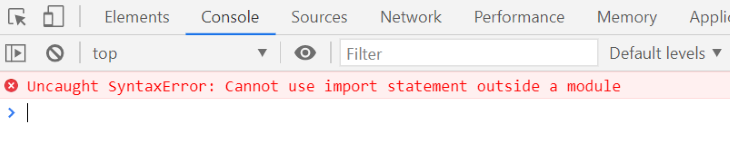
The question is why? Well, the src attribute of the script tag on index.html points to a JavaScript file (useaddition.js), therefore, when the browser reads useaddition.js it discovers an import statement, which on a normal should occur only in a module, but the browser does not recognize useaddition.js as a module, and it will stop reading the file and report the error.
Do you remember the additional attribute I told you about? It is type="module" which basically tells the browser that the linked JavaScript file is a module. Now, modify the script tag in your index.html as such:
<!-- Code truncated -->
<body>
    <!-- Note the added attribute in the script tag -->
    <script type="module" src="js/useaddition.js"></script>
</body>
<!-- Code truncated -->
Save all files and refresh your browser. No alert message whatsoever, check the Console in the Developer tools, yet another error.

This time it’s a CORS error. CORS stands for Cross-Origin Resource Sharing which is an HTTP-header mechanism that allows a server to indicate other origins which a browser should permit loading resources from. These origins could be a domain, scheme, or port.
For security reasons, browsers restrict cross-origin HTTP requests initiated from scripts. This is exactly what useaddition.js is trying to do.
First, useaddition.js is a JavaScript file attempting to fetch a resource (addition.js) via an HTTP request using the file:/// protocol, this is considered a security risk, as a result the browser blocks the request. Furthermore, it states the origin is null, because it does not consider a script file from a browser as an acceptable origin that will request a resource.
The fix is to change the origin, and as stated earlier, this origin could be a domain, scheme or port. In our case, we’ll use a scheme which is another word for a protocol such as http or https, and the only way we can use such protocol is if we put our code on a server.
There are several ways to do this among which are:
If you are like me, go for the last one. You can get a server like Apache when you install XAMPP. Afterwards, do the following
htdocs folder on the serverhttp://localhost/projectfolderWhere:
projectfolder is the name of the folder you created earlier.If you’ve done everything correctly, the module should work, and you’ll get an alert message in your web browser.
Now, that we have an environment that allowed the module to work (as shown in the image above), please, keep the environment live, and let’s explore other ways we can export and import modules, because as you might have noticed, how we exported and imported the module from addition.js is just one of the ways you can work with modules in your JavaScript applications.
In the previous section, you’ve learned how to export and import a module, and I did mention it’s just one of the ways of working with modules in JavaScript. There are others listed below:
This means whatever you are exporting from your module should have a name. This name could be a variable name, class name or function name. Later, when you import this module, you’ll access this export via the name.
This is what we did in the addition.js file, for more clarity, here is it again (in a truncated version):
// js/addition.js

// "addition" is the name of the export
// and it's what is used by any file
// importing this module.
// This exporting style is known as inline.
export function addition(a, b) {}
When you want to import it, you’ll have to surround the exported name with a pair of curly braces, this means you are reaching into the module to get the exported name. Again, here is the import statement from useaddition.js:
// useaddition.js

// Note the curly braces around the
// function name
import { addition } from './addition.js';

// code truncated
As the name implies, this means the value exported from your module is the default one. You add the default keyword before whatever you want to export. It’s recommended to only have one default export per module.
Now, switch to addition.js in your code editor then add default before the function as shown below:
// js/addition.js

// The addition function as a default
// export
export default function addition(a, b) {
    // code truncated
}
Save the file and refresh your browser (preferably hard refresh: ctrl + Shift + R). You should get an error similar to what’s shown in the image below.
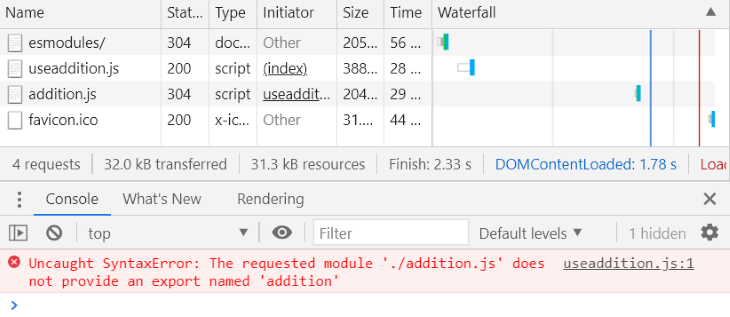
The cause of the error is in useaddition.js, since function addition is now a default export, you need to change the syntax of the import statement by removing the curly braces, and you should be left with something as such:
// useaddition.js

// Importing the addition function as a default
// export
import addition from './addition.js';

// code truncated
Save your file and refresh your Web browser. Everything should work.
JavaScript allows you to rename an export as an alias using the as keyword. Thereafter, you can import this export using this alias. But when you export part of a module, and you specify it as a default using the default keyword, you will use the export name when importing the module and not the keyword default.
Therefore, you can write the default export in addition.js from the last section as a named default export and everything should work.
// js/addition.js

// Rewritten to used a named export
// on a default export
function addition(a, b) {
    return a + b;
}

// addition as a named default export
export {
    addition as default,
};
The way we exported addition is the other “style” of export I mentioned earlier, it’s called an export clause.
Please note, If you write your import statement in useaddition.js as such it will not work:
// This is an INVALID import statement, and will
// result in an error stating:
// Uncaught SyntaxError: Unexpected token 'default'
import default from "./addition.js";

alert(default(2, 5)); // The code won't execute to this line.
As stated in the last section, you can rename your export and use the new name as the exported name when importing it.
// js/addition.js

// Rewritten to used a named export
// on addition
function addition(a, b) {
    return a + b;
}

// This is called an export clause
// The function "addition" is now available as "sum"
// for any file that imports this module.
export {
    addition as addNumbers,
};
Then you’ll use it in useaddition.js as:
// useaddition.js

// This would FAIL because we exported
// addition as "addNumbers".
// import { addition } from "./addition.js"

// Importing a renamed export
import { addNumbers } from "./addition.js";

alert(addNumbers(2, 5));
You can export and import multiple functionalities of your module with or without renaming them. If you do rename the export, you’ll use the new name when importing them.
To demonstrate this, let’s use our good friend in this article: the shopping cart.
// js/cart_esmodules.js
var items = [];

function addItem(name, price) {
    items.push({
     name: name,
     price: price,
    });
}

function total() {
    return items.reduce(function (a, b) {
     return a + b.price;
    }, 0);
}

// Export multiple items as a list.
// Note, addItem is renamed to addToCart
export {
    total,
    addItem as addToCart,
}
When importing we can use the exported them, or rename them if we want. Create a new JavaScript file and save it with the name use_esshoppingcart.js and type the following code.
// js/use_esshoppingcart.js
// Note, total is renamed to cartTotal.
import {
addToCart,
total as cartTotal
} from "./cart_esmodules.js";
addToCart("USB drive", 20);
addToCart("Keyboard", 10);
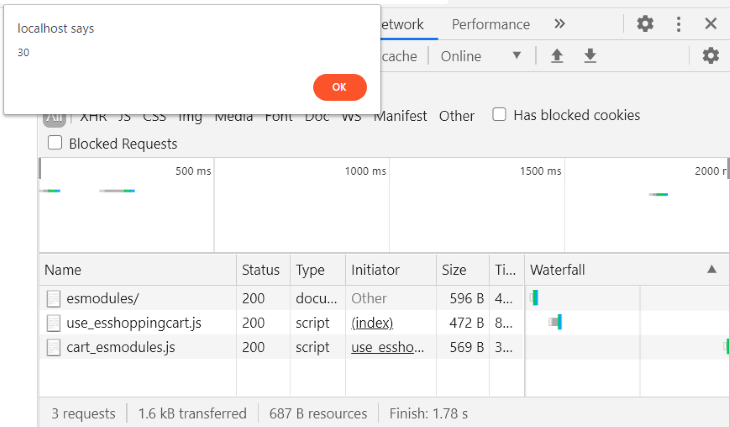
alert(cartTotal()); // 30
Next, modify the index.html file to make use_esshoppingcart.js as the point of entry to the application.
<!-- Code truncated -->
<body>
    <!-- Note, the src attribute value has changed -->
    <script type="module" src="js/use_esshoppingcart.js"></script>
</body>
<!-- Code truncated -->
Save your files and refresh your browser. Your output should resemble the image below.
Though you’ve learned how to import module code using their name or by renaming them, namespace import allows you to import all module exports at once. When you do this, the namespace import becomes an object whose properties are the named exports.
The two key ingredients of a namespace import are:
* symbol: Which in this context, means “everything”Still using use_esshopingcart.js, modify it to use namespace import.
// js/use_esshoppingcart.js

// Now, we are using a namespace import
// to import all the module exports.
// This line means, "import everything from
// cart_esmodules.js" as ShoppingCart.
import * as ShoppingCart from "./cart_esmodules.js";

// add items to the cart
ShoppingCart.addToCart("USB drive", 20);
ShoppingCart.addToCart("Keyboard", 10);

alert(ShoppingCart.total()); // 30

// You can test ShoppingCart is an object
// by writing the following code.
// alert(ShoppingCart instanceof Object); // true
Save it and test it by refreshing your browser.
This approach is possible, but it’s not recommended.
// js/cart_esmodules.js

// code truncated

// The addition function is exported
// as a default and the total function
// is exported as a renamed export.
export {
    addItem as default,
    total as cartTotal
};
And in use_esshoppingcart.js you’ll write the import statement as such:
// js/use_esshoppingcart.js

// Importing a default export and a named
// export.
import addItem, { cartTotal } from "./cart_esmodules.js";

// code truncated
All the import statements that we’ve discussed so far is known as a static import, and it has its limitations. It must be at the top level of the module, and you cannot use it inside a block.
In dynamic import, you can use the import() operator to load code “on demand,” thereby getting around the constraint posed by a static import where you have to put the import statement at the top level of the module.
We’ll use addition.js and useaddition.js for this example. Mind you, we’ll use the last modified version of addition.js which was made in section Rename export and Name import, but here is it again (without the comments):
// js/addition.js
function addition(a, b) {
    return a + b;
}

export {
    addition as addNumbers,
};
Next, we’ll rewrite useaddition.js using dynamic import.
// js/useadditon.js
// The directory of the file specified
// as a constant. In this case it's just
// a relative path because useaddition.js and
// addition.js are in the same directory. i.e. the
// js directory
const dir = "./";
// Concatenate the directory name to the
// module name,
const moduleSpecifier = dir + "addition.js";
function loadAdditionModule() {
// The "addition" parameter to 'then' is NOT
// the exported name of the module from
// addition.js, instead, the exported function
// is "addNumbers".
//
// Note the import() operator below.
return import(moduleSpecifier).then(function (addition) {
const result = addition.addNumbers(2, 5);
return alert(result);
});
}
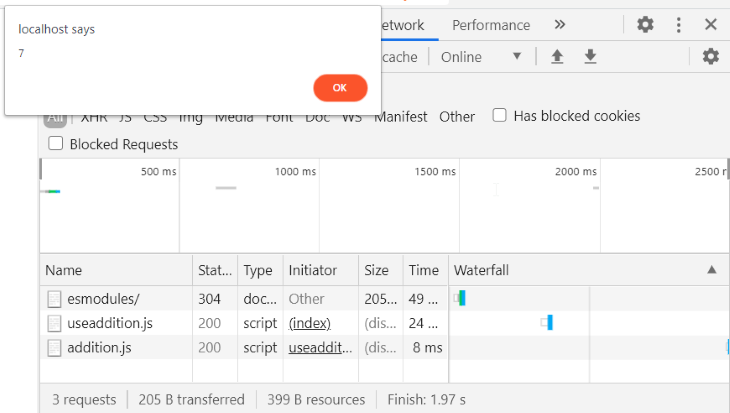
loadAdditionModule(); // 7
Update the index.html file to make usadditon.js as the entry point of your application and refresh your browser, you should get an alert message of 7.
Please note, if addition was exported as a default value in addition.js as such:
// js/addition.js

// code truncated

export {
    addition as default,
};
You’ll use default in your dynamic import. Therefore, useadition.js with dynamic import would like such:
// js/useadditon.js (working with a default export)
const dir = "./";

const moduleSpecifier = dir + "addition.js";

function loadAdditionModule() {
    return import(moduleSpecifier).then(function (addition) {
     const result = addition.default(2, 5); // Note the "default" on this line
     return alert(result);
    });
}

loadAdditionModule(); // 7
Personally, I would not recommend this because readability goes out the window when another person or your future self tries to figure out what default means in this context.
If you’ve done destructuring in JavaScript before, you might think a named export is destructuring, it’s not, though they look similar.
import { cartTotal } from "./cart_esmodules.js"; // named import
let [a, b] = [20, 30]; // destructuring
In addition, renaming is different:
// A renamed import
import { cartTotal as ShoppingCartTotal} from "./cart_esmodules.js"; // named import

// Destructuring with renaming variables
let myDetails = {first_name: "Habdul", last_name: "Hazeez"};
// Rename first_name and last_name
let {first_name: FirstName, last_name: LastName} = myDetails;

// FirstName: Habdul, LastName: Hazeez
Module specifiers are the strings that identify modules e.g. ./cart_esmodules.js. Their behavior is different in Web browsers and Node.js. The following are the categories of module specifiers:
cart_esmodules.js, it starts with a dot. An example is ./cart_esmodules.js/js/cart_esmodules.jshttp://localhost/esmodules/js/cart_esmodules.jscart_esmodules.js. Currently, not supported in web browsersjs/cart_esmodules.js. Not yet supported in web browsersIn Node.js specifiers works as follows:
file:///file: is supportednode_modules directorynode_modules directorySimilar to CommonJS and AMD, modules are singletons. This means if you import a module multiple times, only a single instance of it exists.
To drive this point home, switch to your editor and modify use_esshoppingcart.js to match the code below (do not save it yet, read on):
// js/use_esshoppingcart.js

import * as firstShoppingCart from "./cart_esmodules.js";
import * as secondShoppingCart from "./cart_esmodules.js";
In the previous code block, cart_esmodules.js was imported twice as a namespace import in firstShoppingCart and secondShoppingCart therefore, both shopping carts are objects whose properties are the named exports of the module (refer to section: Namespace import).
Now, you might think firstShoppingCart and secondShoppingCart are different because in JavaScript two objects are not equal, the reality is: firstShoppingCart and secondShoppingCart is the same object.
To confirm that, create two objects in cart_esmodules.js as shown in the code block below:
// js/use_esshoppingcart.js

// Previous import statements remains the same

// create two objects ( not necessarily with my name :) )
let firstObject = {
    first_name: "Habdul",
    last_name: "Hazeez",
};

let secondObject = {
    first_name: "Habdul",
    last_name: "Hazeez",
};
When you test the equality of firstObject and secondObject , you’ll realize they are not the same. Add the following to cart_esmodules.js:
// js/use_esshoppingcart.js
// previous code remains the same

alert(firstObject === secondObject); // false
Save your file, ensure the script tag on inex.html points to the location of use_esshoppingcart.js. Launch (or refresh your browser). The alert message should read false.
Now, it’s time to test for the equality firstShoppingCart and secondShoppingCart.
Add the following code:
// js/use_esshoppingcart.js
// previous code remains the same

alert(firstShoppingCart === secondShoppingCart); // true
That proves modules are singletons. Only one instance exists, as an additional evidence, you can add items to the cart using firstShoppingCart or secondShoppingCart objects, the total will be the same.
Before that, ensure cart_esmodules.js is exporting its functions as addItem and cartTotal, then modify use_esshoppingcart.js as follows:
// js/use_esshoppingcart.js
// Comment the two alert statements then add
// the following

// add some items
firstShoppingCart.addItem("USB drive", 20);
firstShoppingCart.addItem("Keyboard", 10);

// Use the "second" shopping cart
secondShoppingCart.addItem("JoyStick", 30);

// Check the total
alert(firstShoppingCart.cartTotal()); // 60
alert(secondShoppingCart.cartTotal()); // 60
The current state of use_esshoppingcart.js is used in the next section, therefore, leave it as it is, then proceed.
When we say, “imports are live,” this means when you modify an exported value from a module, any other file requesting this module will have access to this modified value.
Create a new module called testLiveImports.js and save the following code:
// js/testLiveImports.js
import { cartTotal } from "./cart_esmodules.js";

alert(cartTotal());
Switch to index.html, then add a script tag points to testLiveImports.js. Now, you’ll have two script tags as shown in the code block below.
<!-- index.html -->
<!-- Preious code remains the same. -->
<script type="module" src="js/use_esshoppingcart.js"></script>
<script type="module" src="js/testLiveImports.js"></script>
When you refresh your browser, you’ll realize cartTotal() in testLiveImports.js has the same value as the cartTotal() in use_esshoppingcart.js. Therefore, you should get 3 alert messages with the same output: 60.
As you’ve learned in previous sections, Node.js uses the CommonJS module format, but it also supports ES modules.
Meanwhile, all the modules we’ve created so far we’ve executed in a Web browser, now let’s see how they play out in Node.js.
Now, before testing, please note: prior to Node 13, ES modules were an experimental technology, therefore, you could use modules by saving it with .mjs extension and accessing it via a flag.
On the other hand, from Node 13 upwards you can use modules in two ways. They are:
.mjs extension orpackage.json file with type="module" in the nearest folder.To make things more clear: here is what we’ll explain.
.mjs extension in Node.js >= 13.js extension in Node.js >= 13The current version of Node.js at the time of writing is 15.10.0 and 14.16.0 LTS, but if you have a version of Node.js less than these versions, here is how you’ll test it.
We’ll use use_esshopingcart.js from the last section (as we left it), but before that, please do the following:
use_esshopingcart.js and save the file with .mjs extension.alert() functions to console.log() because alert() won’t work in Node.js.When you are done with that, fire up your console and navigate to the js directory of the project folder we’ve used throughout this section then type the following and hit the enter key on your keyboard:
node --experimental-modules use_esshoppingcart.mjs
You should get an output similar to the image below.

.mjs extension in Node.js >= 13If you have Node.js 13 upwards installed, and your module is saved with .mjs extension, type the following and hit enter on your keyboard:
node use_esshoppingcart.mjs
The output should be the same.

.js extension in Node.js >= 13Node 13 upwards allows you to use modules saved with the .js extension, but you need to add {"type": "module"} to the nearest package.json file.
Switch to your editor, save the following JSON code in your js directory:
// js/package.json
{
    "type": "module",
}
Next, you can use use_esshoppingcart.js. Do not forget to change the alert() functions to console.log() because we only made this change with the .mjs version.
# Kindly note the .js extension.
node use_esshoppingcart.js
As expected, the output should be the same.

If you read this article to this point, you already know the characteristics of a module. Here are some:
There you have it. ES modules. For more on ES modules, please, refer to the Further reading section.
Up next: Node Package Manager.
Node Package Manager, popularly called NPM, is a popular package manager used by developers around the world to share modules (also called packages), and full-blown applications like express.
NPM is coded in JavaScript and was developed by Isaac Z. Schlueter, who took inspiration from PHP Extension and Application Repository (PEAR) and Comprehensive Perl Archive Network (CPAN), used by PHP and Perl programmers respectively.
At this time, NPM is the world’s largest software registry that hosts thousands of software packages. It is also the default package manager for Node.JS. You can find many of those packages on npm website.
NPM comes pre-installed with Node.js and if you’ve Node.js installed, you can use it by typing npm on the command line or GitBash, and you’ll get an output similar to the image below.
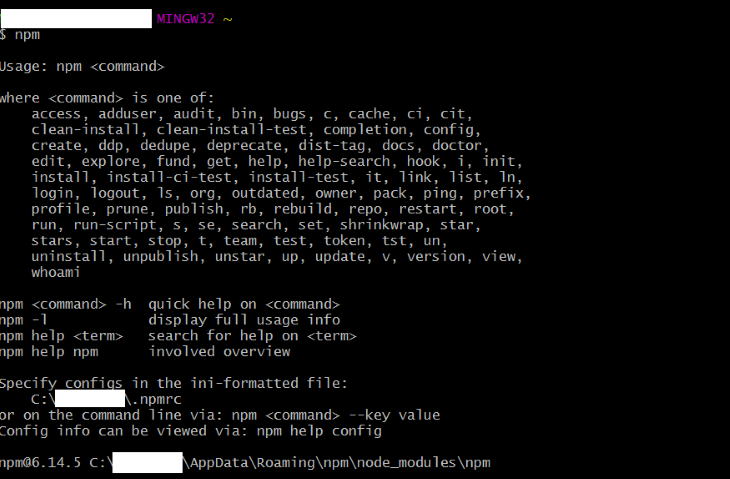
The image shows you some command options available with npm. The command you’ll find yourself using most often is npm install. This command is used to install packages published on the NPM registry.
As always, be careful with the packages you download and watch out for any package with known vulnerabilities. Fortunately, NPM will notify you when you install such applications.
For more familiarity with NPM, you can watch Brad Traversy’s NPM crash course on YouTube.
Since ES modules became mainstream, some notable projects have adopted it in their code base, among which are:
React is a JavaScript library used for building user interfaces (UI). It has gained popularity in recent years since its release by Facebook in 2013.
The following is an example of React code using ES modules:
import React from "react";
import logo from "./logo.svg";
import "./App.css";

function App() {
  return (
    <div className="App">
      // UI code here
    </div>
  );
}

export default App;
Svelte is another tool in the JavaScript toolbox that allows you to create so-called “Cybernetically enhanced web apps”.
Here is an example of a Svelte code using ES Modules taken from Svelte’s website:
/* App.svelte generated by Svelte v3.32.0 */
import {
    SvelteComponent,
    detach,
    element,
    init,
    insert,
    noop,
    safe_not_equal
} from "svelte/internal";

function create_fragment(ctx) {
    // Code truncated
    // Check https://svelte.dev/tutorial/basics
}

class App extends SvelteComponent {
    constructor(options) {
        super();
        init(this, options, null, create_fragment, safe_not_equal, {});
    }
}

export default App;
This article explained the varieties of module systems available in JavaScript and how you can use them to create modules. In addition, we briefly discussed NPM which is a package manager that is used for sharing modules (packages) among software developers.
In the end, we gave examples of popular projects like React using ES modules in their code base.
Debugging code is always a tedious task. But the more you understand your errors, the easier it is to fix them.
LogRocket allows you to understand these errors in new and unique ways. Our frontend monitoring solution tracks user engagement with your JavaScript frontends to give you the ability to see exactly what the user did that led to an error.

LogRocket records console logs, page load times, stack traces, slow network requests/responses with headers + bodies, browser metadata, and custom logs. Understanding the impact of your JavaScript code will never be easier!

AI-generated tests can speed up React testing, but they also create hidden risks. Here’s what broke in a real app.re

Multimodal UX goes beyond designing for screens. Learn how context-aware systems, progressive modality, failover modes, and accessibility-first design create better digital product experiences.

Why the future of DX might come from the web platform itself, not more tools or frameworks.

Learn how code-style reasoning helps product managers make sharper decisions, surface edge cases, and write clearer requirements.


