
ML Kit is a collection of machine learning APIs that can be used for both Android and iOS. ML Kit allows developers to easily integrate machine learning capabilities into their mobile apps without extensive knowledge of machine learning algorithms and techniques. You can use this library to perform machine learning tasks, such as text recognition, image labeling, barcode scanning, text translation, and more.
In this article, we’ll demonstrate how to apply machine learning in Android Studio. In our tutorial, we’ll use the Text recognition API to scan and extract text. We’ll also show how to use the Object detection and tracking API to identify and locate objects in images.
Jump ahead:
The Replay is a weekly newsletter for dev and engineering leaders.
Delivered once a week, it's your curated guide to the most important conversations around frontend dev, emerging AI tools, and the state of modern software.
One of the key advantages of ML Kit is that it allows developers to run machine learning models on the device, rather than sending data to a remote server for processing. This is particularly useful in situations where real-time results are required, as it allows for faster data processing. Additionally, running models on the device can help improve the privacy of user data, as it reduces the amount of data that needs to be transmitted to remote servers.
Another great benefit of ML Kit is that you don’t need to train your own models. Instead, pre-trained models are available that have already been trained on large datasets.
Using pre-trained models can save time and resources when developing machine learning applications. This strategy can help get your application up and running quickly, without requiring a lot of training data or computational resources. However, there are also some potential limitations to using pre-trained models. For example, they may not be as accurate or performant as models that have been trained for your app’s specific use case.
All ML Kit APIs require Android API level 19 or higher, so make sure your minSdkVersion is set to at least 19. In this tutorial, I’ll use Android Studio as my IDE; it does a good job organizing files.
If you’re using Gradle v7.6 or higher, modify your settings.gradle to include the following repositories:
pluginManagement {
   repositories {
       google()
    ...
   }
}

dependencyResolutionManagement {
   repositories {
      google()
    ...
   }
}
Now, in your app/build.gradle file add the following dependency:
dependencies {
   // This is the dependency for text recognition
   implementation 'com.google.android.gms:play-services-mlkit-text-recognition:18.0.2'
   // This is the dependency for object detection
   implementation 'com.google.mlkit:object-detection:17.0.0'
}
Next, sync your project with Gradle Files and it will download the library.
The machine learning models are downloaded dynamically via Google Play Services upon first usage, but you can change this so that the models are downloaded when the app is installed. To do so, add the following code to your AndroidManifest.xml file:
<application ...>
   <meta-data
       android:name="com.google.mlkit.vision.DEPENDENCIES"
       android:value="ocr" />
   <!-- This will cause the model for text recognition(ocr) to be downloaded -->
</application>
The ML Kit Text recognition API is designed to recognize and extract text from images or videos in a variety of languages and formats.
One of the most common applications of text recognition is optical character recognition (OCR), which involves using machine learning algorithms to interpret text from images or scanned documents. OCR can be used to automatically extract information from business cards or scanned documents, or to transcribe handwritten notes into digital text.
Given that we previously imported the ML Kit library, we don’t need to do so again. I’ll demonstrate two options for scanning and extracting the text.
The first method you’ll use to scan and extract the text is to use a file picker.
First, I’ll create a variable to get the text recognition client; I’ll use it later to process the image. The TextRecognition class acts as an interface to the machine learning models; it abstracts all the complexity:
private val recognizer by lazy {
   TextRecognition.getClient(TextRecognizerOptions.DEFAULT_OPTIONS)
}
If you want to set your own executor, you can pass custom options to it:
val options = TextRecognizerOptions.Builder()
   .setExecutor(executor)
   .build()

TextRecognition.getClient(options)
Here, I defined this variable in an Activity, so I used the lazy function to defer the creation of this object until it is actually needed. In your Activity or Fragment, register an activity result contract for picking the image:
private val pickImage = registerForActivityResult(
   ActivityResultContracts.OpenDocument()
) { uri ->
   if (uri != null) {
       processImage(uri) // We'll define this later
   } else {
       Toast.makeText(this, "Error picking image", Toast.LENGTH_SHORT).show()
   }
}
If you haven’t used the Activity Result API before, you can learn more about it here.
Now, decide where you’d like to launch the image picker from and call pickImage.launch(arrayOf("image/*")). In my case, I’m launching it from a button:
pickImageButton.setOnClickListener { pickImage.launch(arrayOf("image/*")) }
Next, define the method that will use the recognizer we created earlier to process the image:
// uri of the file that was picked
private fun processImage(uri: Uri) {
   val image = InputImage.fromFilePath(this, uri)

   recognizer.process(image)
       .addOnSuccessListener { result -> extractResult(result) }
       .addOnFailureListener { Log.e("MainActivity", "Error processing image", it) }
}
The TextRecognizer.process function returns a Task. You can observe its results by adding the success and failures listeners. Now, let’s create a method that receives the success result:
private fun extractResult(result: Text) {
   recognizedTextView.text = result.text
}
For now, I’m just getting the extracted text from the results and displaying that in a TextView.
Let’s test it. Here’s how it appears on my device’s home screen:
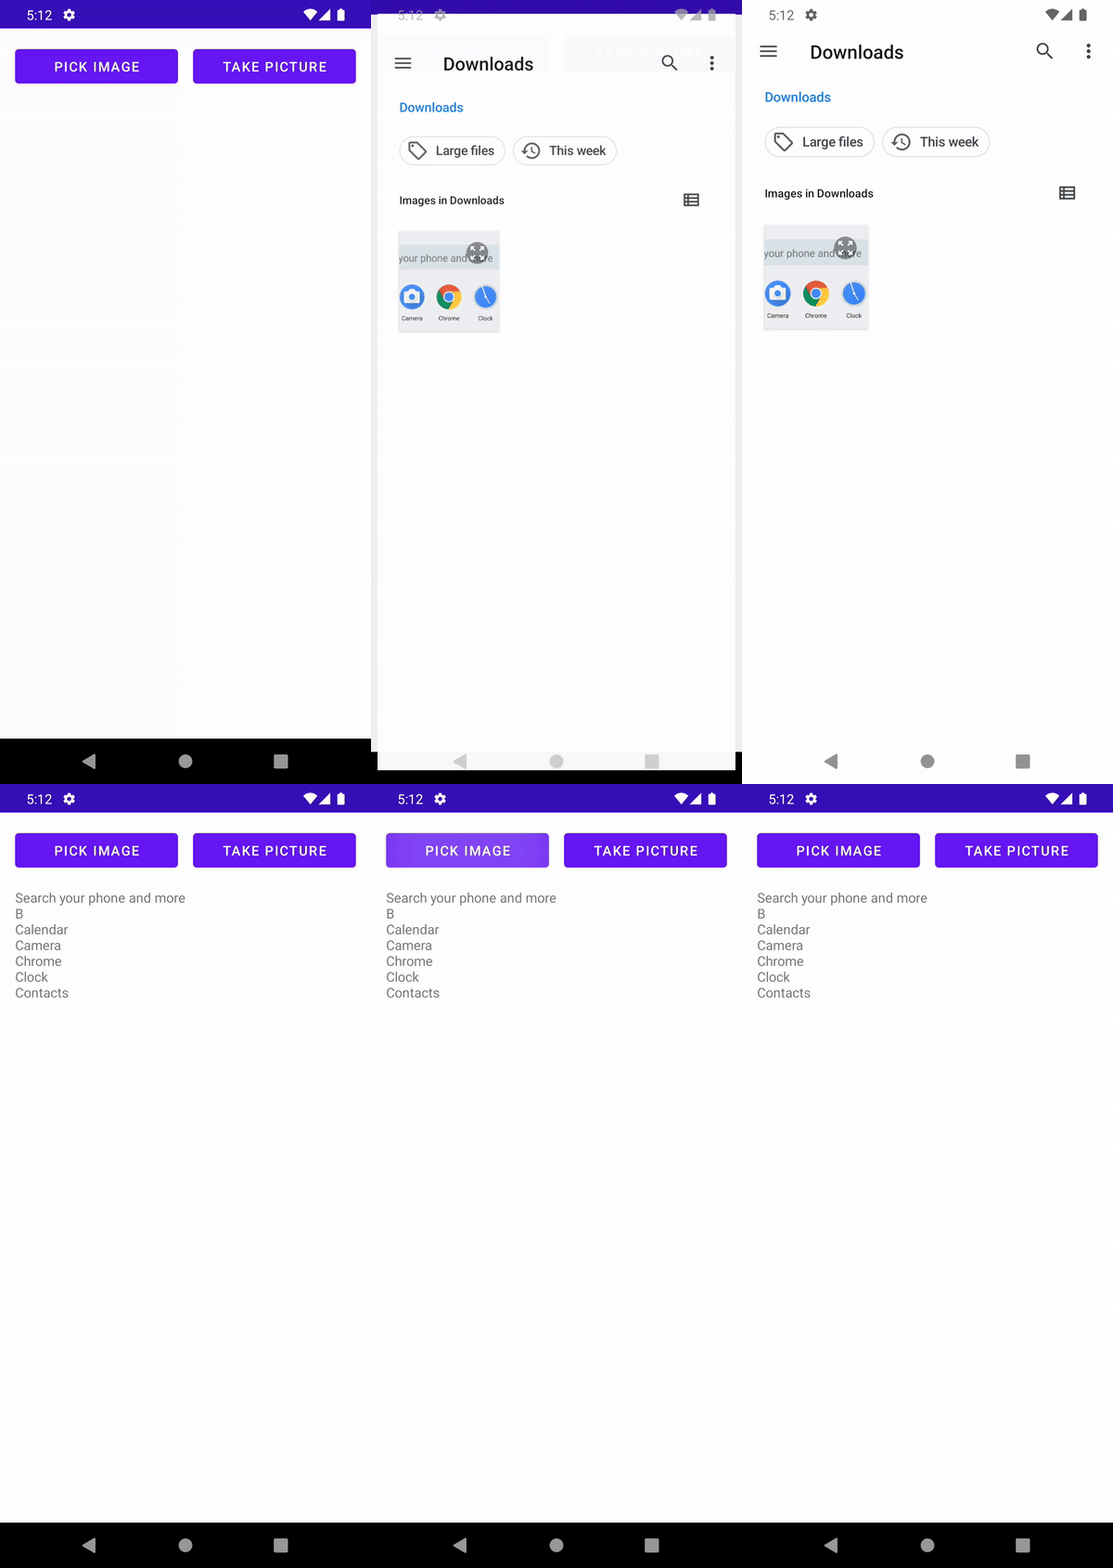
As you can see, this method does a pretty good job of reading the image, even though it scans a “B” that doesn’t exist in the image. As mentioned earlier, machine learning models are not 100% accurate so this will be something you’ll have to handle yourself.
This result is pretty cool, but can we do more? Yes, we can!
Besides giving us the scanned text, the library also returns the location of the text in the image.
Let’s draw some borders around the recognized text. To start, let’s define the paint:
private val paint by lazy {
   Paint().apply {
       style = Paint.Style.STROKE
       strokeWidth = 4f
       color = Color.MAGENTA
   }
}
I’ll add two new variables. One is a reference to the rootView; the other is an imageView I’ll add to our layout so we can see the modified image:
private val rootView by lazy { findViewById<View>(android.R.id.content).rootView }
private val imageView by lazy { findViewById<ImageView>(R.id.image) }
Next, modify processImage to display the image that was picked in the ImageView you added to your layout:
private fun processImage(uri: Uri) {
   val image = InputImage.fromFilePath(this, uri)
   imageView.setImageURI(uri)
   ...
}
Now, let’s modify the functions that extract the result to also draw borders around the recognized text:
private fun extractResult(result: Text) {
   recognizedTextView.text = result.text

   // I'm using post here to make sure this code runs on the main thread
   rootView.post {
     // Let's first convert the image to a bitmap so we can draw on it.
       val bitmap = imageView.drawToBitmap()
       val canvas = Canvas(bitmap)

     // textBlocks is an array that contains all the individual blocks of text
     // that were recognized
     result.textBlocks
          // the boundingBox represents where the given text is in the image
        .mapNotNull { it.boundingBox }
        .forEach { box -> canvas.drawRect(box, paint)
     }


     // Set the modified bitmap in the ImageView
       imageView.setImageBitmap(bitmap)
   }
}
Here’s the result; all of the recognized text has a border:
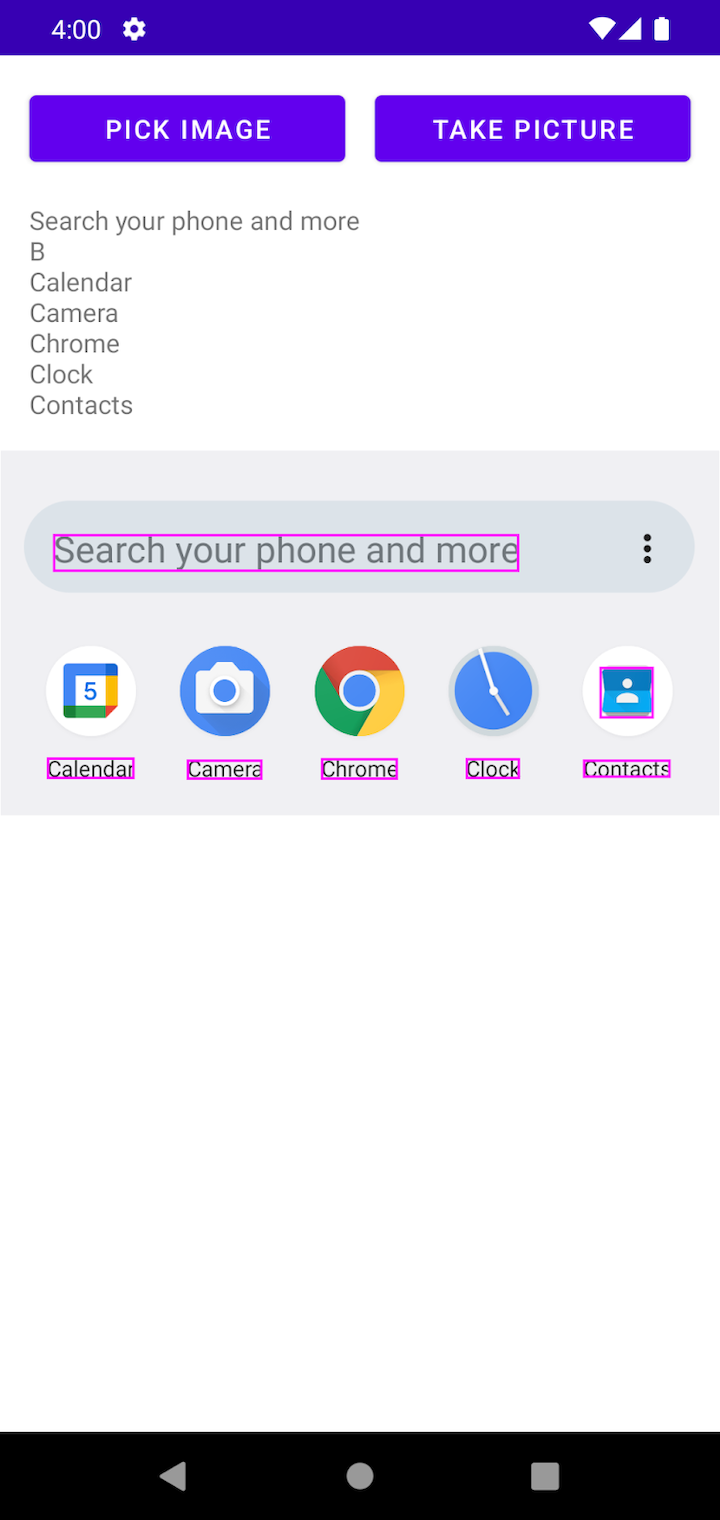
Now we can see where the “B” is coming from; it’s from the contacts app icon.
Using a camera is the second method we’ll use to scan and extract text. Most of the code is pretty similar to the previous section, so I’ll just describe what differs here.
I’ll demonstrate how to use the Activity Result API to take a picture, but if you prefer you can create your own camera using a library like CameraX.
Start by adding the below code to your AndroidManifest.xml file:
<provider
   android:name="androidx.core.content.FileProvider"
   android:authorities="${applicationId}.provider"
   android:exported="false"
   android:grantUriPermissions="true">
   <meta-data
       android:name="android.support.FILE_PROVIDER_PATHS"
       android:resource="@xml/provider_paths" />
</provider>
Next, inside res/xml, create a file called provider_paths.xml and add the following content:
<?xml version="1.0" encoding="utf-8"?>
<paths>
   <cache-path
       name="cache_folder"
       path="." />
</paths>
Now, go back to the Activity or Fragment and define a URI for where you want the image to be stored:
private val imageUri by lazy {
   val tempFile = File.createTempFile("ml_image", ".png", cacheDir).apply {
       createNewFile()
       deleteOnExit()
   }

   FileProvider.getUriForFile(
       applicationContext,
       "${BuildConfig.APPLICATION_ID}.provider",
       tempFile
   )
}
Let’s also register the takePicture contract for taking pictures. The benefit of doing this is that you won’t need to write your own code to take pictures:
private val takePicture = registerForActivityResult(
   ActivityResultContracts.TakePicture()
) { success ->
   if (success) {
       processImage(imageUri)
   } else {
       Toast.makeText(this, "Error taking picture", Toast.LENGTH_SHORT).show()
   }
}
You’ve seen the processImage before, everything after that is the same.
Object detection and tracking is a specific type of image recognition that involves identifying and locating objects in images or videos.
One common use case is in the transportation industry, where object detection and tracking can be used to improve the safety of any vehicle, especially those that use self-driving technology. Using a camera mounted on a vehicle, machine learning models can detect and track other objects on the road, such as other vehicles, pedestrians, and traffic signs. Object detection and tracking can help the vehicle navigate safely and avoid collisions.
We already added the dependency earlier so we don’t need to do that again. Let’s start by configuring the object detector:
private val objectDetector by lazy {
   val options = ObjectDetectorOptions.Builder()
       .setDetectorMode(ObjectDetectorOptions.SINGLE_IMAGE_MODE)
       .enableMultipleObjects()
       .build()

   ObjectDetection.getClient(options)
}
There are a few options you can set; let’s review each one to understand what they do:
setDetectorMode(ObjectDetectorOptions): There are two modes (STREAM_MODE and the SINGLE_IMAGE_MODE). There’s the STREAM_MODE is faster but produces less accurate results; SINGLE_IMAGE_MODE takes a little longer to run but gives better resultsenableMultipleObjects(): Defines whether only the main object should be detected or if more objects should also be detectedenableClassification(): Defines whether to classify detected objects into broad categories. If enabled, it will classify objects into five categories: fashion goods, food, home goods, places, and plants. If it cannot classify an object, the result may be nullNow in the processImage function, you can call the objectDetector that you created earlier:
rivate fun processImage2(uri: Uri) {
   val image = InputImage.fromFilePath(this, uri)
   imageView.setImageURI(uri)

   objectDetector.process(image)
       .addOnSuccessListener { result -> extractResult(result) }
       .addOnFailureListener { Log.e("MainActivity", "Error processing image", it) }
}
The extractResult function is very similar to the one used earlier in the text recognition section:
private fun extractResult(result: List<DetectedObject>) {
   rootView.post {
       val bitmap = imageView.drawToBitmap()
       val canvas = Canvas(bitmap)

       result.forEach { box ->
           canvas.drawRect(box.boundingBox, paint)
       }

       imageView.setImageBitmap(bitmap)
   }
}
Here’s the final result; it recognized two objects — the couch and the table:
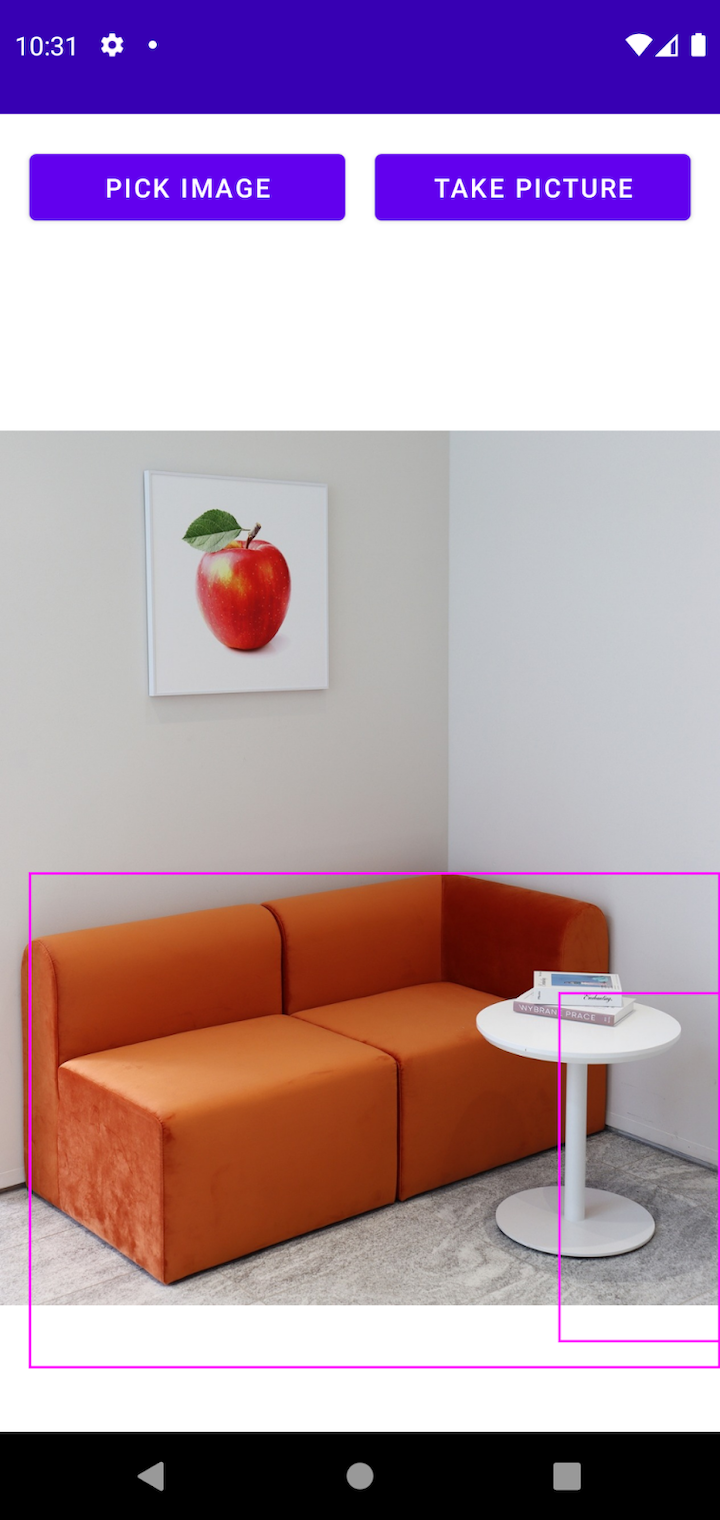
As you can see, the model is not 100% accurate. For example, it did not detect the painting or the books. Nonetheless, it does a good job of identifying where the objects are in the image.
The ML Kit Text recognition v2 API is an improved version of the Text Recognition API. As of this writing, it is still in beta.
One of the biggest differences between the two versions is that V2 supports text in Chinese, Devanagari, Japanese, and Korean.
The Text recognition V2 API is very similar to V1, so if you’re familiar with V1 you should not have any issues implementing V2. You can read more about the new version here.
Firebase Machine Learning and ML Kit are both tools that allow developers to incorporate machine learning features into their Android and iOS apps.
Firebase Machine Learning provides a broader set of features than ML Kit. In addition to providing pre-trained models for common tasks, it also offers tools for training and deploying custom machine learning models.
If you want to migrate from ML Kit to Firebase Machine Learning, there’s a migration guide you can follow.
Using real-time ML Kit APIs for text recognition and object detection can be an efficient and effective way to add powerful machine learning capabilities to your app.
In this article, we demonstrated how to select the input image using the file picker as well as the camera. In the end, both approaches produced the same result.
While machine learning can be incredibly powerful, it’s not a magic bullet that can solve every problem. It’s important to understand the limitations of machine learning in order to use it effectively in your app.
LogRocket is an Android monitoring solution that helps you reproduce issues instantly, prioritize bugs, and understand performance in your Android apps.
LogRocket's Galileo AI watches sessions for you, instantly identifying and explaining user struggles with automated monitoring of your entire product experience.
LogRocket also helps you increase conversion rates and product usage by showing you exactly how users are interacting with your app. LogRocket's product analytics features surface the reasons why users don't complete a particular flow or don't adopt a new feature.
Start proactively monitoring your Android apps — try LogRocket for free.

React Server Components and the Next.js App Router enable streaming and smaller client bundles, but only when used correctly. This article explores six common mistakes that block streaming, bloat hydration, and create stale UI in production.

Gil Fink (SparXis CEO) joins PodRocket to break down today’s most common web rendering patterns: SSR, CSR, static rednering, and islands/resumability.

@container scroll-state: Replace JS scroll listeners nowCSS @container scroll-state lets you build sticky headers, snapping carousels, and scroll indicators without JavaScript. Here’s how to replace scroll listeners with clean, declarative state queries.

Explore 10 Web APIs that replace common JavaScript libraries and reduce npm dependencies, bundle size, and performance overhead.
Would you be interested in joining LogRocket's developer community?
Join LogRocket’s Content Advisory Board. You’ll help inform the type of content we create and get access to exclusive meetups, social accreditation, and swag.
Sign up now