Flutter has always been presented as a multi-platform framework, but it did not become multi-platform overnight. Flutter for mobile came out of beta around late 2018, while web and desktop was out of beta by 2021. Because of this head start, most of the content we see for Flutter is focused more towards mobile development.

While this does not affect most use cases for Flutter, one case it may severely undermine is authentication. In this article, we will learn why authentication flows cannot be treated the same way in Flutter with mobile and web platforms with an example of a simple dashboard.
Each dashboard has a few screens that are publicly accessible, and some that can only be accessed once user has logged in. Considering this example, let’s look at the authentication flows on both mobile and web.
Once user opens the app, we can decide in the main() itself if the user is logged in. Then, they are taken to the home screen of the dashboard, otherwise they are asked to log in.
A developer can rest assured there is no way an unauthenticated user is able to access the dashboard screen, so they don’t have to handle an edge case in which there’s no authentication on an authenticated access page.
Once user logs out, we do a pushAndRemoveUntil on the navigator and take user to the login screen.
If user presses the back button, the app will exit and it will not take them back to the dashboard. This is what a user on mobile should expect to experience.
We still can decide in main() whether user is logged in or not and proceed the user accordingly. Everything works fine until the user behaves like they would in a mobile app.
Things break when the user tries to navigate using the back and forward buttons in the browser; the developer cannot assume that a user is unable to reach the dashboard if they are not authenticated. This is because the user can directly enter the dashboard url.
If the user has entered the url of a page once they have logged in, the user expects to be taken to that page or a specific tab of this dashboard. This is called deep linking.
If a user logs out, while we can do a pushAndRemoveUntil here, the browser will store the navigation history, and the user can still press the back button and go back to the dashboard.
The developer can no longer assume a lot of things they could while developing for mobile apps. Therefore, rather than putting a conditional on every screen that requires authentication, we can use a route guard to solve this problem more elegantly.
For this guide, we will be making a simple dashboard, which will have a mix of both unauthenticated and authenticated screens.
For routing, we’ll use auto_route, because route generation can be completely automated and it has support for deep linking out of the box.
Let’s start by creating a new Flutter project. The project name for this example will be route_guard_example.
Next, add auto_route: ^3.0.4 under dependencies for handling routing.
Under dev_dependencies, add build_runner: ^2.1.4 (the package used for everything related to code generation in Flutter) and auto_route_generator: ^3.0.4 (a helper package to auto_route for generating the routes).
Finally, run flutter pub get.
This example dashboard will have the following screens:
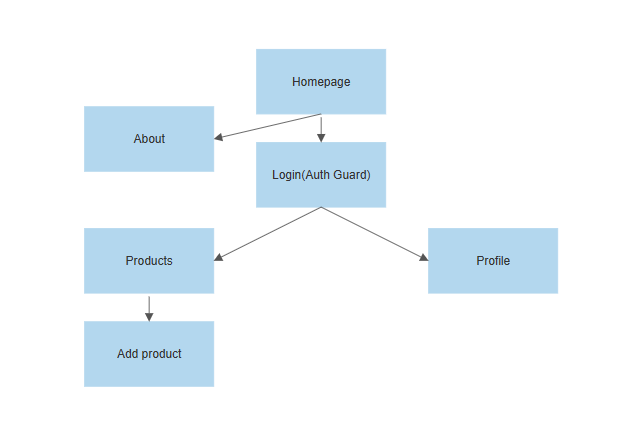
All the screens will be added under a screens folder for better structure, like so:
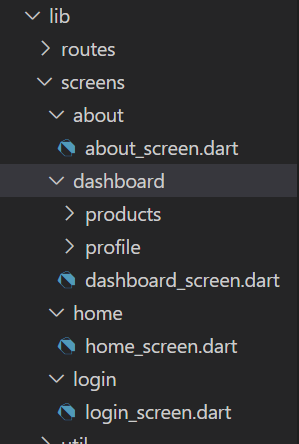
As you can see under products folder, there is a products_screen.dart and a sub folder add_products with a corresponding file. This is because we will also be using nested routing, just to make this example on par with a production-grade app.
At this point, all of the **screen_name**_screen.dart files have only the boilerplate code:
import 'package:flutter/material.dart';
class HomeScreen extends StatelessWidget {
  const HomeScreen({Key? key}) : super(key: key);
  @override
  Widget build(BuildContext context) {
    return Scaffold(
      body: Text('Home'),
    );
  }
}
Create a routes folder directly under the lib folder. Then, inside routes, create a router.dart file.
Add the routes to this file in the following manner:
@MaterialAutoRouter(
  routes: <AutoRoute>[
    AutoRoute(
      page: HomeScreen,
      name: 'HomeRoute',
      path: '/',
    ),
    AutoRoute(
      page: DashboardScreen,
      name: 'DashboardRoute',
      path: '/dashboard',
      children: <AutoRoute>[
        AutoRoute<EmptyRouterPage>(
          name: 'ProductsRoute',
          path: 'products',
          page: EmptyRouterPage,
          children: [
            AutoRoute(
              page: ProductsScreen,
              path: '',
            ),
            AutoRoute(
                page: AddProductsScreen,
                name: 'AddProductsRoute',
                path: 'add_products'),
          ],
        ),
        AutoRoute(page: ProfileScreen, name: 'ProfileRoute', path: 'profile')
      ],
    ),
    AutoRoute(page: AboutScreen, name: 'AboutRouter', path: '/about')
  ],
)
class $AppRouter {}
Let us ignore the $AppRouter class for now. This way of declaring routes is cleaner, because we are declaring the routes as we have structured our navigation.
The dashboard and homescreen are independent, hence different routes altogether.
The products and profile pages will be tabs inside Dashboardscreen, so they are nested inside it.
For nested navigation in the products page, we will need a staging area where we can stack all the screens. We use the EmptyProductPage provided by auto route for that. This route will be named “products” and we will pass ProductScreen and AddProductsScreen as a children to it.
Passing the path as '' for ProductsScreen means that this is the default screen we want to show when we hit this route.
Structuring this way makes our route guarding problem very straightforward; any route that comes inside the dashboard screen needs to be guarded, regardless of how the user arrives at that route. Simple, isn’t it!
Now run the following command in your terminal to generate the routes:
flutter packages pub run build_runner build --delete-conflicting-outputs
What you will find is a router.gr.dart file. This is the generated file with all the routes. Now delete everything in main.dart and replace it with this:
void main() {
  runApp(MyApp());
}
class MyApp extends StatelessWidget {
  MyApp({Key? key}) : super(key: key);
  final _appRouter = AppRouter();
  @override
  Widget build(BuildContext context) {
    return MaterialApp.router(
        routeInformationParser: _appRouter.defaultRouteParser(),
        routerDelegate: _appRouter.delegate());
  }
}
Notice that in the generated file, the class is AppRouter. This comes from the $AppRouter we had declared in router.dart file, just with the $ removed.
Now simply run the project in a web browser by executing flutter run in the terminal. You should now see a page with “Home” written on it!
Our route guard should do the following in order for it to function appropriately:
It should protect the dashboard regardless of how a user tries to access it (by entering the url or navigating forward/backward from browser history, for example).
The route guard should have a single source of truth for checking whether user is authenticated at any point of time or not.
Finally, if a user logs out midway, then all the previous pages accessed by them should also become inaccessible.
For making authentication data available from a single source of truth, we will implement a basic AuthService.
Create a folder util under lib and create a file auth_service.dart. Add the following code in that file:
class AuthService extends ChangeNotifier {
  bool _authenticated = false;
  bool get authenticated => _authenticated;
  set authenticated(bool value) {
    _authenticated = value;
    notifyListeners();
  }
}
Now we create a route_guard.dart file under routes folder. In this file, we add the following:
class RouteGuard extends AutoRedirectGuard {
  final AuthService authService;
  RouteGuard(this.authService) {
    authService.addListener(() {
      if (!authService.authenticated) {
        reevaluate();
      }
    });
  }
  @override
  void onNavigation(NavigationResolver resolver, StackRouter router) {

    if (authService.authenticated) return resolver.next();
    // TODO: Navigate to login screen
  }
}
Here, we see in the constructor itself that we have attached a listener to AuthService. This will trigger whenever there is a change in authentication state. The developer does not have to explicitly check for authentication anywhere.
onNavigation() is called anytime navigation takes place. In case an unauthenticated user enters the url of the “add products” screen for example, the following occurs: First, they are taken to a login screen. Once logged in, onNavigation() is fired. The resolver object has the data about where the user wanted to navigate (“add products” in this case) and takes the user there.
Inside onNavigation(), if the user is not logged in, we need to take them to a login screen first. Let’s implement a single button login screen.
Create a new folder login under screens, and add the following code to the login_screen.dart file:
class LoginScreen extends StatelessWidget {
  const LoginScreen({Key? key}) : super(key: key);
  @override
  Widget build(BuildContext context) {
    return Scaffold(
      body: Center(
        child: TextButton(
            onPressed: () {
              // Change value of auth in authservice

            },
            child:const Text('Tap to login')),
      ),
    );
  }
}
We will be needing an instance of AuthService that can be used here as well. For that we will need to make the following changes to our main.dart:
void main() {
  runApp(MyApp());
}
class MyApp extends StatefulWidget {
  MyApp({Key? key}) : super(key: key);
  static MyAppState of(BuildContext context) =>
      context.findAncestorStateOfType<MyAppState>()!;
  @override
  State<MyApp> createState() => MyAppState();
}
class MyAppState extends State<MyApp> {
  final authService = AuthService();
  final _appRouter = AppRouter();
  @override
  Widget build(BuildContext context) {
    return MaterialApp.router(
        routeInformationParser: _appRouter.defaultRouteParser(),
        routerDelegate: _appRouter.delegate());
  }
}
You might wonder what findAncestorStateOfType does. Flutter stores the widgets as a tree, and the states are stored along with the widgets. If we want to access any member of a state up this tree, we can use this function to first find MyAppState within this context, and then access the authService member variable.
Now, when user taps on the login button, inside the onTap method we can change the authentication status by MyApp.of(context).authService.authenticated = true.
In the code for route_guard.dart mentioned above, there is a comment that tells where to push to LoginScreen. Once a user has successfully logged in, we will need a callback from the LoginScreen, which will send the value to RouteGuard.
We add the callback like so:
class LoginScreen extends StatelessWidget {
  const LoginScreen({Key? key, required this.onLoginCallback})
      : super(key: key);
  final Function(bool loggedIn) onLoginCallback;
  ...
  ...
And inside onPressed:
onPressed: () {
  MyApp.of(context).authService.authenticated = true;
  onLoginCallback.call(true);
            },
Now we can navigate to LoginScreen from inside RouteGuard. Add that to the top level of routes, at the same level as DashboardRoute and run the build_runner command again.
Now we can finally add navigating to the login screen in our route guard:
...
...
  @override
  void onNavigation(NavigationResolver resolver, StackRouter router) {
    if (authService.authenticated) return resolver.next();
    router.push(
      LoginRoute(
        onLoginCallback: (_) {
          resolver.next();
          router.removeLast();
        },
      ),
    );
  }
We have already learned what resolver.next() does. Now we need router.remoteLast() to remove this login screen from our navigation stack, so when user presses the back button they are not taken to a login screen again.
Now we want to guard all the screens that come under DashboardRoute. For that, we can pass our route guard to the AutoRoute object declaring our DashboardScreen route as a property like this:
...
...
    AutoRoute(
      page: DashboardScreen,
      name: 'DashboardRoute',
      path: 'dashboard',
      guards: [RouteGuard],
...
...
Because we have tweaked the router.dart file, we run the command to generate the routes again. Upon generating the files this time, you will find an error in main.dart. The AppRouter instance there is asking for a route guard.
Change that line to the following:
late final _appRouter = AppRouter(routeGuard: RouteGuard(authService));
For demo purposes, let us add a floating action button on our homepage which will navigate to our dashboard:
class HomeScreen extends StatelessWidget {
  const HomeScreen({Key? key}) : super(key: key);
  @override
  Widget build(BuildContext context) {
    return Scaffold(
      body: Text('Home'),
      floatingActionButton: FloatingActionButton(onPressed: () {
        AutoRouter.of(context).push(DashboardRoute());
      }),
    );
  }
}
Now try running the project and click on the floating action button. Even if you are trying to navigate directly to the dashboard, it is intercepted by our route guard and you are shown the login screen.
Once you click on Tap to login, you are let through! Now close the browser and run the project one more time, and enter “http://localhost:/#/dashboard” directly. You will again be intercepted and shown the login screen!
Now we will add some UI to the dashboard so that it is easier to follow. The code at this point will be the same as the final commit in the github repo for this example.
In the dashboard screen we are using a widget provided by the auto-route package itself called AutoTabsScaffold. It takes care of a lot of the boilerplate we will need for nested routing. Now you can try running the project, navigating different screens by logging in and out, and directly entering urls (deep linking).
Now, we don’t have to think about handling such cases anymore. All we need to do is add the routes accordingly, generate it, and forget it!
This routing strategy will run seamlessly even on mobile. You can try running this exact code on a mobile device and try everything out!
From this article, we can conclude that while the mobile-only approach for ensuring authentication works only for mobile, route guarding for Flutter web works works for mobile and web. That’s one more step towards making Flutter truly multi-platform!
Install LogRocket via npm or script tag. LogRocket.init() must be called client-side, not
server-side
$ npm i --save logrocket

// Code:

import LogRocket from 'logrocket';
LogRocket.init('app/id');
// Add to your HTML:

<script src="https://cdn.lr-ingest.com/LogRocket.min.js"></script>
<script>window.LogRocket && window.LogRocket.init('app/id');</script>

Learn how to detect unused and ghost dependencies in JavaScript projects using Knip, a project-level linter that keeps your dependency graph accurate.

Learn how Storybook MCP enables AI agents to understand your component library, generate accurate UI, and validate code using documentation, stories, and automated tests.

Debug RSC hydration mismatches in production with Next.js instrumentation, Suspense isolation, HTML diffing, and CI smoke tests.

Explore why npm dependencies are a major supply chain security risk and how to protect JavaScript apps from compromised packages and transitive threats.
Hey there, want to help make our blog better?
Join LogRocket’s Content Advisory Board. You’ll help inform the type of content we create and get access to exclusive meetups, social accreditation, and swag.
Sign up now

