The Replay is a weekly newsletter for dev and engineering leaders.
Delivered once a week, it's your curated guide to the most important conversations around frontend dev, emerging AI tools, and the state of modern software.
Providing secure user authentication and management can sometimes be a daunting task when building a modern application. This is why most developers prefer to offload the problem to third-party authentication services like Okta, Auth0, or Keycloak.

In this tutorial, you will learn how to secure your React app with Keycloak. Keycloak is an open-source identity and access management tool for adding authentication to modern applications and services.
With Keycloak, you can easily set up your application’s login/logout, protected routes, identity management, and more, without much work on your part. This tutorial will show you how to implement a simple login/logout feature with protected routes in a React app.
Enjoy!
To easily follow through with the tutorial, ensure you have the following:
There are numerous ways to set up a Keycloak server on your local machine. However, for this tutorial, we will be pulling the Keycloak Docker image because it is much easier and faster to implement.
First, open your terminal and run the following command to confirm your Docker installation.
$ docker version

Client:
 Cloud integration: v1.0.20
 Version:           20.10.10
 API version:       1.41
 Go version:        go1.16.9
 Git commit:        b485636
 Built:             Mon Oct 25 07:43:15 2021
 OS/Arch:           darwin/amd64
 Context:           default
 Experimental:      true

Server: Docker Engine - Community
 Engine:
  Version:          20.10.10
  API version:      1.41 (minimum version 1.12)
  Go version:       go1.16.9
  Git commit:       e2f740d
  Built:            Mon Oct 25 07:41:30 2021
  OS/Arch:          linux/amd64
  Experimental:     false
 containerd:
  Version:          1.4.11
  GitCommit:        5b46e404f6b9f661a205e28d59c982d3634148f8
 runc:
  Version:          1.0.2
  GitCommit:        v1.0.2-0-g52b36a2
 docker-init:
  Version:          0.19.0
  GitCommit:        de40ad0
If you don’t have Docker installed locally, you can follow this complete Docker installation guide to install Docker on your Windows, macOS, or Linux machine.
After confirming your Docker installation, the next step will be to set up a Keycloak server. To start up the Keycloak server on your local machine, run the following command in your terminal:
$ docker run -p 8080:8080 -e KEYCLOAK_USER=<username> -e KEYCLOAK_PASSWORD=<password> quay.io/keycloak/keycloak:15.0.2
Change <username> to your preferred Keycloak admin username and <password> to your preferred admin password. These two inputs will be required to log in to the server.
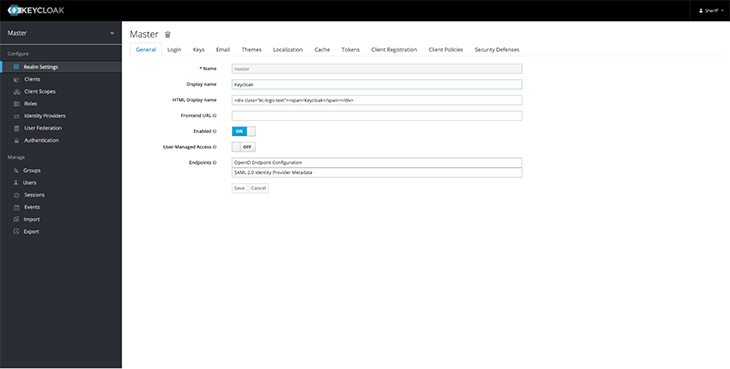
After the successful installation, the admin server will open up at http://localhost:8080/auth/admin. Log in with your username and password. You should gain access to a server that looks something like this:
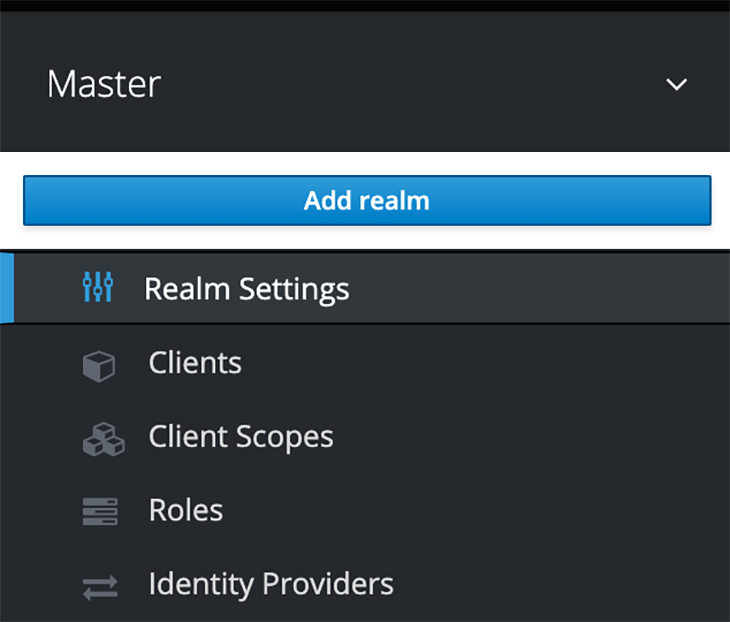
The next step in the Keycloak setup will be to create a realm. According to Keycloak:
A realm manages a set of users, credentials, roles, and groups. A user belongs to and logs into a realm. Realms are isolated from one another and can only manage and authenticate the users that they control.
By default, Keycloak ships with a realm called master. This is used specifically for managing Keycloak and should not be tampered with.
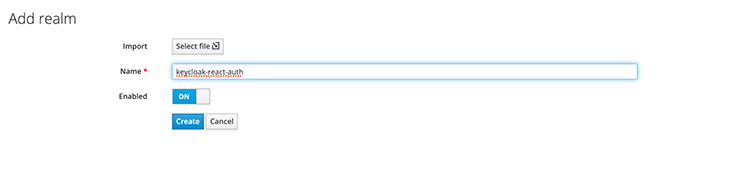
To create a new realm, follow these steps:
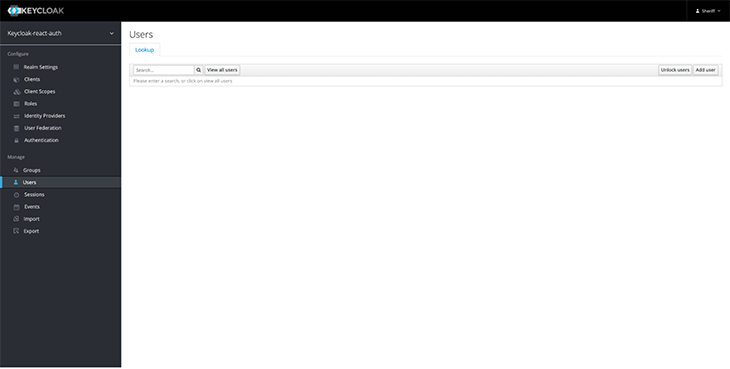
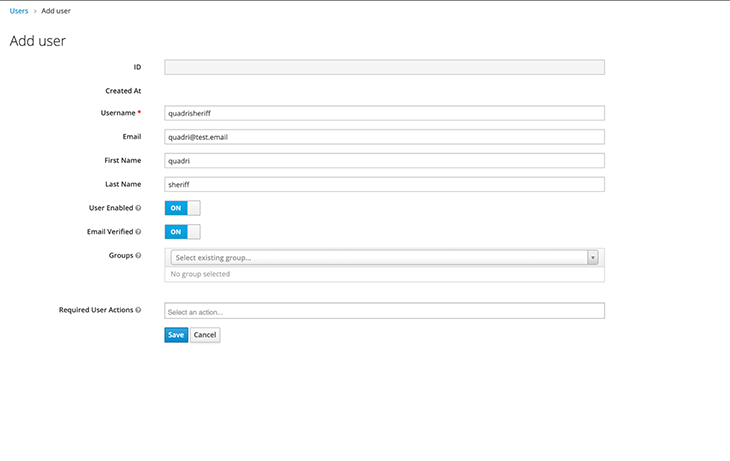
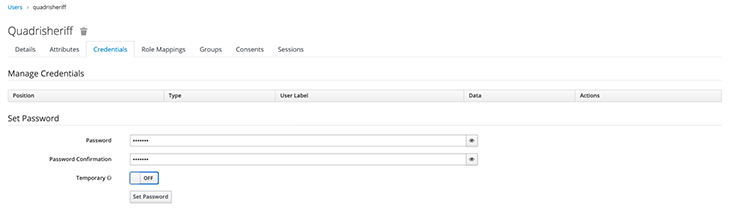
After creating a realm, the next step will be to add users to it. Follow these steps in the admin console:
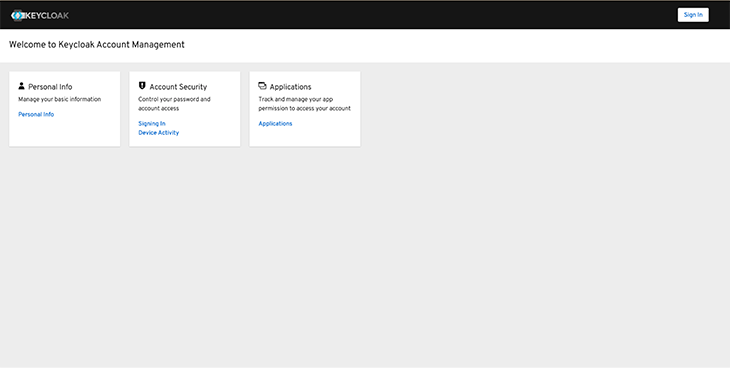
Let’s test if our new user is working. Log out of the admin console and visit http://localhost:8080/auth/realms/<realm-name>/account/ — you should change <realm-name> to the created user’s realm name.
You should see a page like this:
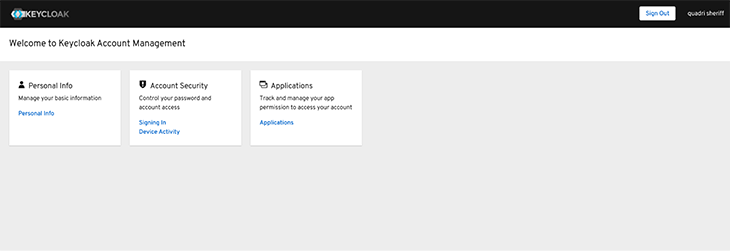
Click Sign in and enter your new user’s username and password. After a successful sign-in, you should gain access to a page similar to this:
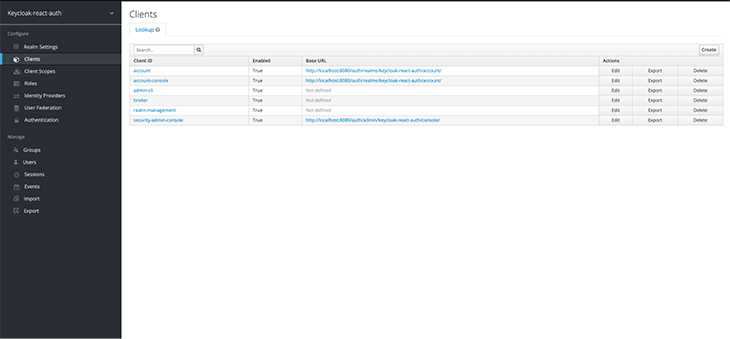
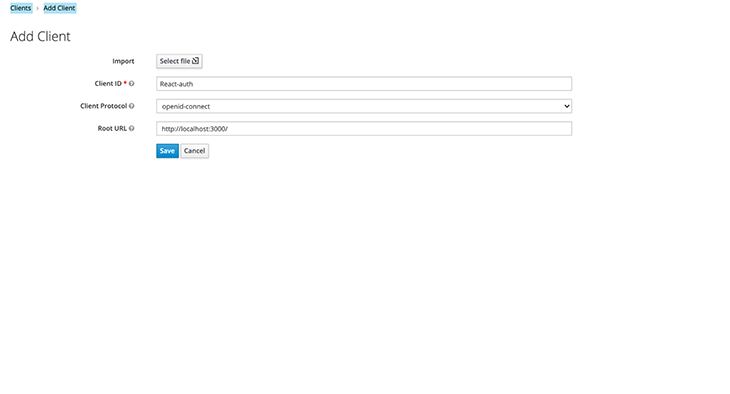
The last step in the Keycloak server setup will be to register the React frontend app as a client. To do that, we want to log in to the admin console, navigate to the Clients page in the sidebar menu, and click Create.
Add the client’s name and set the Root URL to http://localhost:3000/.
With this, our Keycloak server is fully set up! We can now move to the frontend and complete our integration.
First, create a new React app.
npx create-react-app <app-name>
cd <app-name>
npm start
Change <app-name> to your preferred app’s name. We will be using Tailwind CSS for the app’s styling; if you need, you can follow these instructions to install and set up Tailwind CSS with Create React App.
Lastly, to complete the setup, install keycloak-js, @react-keycloack/web, and react-router-dom.
npm install --save keycloak-js @react-keycloak/web react-router-dom
Keycloak and @react-keycloak/web will be used for the React-Keycloak implementation, while React Router DOM will be used for creating our pages. Please note that this tutorial was created using React Router v6.
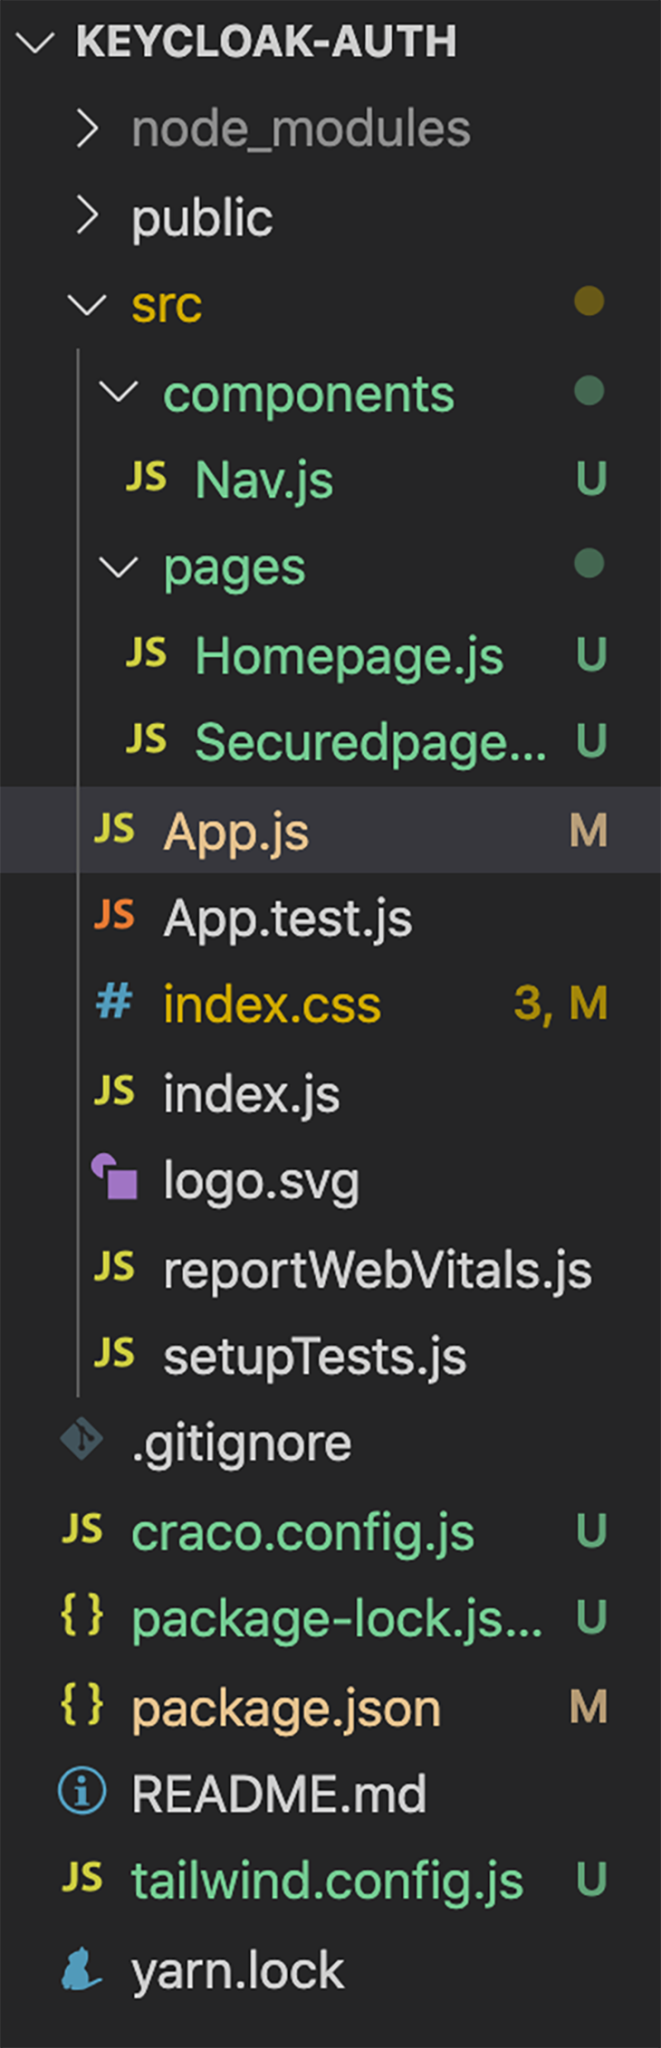
Next, add two folders named components and pages to your src folder. Add a Homepage.js file and a Securedpage.js file to the pages folder, and add a Nav.js file to the components folder.
Add the following code to the components/Nav.js file:
import React from "react";

const Nav = () => {
 return (
   <div>
     <div className="top-0 w-full flex flex-wrap">
       <section className="x-auto">
         <nav className="flex justify-between bg-gray-200 text-blue-800 w-screen">
           <div className="px-5 xl:px-12 py-6 flex w-full items-center">
             <h1 className="text-3xl font-bold font-heading">
               Keycloak React AUTH.
             </h1>
             <ul className="hidden md:flex px-4 mx-auto font-semibold font-heading space-x-12">
               <li>
                 <a className="hover:text-blue-800" href="/">
                   Home
                 </a>
               </li>
               <li>
                 <a className="hover:text-blue-800" href="/secured">
                   Secured Page
                 </a>
               </li>
             </ul>
             <div className="hidden xl:flex items-center space-x-5">
               <div className="hover:text-gray-200">
                 <h1>Login</h1>
               </div>
             </div>
           </div>
         </nav>
       </section>
     </div>
   </div>
 );
};

export default Nav;
And add the following to the pages/Homepage.js file.
import React from 'react';


const Home = () => {

 return (
   <div>
     <h1 className="text-green-800 text-4xl">Welcome to the Homepage</h1>
   </div>
 );
};

export default Home;
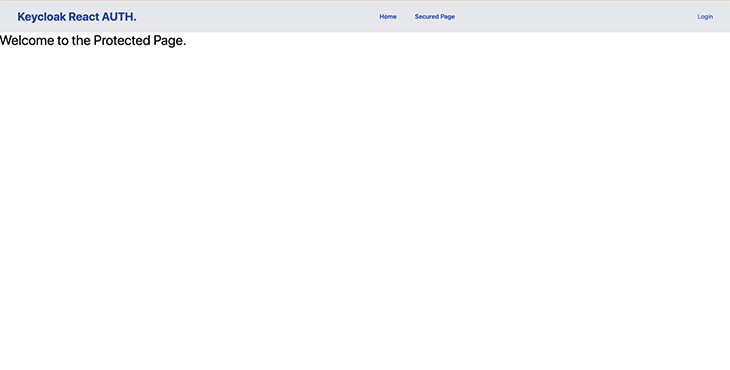
Add the following to the pages/Securedpage.js file.
import React from 'react';


const Secured = () => {

 return (
   <div>
     <h1 className="text-black text-4xl">Welcome to the Protected Page.</h1>
   </div>
 );
};

export default Secured;
Update your App.js code with the following code.
import React from "react";
import { BrowserRouter, Route, Routes } from "react-router-dom";
import Nav from "./components/Nav";
import WelcomePage from "./pages/Homepage";
import SecuredPage from "./pages/Securedpage";

function App() {
 return (
   <div>
     <Nav />
     <BrowserRouter>
       <Routes>
         <Route exact path="/" element={<WelcomePage />} />
         <Route path="/secured" element={<SecuredPage />} />
       </Routes>
     </BrowserRouter>
   </div>
 );
}

export default App;
The frontend file structure should look similar to this:
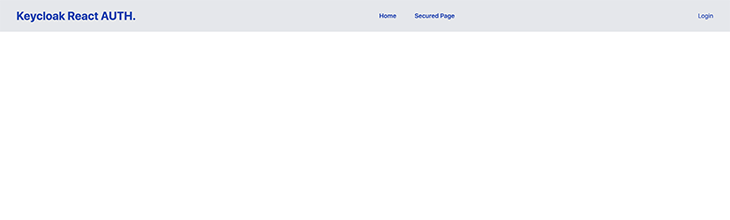
Now, start your React server. You should be directed to a page that looks similar to this:
After the React frontend is completely implemented, the next step is to configure Keycloak in the React project.
Create a file named Keycloak.js in your src folder and add the following code to it.
import Keycloak from "keycloak-js";
const keycloak = new Keycloak({
 url: "http://localhost:8080/auth",
 realm: "Keycloak-react-auth",
 clientId: "React-auth",
});

export default keycloak;
url is the Keycloak server URL, realm is your created realm name, and clientId is the name of the created client. Update your App.js code to this:
import React from "react";
import { ReactKeycloakProvider } from "@react-keycloak/web";
import keycloak from "./Keycloak"
import { BrowserRouter, Route, Routes } from "react-router-dom";
import Nav from "./components/Nav";
import WelcomePage from "./pages/Homepage";
import SecuredPage from "./pages/Securedpage";

function App() {
 return (
   <div>
     <ReactKeycloakProvider authClient={keycloak}>
       <Nav />
       <BrowserRouter>
         <Routes>
           <Route exact path="/" element={<WelcomePage />} />
           <Route path="/secured" element={<SecuredPage />} />
         </Routes>
       </BrowserRouter>
       </ReactKeycloakProvider>
   </div>
 );
}

export default App;
This code imports <ReactKeycloakProvider /> and wraps the entire app with the provider. We also added our keycloak.js file as a prop.
ProtectedRouteIn this step, we will create a protected route that can only be accessed by authenticated users. Create a helpers folder, and add a PrivateRoute.js file to it. Add the following code to the helpers/PrivateRoute.js file.
import { useKeycloak } from "@react-keycloak/web";

const PrivateRoute = ({ children }) => {
 const { keycloak } = useKeycloak();

 const isLoggedIn = keycloak.authenticated;

 return isLoggedIn ? children : null;
};

export default PrivateRoute;
This code checks if a user trying to access a protected route is authenticated, and either displays the protected route when a user is authenticated, or displays nothing if the user is unauthenticated.
Keycloak’s JavaScript adapter provides access to some additional properties for securing your application, such as the authenticated property, which we will be using to check if a user is authenticated. You can view the other available properties in the Keycloak docs.
Update the routes in your App.js file. We wrapped our SecuredPage route with the protected route we created; this will ensure that the contents of SecuredPage can only be accessed by authenticated individuals.
import React from "react";
import { ReactKeycloakProvider } from "@react-keycloak/web";
import keycloak from "./Keycloak";
import { BrowserRouter, Route, Routes } from "react-router-dom";
import Nav from "./components/Nav";
import WelcomePage from "./pages/Homepage";
import SecuredPage from "./pages/Securedpage";
import PrivateRoute from "./helpers/PrivateRoute";

function App() {
 return (
   <div>
     <ReactKeycloakProvider authClient={keycloak}>
       <Nav />
       <BrowserRouter>
         <Routes>
           <Route exact path="/" element={<WelcomePage />} />
           <Route
             path="/secured"
             element={
               <PrivateRoute>
                 <SecuredPage />
               </PrivateRoute>
             }
           />
         </Routes>
       </BrowserRouter>
     </ReactKeycloakProvider>
   </div>
 );
}

export default App;
Now, we need to add a login/logout button to the navbar. Update the code snippets in your components/Nav.js file to the following:
import React from "react";
import { useKeycloak } from "@react-keycloak/web";

const Nav = () => {
 const { keycloak, initialized } = useKeycloak();

 return (
   <div>
     <div className="top-0 w-full flex flex-wrap">
       <section className="x-auto">
         <nav className="flex justify-between bg-gray-200 text-blue-800 w-screen">
           <div className="px-5 xl:px-12 py-6 flex w-full items-center">
             <h1 className="text-3xl font-bold font-heading">
               Keycloak React AUTH.
             </h1>
             <ul className="hidden md:flex px-4 mx-auto font-semibold font-heading space-x-12">
               <li>
                 <a className="hover:text-blue-800" href="/">
                   Home
                 </a>
               </li>
               <li>
                 <a className="hover:text-blue-800" href="/secured">
                   Secured Page
                 </a>
               </li>
             </ul>
             <div className="hidden xl:flex items-center space-x-5">
               <div className="hover:text-gray-200">
                 {!keycloak.authenticated && (
                   <button
                     type="button"
                     className="text-blue-800"
                     onClick={() => keycloak.login()}
                   >
                     Login
                   </button>
                 )}

                 {!!keycloak.authenticated && (
                   <button
                     type="button"
                     className="text-blue-800"
                     onClick={() => keycloak.logout()}
                   >
                     Logout ({keycloak.tokenParsed.preferred_username})
                   </button>
                 )}
               </div>
             </div>
           </div>
         </nav>
       </section>
     </div>
   </div>
 );
};

export default Nav;
We have now added a new login/logout button. The code checks if a user is authenticated and displays the Login button when the user has been authenticated, and a Logout button when the user has not been authenticated.
When the Login button is clicked, it calls Keycloak’s Login method to authenticate the user. When the Logout button is clicked, it calls the Logout method to log the user out.
When you visit the demo React website we created, there should now be a Login button on the navbar. Also, the secured page should display nothing if you try to access it.
When you click the Login button, you should be redirected to a Keycloak login page.
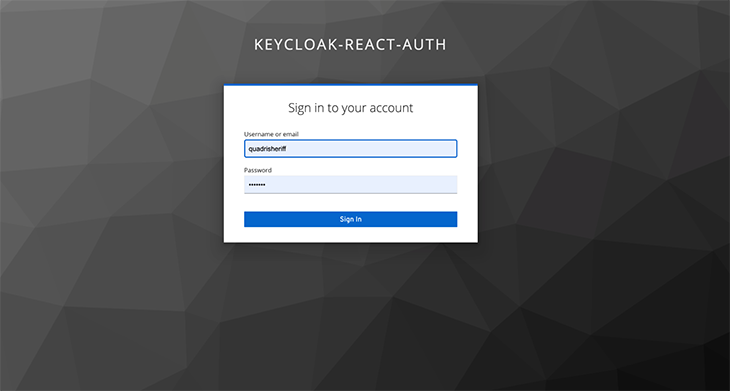
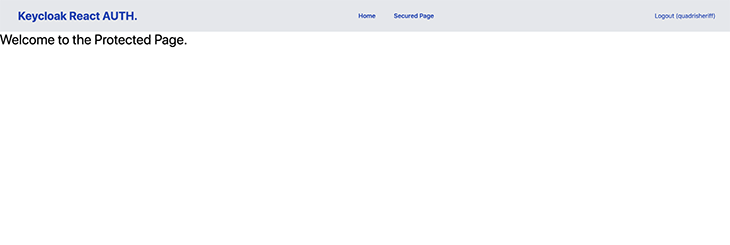
Enter the created user details to log in and you will be automatically redirected to the website. After a successful login, the Login button should change to a Logout button, and the secured page should be accessible.
In this tutorial, we implemented a simple login/logout feature with protected routes in a React app using Keycloak. We implemented a private route with Keycloak’s authenticated property, and login/logout functionality with Keycloak’s Login and Logout methods.
You can easily create more custom implementations depending on your needs; Keycloak’s JavaScript adapter documentation is a good resource if you want to learn more.
Install LogRocket via npm or script tag. LogRocket.init() must be called client-side, not
server-side
$ npm i --save logrocket

// Code:

import LogRocket from 'logrocket';
LogRocket.init('app/id');
// Add to your HTML:

<script src="https://cdn.lr-ingest.com/LogRocket.min.js"></script>
<script>window.LogRocket && window.LogRocket.init('app/id');</script>

Write agent-friendly API documentation with OpenAPI, clear schemas, workflow guidance, and llms.txt for safer AI automation.

Local AI proxy tutorial for detecting, masking, and rehydrating PII before prompts reach cloud LLMs.

Learn how Graph RAG uses connected knowledge structures to improve retrieval beyond simple text similarity.

Learn how sibling-index() enables clean, JavaScript-free stagger animations using native CSS.
Hey there, want to help make our blog better?
Join LogRocket’s Content Advisory Board. You’ll help inform the type of content we create and get access to exclusive meetups, social accreditation, and swag.
Sign up now

