Bare simplicity isn’t very common in the rapidly shifting modern web development landscape. Innovative solutions like server components and libraries like React, Vue, Svelte, etc., are transforming how we build server-powered web applications.

However, the developer experience these modern solutions offer often doesn’t match the straightforwardness of classic libraries like jQuery. The htmx library aims to bridge this gap by providing a simplified approach to creating server-driven apps.
In this tutorial, we’ll explore htmx, see some of its practical working examples, and learn how to use it to build a to-do app. The only prerequisite for this htmx tutorial guide is a working knowledge of HTML, JavaScript, HTTP requests, and the Web in general.
htmx is a small browser-oriented JavaScript library aimed at building no-nonsense, server-driven web apps. It lets you create UIs powered by server responses with simple markup via custom attributes.
With htmx, you can perform AJAX requests, trigger CSS transitions, and even invoke WebSocket and server-sent events directly from HTML elements.
The core idea of htmx involves exchanging hypermedia between the client (browser) and the server using HTTP to control the UI and functionality.
It’s not HTML vs. htmx as one might think. HTML is the standard for marking up web pages, while htmx is a library for adding more flair to HTML, making it ready to talk to the backend in a few quick steps.
In modern-day web development, making asynchronous requests and updating the UI are two fundamental tasks that involve JavaScript usage.
htmx takes an entirely different path to achieve that. Instead of relying on XML, REST, or GraphQL to send and receive data, it provides a hypermedia-driven approach where hypertext and media are directly sent and received via AJAX requests.
Here’s a glimpse of simple data-fetching done with htmx directly through your markup:
<button
  hx-get="/path/to/api"
  hx-swap="innerHTML"
  hx-target="#target-container"
>Click Me</button>

<div id="target-container">...</div>
The code above illustrates an HTML button with some htmx attributes. Once this button is clicked, your htmx-powered application sends a GET request to the API with the hx-get attribute.
The hypermedia content received in response to this request replaces the inner HTML of #target-container as specified by the hx-target and hx-swap attributes.
We will discuss these attributes soon in the upcoming sections.
Simplicity is one of the main benefits of using htmx, which also positions the library to help you get things done quickly while writing minimal code.
The htmx library has been criticized in the JavaScript community for its unconventional ways of doing things. Here are some of the areas where htmx may fail to deliver:
Even though htmx is not accepted as warmly as other traditional JavaScript libraries, it’s still improving and has recently added some good changes to its 2.0 and later releases:
hx-on becomes hx-on: for better event declarationsBuilding apps with htmx differs from developing apps with JavaScript nowadays. Let’s learn some HTML basics first, from installation to presenting data, and then we’ll take a hands-on approach to use htmx with a modern backend and database solution.
The easiest way to start with htmx is by including its CDN link directly in your markup, as shown below:
<script src="https://unpkg.com/[email protected]"></script>
The script above loads the current stable version of htmx — at the time of writing, version 2.0.4 — on your webpage. Alternatively, you can install htmx with your favorite package manager using the command below:
pnpm install [email protected]
This suits the traditional JavaScript project workflow and may require you to make the htmx object accessible globally to use htmx attributes anywhere in the HTML:
import htmx from 'htmx.org';
window.htmx = htmx;
We won’t use any build tool in this guide, but we will utilize Express with Supabase to perform some CRUD operations later. We’ll follow a different approach to access the library.
Once that’s done, you can start implementing htmx on your webpage. We’ll see major htmx features closely by building a simple Todo app with a backend powered by Express and a database managed by Supabase.
htmx provides five attributes to make all kinds of AJAX requests directly from HTML elements:
hx-get — Send a GET request to the provided URLhx-post — Send a POST request to the provided URLhx-put — Sendोa PUT request to the provided URLhx-patch — Send a PATCH request to the provided URLhx-delete — Send a DELETE request to the provided URLWe’ll use nearly all of these attributes in the latter half of the tutorial. We will stick to hx-get in the next few htmx examples.
We expect a response for every request made to the backend. In htmx, that response is likely to be hypermedia content that goes right on the front end.
The placement of content received is taken care of by defining targets and swapping policies with hx-swap and hx-target attributes:
<button hx-get="path/to/api" hx-swap="textContent" hx-target="#content">
  Click to load content from path/to/url
</button>

<div id="content">...</div>
Here’s a working demonstration of the same, loading a random tech joke on button click from the Joke API:
See the Pen
HTMX Joke Generator by Rahul (@c99rahul)
on CodePen.
With hx-trigger, you may specify different web API events to trigger a request, such as:
<div hx-get="path/to/api" hx-trigger="load" hx-swap="innerHTML">
  This should change once hovered.
</div>
Using this approach in our example, we can populate the joke division automatically with the required data:
See the Pen
HTMX Joke Generator by Rahul (@c99rahul)
on CodePen.
The hx-swap attribute can take a transition value to turn on automatic transition during swapping and settling the content:
<button
  hx-get="path/to/api"
  hx-target="#content"
  hx-swap="textContent transition:true">
  Click to load content from path/to/url
</button>
See the Pen
HTMX Joke Generator (w/ Transitions) by Rahul (@c99rahul)
on CodePen.
For perceived performance, you may show loading indicators until the data finishes loading in the specified target. This addition calls for some custom CSS using the .htmx-request and .htmx-indicator CSS classes.
The .htmx-request class is added to the indicator whenever a request is made. It gets removed automatically after the request is completed.
We can add .htmx-indicator class to our loading indicator to tell htmx about it, and then utilize .htmx-request class in the CSS to take care of the loader animation as well as the transition of the content:
See the Pen
HTMX Joke Generator (w/ Loading indicator) by Rahul (@c99rahul)
on CodePen.
Using these htmx basics, you can start making an app with any backend of your choice. As discussed before, we are pairing it with modern JavaScript-based solutions to observe how adaptable htmx is in modern scenarios.
Let’s learn htmx by building a to-do app. Our objective is to create a simple yet functional htmx CRUD app capable of fetching our to-do data from a database, creating new data, as well as updating and deleting existing data on demand.
Our first step should be creating a project directory to organize the different files of our to-do app. After cding into the project directory, we are ready to add some dependencies necessary to build our app:
cd htmx-todo
We’ll start by installing htmx in the traditional JavaScript way. We’ll also add Express, the widely used JavaScript backend framework, to manage our backend API without hassle:
pnpm add [email protected] express
Let’s create a JavaScript file at the root of our project and call it server.js. This file manages everything backend-related, from connecting the app to the database to serving it in the browser:
// server.js
import path from 'path';
import { fileURLToPath } from 'url';
import express from 'express';
import bodyParser from 'body-parser';
import { createClient } from '@supabase/supabase-js';

const __filename = fileURLToPath(import.meta.url);
const __dirname = path.dirname(__filename);

const app = express();
const port = process.env.PORT || 3000;
const host = process.env.HOST || 'localhost';
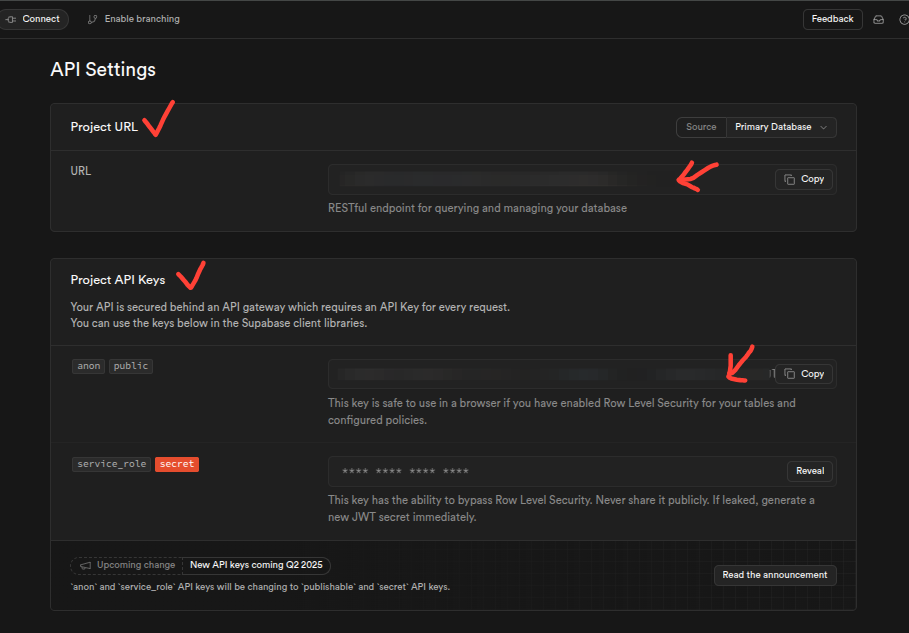
Next, we should pick a database solution to manage our to-do data. I’m going for the Supabase free tier, which is apt for testing purposes and hobby projects. You may follow the underlying steps to continue with Supabase or use a different solution, if you’re more comfortable doing that.
After creating a project on Supabase, carefully note down the project URL and the anon key. Follow the screenshot below if you are having a hard time finding these two API secrets:
Now, put these credentials in a .env file, which should look like the below:
SUPABASE_URL=<Path to your Supabase URL>
SUPABASE_KEY=<Your Supabase anon key>
SERVER_HOST=localhost
SERVER_PORT=5555 // Or anything you'd like to set
The .env file lives at the root of the project. You may have different variations of .env files from shared, development, production, testing, and other environments. I’m sticking to the simplest one here, but you may add more depending on your needs. Learn more about .env files here.
N.B.: Ensure your project has a .gitignore file with all the .env files mentioned. This will keep your Supabase API secrets and other sensitive info from being accidentally pushed to a public repository.
Using your Supabase dashboard, either use the Table Creator or run the following SQL query to create a table to hold our to-do list data:
CREATE TABLE todos (
  id SERIAL PRIMARY KEY,
  task TEXT NOT NULL,
  completed BOOLEAN DEFAULT FALSE,
  created_at TIMESTAMPTZ DEFAULT NOW()
);
In the above query, we are adding the following four fields:
id — A unique ID for each todo tasktask — A text field to store the task descriptioncompleted — A boolean property to help track whether the task is complete or notcreated_at— A timestamp to know when the task was createdMoving on, let’s hit the terminal again and install the Supabase JavaScript client:
pnpm add @supabase/supabase-js
We can now access our Supabase credentials from the .env file and use them as shown below in our app’s backend with the server.js file:
// server.js
/* Previous code... */

const supabaseUrl = process.env.SUPABASE_URL;
const supabaseKey = process.env.SUPABASE_KEY;
const supabase = createClient(supabaseUrl, supabaseKey);
We’ll handle templating with ejs, one of the commonly used templating tools available for JavaScript-powered apps. We’ll also add body-parser, an Express middleware that makes reading request bodies a breeze:
pnpm add ejs body-parser
We’ll then instruct Express to employ ejs as the templating engine and use body-parser middleware to parse form data:
// server.js
/* Previous code... */

app.set('view engine', 'ejs'); // Tell Express to use ejs
app.use(bodyParser.urlencoded({ extended: true })); // For parsing form data
To save the hassle of copying the htmx library file to the public folder to access it, we should ask Express to serve it directly from the package directory with a normal-looking path like js/htmx.min.js:
// server.js
/* Previous code... */

app.get('/js/htmx.min.js', (req, res) => {
  res.sendFile(path.join(__dirname, 'node_modules/htmx.org/dist/htmx.min.js'));
});
I’ll let you improvise on the styling part: feel free to use a framework of your choice or write vanilla CSS if you like. I’m using Tailwind CSS Play CDN to refer directly to the framework in the head of our index.ejs file.
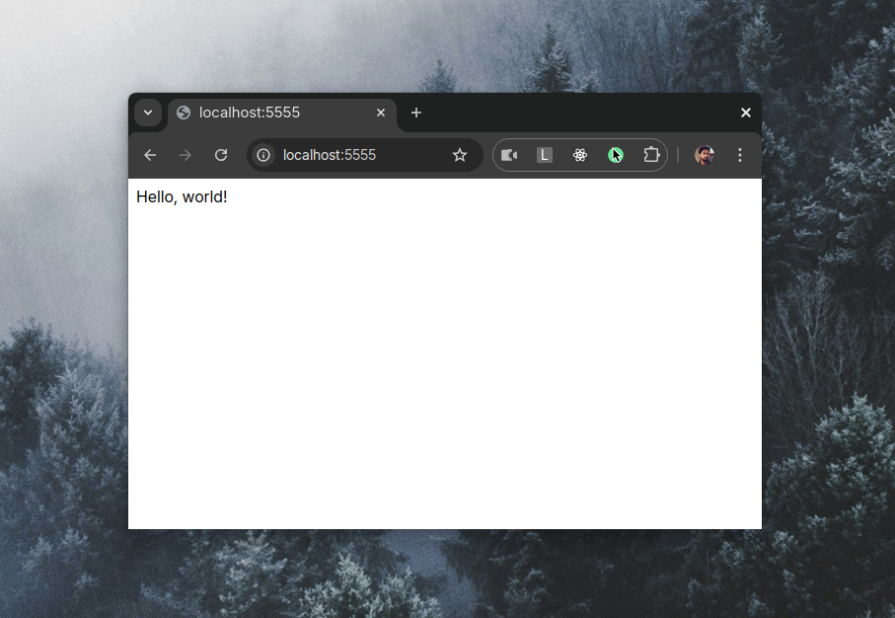
Let’s define a route handler for the root path in server.js. Whenever this route is requested by the client (browser), the backend should send some dummy text in response. This will help us check if our app is running correctly:
app.get('/', (req, res) => {
  res.send('Hello, world!')
})

app.listen(port, () => {
  console.log(`Server running on http://${host}:${port}`);
});
At last, we ensure that when our app runs, the Express server serves it using the host and port we specified in our .env file.
It’s time to configure some scripts in the package.json file that we could use in the terminal to run server.js to serve our app:
{
  "name": "htmx-todo",
  "...": "...",
  "scripts": {
    "start": "node --env-file=.env server.js",
    "dev": "node --env-file=.env --watch server.js"
  },
}
Make sure you are using a recent Node version for effortless file watching and automatic loading of environment files. You may also consider using a tool like Nodemon for a slightly better development workflow, but I’m sticking to the basics to keep things simple and easy to understand.
Now, running pnpm dev in the terminal should start serving our app, which looks something like the screenshot below:
With the Supabase API, we expect to receive an array of objects containing the data requested from our database. Considering todo as an object of that array, let’s create some template partials to utilize later with our backend.
Firstly, let’s establish an index template responsible for rendering on the main route of our app. Let’s call it index.ejs file, which goes to a views directory, the default way to organize templates in Express. It should look like this, where we are referencing the htmx library using a static path as configured above:
<!-- views/index.ejs -->
<!DOCTYPE html>
<html>
  <head>
    <title>Todo App w/ htmx</title>
    <meta charset="utf-8" />
    <meta name="viewport" content="width=device-width" />
    <script src="/js/htmx.min.js"></script>
    <!-- Add more CSS/JS stuff here if needed -->
  </head>
  <body>
    <!-- more elements will be added here -->
  </body>
</html>
This resembles the traditional HTML approach, where we write only markup, CSS, and JavaScript to lay out a page. We will add more elements to this file in the later sections.
Secondly, add a partials directory to views, and create the todo-item.ejs partial that renders a single item in our to-do list. It uses the unique id and task properties of the todo object to populate the list item. Later, we will use the same id property to update or delete the todo tasks:
<!-- views/partials/todo-item.ejs -->
<li id="todo-<%= todo.id %>">
  <%= todo.task %>
</li>
Next up, use todo-item.ejs in the todo-list.ejs partial to loop through the entire array of data objects received from the database:
<!-- views/partials/todo-list.ejs -->
<div id="todo-list">
  <% if (todos && todos.length > 0) { %>
  <ul>
    <% [...todos].forEach(todo => { %> <%- include('todo-item', { todo }) %> <% }) %>
  </ul>
  <% } else { %>
  <div>
    <p>No todos yet!</p>
  </div>
  <% } %>
</div>
Lastly, let’s also define an error.ejs partial to display error messages. You may style it differently to make them appear like errors:
<!-- views/partials/error.ejs -->
<div class="...">
  <p><%= message %></p>
</div>
As discussed, our backend API is managed using Express. We will use Express to specify the content to render on specific routes while responding to requests with certain endpoints to perform CRUD operations.
We can use different htmx attributes to make certain requests to our backend, which we will set up in the next few segments.
In simpler words, sending data means taking the to-do task data from the frontend, sending it to the backend, and storing it in our database.
In the server.js file, we should define an endpoint to make a POST request to our backend, which should then talk to the Supabase client and add data to the database:
// server.js

app.post('/todos', async (req, res) => {
  try {
    const { task } = req.body;

    if (!task || task.trim().length === 0) {
      return res.render('partials/error', { message: 'Task is required' });
    }

    await supabase
      .from('todos')
      .insert([{ task: task.trim() }])

    // Fetch updated list
    const { data: todos, error: fetchError} = await supabase
      .from('todos')
      .select('*')
      .order('created_at', { ascending: false });


    if (fetchError) throw fetchError;

    res.render('partials/todo-list', { todos });
  } catch (error) {
    console.error('Error creating todo:', error);
    res.render('partials/error', { message: error });
  }
});
Whenever a POST request is made to the /todos endpoint, the above code parses the todo task from the request body and inserts it into our database. We also fetched an updated list of todos from the database and rendered the todo-list.ejs template with the freshly updated data.
Let’s also update the index.ejs template to make POST requests to this endpoint:
<!-- views/index.ejs -->
<!-- Add todo form -->
<form
  hx-post="/todos"
  hx-target="#todo-list"
  hx-swap="outerHTML transition:true"
  hx-on::after-request="this.reset()"
>
  <input
    type="text"
    name="task"
    required
  />
  <button type="submit">Add</button>
</form>
Now, we can send our to-do tasks to our database using the above form. The form element in the above code performs the following operations:
hx-post to hit the /todos endpoint in the backendhx-targethx-swaphx-on: to set up an htmx event to reset the form after the request has been madeNote: In the backend, the name attribute of the text input acts as an anchor point for accessing the data from the request. Ensure that you use the same name attribute to get data from the request body when setting up a POST request in the backend.
Receiving the data from the database and showing it on the frontend is relatively simple compared to other operations.
To receive the data, we should establish an endpoint for the GET request in the backend and then utilize the Supabase API to query the data from our todos table:
app.get('/', async (req, res) => {
  try {
    const { data: todos, error } = await supabase
      .from('todos')
      .select('*')
      .order('created_at', { ascending: false });

    if (error) throw error;

    res.render('index', {
      todos: todos || [],
      error: null,
    });
  } catch (error) {
    console.error('Error fetching todos:', error);
    res.render('index', {
      todos: [],
      error: 'Failed to load todos',
    });
  }
});
We can now employ the templates we’ve created previously to show the data on the frontend. Here’s how we can use them in our index.ejs file to display the data we receive through a GET request:
<!-- views/index.ejs -->
<!-- Add todo form -->
<form
  hx-post="/todos"
  ...
>
  <!-- Previous setup -->
</form>

<!-- Todo list container -->
<% if (error) { %>
  <%- include('partials/error', { message: error }) %>
<% } else{ %>
  <%- include('partials/todo-list', { todos }) %>
<% } %>
Since we are making this GET request to the endpoint where our to-dos render by default, we don’t need an hx-get trigger to control the request.
When our app’s root path is requested, the to-do data is made available to index.ejs, which then renders in the browser as expected with the help of todo-item.ejs, or an error is displayed using error.ejs if something goes wrong.
Updating comes in handy when marking a todo task as completed, while deletion, as obvious, makes sense when you need to delete a todo task.
We use PUT and DELETE requests to send update and deletion requests to the backend. Let’s optimize our todo-item.ejs template to consume an endpoint we’ll define in our backend for task deletion and updation.
We’ll use the same id property from the todo object to construct the endpoint for hx-put and hx-delete attributes, as shown in the updated template below:
<!-- views/partials/todo-item.ejs -->
<li id="todo-<%= todo.id %>">
  <form
    hx-put="/todos/<%= todo.id %>"
    hx-target="#todo-<%= todo.id %>"
    hx-swap="outerHTML"
    hx-on:change="this.requestSubmit()"
  >
    <!--
      Marking a name (completed) is important here, this
      is what we will receive in the request body at
      the backend.
    -->
    <input
      type="checkbox"
      id="todo-item-<%= todo.id %>"
      name="completed"
      <%= todo.completed ? 'checked' : '' %>
    / >
    <input
      type="hidden"
      name="task"
      value="<%= todo.task %>"
    />
    <label
      for="todo-item-<%= todo.id %>"
      style="text-decoration: <%= todo.completed ? 'line-through' : 'none' %>"
    >
      <%= todo.task %>
    </label>
    <button
      type="button"
      hx-delete="/todos/<%= todo.id %>"
      hx-target="#todo-list"
      hx-swap="outerHTML transition:true"
      hx-confirm="Are you sure you want to delete this task?"
    >
      Delete
    </button>
  </form>
</li>
The above template is now well-equipped to send the id property and completion status of a given to-do task in a request through hx-put and hx-delete attributes. If you notice carefully, we’ve also added an hx-confirm attribute to prompt the user to reconsider the deletion.
We should hit the same /todos endpoint to receive PUT and DELETE requests at the backend and then use the Supabase API to query the database accordingly.
Now, we also need the id and completion status of our to-do task to query our database and update or delete this selected task. In this case, we should use Express’s route parameter to access this id property from the request.
Here’s how you would set up a route handler for a PUT request in Express to update our to-do tasks:
// server.js
app.put('/todos/:id', async (req, res) => {
  try {
    const { id } = req.params;
    const { task, completed } = req.body;

    // Create updates object, handling checkbox value
    const updates = {
      task: task?.trim(),
      completed: completed === 'on'
    };

    // Remove undefined values
    Object.keys(updates).forEach(key =>
      updates[key] === undefined && delete updates[key]
    );

    // Update in database
    await supabase.from('todos').update(updates).eq('id', id);

    // Get and return updated todo
    const { data: todo } = await supabase
      .from('todos').select('*').eq('id', id).single();

    res.render('partials/todo-item', { todo });
  } catch (error) {
    res.render('partials/error', { message: 'Failed to update todo' });
  }
});
Similarly, we can set up a route handler for a DELETE request, which picks up the id for the deleted to-do task from the request parameters:
app.delete('/todos/:id', async (req, res) => {
  try {
    const { id } = req.params;

    // Delete from database
    await supabase.from('todos').delete().eq('id', id);

    // Check if any to-dos remain
    const { data: remainingTodos } = await supabase
      .from('todos').select('*');

    // Refresh the #todo-list for proper UI updates
    res.setHeader('HX-Retarget', '#todo-list');

    // Render the fresh todo list
    res.render('partials/todo-list', { todos: remainingTodos });
  } catch (error) {
    res.render('partials/error', { message: 'Failed to delete to-do' });
  }
});
If you have noticed, we are setting a htmx-specific HX-Retarget response header that tells the client to update the #todo-list element again for a proper UI update to display an empty placeholder element.
Piecing it all together with some Tailwind CSS decorations, our htmx todo app should look like something as shown below:
Feel free to fork this app from here and improve it by adding other htmx features like CSS animations, indicators, and more.
If you are coming from a React, Vue, or Svelte background, you might not like the way htmx works. You’ll find no component support, no state management, and some more tradeoffs we discussed previously in the article. htmx was created to enhance server-rendered HTML, therefore, it is more suitable for quick, small apps that are expected to make frequent network trips.
To decide if htmx is for you, you should try it to build more apps. You must try htmx extensions for basic DOM operations, and even go an extra mile by trying WebSocket and SSE extensions.
The htmx community is steadily growing, with the library garnering over 44k stars on GitHub. Given its popularity and active development, we can expect even more features and improvements in the future.
Install LogRocket via npm or script tag. LogRocket.init() must be called client-side, not
server-side
$ npm i --save logrocket

// Code:

import LogRocket from 'logrocket';
LogRocket.init('app/id');
// Add to your HTML:

<script src="https://cdn.lr-ingest.com/LogRocket.min.js"></script>
<script>window.LogRocket && window.LogRocket.init('app/id');</script>

Discover how React Fiber works under the hood. Learn how React builds the DOM, handles concurrent rendering, and works alongside React 19 features and the new React Compiler.

Learn how to use Skybridge, an open-source React framework, to build and deploy cross-platform AI apps and interactive UI widgets for ChatGPT, Claude, and MCP clients from a single codebase.

Learn how to set up Meilisearch, index documents, and build keyword, semantic, and hybrid search with AI-powered retrieval.

Compare pnpm and npm across security defaults, disk usage, dependency strictness, and workspace policy to decide which package manager fits your project.
Would you be interested in joining LogRocket's developer community?
Join LogRocket’s Content Advisory Board. You’ll help inform the type of content we create and get access to exclusive meetups, social accreditation, and swag.
Sign up now

