Go is an open-source programming language designed for building simple, fast, and reliable web applications. From the basics of web programming, such as as routers and templates, to middleware and WebSockets, CLIs, and databases, you can use Go, sometimes referred to as Golang, to create backend web services as your needs demand.

In this tutorial, we’ll demonstrate how to convert data from its raw state in JSON (raw strings or bytes) to Golang’s data types, including structured types (e.g., structs, arrays, and slices) and unstructured types (e.g., maps).
Once we’ve established this knowledge, we’ll apply it by sending an HTTP POST request with a JSON body to a simple web server that we’ll later set up.
We’ll cover the following with practical examples:
The process of converting raw JSON data into Go objects is called unmarshalling. Go’s JSON standard library provides the Unmarshal function that eables you to parse raw JSON data in the form of []byte variables.
JSON is a language-independent data format. Go has an inbuilt encoding/JSON package provided in the standard library to perform JSON-related operations.
Create a ./main.go file; we’ll write all the source code needed for this tutorial inside it. Then, update it with following code:
package main

type Article struct {
  Id string
  Title string
  Content string
  Summary string
}

article := `{"id": "BM-1347", "title": "The underage storm", "Content": "The creatives' careers can easily get uncreative but yet creative...", "Summary": "Seeking freedom"}`

...
In the above code snippet, we created a structure data type, a struct, that mirrors the data we want to parse. In our case, we created an Article struct that has four attributes: Id, Title, Content, and Summary.
Now, let’s unmarshal raw JSON data into the Go data type, as follows:
...

import (
  "encoding/json"
  "fmt"
)
...

func main {
  var post Article
  json.Unmarshal([]byte(article), &post)

  fmt.Printf("Recently posted article: %s", post)
}
Now, use the go run command to run this file on the terminal:
$ go run main.go
// Recently posted article: {BM-1347 The underage storm The creatives' careers can easily get uncreative but yet creative... Seeking freedom}
Marshalling is simply the opposite of unmarshalling in Go. The encoding/json package also has the json.Unmarshal() method, which is used to convert s struct into JSON.
...
func main {
  ...
  newData, err := json.Marshal(post)

  if err != nil {
    fmt.Println(err)
  } else {
    fmt.Println(string(newData))
  }
}
Run the above code using the go run command to get the following output on the terminal:
$ go run main.go
// {"Id":"BM-1347","Title":"The underage storm","Content":"The creatives' careers can easily get uncreative but yet creative...","Summary":"Seeking freedom"}
For our demonstration, let’s set up a very simple server to handle incoming HTTP requests. Then, we’ll define a route alongside the function to handle the POST request.
We’ll define a createNewArticle function to handle all the incoming requests to the localhost:8000/post URL. The handleReqs function will trigger the createNewArticle function when a request hits this URL path.
...
import (
  "encoding/json"
  "fmt"
  "io/ioutil"
  "log"
  "net/http"

  "github.com/gorilla/mux"
)

type Article struct {
  Id string `json:"Id"`
  Title string `json:"Title"`
  Content string `json:"Content"`
  Summary string `json:"Summary"`
}

...

func createNewArticle(w http.ResponseWriter, r *http.Request) {
  reqBody, _ := ioutil.ReadAll(r.Body)
  var post Article
  json.Unmarshal(reqBody, &post)

  json.NewEncoder(w).Encode(post)

  newData, err := json.Marshal(post)
  if err != nil {
    fmt.Println(err)
  } else {
    fmt.Println(string(newData))
  }
}

func handleReqs() {
  r := mux.NewRouter().StrictSlash(true)
  r.HandleFunc("/post", createNewArticle).Methods("POST")

  log.Fatal(http.ListenAndServe(":8000", r))
}

func main() {
  handleReqs();
}
The above code represents the whole source code needed to make an HTTP POST request to the server. The syntax json:"Id" used in the Article struct explicitly tells our code which JSON property to map to which attribute.
Next, we define the createNewArticle function. Here, we’re accessing the data attached to the body of our request using r.Body. Then, we store this in the reqBody variable. Using the json.Unmarshal, we parse the incoming JSON data into a Go type.
Next, within the handleReqs function, we use the gorilla/mux library to define a new router. With this new router, we can add routes such as the r.HandleFunc("/post", createNewArticle).Methods("POST") to our web server within the handleReqs function.
We’ll add .Methods("POST") to the end of our route to specify that we only want to call the createNewArticle function when the incoming request is an HTTP POST request.
Make sure to run the go mod init and go mod tidy commands to set up and install the gorilla/mux package.
For this tutorial, we’ll use Postman to make the HTTP POST request to our application. That way, e can make sure everything is working optimally.
Use the below command to start the server:
go run main.go
Then open Postman and make an HTTP POST request to the localhost:8000/post, as shown below:
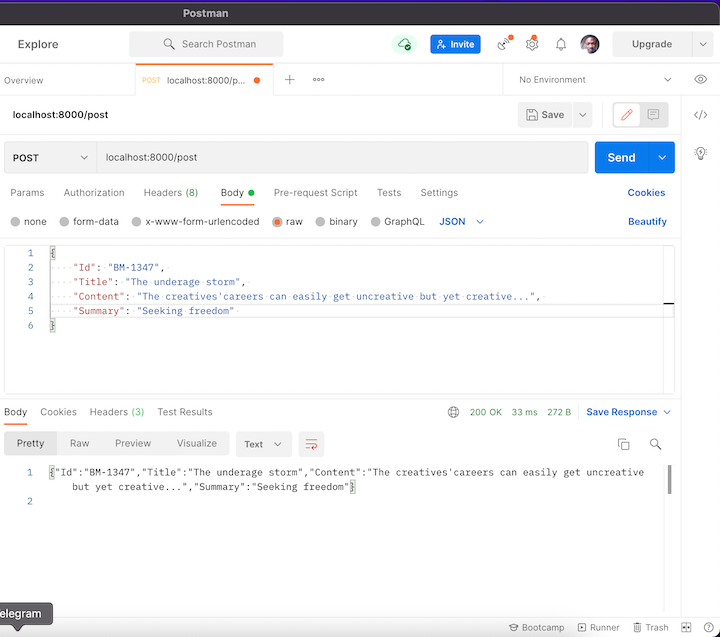
Once we’ve successfully made our HTTP POST request to the server, we can check our local terminal to see the output of the data passed through the request body, which has been successfully converted back to JSON data.
This tutorial provides a very basic outline of the procedures for building a simple web server using Go. We also covered the concepts of unmarshalling and marshalling in Go. Then, we walked through a simple process for setting up and making HTTP POST requests to the server.
In a real project, you’d typically connect your server to a database so that you can make CRUD requests to return real values that are important to your application.
The source code for this tutorial is available on GitHub.
Install LogRocket via npm or script tag. LogRocket.init() must be called client-side, not
server-side
$ npm i --save logrocket

// Code:

import LogRocket from 'logrocket';
LogRocket.init('app/id');
// Add to your HTML:

<script src="https://cdn.lr-ingest.com/LogRocket.min.js"></script>
<script>window.LogRocket && window.LogRocket.init('app/id');</script>
Would you be interested in joining LogRocket's developer community?
Join LogRocket’s Content Advisory Board. You’ll help inform the type of content we create and get access to exclusive meetups, social accreditation, and swag.
Sign up now
This guide walks you through creating a web UI for an AI agent that browses, clicks, and extracts info from websites powered by Stagehand and Gemini.

This guide explores how to use Anthropic’s Claude 4 models, including Opus 4 and Sonnet 4, to build AI-powered applications.

Which AI frontend dev tool reigns supreme in July 2025? Check out our power rankings and use our interactive comparison tool to find out.

Learn how OpenAPI can automate API client generation to save time, reduce bugs, and streamline how your frontend app talks to backend APIs.


