The Replay is a weekly newsletter for dev and engineering leaders.
Delivered once a week, it's your curated guide to the most important conversations around frontend dev, emerging AI tools, and the state of modern software.
In this tutorial, we are going to build a Telegram chatbot capable of performing optical character recognition (OCR). Telegram is a cloud-based mobile and desktop messaging app with a focus on security and speed. Optical Character Recognition (OCR) is the process of electronically extracting text from images, videos, or any type of documents.

To build this Telegram bot we are going to use Node.js with the following modules telegraf, node-tesseract-ocr, node-ffmpeg, dotenv, and Axios.
telegraf is a Telegram bot framework that makes the development of bots easy and straightforwardnode-tesseract-ocr is a Node.js wrapper for the Tesseract OCR API. Tesseract is an OCR engine that is able to extract text from various media formats. We will use this module to extract text from imagesnode-ffmpeg is a FFmpeg module for Node. This library provides a set of functions and utilities to abstract command-line usage of FFmpeg. FFmpeg is a collection of libraries and tools to process multimedia content such as audio, video, subtitles, and related metadata. We will use this module to extract a frame from a video, so that we can then use Tesseract to extract text from said framedotenv is a Node.js module that loads environment variables from a .env file into process.env. We will use this module to store our bot credentialsaxios is a module that provides us a promise-based HTTP client for the browser and Node.js. We will use this module to download images to a folder located in our serverAt the end of this tutorial, you will have a bot that can extract text from images and videos sent to it.
In order to follow this tutorial, you will need to:
In this tutorial, we are going to use telegraf to build our bot, telegraf allows us to create two types of bots:
pong whenever a user sends a message saying pingOur OCR bot falls under the complex type, and in order to build it we will divide the bot logic into scenes. You can think of scenes as different isolated conversations that may happen between a bot and a user, commands in a scene will only be available when the user enters that specific scene. We are going to divide our bot into two independent scenes imageScene and the videoScene.
The imageScene will reside in the imageScene.js file. This scene is where the user will ask the bot to extract text from an image. The workflow will be:
tesseract to extract text from the received imageThe videoScene will reside in the videoScene.js file, this scene is where the user will ask the bot to extract text from a frame in a video, the workflow will be:
ffmpeg, then the bot uses tesseract to extract text from the imageWhen a user sends a file to a Telegram bot, the file is stored in Telegram’s server, not in our server, in order to get the file sent by the user we will create a script called fileManager.js this script will be responsible for downloading and deleting the files sent by the user.
We are going to put the code responsible for performing OCR in a file called ocr.js, this file will contain the method to perform OCR, and the method to extract a specific frame from a video.
We will have a file called main.js which will be responsible for running our bot, given the user input enters the imageScene or videoScene.
In this section, we discussed our bot logic, in the next step we are going to create our working directory.
In this step, we will create a working directory for our bot and install the necessary libraries.
Open a terminal window and write the following commands:
mkdir ocr-bot && cd ocr-bot
With the commands above we have created our working directory named ocr-bot and we changed directory into it.
In the terminal run the following command:
mkdir -p scenes tmp/{images,videos}
With the command above we have created the following directories:
scenes, this is where we will store all the scenes for our bottmp, this is where we will store temporarily the files sent to the bot, the images subdirectory is where the images will be stored and videos subdirectory is where the videos will be storedIn the terminal run the following command:
npm init -y
With the command above we have created a new Node project, now it’s time to install the necessary dependencies to make our bot.
In the terminal run the following command:
npm install telegraf node-tesseract-ocr ffmpeg dotenv axios --save
In this section, we have created the working directory, created, and activated our Node project, and installed the necessary libraries. In the next step, we will register our bot.
In this step we are going to register our bot in telegram, in order to do that, we first need to contact the BotFather, which is a bot that is used to create new bot accounts and manage your existing bots.
Open your favorite Telegram client, search for @BotFather and start the chat. Send /newbot command and follow the instructions sent by the BotFather:

After choosing your bot name and username you will receive a message containing your access token:

In the terminal window create a file called .env:
nano .env
We will use the .env file created above to store the access token sent by BotFather and the username you chose for the bot.
Add the following to the .env file:
bot_token = "Your bot token"
In this section, we have registered our bot using BotFather and saved our bot credentials to a .env file. In the next step, we are going to create the file responsible for running the bot.
In this step we are going to create our main bot file, this file will be called main.js. In this file, we are going to import the necessary modules to create and manage a bot.
Run the following command in the terminal:
nano main.js
Inside the main.js file add the following code:
const Telegraf = require('telegraf')
const session = require('telegraf/session')
const Stage = require('telegraf/stage')
const Markup = require('telegraf/markup')
require('dotenv').config()
In the block of code above, we have required the telegraf module and its classes that we are going to use to create and manage the bot, and we also required the dotenv module that we are going to use to get our BOT_TOKEN stored in the .env file.
In the bottom of the main.js file add the following code:
const imageScene = require('./scenes/imageScene').imageScene
const videoScene = require('./scenes/videoScene').videoScene

const bot = new Telegraf(process.env.BOT_TOKEN)
const stage = new Stage([imageScene, videoScene])
bot.use(session())
bot.use(stage.middleware())
In the block of code above, we required our bot scenes(imageScene and videoScene) then we used the BOT_TOKEN that BotFather sent and created a new bot instance and assigned it to a variable called bot. After creating a new bot instance we created a new Stage object and assigned it to a variable called stage. Inside this object, we stored the scenes for our bot. Lastly, we passed the session and stage object to the bot.
In the bottom of the main.js file add the following code:
bot.start((ctx) => {
    let userFirstName = ctx.message.from.first_name
    let message = ` Hello master ${userFirstName}, i am OCR bot your humble servant. \n
    Where would you like to extract text from ?`

    let options = Markup.inlineKeyboard([
        Markup.callbackButton('Extract from 🖼️', 'extractFromImage'),
        Markup.callbackButton('Extract from 🎬', 'extractFromVideo'),
    ]).extra()
    ctx.reply(message, options)
})

bot.action('extractFromImage', Stage.enter('imageScene'))
bot.action('extractFromVideo', Stage.enter('videoScene'))

bot.launch()
In the block of code above, we have created the method responsible for responding to the user when they send a message containing the command /start. Once this command is triggered the code retrieves the user’s first name and stores it in a variable called userFirstName.
Using the userFirstName, we create a message that greets and asks the user where they would like to extract text from. Inside this message, we pass the available options that the user can choose from, these options will reside inside an inlineKeyboard (this is how we create buttons in the same line using telegraf).
The available options are extract text from an image or extract text from a video; if the user chooses one of these options, a bot.action will be triggered. If the user chooses the Extract from 🖼️ option, the bot will enter the imageScene, and if the user chooses Extract from 🎬, the bot will enter the videoScene.
Lastly, we launched our bot by calling the bot.launch() method. The main.js should now look like the following:
const Telegraf = require('telegraf')
const session = require('telegraf/session')
const Stage = require('telegraf/stage')
const Markup = require('telegraf/markup')
require('dotenv').config()

const imageScene = require('./scenes/imageScene').imageScene
const videoScene = require('./scenes/videoScene').videoScene

const bot = new Telegraf(process.env.BOT_TOKEN)
const stage = new Stage([imageScene, videoScene])
bot.use(session())
bot.use(stage.middleware())

bot.start((ctx) => {
    let userFirstName = ctx.message.from.first_name
    let message = ` Hello master ${userFirstName}, i am OCR bot your humble servant. \n
    Where would you like to extract text from ?`

    let options = Markup.inlineKeyboard([
        Markup.callbackButton('Extract from 🖼️', 'extractFromImage'),
        Markup.callbackButton('Extract from 🎬', 'extractFromVideo'),
    ]).extra()
    ctx.reply(message, options)
})

bot.action('extractFromImage', Stage.enter('imageScene'))
bot.action('extractFromVideo', Stage.enter('videoScene'))

bot.launch()
In this section, we have created our bot, added a listener for the /start command that will give the user a choice to enter a scene, and then we launched our bot. In the next step, we are going to create the file responsible for managing the imageScene.
imageSceneIn this step, we are going to create the scene responsible for managing the interaction with the user when they want to extract text from an image. In order to do that we will have to create a file called imageScene.js .
In the terminal run the following command to navigate to the scenes directory:
cd scenes
Now run the following command to create the imageScene.js file:
nano imageScene.js
Add the following code inside the imageScene.js file:
const WizardScene = require('telegraf/scenes/wizard')
const Composer = require('telegraf/composer')

const fileManager = require('../fileManager')
const OCR = require('../ocr')
In the code of block above, we have required the WizardScene and Composer from telegraf. We are going to use the WizardScene to create a scene object and the Composer to create the steps for the scene. When using the WizardScene we divide the code logic for a scene into steps.
Lastly, we required the fileManager.js and ocr.js file and assigned them to the fileManager and ocr object. Please note that we haven’t created these files yet, but we will create them later in this tutorial.
Add the following code to the bottom of the imageScene.js file:
const step1 = (ctx) => {
    ctx.reply('Send me the image')
    return ctx.wizard.next()
}
In the block of code above, we created step1, this step will be the first to run when the bot enters the imageScene, in this step, the bot asks the user to send the image containing the text that the user wants to extract and then moves to the next step by calling ctx.wizard.next().
Add the following code to the bottom of the imageScene.js file:
const step2 = new Composer()

step2.on('photo', async (ctx) => {
    ctx.reply('I have received the image please wait while i extract the text')
    let photos = ctx.update.message.photo
    const { file_id: fileId } = photos[photos.length - 1]
    const { file_unique_id: fileUniqueId } = photos[photos.length - 1]
    const fileUrl = await ctx.telegram.getFileLink(fileId);
    let imagePath = await fileManager.downloadFile(fileUrl, fileUniqueId, 'Image')
});
In the block of code above, we created the step2, and added a listener to it, that will listen to any incoming messages containing images sent by the user by using on('photo',...).
When the bot receives a message containing an image, the bot sends a message to the user saying that the image was received, the bot will extract from the message the image’s fileId and fileUniqueId values. We use the fileId to get the link to the image stored in the Telegram’s server, and then we store the link to the image in a variable called fileUrl.
We pass the fileUrl and the fileUniqueId to the downloadFile() method in fileManager. This method will download the image and then return the path where the image was stored locally. After the downloadFile() method returns, we store the path to the image in a variable called imagePath.
Add the following code to the bottom of the step2.on('photo',…):
step2.on('photo', async (ctx) => {
    . . .

    let text = await OCR.extractText(imagePath)
    fileManager.deleteFile(imagePath)
    if (text != 'Empty') {
        ctx.replyWithHTML(`The extracted text is: \n <b>${text}</b>`)
    } else {
        ctx.reply(`Sorry we couldn't extract any text from the image`)
    }
    ctx.reply('Lets try this again , please send me another image')
    const currentStepIndex = ctx.wizard.cursor
    return ctx.wizard.selectStep(currentStepIndex)
});
In the block of code above, we pass the imagePath to the extractText() method in OCR. The extractText() will extract text from the image located in the imagePath and then return the extracted text.
After the extractText() method returns, we store the extracted text in a variable called text. We delete the image stored by passing the imagePath to the deleteFile() method in fileManager.
After deleting the image, we check if the text is not equal to Empty. If that is the case, the bot sends a reply to the user containing the extracted text in a bold format (telegraf allow us to send HTML back to the user by using the .replyWithHTML() method.) If that is not the case, the bot asks the user to send another image.
Lastly, we retrieve the current step, store it in a variable called currentStepIndex, and make the bot remain in the same step by using wizard.selectStep(). This way, the user can send another image without having to render this scene.
Add the following code to the bottom of the imageScene.js file:
step2.command('cancel', (ctx) => {
    ctx.reply('Bye bye')
    return ctx.scene.leave()
})

const imageScene = new WizardScene('imageScene',
    (ctx) => step1(ctx),
    step2,
)

module.exports = { imageScene }
In the block of code above, we added in step2 a listener for the command /cancel that will send a reply saying Bye and then leave the imageScene. We created the imageScene object and added all the steps created previously. Lastly, we exported imageScene so that we can use it in the main.js file.
The imageScene.js should look like the following:
const WizardScene = require('telegraf/scenes/wizard')
const Composer = require('telegraf/composer')

const fileManager = require('../fileManager')
const OCR = require('../ocr')

const step1 = (ctx) => {
    ctx.reply('Send me the image')
    return ctx.wizard.next()
}

const step2 = new Composer()


step2.on('photo', async (ctx) => {
    ctx.reply('I have received the image please wait while i extract the text')
    let photos = ctx.update.message.photo
    const { file_id: fileId } = photos[photos.length - 1]
    const { file_unique_id: fileUniqueId } = photos[photos.length - 1]
    const fileUrl = await ctx.telegram.getFileLink(fileId);
    let imagePath = await fileManager.downloadFile(fileUrl, fileUniqueId, 'Image')

    let text = await OCR.extractText(imagePath)
    fileManager.deleteFile(imagePath)
    if (text != 'Empty') {
        ctx.replyWithHTML(`The extracted text is: \n <b>${text}</b>`)
    } else {
        ctx.reply(`Sorry we couldn't extract any text from the image`)
    }
    ctx.reply('Lets try this again , please send me another image')
    const currentStepIndex = ctx.wizard.cursor
    return ctx.wizard.selectStep(currentStepIndex)
});

step2.command('cancel', (ctx) => {
    ctx.reply('Bye bye')
    return ctx.scene.leave()
})

const imageScene = new WizardScene('imageScene',
    (ctx) => step1(ctx),
    step2,
)

module.exports = { imageScene }
In this section, we have created the imageScene and all the methods needed to manage the interaction with the user when they want to extract text from an image. In the next step, we are going to create the videoScene.
videoSceneIn this step, we are going to create the scene responsible for managing the interaction with the user when they want to extract text from a video. In order to do that we will have to create a file called videoScene.js .
Still in the scenes directory, create a new file called videoScene.js by running the following command:
nano videoScene.js
Add the following code inside the videoScene.js file:
const Composer = require('telegraf/composer')
const WizardScene = require('telegraf/scenes/wizard')

const fileManager = require('../fileManager')
const OCR = require('../ocr')
In the block of code above, we have required the WizardScene and Composer from telegraf. We also have required the fileManager.js and ocr.js file, just like we did when creating the imageScene . Please note that we are going to create these two files later in this tutorial.
Add the following code to the bottom of the videoScene.js file:
const step1 = (ctx)=>{
    ctx.replyWithHTML('Send me the exact frame where you want to extract the text in the format <code>hh:mm:ss</code>. Example: <code>00:00:50</code> \n If you want to extract text from multiple frames use <code>,</code> to separate them. Example: <code>00:00:30,00:00:34</code> ')
    return ctx.wizard.next()
}
In the block of code above, we created the step1 of the videoScene. This step will be the first to run when the bot enters this scene. First, the bot asks the user to send a message containing the frame location in a video where they want to extract text from. The message the user sends should be in the following format hh:mm:ss, where hh stands for hours in the video, mm stand for minutes in the video and ss stands for seconds in the video. For example, if the user wants to extract text from a frame in the video when the video is at the 30 seconds mark they should send a message containing the following text: 00:00:30.
If the user wants to extract text from multiple frames they can do so by using , to separate the frame’s location. For example, if the user wants to extract text from a video at the 30 and 34 seconds mark they should send the following text 00:00:30,00:00:34.
Lastly, the bot moves to the next step by calling ctx.wizard.next().
Add the following code to the bottom of the videoScene.js file:
const step2 = new Composer()
step2.on('text',(ctx)=>{
    let message = ctx.update.message.text.toLowerCase()
    if(message.includes(':')){
        let frames = message.includes(',') ?  message.split(',') : [message]
        ctx.scene.session.state.frames = frames
        ctx.reply('I know where to look for the images , now please send me the video')
        return ctx.wizard.next()
    }else if (message.includes('cancel')){
        leaveScene(ctx)
    }else{
        const currentStepIndex = ctx.wizard.cursor
        ctx.replyWithHTML('sorry but i am waiting for a message in the following format <code>hh:mm:ss</code>')
        return ctx.wizard.selectStep(currentStepIndex)
    }
})

step2.command('cancel',(ctx) => leaveScene(ctx))
In the block of code above, we created step2 and added a text listener to it, this listener will listen to any incoming message containing text by calling the on('text',...). When a message containing text is received we check if the message is the format described in step1. If that is the case we save the image or the image’s location in the video in a variable called frames in the scene.session.state object. If the message contains the /cancel command then we leave the videoScene. If the message contains neither the format described in step1 nor /cancel command then we ask the user to send a message in the correct format and remain in the same step by using wizard.selectStep(). Lastly, we added a listener for the /cancel command, which will exit the current scene by calling the leaveScene() method.
Add the following code to the bottom of the videoScene.js file:
const step3 = new Composer()
step3.on('video', async (ctx) => {
    ctx.reply('I have received the video please wait while i extract the text')
    let video = ctx.update.message.video
    const currentStepIndex = ctx.wizard.cursor
    const { file_id: fileId } = video
    const { file_unique_id: fileUniqueId } = video
    const fileUrl = await ctx.telegram.getFileLink(fileId);
    let videoPath = await fileManager.downloadFile(fileUrl, fileUniqueId, 'Video')
})
In the block of code above, we created step3 and added a listener that will listen to any incoming message containing a video by using .on('video'). Just like we did in the imageScene, first, the bot sends a message to the user saying that the video was received. Then we extract the values needed to download the video stored in Telegram’s server and pass it to the downloadFile() method in fileManager. Once the video is downloaded, the video’s path will be stored in a variable called videoPath.
Add the following code to the bottom of the step3.on('video',…) :
step3.on('video', async (ctx) => {
    . . .

    let frames = ctx.scene.session.state.frames
    let promises = []
    for(let i=0; i<frames.length;i++){
        promises.push(OCR.videoOCR(videoPath,fileUniqueId,frames[i]))
    }
    const data = await Promise.all(promises)
    data.forEach(item =>{
        let text = item.text
        let frame = item.frame
        if (text != 'Empty') {
            ctx.replyWithHTML(`The text extracted from the frame at the video length <b>${frame}</b> is : \n <b>${text}</b>`)
        } else {
            ctx.replyWithHTML(`Sorry we couldn't extract any text from the frame at the video length <b>${frame}</b>`)
        }
    })
})
In the block of code above, we retrieve from the ctx.scene.session.state the location of frames where we want to extract text from and store it in a variable called frames. We go through the values stored in frames and for each value in it, we take the value and pass it alongside the videoPath and fileUniqueId to the videoOCR() method in ocr. The videoOCR() method will return an array of objects containing the text extracted from the given frame and the frame where the text was extracted. Once the videoOCR() method returns, we store the returned values in a variable called data. Lastly, we go through the objects in data and for each object found we send the text and the frame to the user.
Add the following code to the bottom of the step3.on('video',…):
step3.on('video', async (ctx) => {
    . . .

    fileManager.deleteFile(videoPath)
    ctx.reply('Lets try this again, send me the frames')
    return ctx.wizard.selectStep(1)
})
In the block of code above, we delete the downloaded video and then we ask the user to send the frames in order to extract text from another video and use the ctx.wizard.selectStep() method to go back to step2.
Add the following code to the bottom of the videoScene.js file:
step3.on('text', async (ctx) => {
    let message = ctx.update.message.text.toLowerCase()
    if(message.includes('cancel')){
        leaveScene()
    }else{
        console.log(Object.keys(ctx.update.message))
        const currentStepIndex = ctx.wizard.cursor
        ctx.reply('sorry but i am waiting for a video')
        return ctx.wizard.selectStep(currentStepIndex)
    }
});
In the block of code above, we added a listener to step3 that will listen to any message containing text by using .on('text',...). If the message contains the string cancel then we will exit the scene. If the message contains other text the bot will tell the user that the bot is expecting a video and then remain in the current scene.
Add the following code to the bottom of the videoScene.js file:
const leaveScene = (ctx) =>{
    ctx.reply('Bye !!!')
    return ctx.scene.leave()
}

const videoScene = new WizardScene('videoScene',
    (ctx) => step1(ctx),
    step2,
    step3
)

module.exports = { videoScene }
In the block of code above, we created the leaveScene() method which will send a message to the user saying Bye and exit the current scene. After creating the leaveScene() method, we created the videoScene object and added all the steps created previously. Lastly, we exported videoScene so that we can use it in the main.js file.
The videoScene.js should look like the following:
const Composer = require('telegraf/composer')
const WizardScene = require('telegraf/scenes/wizard')
const fileManager = require('../fileManager')
const OCR = require('../ocr')

const step1 = (ctx)=>{
    ctx.replyWithHTML('Send me the exact frame where you want to extract the text in the format <code>hh:mm:ss</code>. Example: <code>00:00:50</code> \n If you want to extract text from multiple frames use <code>,</code> to separate them. Example: <code>00:00:30,00:00:34</code> ')
    return ctx.wizard.next()
}

const step2 = new Composer()
step2.on('text',(ctx)=>{
    let message = ctx.update.message.text.toLowerCase()
    if(message.includes(':')){
        let frames = message.includes(',') ?  message.split(',') : [message]
        ctx.scene.session.state.frames = frames
        ctx.reply('I know where to look for the images , now please send me the video')
        return ctx.wizard.next()
    }else if (message.includes('cancel')){
        leaveScene(ctx)
    }else{
        const currentStepIndex = ctx.wizard.cursor
        ctx.replyWithHTML('sorry but i am waiting for a message in the following format <code>hh:mm:ss</code>')
        return ctx.wizard.selectStep(currentStepIndex)
    }
})

step2.command('cancel',(ctx) => leaveScene(ctx))

const step3 = new Composer()
step3.on('video', async (ctx) => {
    ctx.reply('I have received the video please wait while i extract the text')
    let video = ctx.update.message.video
    const currentStepIndex = ctx.wizard.cursor
    const { file_id: fileId } = video
    const { file_unique_id: fileUniqueId } = video
    const fileUrl = await ctx.telegram.getFileLink(fileId);
    let videoPath = await fileManager.downloadFile(fileUrl, fileUniqueId, 'Video')
    let frames = ctx.scene.session.state.frames
    let promises = []
    for(let i=0; i<frames.length;i++){
        promises.push(OCR.videoOCR(videoPath,fileUniqueId,frames[i]))
    }
    const data = await Promise.all(promises)
    data.forEach(item =>{
        let text = item.text
        let frame = item.frame
        if (text != 'Empty') {
            ctx.replyWithHTML(`The text extracted from the frame at the video length <b>${frame}</b> is : \n <b>${text}</b>`)
        } else {
            ctx.replyWithHTML(`Sorry we couldn't extract any text from the frame at the video length <b>${frame}</b>`)
        }
    })

    fileManager.deleteFile(videoPath)
    ctx.reply('Lets try this again, send me the frames')
    return ctx.wizard.selectStep(1)
})
step3.on('text', async (ctx) => {
    let message = ctx.update.message.text.toLowerCase()
    if(message.includes('cancel')){
        leaveScene()
    }else{
        const currentStepIndex = ctx.wizard.cursor
        ctx.reply('sorry but i am waiting for a video')
        return ctx.wizard.selectStep(currentStepIndex)
    }
});

const leaveScene = (ctx) =>{
    ctx.reply('Bye !!!')
    return ctx.scene.leave()
}
const videoScene = new WizardScene('videoScene',
    (ctx) => step1(ctx),
    step2,
    step3
)
module.exports = { videoScene }
In this section, we have created videoScene which is responsible for managing the interaction with the user, when the user wants to extract text from a video. In the next step, we are going to create the fileManager.js file.
In this step, we are going to create the fileManager.js, this file will contain the methods needed to manage the files sent by the user.
In the terminal run the following commands to go back to the root directory of our project and create the fileManager.js:
cd .. && nano fileManager.js
Add the following code inside the fileManager.js file:
const fs = require('fs')
const path = require('path')
const axios = require('axios')
In the block of code above, we required the modules needed to download the files sent by the user and then save them in the tmp directory.
Add the following code to the bottom of the fileManager.js file:
const downloadFile = async (fileUrl, fileUniqueId, type) => {
  const fileDir = type === 'Image' ? 'images' : 'videos'
  const splitFileUrl = fileUrl.split('.')
  const fileFormat = splitFileUrl[splitFileUrl.length - 1]
  const fileName = `${fileUniqueId}.${fileFormat}`
  const filePath = path.resolve(__dirname, `tmp/${fileDir}`, fileName)
  const writer = fs.createWriteStream(filePath)

  return axios({
    method: 'get',
    url: fileUrl,
    responseType: 'stream',
  }).then(response => {

    return new Promise((resolve, reject) => {
      response.data.pipe(writer);
      let error = null;
      writer.on('error', err => {
        error = err;
        writer.close();
        reject(err);
      });
      writer.on('close', () => {
        if (!error) {
          resolve(writer.path);
        }
      });
    });
  });
}
In the block of code above, we created the downloadFile() method, which will be responsible for downloading files from Telegram’s server and storing them in either the tmp/images or tmp/videos directory, depending on file type.
First, we do a string comparison to see whether the file type is equal to Image to determine which tmp subdirectory the file will be saved in. We then store the value in the fileDir variable.
We split the fileUrl to determine the file format and store it in the fileFormat variable. We join the fileUniqueId with the fileFormat to create the fileName. We use the path module with the fileDir and fileFormat variables to create the filePath. We use the fs module to create a file writer.
Add the following code to the bottom of the downloadFile() method:
const downloadFile = async (fileUrl, fileUniqueId, type) => {
  . . .

  return axios({
    method: 'get',
    url: fileUrl,
    responseType: 'stream',
  }).then(response => {
    return new Promise((resolve, reject) => {
      response.data.pipe(writer);
      let error = null;
      writer.on('error', err => {
        error = err;
        writer.close();
        reject(err);
      });
      writer.on('close', () => {
        if (!error) {
          resolve(writer.path);
        }
      });
    });
  });
}
In the block of code above, first, we use the module axios to download the file, then we use the writer to save the file in the filePath. Lastly, when the writer finishes saving the file we return the filePath to the method that called the downloadFile() method.
Add the following code to the bottom of the fileManager.js file:
const deleteFile = (filePath) => {
  fs.unlink(filePath, (err) => {
    if (err) {
      return
    }
    console.log('file deleted')
  })
}

module.exports = { downloadFile, deleteFile }
In the block of code above, we created the deleteFile() method, this method will be responsible for deleting the downloaded files, and then we exported the downloadFile() and deleteFile() method.
The fileManager.js file should look like this:
const fs = require('fs')
const path = require('path')
const axios = require('axios')

const downloadFile = async (fileUrl, fileUniqueId, type) => {
  const fileDir = type === 'Image' ? 'images' : 'videos'
  const splitFileUrl = fileUrl.split('.')
  const fileFormat = splitFileUrl[splitFileUrl.length - 1]
  const fileName = `${fileUniqueId}.${fileFormat}`
  const filePath = path.resolve(__dirname, `tmp/${fileDir}`, fileName)
  const writer = fs.createWriteStream(filePath)

  return axios({
    method: 'get',
    url: fileUrl,
    responseType: 'stream',
  }).then(response => {

    return new Promise((resolve, reject) => {
      response.data.pipe(writer);
      let error = null;
      writer.on('error', err => {
        error = err;
        writer.close();
        reject(err);
      });
      writer.on('close', () => {
        if (!error) {
          resolve(writer.path);
        }
      });
    });
  });
}


const deleteFile = (filePath) => {
  fs.unlink(filePath, (err) => {
    if (err) {
      return
    }
    console.log('file deleted')
  })
}

module.exports = { downloadFile, deleteFile }
In this section, we created inside the fileManager.js file, the methods responsible for managing the files sent by the user, in the next step we are going to create the file responsible for performing OCR.
In this step we are going to create the file responsible for performing OCR in both images and videos.
Still in the root directory of our project, create a file called ocr.js by running the following command:
nano ocr.js
Add the following code inside the ocr.js file:
const tesseract = require("node-tesseract-ocr")
const ffmpeg = require('ffmpeg')
const path = require('path')
const fileManager = require('./fileManager')
In the block of code above, we required the libraries need to manage the files sent by the user, extract a frame from a video, and extract text from an image.
Add the following code to the bottom of the ocr.js file:
let extractText = async (imagePath) => {
    let extractedText = 'Empty'
    const config = {
        lang: "eng",
        oem: 1,
        psm: 3,
    }

    await tesseract.recognize(imagePath, config)
        .then(text => {
            console.log("Text :", text)
            extractedText = text
        })
        .catch(err => {
            console.log("Error:", err.message)
        })

    return extractedText
}
In the block of code above, we created a method called extractText, which will be responsible for extracting text in an image located in the imagePath.
We start the method by creating a variable called extractedText, which will store the text extracted from the image, then we create an object called config, which will hold the options that we will pass to tesseract when trying to recognize text inside an image.
We add the following properties to the config object:
lang tells tesseract in which language the text inside the image isoem tells tesseract the type of the algorithm it should usepsm controls the automatic page segmentation mode (page segmentation is the process by which a scanned page is divided into columns and blocks, which are then classified as halftones, graphics, or text)After creating the config object we pass it alongside the imagePath to the tesseract.recognize() method in order to recognize the text inside the image, then we store the text found in the extractedText variable and then we return extractedText to the method that called extractText().
Add the following code to the bottom of the ocr.js file:
let videoOCR = async (videoPath, fileUniqueID, frame) => {
  let extractedText = 'Empty'
  let data = {text : extractedText, frame: frame}
  const imageName = `${fileUniqueID}.jpg`
  const imagePath = path.resolve(__dirname, 'tmp/images', imageName)
}
In the block of code above, we created a method called videoOCR, this method will be responsible for extracting a frame inside a video, save the frame as an image, then call the extractText() method and pass the image path to it, then the extractText() which will extract the text and return it to the videoOCR().
We start the method by creating a variable called extractedText which will store the text extracted from the image, and an object called data which will store the extractedText and the frame. We use the fileUniqueID that was passed to this method and create the imageName. We use the path module and the imageName to create the imagePath.
Add the following code to the bottom of the videoOCR() method:
let videoOCR = async (videoPath, fileUniqueID, frame) => {
  . . .

  try {
    let process = new ffmpeg(videoPath);
    return await process.then(video => {
      return new Promise((resolve, reject) => {
        video.addCommand('-ss', frame)
        video.addCommand('-vframes', '1')
        video.save(imagePath, async (err, file) => {
          if (!err) {
            extractedText = await extractText(imagePath)
            fileManager.deleteFile(imagePath)
            data.text = extractedText
            resolve(data);
          } else {
            console.log('Error: ' + err)
            reject(data);
          }
        })
      });
    })
  } catch (err) {
    console.log(err.code)
    console.log(err.msg)
    return data
  }
}
In the block of code above, we use the ffmpeg module to retrieve a frame inside the video located in the videoPath. We extract the frame by passing the frame variable, which was passed to this method alongside the -ss flag, and '1' alongside the -vframes flag to the addCommand() method.
The -ss flag stands for the position in the video that we want to seek to, and the -vframes flag stands for the number of frames that we want. After getting the frame, we use the video.save() method to save the frame as an image in the imagePath.
Once the frame is saved as an image, we take the imagePath and pass it to the extractText() method, which will extract the text from the image in the imagePath and then return it. After the extractText() method returns, we store the returned text in the extractedText variable, then we update the extractedText value and the data object.
Lastly, we return the data object to the method that called videoOCR(). The ocr.js file should look something like this:
const tesseract = require("node-tesseract-ocr")
const ffmpeg = require('ffmpeg')
const path = require('path')
const fileManager = require('./fileManager')
let extractText = async (imagePath) => {
    let extractedText = 'Empty'
    const config = {
        lang: "eng",
        oem: 1,
        psm: 3,
    }
    await tesseract.recognize(imagePath, config)
        .then(text => {
            extractedText = text
        })
        .catch(err => {
            console.log("Error:", err.message)
        })
    return extractedText
}

let videoOCR = async (videoPath, fileUniqueID, frame) => {
  let extractedText = 'Empty'
  let data = {text : extractedText, frame: frame}
  const imageName = `${fileUniqueID}.jpg`
  const imagePath = path.resolve(__dirname, 'tmp/images', imageName)

  try {
    let process = new ffmpeg(videoPath);
    return await process.then(video => {
      return new Promise((resolve, reject) => {
        video.addCommand('-ss', frame)
        video.addCommand('-vframes', '1')
        video.save(imagePath, async (err, file) => {
          if (!err) {
            extractedText = await extractText(imagePath)
            fileManager.deleteFile(imagePath)
            data.text = extractedText
            resolve(data);
          } else {
            console.log('Error: ' + err)
            reject(data);
          }
        })
      });
    })
  } catch (err) {
    console.log(err.code)
    console.log(err.msg)
    return data
  }
}

module.exports = { extractText, videoOCR }
We have now finished creating our bot. In the next section, we are going to interact with it.
In this step, we are going to run our bot and talk to it on Telegram. Start our bot by running the following command in the terminal:
node main.js
Now that our bot is running, open your Telegram client and add the bot that you have created by adding @your_bot_username. Then start a conversation with it by sending /start or clicking the start button if available.
Click the Extract from 🖼️ button and we will enter the imageScene.
Here is the first image that we sent to the bot:
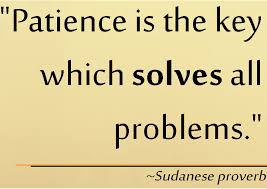
And here is the output:
"Patience is the key
which solves all
problems.”

~Sudanese proverb
Here is the second image that we sent to the bot:
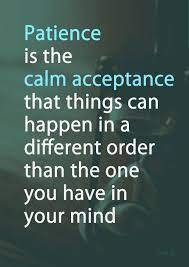
And here is the output:
Patience

mats
(e-\naeeraecyelel ites
that things can
happen ina

Co lhicirnime) felis
than the one
you have in
your mind
Here is the third image that we sent to the bot:

And here is the output:
Be patient.

Some things
take time.
As you can see in the output above our bot was able to extract text from two of the three images we sent to it. This is because we didn’t process any of the images before trying to extract text from it. If that were the case, we would have extracted text from all three images, but this goes beyond the scope of this tutorial.
After extracting text from images, we sent the /cancel command to exit the imageScene. We then sent the /start command to show the available options and selected the Extract from 🎬 option thus entering the videoScene.
Then we sent the following message containing the location for the frames in the video we want to extract text from: 00:00:50,00:01:42,00:02:34.
After sending the location for the frames, we sent this video to the bot; the video that we sent was taken from the Riddle Channel channel on YouTube.
Here is the text we extracted in 00:00:50:
Riddle 1

Voiceless it cries,
Wingless flutters,
Toothless bites,
Mouthless mutters.

What am |?
Here is the text we extracted in 00:01:42:
Riddle 2

This thing all things devours;
Birds, beasts, trees, flowers;
Gnaws iron, bites steel;
Grinds hard stones to meal;
Slays king, ruins town,
And beats mountain down.

What am |?
Here is the text we extracted in 00:02:34:
Riddle 3

What walks on four feet in the morning,
Two in the afternoon,

And three at night?
You can watch the bot in action in the video here.
We were able to extract the text in all the 3 selected frames in the video successfully.
In this tutorial, we have learned how to use the telegraf module to create a Telegram bot capable of extracting text from images and videos. This module allowed us to build a complex bot without having to spend too much time learning the whole Telegram API.
In order to extract text from images, we have learned how to use the node-tesseract-ocr module, but since we also needed to extract text from frames in videos, we learned how to use the node-ffmpeg module, which allowed us to extract frames from videos and then save them as images.
Install LogRocket via npm or script tag. LogRocket.init() must be called client-side, not
server-side
$ npm i --save logrocket

// Code:

import LogRocket from 'logrocket';
LogRocket.init('app/id');
// Add to your HTML:

<script src="https://cdn.lr-ingest.com/LogRocket.min.js"></script>
<script>window.LogRocket && window.LogRocket.init('app/id');</script>

Learn how sibling-index() enables clean, JavaScript-free stagger animations using native CSS.

useEffect breaks AI streaming responses in ReactSee why useEffect breaks AI streaming in React, and how moving stream state outside React fixes flicker and stale updates.

A real-world debugging session using Claude to solve a tricky Next.js UI bug, exploring how AI helps, where it struggles, and what actually fixed the issue.

CSS wasn’t built for dynamic UIs. Pretext flips the model by measuring text before rendering, enabling accurate layouts, faster performance, and better control in React apps.
Would you be interested in joining LogRocket's developer community?
Join LogRocket’s Content Advisory Board. You’ll help inform the type of content we create and get access to exclusive meetups, social accreditation, and swag.
Sign up now

