The Replay is a weekly newsletter for dev and engineering leaders.
Delivered once a week, it's your curated guide to the most important conversations around frontend dev, emerging AI tools, and the state of modern software.
According to its GitHub repository, Redis (which stands for Remote Directory Server) is an in-memory data structure store. It is a disk-persistent key-value database with support for multiple data structures or data types.

This means that while Redis supports mapped key-value-based strings to store and retrieve data (analogous to the data model supported in traditional kinds of databases), it also supports other complex data structures like lists, sets, etc. As we proceed, we will look at the data structures supported by Redis. We will also get to learn about the unique features of Redis.
Redis is an open-source, highly replicated, performant, non-relational kind of database and caching server. It works by mapping keys to values with a sort of predefined data model. Its benefits include:
Note: Redis has a variety of use cases in large enterprise applications. Apart from acting as a caching server, it can also act as a message broker or used in publisher/subscriber kind of systems. For detailed information about other use cases, we can check this section of the documentation.
Before we proceed, it is advisable to have Node and npm installed on our machines. Instructions on how to do so are available here. Furthermore, to install Redis locally, we can visit this section of the documentation.
While we will be making use of Redis’ cloud-hosted version — Redis Labs — we will also run through setting it up locally on our machines. This will enable us to learn while using the command line utility.
To install Redis on our local machines, we can download the latest available binaries. Alternatively, we can use the following command to download as well:
wget http://download.redis.io/releases/redis-5.0.7.tar.gz
After downloading the binaries, we can go ahead and extract it:
tar xzf redis-5.0.7.tar.gz
cd redis-5.0.7
make
ls
cd src/
As seen above, after extracting the binaries, we can then navigate into the redis directory and run the make command, which compiles and builds all executables needed for Redis to function properly. Note that at the time of writing this article, the current Redis version is 5.0.7.
To start up Redis locally, all we have to do is run the following command:
./redis-server
To test that the Redis connection to the server is successful, we can open a new terminal window and run:
redis-cli ping
The output should be:
PONG
Finally, to start the Redis CLI, so as to experiment and start learning how to work with Redis commands, we can run:
./redis-cli
After starting the CLI, we can go ahead and run the info command to see all the parameters of the current running Redis instance. The output is shown below. Note that it is truncated here for brevity:
127.0.0.1:6379> info
# Server
redis_version:5.0.7
redis_git_sha1:00000000
redis_git_dirty:0
redis_build_id:e3be448653a99bb8
redis_mode:standalone
os:Darwin 18.7.0 x86_64
arch_bits:64
multiplexing_api:kqueue
atomicvar_api:atomic-builtin
gcc_version:4.2.1
process_id:98832
run_id:c63164944a269066f81b9bbc553296614fcb3df6
tcp_port:6379
uptime_in_seconds:374
uptime_in_days:0
hz:10
configured_hz:10
lru_clock:443996
executable:/Users/alexander.nnakwue/Downloads/redis-5.0.7/src/./redis-server
config_file:

# Clients
connected_clients:1
client_recent_max_input_buffer:2
client_recent_max_output_buffer:0
blocked_clients:0
Let’s experiment on the redis-cli with the most basic Redis commands, SET and GET, just to be certain we are connected successfully to the server:
SET mykey "Hello world"
Here we are setting the key mykey to the string value "Hello world". The output of this command is shown below:
OK
Now, we can run a get command with the key to get the value back:
get mykey
The output is shown below:
"Hello world"
For a complete list of all the available Redis commands, a reference is available in this section of the Redis documentation.
Note: To install Redis properly, check this section of the documentation. This is absolutely necessary if we intend not to go with a managed Redis server/instance in a live or production application. However, for hacking around and for development purposes, our previous installation setup works fine.
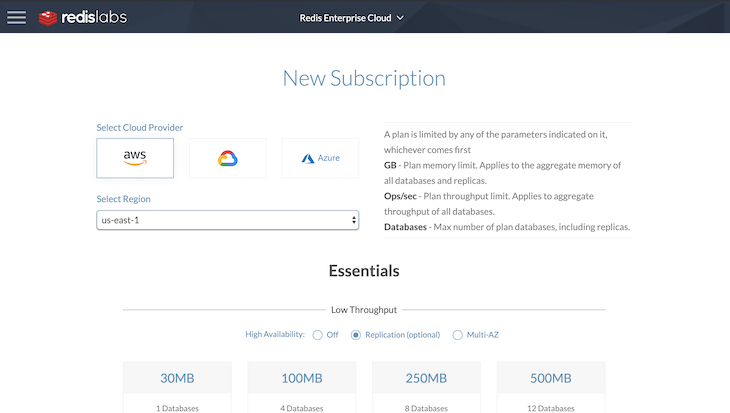
To begin, we can visit Redis Labs, a fully cloud-managed alternative to working with Redis, to set up our account. In this tutorial, we will be making use of the free tier, which is basically a limited option meant for development and testing purposes.

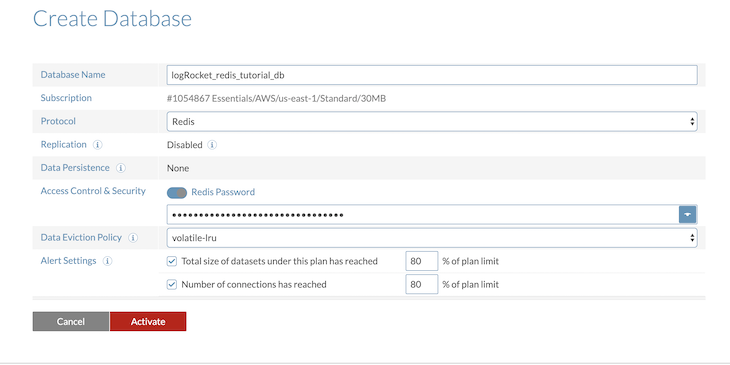
After we are done with the current configuration, we can then go ahead and set up our database as shown below:

After we are done setting up our database, we should now be able to view our current subscription on the dashboard:

Note that we can connect to the Redis database using the redis-cli or telnet. The command for connecting to the cluster via the CLI is shown below:
redis-cli -h <redic-host> -p <redis-port> -a <password>
More information on the setup can be found here.
Redis data stays in memory, as opposed to traditional kinds of databases that persist to disk. This gives Redis an edge over other kinds of storage systems and makes it ultra fast with high throughput and low latency. Therefore, Redis can be used in real-time applications and message queuing systems. Other use cases include:
Redis also comes in handy in managing user sessions at the application level. Typical web applications store user session information about the user login, user IDs, recent user actions, and so on. Details on implementing session management in Redis can found here.
For data that is frequently needed or retrieved by app users, a cache would serve as a temporary data store for quick and fast retrieval without the need for extra database round trips. Note that data stored in a cache is usually data from an earlier query or copy of data stored somewhere else. This feature is vital because the more data we can fetch from a cache, the faster and more efficiently the system performs overall.
More detailed information of Redis use cases like publisher/subscriber systems, fraud detection, leaderboard and data ingestion, etc. can be found in this section of the Redis enterprise documentation.
Redis is very versatile when it comes to how we model data based on particular use cases. As mentioned earlier, it allows us to map keys to strings and other available supported data types. The other supported data types/models include lists, sets, hashes, sorted sets, streams, and so on.
Having other data models supported in Redis eliminates or reduces to the barest minimum the time needed to convert one data type to another, contrary to traditional databases.
For detailed information about the definition and use cases for each data type, you can check this section of the Redis documentation, which explains thoroughly how and when to issue Redis commands on these data types against a Redis server. A complete listing of all Redis commands can also be found here here.
In the documentation/guide, each command is mapped to the respective data types it can operate on. We will be experimenting with just a few of these commands in the next section. Now let’s learn about some of the data structures.
Redis has commands for operating on some parts or the whole of the string data type. The string data type can also store integers and floating point numbers. Here is the link for the documentation on the commands used for operating on strings. We have previously seen an example of how to use the string data type.
Redis sets store unique sets of numbers, almost similar to sets in most programming languages. We can add and remove items to a set, check if an item exists, and so on. Details about using sets can be found here. For the associated commands on the set data structure, we can check this section of the documentation.
Sorted sets in Redis are like regular sets, but are ordered by a score. Apart from normal operation on sets like addition and deletion, we can also fetch details in a sorted set by their scores. For the associated commands on the sorted set data structure, we can check this section of the documentation.
Redis also support the list data structure. Lists hold a collection of strings in order of insertion, i.e., FIFO (first-in, first-out). We can pop and push items from both ends, etc. For the associated commands on the list data structure, we can check this section of the documentation.
Redis hashes store a set of field-value pair. We can perform operations like add, remove, and fetch individual items from the hash. We can also use the hash as a counter, using the INCRBY() command and others. For the associated commands on the hash data structure, we can check this section of the documentation.
Note that a link to learn about other data structures available in Redis like bitmaps, streams, HyperLogLog, bitfields, etc. can be found here.
For keys, we can check if they exist. Also, we can delete or expire a key and even increase/decrease a key.
In the next section on Node.js, we will learn how to use and apply these commands in real-life applications. Stay tuned!
To begin, we can create a directory and call it any name we want. We then navigate into the directory and run the npm init command. After all the required setup, we can install all the dependencies for our application by running:
npm install redis concurrently dotenv --save
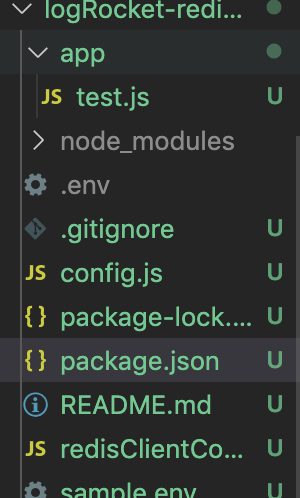
We can then go ahead and create all the necessary files and folders as shown below:

From our subscription details, we can get the parameters needed to connect to our Redis instance. A sample is shown below, which is located in our sample.env file. The real-life credentials are stored in the env file, which are referenced in the config file. The files are shown below:
app_port=6006
host=host
port=port
password=password
The content of the config file is shown below:
const path = require('path');
require('dotenv').config();
const config= {
    port: process.env.APP_PORT,
    redis: {
    host: process.env.REDIS_HOST,
    port: process.env.REDIS_PORT,
    password: process.env.REDIS_PASSWORD
    }
}
module.exports = config;
As seen in the files above, we have the redisClientConfig file, where we handle the connection to our Redis server. The contents of the file are shown below:
const redis = require('redis');
const config = require('./config');
const client = redis.createClient(config.redis.port, config.redis.host, {no_ready_check: true});
client.auth(config.redis.password);
client.on('error', error => console.error('Error Connecting to the Redis Cluster', error));
client.on('connect', () => {
    console.log('Successfully connected to the Redis cluster!');
  });

module.exports = client;
Furthermore, the samples for the various test cases in applying Redis commands are available in the test.js file located in the app directory. Note that we can also choose to test these commands against the data structures using the redis-cli.
The file’s contents are shown below:
const redisConnection = require('../redisClientConnection');

// test redis server
redisConnection.set('foo', 'bar');
    redisConnection.get('foo', function (err, res) {
        console.log(res.toString());
    });

// Retrieving a string value from Redis if it already exists for this key - Redis cache example
redisConnection.get('myStringKey', (err, value) => {
    if (value) {
    console.log(`The value associated with this key is:${value}`)
    }
    else {
    // Storing a simple string in the Redis store
    redisConnection.set('myStringKey', 'LogRocket Redis Tutorial');
    }
});
As seen in the snippet above, we are importing the connection to the Redis cluster. Then, we are using the commands against the data structures based on use cases or need.
A bunch of exhaustive Redis examples with real-world use cases are available in this GitHub repository. Note that this is meant for interacting with Redis using the Node.js client library. Finally, here’s the repo for this project.
Note that we can test our code using the redis-cli or we can as well start our Redis server. We can do so by running the npm run dev command, we get the following output:

In summary, Redis offers highly performant and efficient read and write via the optimizations outlined in this tutorial. For more information on learning Redis, with available resources outlined, you can visit the documentation.
We touched on basic Redis commands in this tutorial, as well as some more complex commands and how to use them in our application. Instructions to do so using Node.js has been mentioned earlier. If you have any questions or feedback, please drop a comment in the comment box below or send me a message on Twitter. Hack on!
 Monitor failed and slow network requests in production
Deploying a Node-based web app or website is the easy part. Making sure your Node instance continues to serve resources to your app is where things get tougher. If you’re interested in ensuring requests to the backend or third-party services are successful, try LogRocket.

LogRocket lets you replay user sessions, eliminating guesswork around why bugs happen by showing exactly what users experienced. It captures console logs, errors, network requests, and pixel-perfect DOM recordings — compatible with all frameworks.
LogRocket's Galileo AI watches sessions for you, instantly identifying and explaining user struggles with automated monitoring of your entire product experience.
LogRocket instruments your app to record baseline performance timings such as page load time, time to first byte, slow network requests, and also logs Redux, NgRx, and Vuex actions/state. Start monitoring for free.

Learn how LLM routing works in production, when it’s worth the complexity, and how teams choose the right model for each request.

Compare key features of popular meta-frameworks Remix, Next.js, and SvelteKit, from project setup to styling.

Discover what’s new in The Replay, LogRocket’s newsletter for dev and engineering leaders, in the February 4th issue.

AI-first isn’t about tools; it’s about how teams think, build, and decide. Ken Pickering, CTO at Scripta Insights, shares how engineering leaders can adapt.
Would you be interested in joining LogRocket's developer community?
Join LogRocket’s Content Advisory Board. You’ll help inform the type of content we create and get access to exclusive meetups, social accreditation, and swag.
Sign up now