One of the most truthful statements in the life of an app developer is the fact that there will always be a few bugs that will creep into your code, even after you’ve completed your code reviews and taken your app through rigorous testing routines.

Bugs and crashes that occur in your app once it has been released on a store can be difficult to debug because your users might not be generous enough to give you the information required to fix it. In fact, it’s common that a user only leaves a bad review on the store and/or deletes your app.
Therefore, it is important for developers to be aware of these situations, which might prevent customers from having the quality experience that we hoped for.
Now, given that you need to be prepared for potential bugs and crashes and react to them as soon as possible, you’ll need the right tools for the job. For this, you have this neat solution called Crashlytics.
Firebase Crashlytics is a crash-reporting solution that helps you collect all the information you’d need to determine why a particular user might be facing a bug or crash in the app.
This blog post will guide you on how to use Crashlytics in your React Native mobile application.
Given that Crashlytics belongs to the Firebase suite of tools, you’ll need to first set up a Firebase project on the Firebase console, then integrate the Firebase SDK in your React Native project.
Head over to the Firebase console, log in, and follow the steps written below:
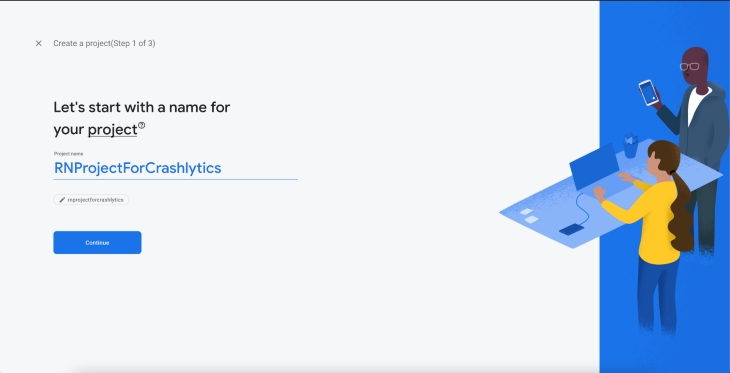
First, add your project name.
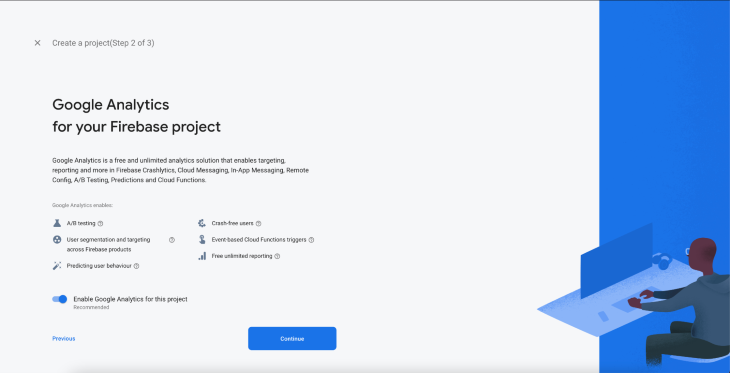
Next, click Continue in step 2. You can choose to disable Google Analytics here if you’d like. I’ve kept it enabled.
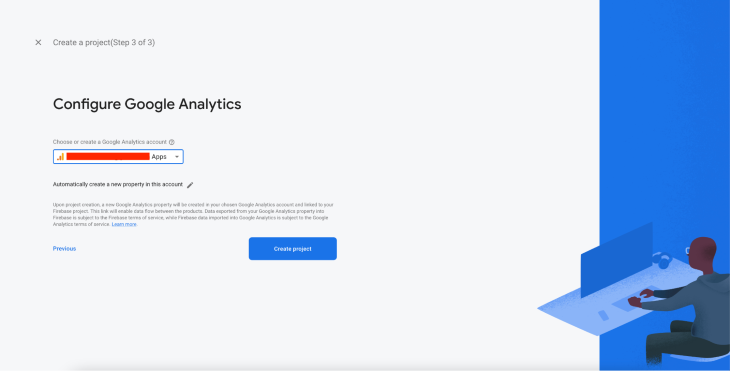
Now, select the account through which you want to create the project.
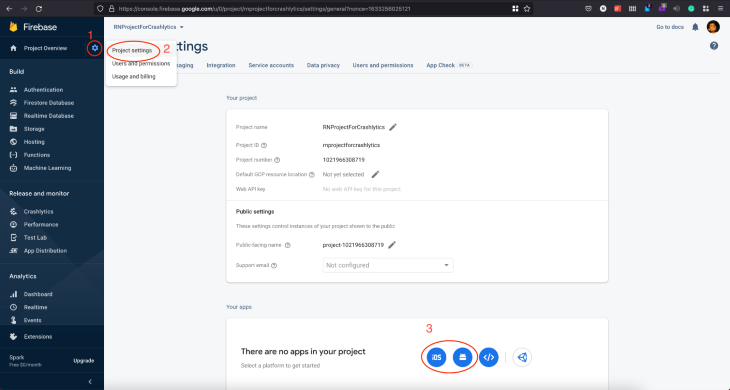
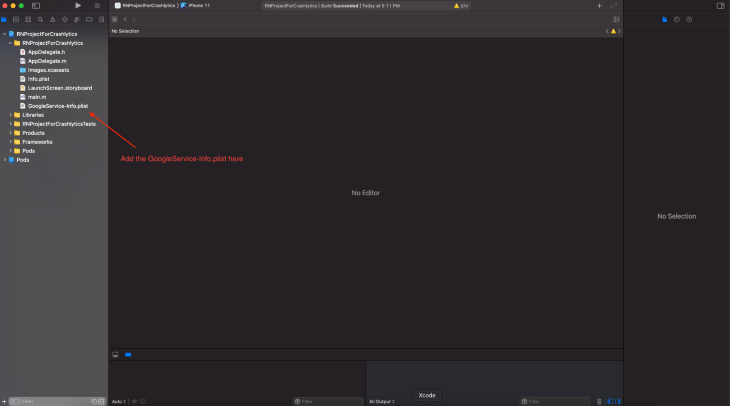
Once the project is created, head over to Project Settings and create your apps in the Firebase Console by clicking on the iOS or Android button (shown as step three in the picture below).
After creating each app on the console, you will be prompted to download a GoogleService-Info.plist for your iOS project and a google-services.json file for your Android project.
You will need these files in just a moment, but for now, head over to the installation procedure.
We’re going to use the react-native-firebase package to integrate both Firebase and Crashlytics into our React Native app.
Run the following npm commands to add them.
npm add @react-native-firebase/app

npm add @react-native-firebase/crashlytics

cd ios/ && pod install
Here are the steps to complete your Firebase integration in your iOS project.
First, open the workspace file and drag the GoogleService-Info.plist that you downloaded earlier into your project folder. Make sure the Copy Items if Needed checkbox is ticked.
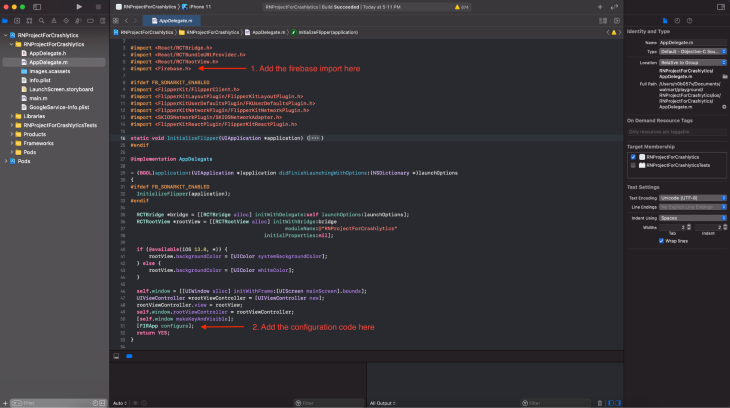
After copying the file, open the AppDelegate.m file and make the following changes:
Added ```import <Firebase.h>``` at the top of the file

```

#import <React/RCTBridge.h>

#import <React/RCTBundleURLProvider.h>

#import <React/RCTRootView.h>

#import <Firebase.h> // add this here
Now, scroll down to the bottom of the applicationDidFinishLaunching method and add [FIRApp configure] just before you return from the function. It should look something like this:
- (BOOL)application:(UIApplication *)application didFinishLaunchingWithOptions:(NSDictionary *)launchOptions
{
// ...

  self.window = [[UIWindow alloc] initWithFrame:[UIScreen mainScreen].bounds];
  UIViewController *rootViewController = [UIViewController new];
  rootViewController.view = rootView;
  self.window.rootViewController = rootViewController;
  [self.window makeKeyAndVisible];

// Add the following line
  [FIRApp configure];

  return YES;
}
The Android integration is a little more demanding compared to the iOS setup. Here are the steps that you need to follow to complete integrating Firebase and Crashlytics in your Android project:
Drag the google-services.json file that you downloaded earlier into the following path: /android/app/.

Open your android/build.gradle file and add the following dependency:
classpath 'com.google.gms:google-services:4.3.10'

classpath 'com.google.firebase:firebase-crashlytics-gradle:2.7.1'

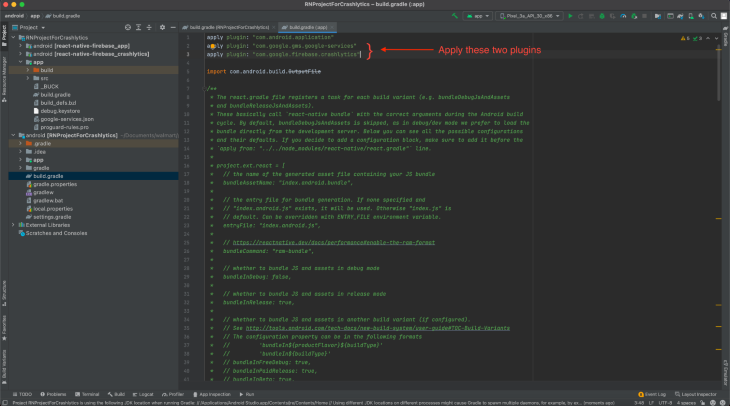
Next, open your android/app/build.gradle and add the following plugins at the top of the gradle file.
apply plugin: “com.google.gms.google-services”

apply plugin: “com.google.firebase.crashlytics”
That’s it, you’re done with the android setup as well!
In order to verify if your installation of Crashlytics works, you’ll have to make two changes:
React Native Crashlytics does not collect crash information when you’re debugging the app, as you have all the information required to assess the crash during your debug session. To log crash information even during a debug session, you’ll need to enable it.
Add a file to the base folder of your project with the name firebase.json and paste the following contents into it:
{
  "react-native": {
    "crashlytics_debug_enabled": true
  }
}
Go to your App.tsx file and replace the entire code with the following screen
import React from 'react';
import {SafeAreaView, StyleSheet, Text, TouchableOpacity} from 'react-native';
import crashlytics from '@react-native-firebase/crashlytics';

export const App = () => {
 return (

      {
         crashlytics().crash();
       }}>
       Force Crash


 );
};

const styles = StyleSheet.create({
 container: {flex: 1, justifyContent: 'center', alignItems: 'center'},
});
The above code adds a button to the middle of your screen that forces a crash.
The piece of code that actually performs the crash is this:
crashlytics().crash();
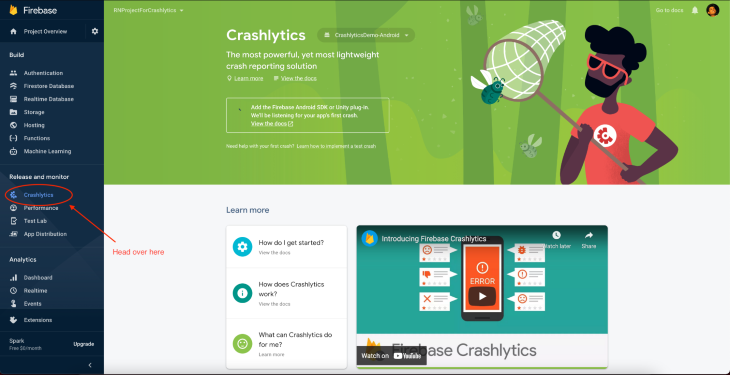
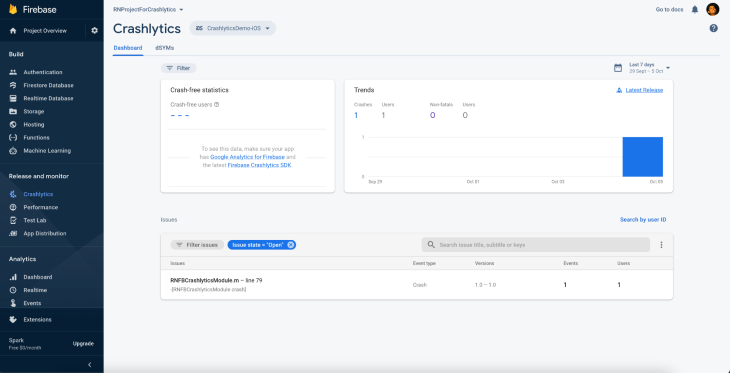
Now, before you click the button, open the Firebase console page for your project and head over to the Crashlytics tab.
Once you’re on this screen, open up your app without the debugger connected to it. Now, tap the button. Doing so will lead to an app crash.
Now, open the app again and wait for Crashlytics to sync with the console. The Firebase Crashlytics console should now look like this:
Do this for both your iOS and Android projects.
At this point, you’ve successfully integrated Firebase Crashlytics in your React Native project!
Now that your setup is complete, let’s see the different APIs Crashlytics offers to help with debugging these bugs and crashes.
These are situations when your app abruptly closes and can be caused by bugs in your code or due to memory constraints where the system decides to close your app.
Fatal crashes are tracked automatically by the Crashlytics SDK and are synced on the next run of the app. You can then view the details of this crash on your Firebase Crashlytics console.
The Firebase console will provide you with the stack trace of the crash and the device details on which the crash occurred. You can click on it to view the finer details about the crash.
Non-fatal crashes are error flows that are probably handled gracefully in your code, but you would still like to know about their occurrence. These don’t abruptly close your app. Rather, they prohibit the user from using certain features of your app (and this is why we call them non-fatal).
A few examples are server call failures and database failures. These situations may not occur during your general development cycle, but they can occur on certain devices under certain specific conditions in production.
You should record these crashes as well. React Native Crashlytics provides you with the recordError API to help record these errors.
crashlytics().recordError(error);
Here’s a small example:
const getUserDetailsFromBackend = () => {
   BackendAPIService.fetchUserDetails()
     .then(response => {
       setUserDetails(response);
     })
     .catch(error => {
       // This is the function you can use to record this error.
       crashlytics().recordError(error);
       setUserDetailFetchError(error)
     });
 };
This API records the stack trace and the information it captures during a fatal crash. You can view these in the Firebase console as well. By default, the console displays both fatal and non-fatal crashes, but you can filter it to show only the non-fatal crashes.
Although Crashlytics helps you record the stack traces of both fatal and non-fatal crashes, sometimes reading the stack trace may not help you uncover how things went wrong or what led to the crash.
Therefore, it’s always helpful to log messages throughout your app session that might help you reproduce the same crash once it has been caught by Crashlytics.
You can use the log API
const signInUser = (email: string, password: string) => {
   userSignIn({email, password})
     .then(response => {
       if (response.userSignInSuccessful) {
         // Keep logging the most important parts of the sessions so that
         // if a crash occurs post this log, you can be sure the
         // path your app took before it crashes
         crashlytics().log(`User has signed in`);
       } else {
         crashlytics().log(
           `User not present, proceeding with user creation process`,
         );
         proceedWithUserCreationProcess();
       }
     })
     .catch(error => {
       crashlytics().recordError(error);
     });
 };
Setting attributes is another way of providing you with more details about a session. Crashlytics tracks a few device details by itself, but you can use these APIs to track certain attributes that are specific to your application.
// store a single key value pair using the following method

crashlytics().setAttribute(‘attribute_name’, ‘attribute_value’);

// store an object of key value pairs using the following method

crashlytics().setAttributes(‘attribute_name’,{attribute_key: attribute_value});
You can only use string values whether you’re using the setAttribute method or the setAttributes method.
Another point to note is that you should ideally not log any PII (personally identifiable information) data that can identify individual users, as it is not a good practice to follow in any login setup that you have. It could cause security issues in the case that your data gets leaked.
Although many apps do not provide this configuration to the user, it’s always a good idea to let the user take control over whether they want to share information about crashes with you or not.
You can toggle this collection configuration using the following API:
crashlytics().setCrashlyticsCollectionEnabled(true) // or you can set it to false
In this article, you learned how to set up and use the React Native Firebase Crashlytics library. Crashlytics helps you identify crashes and track all the information you’d require in order to investigate them. Here are a few documentation links that you should definitely check out in order to learn more about it:

LogRocket is a React Native monitoring solution that helps you reproduce issues instantly, prioritize bugs, and understand performance in your React Native apps.
LogRocket also helps you increase conversion rates and product usage by showing you exactly how users are interacting with your app. LogRocket's product analytics features surface the reasons why users don't complete a particular flow or don't adopt a new feature.
Start proactively monitoring your React Native apps — try LogRocket for free.
Hey there, want to help make our blog better?
Join LogRocket’s Content Advisory Board. You’ll help inform the type of content we create and get access to exclusive meetups, social accreditation, and swag.
Sign up now
Get to know RxJS features, benefits, and more to help you understand what it is, how it works, and why you should use it.

Explore how to effectively break down a monolithic application into microservices using feature flags and Flagsmith.

Native dialog and popover elements have their own well-defined roles in modern-day frontend web development. Dialog elements are known to […]

LlamaIndex provides tools for ingesting, processing, and implementing complex query workflows that combine data access with LLM prompting.


One Reply to "Firebase Crashlytics: Identify bugs in React Native apps"
It would be useful to tell users where to find the most recent versions of the dependencies
com.google.gms:google-services
com.google.firebase:firebase-crashlytics-gradle