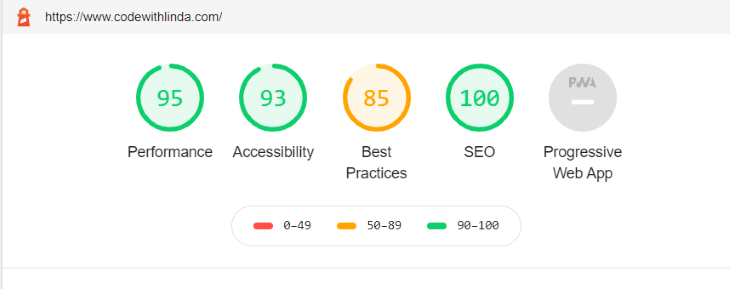
Building with Gatsby means that a lot of heavy lifting needed for setup is automatically taken care of for you, so you can focus on writing code for the UI. However, Gatsby doesn’t enable offline capability or what is commonly known as Progressive Web Apps (PWAs), right out of the box.

A PWA is any website that can be navigated, fully or partially, without an internet connection and can be installed on devices – just like a native app – right from the browser. There are three baseline criterias a site must meet to qualify as a PWA. In summary, it:
In this article, I’m going to detail how I converted my Gatsby powered website into a PWA and how you can do the same.

A manifest is a JSON file that instructs the browser to make your website installable and enables ‘Add to home screen’ functionality. It also describes how your site should behave when installed on a device. In a manifest file, you’ll define things like the name of the app, icons, and a base URL that should be navigated to when the app is launched from a device’s home screen.
As with almost everything, Gatsby provides a plugin to make this process easier.
To get started, install the plugin:
npm install gatsby-plugin-manifest
Then, add and configure the plugin in gatsby-config.js file:
plugins: [
    {
      resolve: `gatsby-plugin-manifest`,
      options: {
        name: `CodeWithLinda`,
        short_name: `CodeWithLinda`,
        start_url: `/`,
        background_color: `#212121`,
        theme_color: `#f39ca9`,
        display: `standalone`,
        icon: `src/images/icon.png`
      },
    },
  ],
Let me explain the config properties:
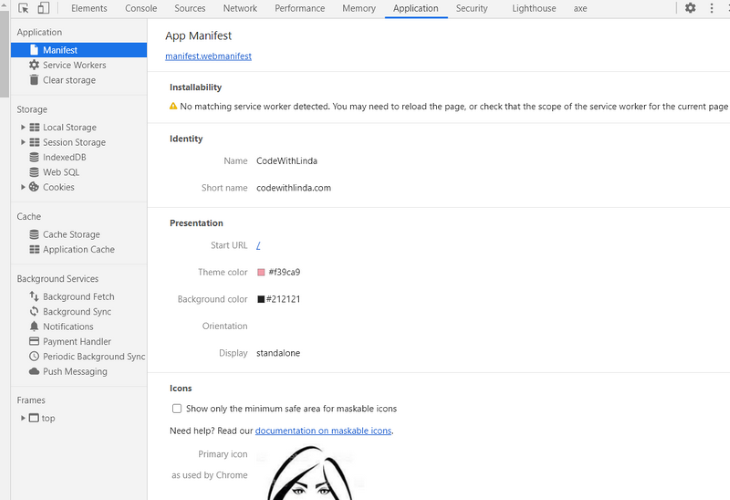
name – the name displayed when your site is installed as an app from the browsershort_name – the name displayed on the user’s home screen, launcher, or other places where space may be limitedstart_url – tells the browser which URL to navigate to when the app is launched from the device home screen. Think of it as your homepage URLbackground_color – the color used on the splash screen when the application is first launched on mobiletheme_color – the color of the browser’s toolbar when the app is launched from the home screendisplay – specifies how the browser UI is shown when the app is launched. Options include fullscreen, standalone, minimal-UI, and browsericon – an array of icons of different sizes for different device sizes. These icons are used on the home screen, app launcher, task switcher, splash screen, and so on. Gatsby provides a default 512×512 and it will auto-generate the other sizes for other screensTo test and verify that the manifest is set up correctly, you need to restart the dev server. To do that, kill the port with Ctrl/Cmd + C and then rerun gatsby develop. Use the manifest pane in the application panel of the Chrome dev tools to confirm:

As you can see, the manifest is being detected.
A service worker is simply a JavaScript file run by the browser, whose primary purpose is to cache the website’s resources using the browser’s cache storage and then intercept network requests to fetch those resources from the browser’s cache when a user requests them. This makes it possible for your site to be navigable even without an internet connection.
Just like the manifest plugin, Gatsby has a plugin for adding service workers, which uses Workbox Build to create a service worker for the site and then load the service worker into the client.
To get started. Install the plugin:
npm install gatsby-plugin-offline
Then, add and configure the plugin in your gatsby config.js file:
plugins: [
{
  resolve: `gatsby-plugin-offline`,
  options: {
    precachePages: [`/`, `/blog/*`],
  },
},
]
precachePages lets you specify an array of pages whose resources should be precached by the service worker. In the code sample above, I’m precaching the home page and all pages whose URL starts with /blog/. This includes the blog page and all individual blog posts.
For most use cases, that’s all the config you need.
Make sure to configure gatsby-plugin-offline after gatsby-plugin-manfest in your gastby-config.js file. This ensures that the offline plugin is able to cache the created manifest file too.
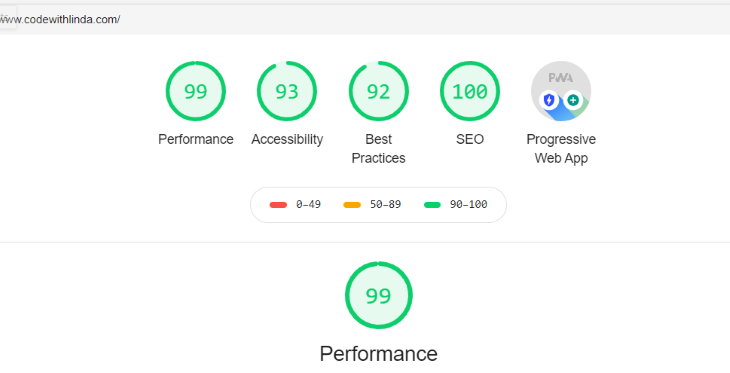
You can’t test service workers in development mode. To test, build, and serve your website by running gatsby build and gatsby serve.

As you can see, converting the website to a PWA not only improved the performance metrics but also the best-practices metrics.
There’s a caveat, service workers can become a scary delight. As much as it aims to improve UX, if not handled properly, it can become a source of bad UX because of its update problem.
In Gatsby, when you make a change to a project and deploy, new files with unique filenames are generated. This causes the service worker file to update. But, the browser only looks for updates to the service worker file in three scenarios, a user reloads a page, a user navigates to another page or periodically on every visit that happens at least 24 hours after the last update. Following the service worker lifecycle, if the browser finds an updated service worker during any of these activities, it starts installing it. Once successfully installed, the updated service worker will not be activated immediately, but will wait until all other tabs that are controlled by the current service worker are closed.
This means that if our visitors forget about already opened tabs of our website or don’t occasionally close and reopen your website, the service worker may never be updated and users will be stuck in the old version of the website. As a solution, the gatsby-plugin-offline workbox configuration sets the service worker’s skipWaiting to true. This makes sure that the new service worker will be activated as soon as it’s done installing without staying in the waiting period. This way users will be served the latest update to our site as soon as possible.
The only problem now is that as soon as the new service worker is activated, Gatsby will initiate a full site reload on route change. If a user was performing an action on the site – like maybe filling a form, they will likely have to start over. This is bad UX.
We can improve our service worker update flow by deferring skipWaiting and then show an update button or banner which the user can click on to initiate the reload and update the site to the latest changes at their own convenience. Jakub Ziebikiewicz has written a pretty easy-to-follow guide on how to do this using his service-worker-updater npm package. There are also other deferment strategies which you can read about here.
Also, if for any reason, you do not want to use the gatsby-offline-plugin, you can write your own custom service worker by adding an sw.js to the static folder and then registering the service worker in your gatsby-browser.js file:
//in gatsby-browser.js

export const registerServiceWorker = () => true
During development, you’ll have access to and be able to test service workers on localhost, but for it to be accessible to visitors, you must serve your site via HTTPS and not HTTP. This is because service workers have the ability to intercept network requests and change responses, thereby making the communication channel vulnerable to a “man-in-the-middle” attack. Serving service workers over HTTPS ensures that the communication channel is secure and that it won’t be tampered with during its journey through the network.
If you’re hosting your site on GitHub pages or Netlify, then HTTPS is enabled by default. Else, depending on your hosting provider, you can either use the free Let’s Encrypt SSL certificates if your hosting provider supports it or buy an SSL certificate and configure it with your hosting provider. You’ll find everything you need to know with a Google search.
Adding offline capability to a website isn’t a necessity but it could improve your site’s performance and also upgrade your visitor’s experience so they can still have access to all or some parts of your website when using devices with low bandwidths like mobile phones or in a place with no reception like an underground tunnel, an elevator, or an airplane.
Concerning service workers, if you make use of any custom update flow, I’d love to hear about it in the comments. Until then, keep building great things!
Install LogRocket via npm or script tag. LogRocket.init() must be called client-side, not
server-side
$ npm i --save logrocket

// Code:

import LogRocket from 'logrocket';
LogRocket.init('app/id');
// Add to your HTML:

<script src="https://cdn.lr-ingest.com/LogRocket.min.js"></script>
<script>window.LogRocket && window.LogRocket.init('app/id');</script>
Hey there, want to help make our blog better?
Join LogRocket’s Content Advisory Board. You’ll help inform the type of content we create and get access to exclusive meetups, social accreditation, and swag.
Sign up now
This guide walks you through creating a web UI for an AI agent that browses, clicks, and extracts info from websites powered by Stagehand and Gemini.

This guide explores how to use Anthropic’s Claude 4 models, including Opus 4 and Sonnet 4, to build AI-powered applications.

Which AI frontend dev tool reigns supreme in July 2025? Check out our power rankings and use our interactive comparison tool to find out.

Learn how OpenAPI can automate API client generation to save time, reduce bugs, and streamline how your frontend app talks to backend APIs.