Data persistence is an important feature that all apps should have in order to save important data, such as the most recent feeds for fast loading, user preferences, and server-critical information. It is critical to properly manage local data in order to avoid losing data and providing an inconsistent experience.
In this article, we’ll learn how to use Realm as the data persistence engine with SwiftUI to manage your data in iOS apps in a simple way.
We will create to-do apps with the following features:
Please note that this tutorial is using Xcode 12, Swift v5, and iOS 14.
Let’s take a look at the main reasons you’ll benefit from using Realm before we begin our development.
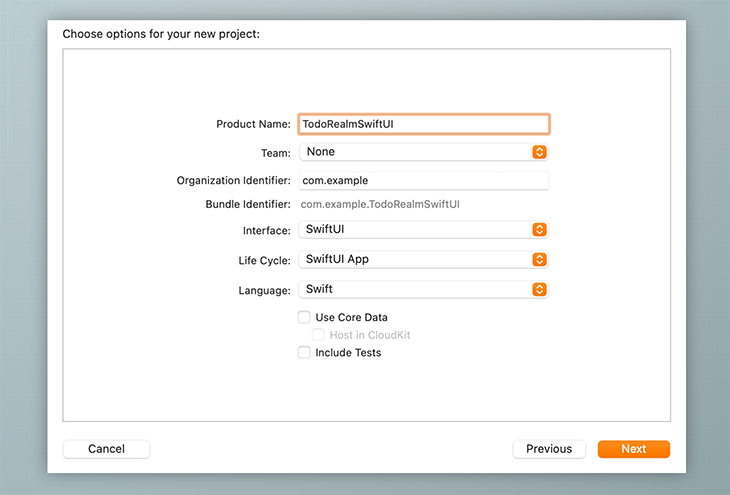
Open Xcode and create a new SwiftUI project.
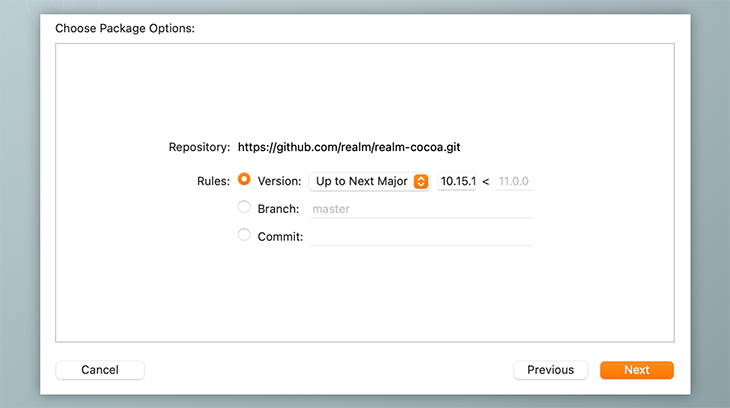
In the Xcode menu, go to File > Swift Packages > Add Package Dependency, and enter the Realm repository URL as shown below.
https://github.com/realm/realm-cocoa
Click Next, and it will redirect to this screen. The latest version of this package is v10.15.1.
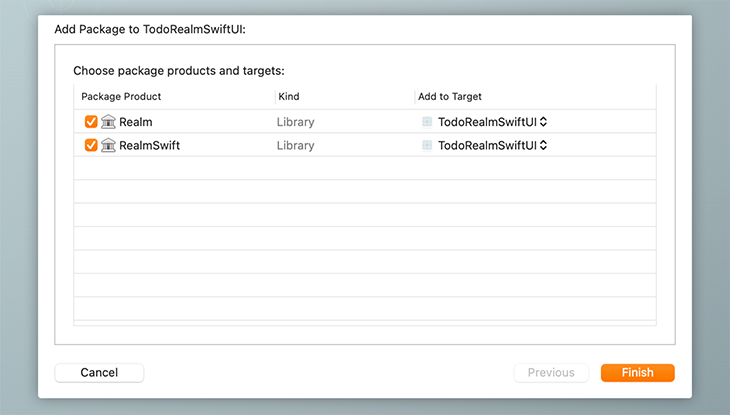
In this screen, check both Realm and RealmSwift packages.
Let’s create a to-do model called Task with the Identifiable protocol.
struct Task: Identifiable {
    var id: String
    var title: String
    var completed: Bool = false
    var completedAt: Date = Date()
}
In this section, we will create a list view and the reusable item view.
Add a new SwiftUI View file called TaskRowView and update it with the below code.
struct TaskRowView: View {
    // 1
    let task: Task
    var body: some View {
        // 2
        HStack(spacing: 8) {
            Button(action: {
                // mark complete action
            }) {
                Image(systemName: task.completed ? "checkmark.circle.fill" : "circle")
                    .resizable()
                    .frame(width: 20, height: 20)
                    .foregroundColor(task.completed ? Color.green : Color.gray)
            }
            Text(task.title)
                .foregroundColor(.black)
            Spacer()
        }
        .padding(EdgeInsets(top: 16, leading: 20, bottom: 16, trailing: 20))
    }
}
Below is the details of the code written above:
task is a view dependency data that is required during view initialization.Button to mark the task completion status and a Text for the task title, which are managed in the horizontal stack.In this project, I’ll use LazyVStack with ScrollView. LazyVStack is only available for iOS v14 and above, but is known as one of the great SwiftUI components for listing items.
Initially, we will use sample to-do data before we integrate with Realm.
Create a new file called TaskListView to show the list of to-dos.
struct TaskListView: View {
    // 1
    private var mockTasks = [
        Task(id: "001", title: "Eat Burger"),
        Task(id: "002", title: "Go Swimming with Fred"),
        Task(id: "003", title: "Make a Coffee"),
        Task(id: "004", title: "Travel to Europe"),
    ]
    var body: some View {
        ScrollView {
            LazyVStack (alignment: .leading) {
                // 2
                ForEach(mockTasks, id: \.id) { task in
                    // 3
                    TaskRowView(task: task)
                    Divider().padding(.leading, 20)
                }
                .animation(.default)
            }
        }
    }
}
Here’s the details on what we have written above:
TaskRowView is called in the ForEach closure to display each of the mockTasks itemstask object into TaskRowView.ContentViewOnce we have finished creating these two task-related views, we need to update the main ContentView file to include the NavigationView and the newly created TaskListView. The code below will also add a navigation title.
struct ContentView: View {
    var body: some View {
        NavigationView {
            TaskListView()
            .navigationTitle("Todo")
            .navigationBarTitleDisplayMode(.automatic)
        }
    }
}
Now, if we try run the project, it will show a similar output to the below.
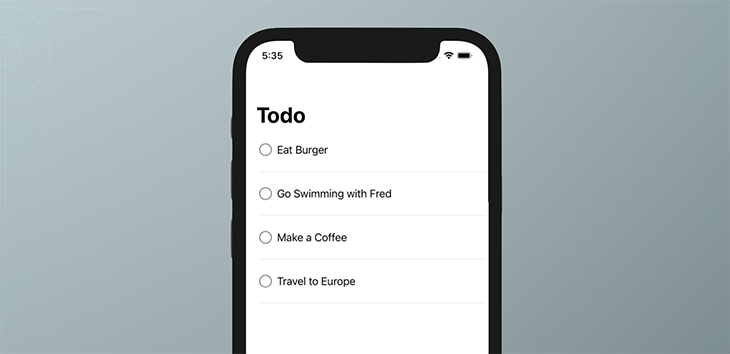
Great, we have created a view for the main to-do list. Now, let’s add a simple form in the list to enable us to add more tasks dynamically.
AddTaskViewCreate a new view file called AddTaskView and update it with below code.
struct AddTaskView: View {
    // 1
    @State private var taskTitle: String = ""
    var body: some View {
        HStack(spacing: 12) {
            // 2
            TextField("Enter New Task..", text: $taskTitle)
            // 3
            Button(action: handleSubmit) {
                Image(systemName: "plus")
            }
        }
        .padding(20)
    }

    private func handleSubmit() {
        // some action
    }
}
Below is an explanation of each important point added in this view:
taskTitle with the @State property wrapper is used to receive an update on every change that is made.TextField view to enable the user to add new text and bind it with the taskTitle variable using $ sign.handleSubmit is then added to the Button view as the action handler function, which we will integrate with the data insertion process in the next section.After creating the form, we need to update the ContentView. Add a VStack inside the ContentView and include both the AddTaskView and TaskListView.
struct ContentView: View {
    var body: some View {
        NavigationView {
            VStack {
                AddTaskView()
                TaskListView()
            }
            .navigationTitle("Todo")
            .navigationBarTitleDisplayMode(.automatic)
        }
    }
}
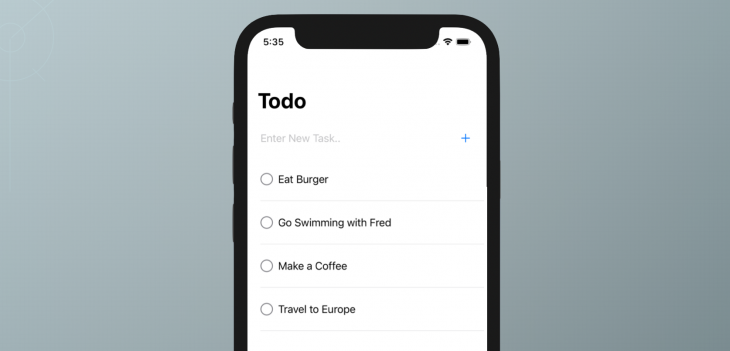
If we run the project again, the output will show the newly added form above the list.
A Realm model is a regular Swift class that subclasses Realm Object protocol and conforms the objects created to the Realm database schema. The Realm object will be automatically saved as a table in the Realm database with all the defined properties. It also has additional features such as live queries, a reactive events handler, and real-time data updates.
These are the supported Swift data types that can be used in the Realm model:
StringDataIntDoubleFloatBoolDateTaskObject Realm modelFirst, we will create another Realm model called TaskObject.
Now, we have two models, Task and TaskObject. The Realm TaskObject only communicates with the Realm object protocol and the database, while the Task class takes the data from the Realm object and communicates with Swift views. You can then make changes to the data via the Task class so that it can be used in other areas of the app. The Task model is used to display data that will have features such as formatting, encoding, and decoding in the future, while the TaskObject is created specifically for the Realm data model.
Create a new file called TaskObject that inherits the Realm Object class. Take note that each of the properties in the Realm model should be used with @Persisted wrapper to mark each property as part of the Realm model that will be handled accordingly during read and write operations.
import Foundation
import RealmSwift

class TaskObject: Object {
    @Persisted(primaryKey: true) var id: ObjectId
    @Persisted var title: String
    @Persisted var completed: Bool = false
    @Persisted var completedAt: Date = Date()
}
Then, update the Task model with the custom init(taskObject:) function to enable quick data mapping with the Realm object.
struct Task: Identifiable {
    var id: String
    var title: String
    var completed: Bool = false
    var completedAt: Date = Date()

    init(taskObject: taskObject) {
        self.id = taskObject.id.stringValue
        self.title = taskObject.title
        self.completed = taskObject.completed
        self.completedAt = taskObject.completedAt
    }
}
View model to enable communication between our newly created views and the Realm database. Initially, we will focus on how to insert new tasks and get the list of all tasks.
Create a new file called TaskViewModel and add the below code.
// 1
import Foundation
import Combine
import RealmSwift

// 2
final class TaskViewModel: ObservableObject {
    // 3
    @Published var tasks: [Task] = []
    // 4
    private var token: NotificationToken?

    init() {
        setupObserver()
    }

    deinit {
        token?.invalidate()
    }
    // 5
    private func setupObserver() {
        do {
            let realm = try Realm()
            let results = realm.objects(TaskObject.self)

            token = results.observe({ [weak self] changes in
                // 6
                self?.tasks = results.map(Task.init)
                    .sorted(by: { $0.completedAt > $1.completedAt })
                    .sorted(by: { !$0.completed && $1.completed })
            })
        } catch let error {
            print(error.localizedDescription)
        }
    }
    // 7
    func addTask(title: String) {
        let taskObject = TaskObject(value: [
            "title": title,
            "completed": false
        ])
        do {
            let realm = try Realm()
            try realm.write {
                realm.add(taskObject)
            }
        } catch let error {
            print(error.localizedDescription)
        }
    }
    // 8
    func markComplete(id: String, completed: Bool) {
        do {
            let realm = try Realm()
            let objectId = try ObjectId(string: id)
            let task = realm.object(ofType: TaskObject.self, forPrimaryKey: objectId)
            try realm.write {
                task?.completed = completed
                task?.completedAt = Date()
            }
        } catch let error {
            print(error.localizedDescription)
        }
    }
}
Below is the explanation of each important point added in the code above:
Combine and RealmSwift. Combine is a powerful Swift API that manages asynchronous events, and is part of the native iOS framework, so we can just import them into our project without any installation required. RealmSwift is also required in order to use its functions in accessing the Realm database.ObservableObject protocol, which will emit important changes to the views.tasks is using the @Published wrapper to enable the subscriber’s views to receive updates when its value updated.token is a Realm NotificationToken that holds the observer object.setupObserver() is mainly to setup an observer to watch any changes on the TaskObject list, such as the add, update, and delete operations.tasks variable, it will inform all of the subscriber views. The results will be sorted by the incomplete tasks first, then the completed tasks.addTask() that allows us to create new object to be stored in the Realm database.markComplete() to change the completed status of the TaskObject by the given primary key (task ID).After completing the model, we need to update the TaskListView and AddTaskView.
In the ForEach parameter, we’ll now pass tasks as the dynamic data fetched from the Realm database. We don’t have to write extra functions to keep the data up-to-date because the view will automatically reload itself once it receives update from the view model.
struct TaskListView: View {
    @EnvironmentObject private var viewModel: TaskViewModel
    var body: some View {
        ScrollView {
            LazyVStack (alignment: .leading) {
                ForEach(viewModel.tasks, id: \.id) { task in
                    TaskRowView(task: task)
                    Divider().padding(.leading, 20)
                }
                .animation(.default)
            }
        }
    }
}
In this section, we are completing the handleSubmit function by calling the view model addTask function.
struct AddTaskView: View {
    @State private var taskTitle: String = ""
    @EnvironmentObject private var viewModel: TaskViewModel

    var body: some View {
        HStack(spacing: 12) {
            TextField("Enter New Task..", text: $taskTitle)
            Button(action: handleSubmit) {
                Image(systemName: "plus")
            }
        }
        .padding(20)
    }

    private func handleSubmit() {
        viewModel.addTask(title: taskTitle)
        taskTitle = ""
    }
}
@EnvironmentObject wrapperThe environment object is a powerful feature in SwiftUI that automatically keeps the changes on a single shared object among multiple views.
As we can see in both the TaskListView and AddTaskView views, we need to use the @EnvironmentObject wrapper in order to observe any changes that may occur in the TaskViewModel.
To make the environment object available for use in a view, we need to pass the object using environmentObject(). In this case, we need to update the App file in TodoRealmSwiftUIApp.
@main
struct TodoRealmSwiftUIApp: App {
    var body: some Scene {
        WindowGroup {
            ContentView().environmentObject(TaskViewModel())
        }
    }
}
Let’s update the button action with to enable updating task completion status. There are two important changes to this view.
viewModel with @EnvironmentObject wrapperButton closure, call viewModel’s markComplete method to update the task statusstruct TaskRowView: View {
let task: Task
// 1
@EnvironmentObject private var viewModel: TaskViewModel
var body: some View {
HStack(spacing: 12) {
Button(action: {
// 2
viewModel.markComplete(id: task.id, completed: !task.completed)
}) {
Image(systemName: task.completed ? "checkmark.circle.fill" : "circle")
.resizable()
.frame(width: 20, height: 20)
.foregroundColor(task.completed ? Color.green : Color.gray)
}
VStack(alignment: .leading, spacing: 8) {
Text(task.title)
.foregroundColor(.black)
if !task.formattedDate.isEmpty {
Text(task.formattedDate)
.foregroundColor(.gray)
.font(.caption)
}
}
Spacer()
}
.padding(EdgeInsets(top: 16, leading: 20, bottom: 16, trailing: 20))
}
}
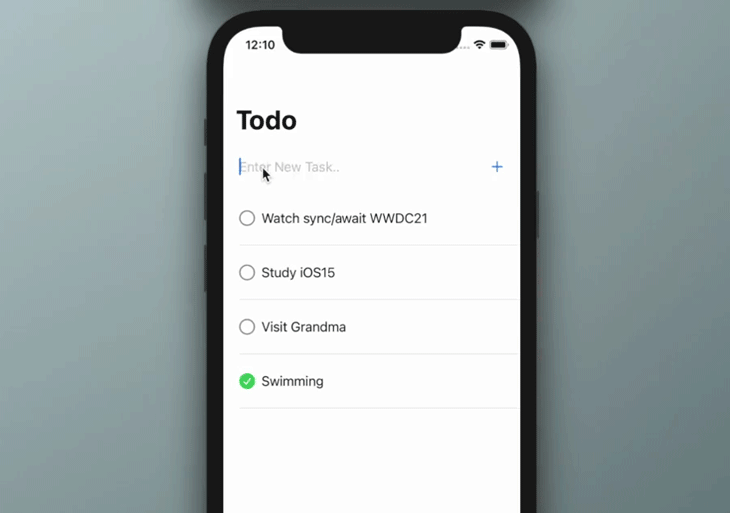
Awesome, now the main list is completely integrated with the Realm database. Let’s run the project, try adding some tasks, and marking a few of them as complete or incomplete.
In this section, we will add one more view to show the details of each task in our list. We also will be adding edit and delete functions to this new view.
Create a new file called TaskView and update it with the following code.
import SwiftUI

struct TaskView: View {
    // 1
    @EnvironmentObject private var viewModel: TaskViewModel
    // 2
    @Environment(\.presentationMode) var presentationMode: Binding<PresentationMode>
    @State private var taskTitle: String = ""
    // 3
    let task: Task

    var body: some View {
        VStack(alignment: .leading, spacing: 24) {
            // 4
            VStack(alignment: .leading, spacing: 4) {
                Text("Title")
                    .foregroundColor(Color.gray)
                TextField("Enter title..", text: $taskTitle)
                    .font(.largeTitle)
                Divider()
            }
            // 5
            Button(action: deleteAction) {
                HStack {
                    Image(systemName: "trash.fill")
                    Text("Delete")
                }
                .foregroundColor(Color.red)
            }
            Spacer()
        }
        .navigationBarTitle("Edit Todo", displayMode: .inline)
        .padding(24)
        .onAppear(perform: {
            taskTitle = task.title
        })
        // 6
        .onDisappear(perform: updateTask)
    }

    private func updateTask() {
        viewModel.updateTitle(id: task.id, newTitle: taskTitle)
    }

    private func deleteAction() {
        viewModel.remove(id: task.id)
        presentationMode.wrappedValue.dismiss()
    }
}
The following is the details explanation of each important point added in the code above:
TaskViewModel as an EnvironmentObject variable to enable access to the shared view model.presentationMode to dismiss the view programmatically.task is added as a dependency model during initializationT``extField is included to enable us to edit the task’s title.updateTask is called to save the data once the user leaves the view.Next, update the TaskViewModel with delete and update functions.
func remove(id: String) {
    do {
        let realm = try Realm()
        let objectId = try ObjectId(string: id)
        if let task = realm.object(ofType: TaskObject.self, forPrimaryKey: objectId) {
            try realm.write {
                realm.delete(task)
            }
        }
    } catch let error {
        print(error.localizedDescription)
    }
}

func updateTitle(id: String, newTitle: String) {
    do {
        let realm = try Realm()
        let objectId = try ObjectId(string: id)
        let task = realm.object(ofType: TaskObject.self, forPrimaryKey: objectId)
        try realm.write {
            task?.title = newTitle
        }
    } catch let error {
        print(error.localizedDescription)
    }
}
TaskListView itemFinally, update the item view in TaskListView with NavigationLink, so that whenever the user taps the row, it will navigate to the detail view.
NavigationLink (destination: TaskView(task: task)) {
    TaskRowView(task: task)
}
Great. We have successfully implemented all of the CRUD operations.
Migration becomes very important when we want to modify the database schema in any of the following ways:
In the following example, we are going to add a new task field called Due Date. We will need to make small update changes to our views and models.
Add a new field called dueDate with an optional Date type to both the TaskObject and Task model.
TaskObject model
We’ll create a new TaskObject model, same as we did above.
class TaskObject: Object {
    @Persisted(primaryKey: true) var id: ObjectId
    @Persisted var title: String
    @Persisted var completed: Bool = false
    @Persisted var completedAt: Date = Date()
    // New property
    @Persisted var dueDate: Date? = nil
}
Task model
In the updated code below, we’ll add a new property (dueDate), the computed variable for formatting the date, and update the init function.
struct Task: Identifiable {
    var id: String
    var title: String
    var completed: Bool = false
    var completedAt: Date = Date()
    // New property
    var dueDate: Date? = nil

    init(taskObject: TaskObject) {
        self.id = taskObject.id.stringValue
        self.title = taskObject.title
        self.completed = taskObject.completed
        self.completedAt = taskObject.completedAt
        // Also map the new property
        self.dueDate = taskObject.dueDate
    }

    var formattedDate: String {
        if let date = dueDate {
            let format = "MMM d, y"
            let dateFormatter = DateFormatter()
            dateFormatter.dateFormat = format
            return "Due at " + dateFormatter.string(from: date)
        }
        return ""
    }
}
Then, update the view model to store the due date value in update() function.
func update(id: String, newTitle: String, dueDate: Date?) {
        do {
            let realm = try Realm()
            let objectId = try ObjectId(string: id)
            let task = realm.object(ofType: TaskObject.self, forPrimaryKey: objectId)
            try realm.write {
                task?.title = newTitle
                // Update due date value (Optional value)
                task?.dueDate = dueDate
            }
        } catch let error {
            print(error.localizedDescription)
        }
    }
As a reminder, migration is required every time a user adds or updates a new property. Let’s try running the project before migration to see the error output in the Xcode log, which will be caught from the exception handler.
Migration is required due to the following errors:
- Property 'TaskObject.dueDate' has been added.
The default schema version is 1, so we have to change the schema to 2 in the configuration.
Add or update your AppDelegate file with this code. In the configMigration function, we have specified the schema version to 2.
import UIKit
import RealmSwift

class AppDelegate: NSObject, UIApplicationDelegate {
    func application(_ application: UIApplication, didFinishLaunchingWithOptions launchOptions: [UIApplication.LaunchOptionsKey : Any]? = nil) -> Bool {
        configMigration()
        return true
    }

    private func configMigration() {
        // perform migration if necessary
        let config = Realm.Configuration(
            schemaVersion: 2,
            migrationBlock: { migration, oldSchemaVersion in
                // additional process such as rename, combine fields and link to other object
            })
        Realm.Configuration.defaultConfiguration = config
    }
}
Also make sure to include the AppDelegate adaptor.
import SwiftUI

@main
struct TodoRealmSwiftUIApp: App {
    @UIApplicationDelegateAdaptor(AppDelegate.self) var appDelegate
    ...
}
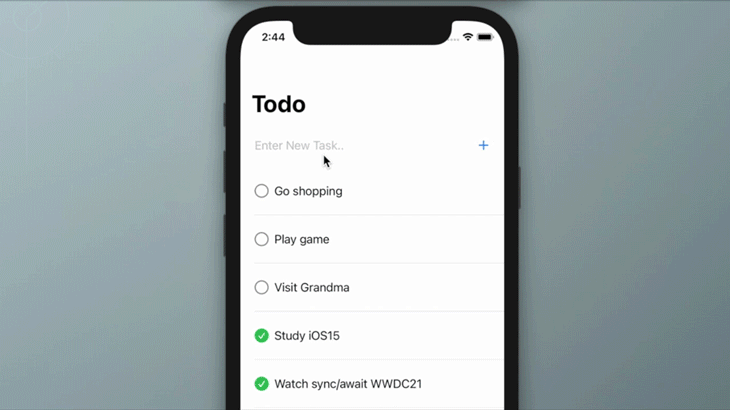
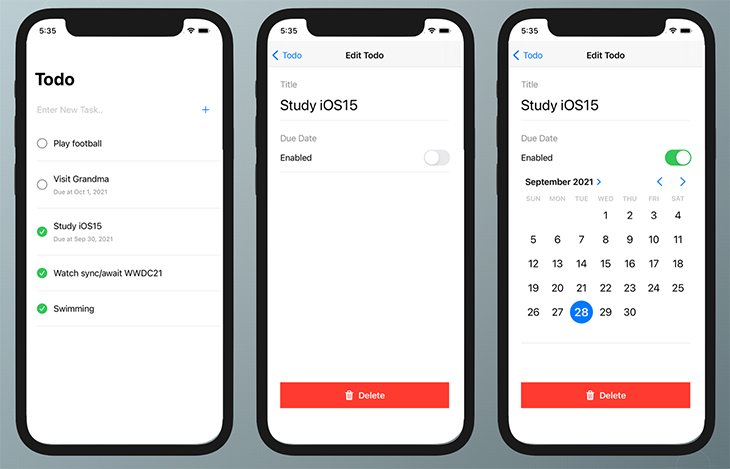
Now, everything should work properly. Run the project and the results will be similar to the below screenshots.
Congratulations! We have completed building a to-do app using Realm and SwiftUI. The entire source code is available for download from my GitHub repository. You may want to try implementing Realm into your future Swift projects.
Thanks for reading and happy coding!
Install LogRocket via npm or script tag. LogRocket.init() must be called client-side, not
server-side
$ npm i --save logrocket

// Code:

import LogRocket from 'logrocket';
LogRocket.init('app/id');
// Add to your HTML:

<script src="https://cdn.lr-ingest.com/LogRocket.min.js"></script>
<script>window.LogRocket && window.LogRocket.init('app/id');</script>

Debug RSC hydration mismatches in production with Next.js instrumentation, Suspense isolation, HTML diffing, and CI smoke tests.

Explore why npm dependencies are a major supply chain security risk and how to protect JavaScript apps from compromised packages and transitive threats.

Enabled React Compiler v1.0 on a production Next.js app. Here’s every warning, breakage, and silent opt-out I documented — and what actually worked.

We built the same app in TanStack Start RSC and Next.js RSC. TanStack shipped 40% less JS and built 4x faster — but Next.js is still the safer production bet.
Hey there, want to help make our blog better?
Join LogRocket’s Content Advisory Board. You’ll help inform the type of content we create and get access to exclusive meetups, social accreditation, and swag.
Sign up now

