This article covers what Bree.js is and how you can get started by building a practical application.

Bree.js is a job scheduler for Node.js applications. Job scheduling is the process of executing a piece of code in a scheduled, repetitive manner.
There are other job schedulers available in the Node.js community. However, there are some good reasons why we should probably go with Bree.js over the alternatives.
The Replay is a weekly newsletter for dev and engineering leaders.
Delivered once a week, it's your curated guide to the most important conversations around frontend dev, emerging AI tools, and the state of modern software.
Bree.js uses worker threads under the hood. Since worker threads are available in the Node.js LTS version, it’s better to go with threads for background jobs rather than using main threads.
Bree.js helps you run the jobs concurrently and with a retries option. Sometimes, you need to retry a specific operation inside the job. You can achieve that using libraries like this, among others.
Let’s install Bree.js and see how to get started with a simple scheduled job in Node.js:
npm install bree
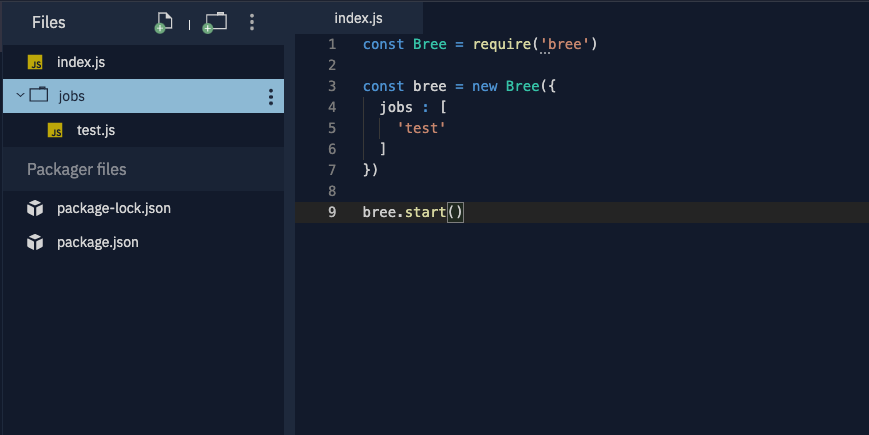
After that, let’s create a folder called jobs in the root directory, which contains all the background jobs:

BreeJS
Run code live in your browser. Write and run code in 50+ languages online with Replit, a powerful IDE, compiler, & interpreter.
bree.start() will start the scheduler and run all the jobs that are configured. Here, we have a jobs array, which contains all the background jobs. The name should match the file name declared in the jobs directory.
For example, here we have a job test. So, the jobs directory should contain a file called test.js to run this job. We can write our logic inside test.js, which runs with the background job.
Once we run our script, we can run our job and execute the logic inside our job script file.

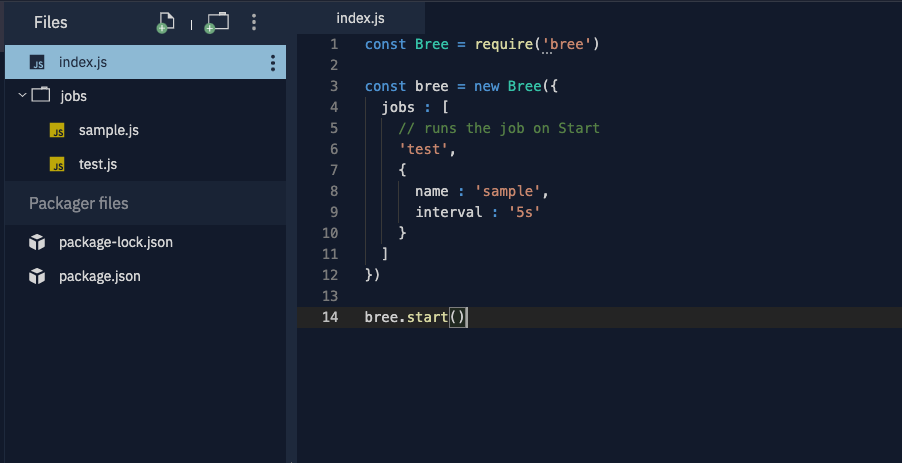
So far, we have seen how to run a job on script start. Now, let’s see how to schedule a job using Bree.js. Scheduling a job is simple. You just need to pass an additional parameter to a jobs array element:

Here, we have a parameter interval, which runs the script every 5 seconds.
const Bree = require('bree')
const bree = new Bree({
  jobs : [
    // runs the job on Start
    'test',
    {
      name : 'sample',
      interval : '5s'
    }
  ]
})
bree.start()
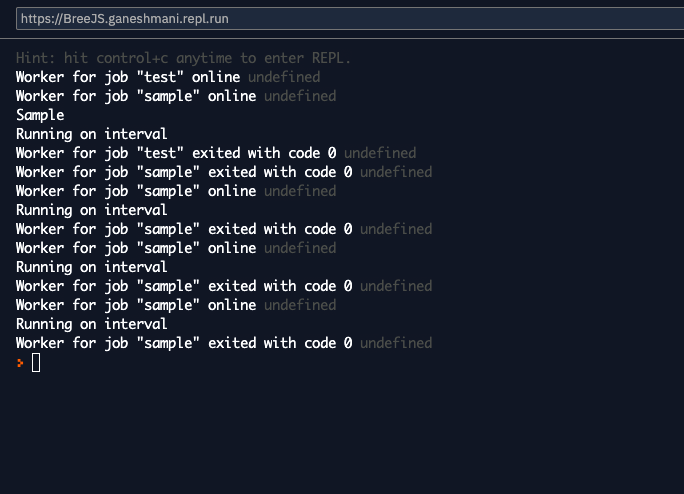
Our output will look like this:

There are other options you can use to schedule the job, including the following:
Timeout runs the script after a specified time in the jobs configuration. You can use this as an alternative to setTimeout in JavaScript.
const Bree = require('bree')
const bree = new Bree({
  jobs : [
    // runs the job on Start
    'test',
    {
      name : 'sample',
      timeout : '30s' //run the script after 30 seconds from the start
    }
  ]
})
bree.start()
Cron is simply for running a cron job in Node.js. We need to specify the cron along with the job. Use cases for cron jobs include backing up your database and running scripts according to a specified hour, day, month, or year.
const Bree = require('bree')
const bree = new Bree({
  jobs : [
    // runs the job on Start
    'test',
    {
      name : 'sample',
      cron : '* * * * *'
      // timeout : '30s' //run the script after 30 seconds from the start
    }
  ]
})
bree.start()
So far, we have seen how to schedule a job. Now, we will see how to pass a value to our jobs from the main file.
Since Bree.js uses a worker thread, you can use the same concept for passing data to a worker thread. All you need to do is pass the data in workerData, and it will be available in the respective job file:
const Bree = require('bree')
const bree = new Bree({
  jobs : [
    // runs the job on Start
    // 'test',
    {
      name : 'sample',
      worker: {
        workerData: {
          foo: 'bar',
          beep: 'boop'
        }
      }
      // cron : '* * * * *'
      // timeout : '30s' //run the script after 30 seconds from the start
    }
  ]
})
bree.start()
const { Worker, isMainThread, workerData } = require('worker_threads');
console.log("worker data",workerData.foo)
We have now begun to scratch the surface of Bree.js.
The above details are already available in the documentation for Breejs. I don’t want to run through the documentation again in this article, since it is already well documented.
Instead, we are going to build a small application that uses Bree.js along. In this way, we will learn how to use Bree.js in a practical application.
Here, we are going to build a Twitter scheduler application. It allows the user to schedule a Tweet at a specified time. Let’s see how to build this application using Bree.js:
Let’s install the required dependancies for this application:
npm install express bree body-parser cabin ejs twit passport passport-twitter
Next, create app.js in the root directory and add the following code:
const express = require("express");
const bodyParser = require("body-parser");
const expressLayouts = require("express-ejs-layouts");
const passport = require("passport");
const session = require("express-session");
const mongoose = require("mongoose");
const app = express();
const routes = require("./routes");
const dotenv = require("dotenv");
const Bree = require("bree");
const Cabin = require("cabin");
dotenv.config({});

const MONGO_USER = process.env.MONGODB_USER;
const MONGO_PASSWORD = process.env.MONGODB_PASSWORD;

// MONGODB Connection
mongoose
  .connect(
    <url>,
    { useNewUrlParser: true, useCreateIndex: true, useUnifiedTopology: true }
  )
  .then((res) => {
    console.log("mongodb connected successfully");
    app.use(bodyParser.json());
    app.use(bodyParser.urlencoded({ extended: false }));

    // Template Engine
    app.use(expressLayouts);
    app.set("view engine", "ejs");

    //Passport Configuration
    require("./config/passport")(passport);

    // Express Session for the application
    app.use(
      session({
        secret: "abcdefg",
        resave: true,
        saveUninitialized: false,
      })
    );

    // passport initialization
    app.use(passport.initialize());
    app.use(passport.session());

    // breejs configuration.
    const bree = new Bree({
      //   logger: new Cabin(),
      jobs: [{ name: "tweet-schedule", interval: "1m" }],
    });
    bree.start();

    //routes
    app.use("/", routes);

    //PORT for our application.
    const PORT = process.env.PORT || 4500;
    app.listen(PORT, () => {
      console.log(`Server is running on PORT ${PORT}`);
    });
  })
  .catch((err) => {
    console.log("Error in mongodb connection", err);
  });
We have a MongoDB connection functionality, which connects through the MongoDB URI:
mongoose
  .connect(
    <url>,
    { useNewUrlParser: true, useCreateIndex: true, useUnifiedTopology: true }
  ){
     //logic comes here
   }
After that, we have to implement the body parser for the POST request and our setup for the template engine, which is ejs:
app.use(bodyParser.json());
app.use(bodyParser.urlencoded({ extended: false }));
app.use(expressLayouts);
app.set("view engine", "ejs");
After that, we can set up the express session and passport initialization:
app.use(
      session({
        secret: "abcdefg",
        resave: true,
        saveUninitialized: false,
      })
);
app.use(passport.initialize());
app.use(passport.session());
Finally, we’ll set up Bree.js with a jobs configuration to fulfill Tweet-scheduling functionality.
const bree = new Bree({
      //   logger: new Cabin(),
      jobs: [{ name: "tweet-schedule", interval: "1m" }],
    });
    bree.start();
Let’s write the logic for our scheduler job functionality.
Create a file, tweet-scheduler.js, inside the jobs directory. Now, add the following code:
const { parentPort } = require("worker_threads");
const Cabin = require("cabin");
const { Signale } = require("signale");
const Jobs = require("../models/Jobs");
const User = require("../models/User");
const mongoose = require("mongoose");
const moment = require("moment-timezone");
const tweetUtils = require("../lib/tweetUtils");
const cabin = new Cabin({
  axe: {
    logger: new Signale(),
  },
});
let isCancelled = false;
if (parentPort) {
  parentPort.once("message", (message) => {
    if (message === "cancel") isCancelled = true;
  });
}
(async () => {
  await mongoose.connect(
    <URL>,
    { useNewUrlParser: true, useCreateIndex: true, useUnifiedTopology: true }
  );
  const tweetJobs = await Jobs.find({ isActive: true }).exec();
  await Promise.all(
    tweetJobs.map(async (tweet) => {
      return new Promise(async (resolve, reject) => {
        try {
          if (isCancelled) return;
          const user = await User.findById({ _id: tweet.userId }).exec();
          if (
            moment().tz(tweet.timezone).format("YYYY-MM-DD HH:mm") <
            moment(tweet.scheduledTime, "YYYY-MM-DD HH:mm").format(
              "YYYY-MM-DD HH:mm"
            )
          ) {
            console.log("It it not time yet to post tweet");
            // return;
            resolve();
          } else {
            console.log("==================");
            try {
              await tweetUtils({
                accessToken: user.twitter.accessToken,
                accessSecret: user.twitter.refreshToken,
                tweet: tweet.body,
              });
              await Jobs.findOneAndUpdate(
                { _id: tweet._id },
                { isActive: false }
              );
            } catch (e) {
              cabin.error(e);
            }
            resolve();
          }
        } catch (e) {
          reject(e);
        }
      });
    })
  );
  if (parentPort) parentPort.postMessage("done");
  else process.exit(0);
})();
// cabin.info("tweet schedule jobb");
// console.log("==============================================");
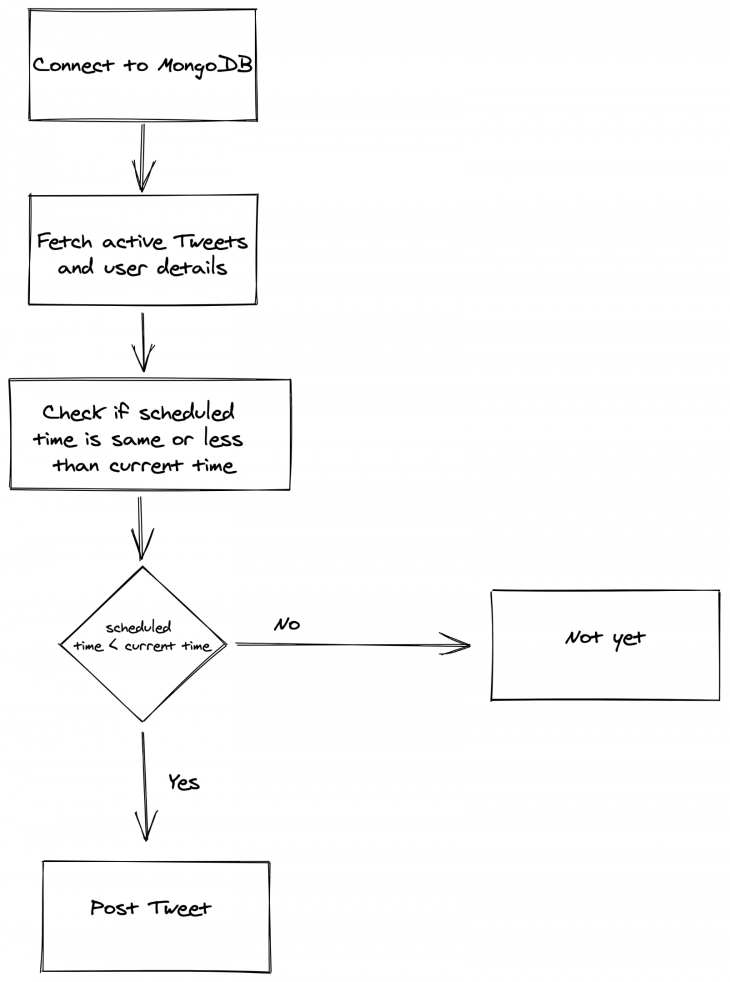
I know it might be overwhelming at first glance. Let’s break it down step by step to gain a better understanding of what’s happening.
First, we have the Cabin.js logger set up. Then, we check to see if the parent port of our worker thread sends any messages. If the parentPort of the worker thread sends a message of the type cancel, then we set isCancelled to true.
const cabin = new Cabin({
  axe: {
    logger: new Signale(),
  },
});
let isCancelled = false;
if (parentPort) {
  parentPort.once("message", (message) => {
    if (message === "cancel") isCancelled = true;
  });
}
Here’s the logic for our application:

We need to check if we can do few things in the background jobs. They include:
To access data from the database, we need to connect with the database separately in our background jobs even though we have connection logic in app.js:
mongoose.connect(
   <URL>,
    { useNewUrlParser: true, useCreateIndex: true, useUnifiedTopology: true }
  );
After that, we need the Immediately Invoking Function Execution(IIFE) inside our job with async functionality to use Async/Await.
(async () => {
  await mongoose.connect(
    <URL>,
    { useNewUrlParser: true, useCreateIndex: true, useUnifiedTopology: true }
  );
  // Logic comes Here
})();
Then, we need to find all the active Tweets from the database using this query:
const tweetJobs = await Jobs.find({ isActive: true }).exec();
Once we get all the active Tweets, we loop through it and send the Tweets. With our scheduler, we want to send these Tweets at a time that is less than or equal to our current time:
await Promise.all(
    tweetJobs.map(async (tweet) => {
      return new Promise(async (resolve, reject) => {
        try {
          if (isCancelled) return;
          const user = await User.findById({ _id: tweet.userId }).exec();
          if (
            moment().tz(tweet.timezone).format("YYYY-MM-DD HH:mm") <
            moment(tweet.scheduledTime, "YYYY-MM-DD HH:mm").format(
              "YYYY-MM-DD HH:mm"
            )
          ) {
            console.log("It it not time yet to post tweet");
            // return;
            resolve();
          } else {
            console.log("==================");
            try {
              await tweetUtils({
                accessToken: user.twitter.accessToken,
                accessSecret: user.twitter.refreshToken,
                tweet: tweet.body,
              });
              await Jobs.findOneAndUpdate(
                { _id: tweet._id },
                { isActive: false }
              );
            } catch (e) {
              cabin.error(e);
            }
            resolve();
          }
        } catch (e) {
          reject(e);
        }
      });
    })
  );
Finally, when we are done with jobs, we can post a message to the parent thread saying the job is done.
if (parentPort) parentPort.postMessage("done");
  else process.exit(0);
Ultimately, you should use whichever framework or library you find easiest to implement so you can confidently say the library has done a good job. By this simple criteria, I feel Bree.js is the perfect library to use. You can use Bree.js to implement as complex a logic as you want.
For an in-depth look at Bree.js, check out the documentation of here and here.
Debugging code is always a tedious task. But the more you understand your errors, the easier it is to fix them.
LogRocket allows you to understand these errors in new and unique ways. Our frontend monitoring solution tracks user engagement with your JavaScript frontends to give you the ability to see exactly what the user did that led to an error.

LogRocket records console logs, page load times, stack traces, slow network requests/responses with headers + bodies, browser metadata, and custom logs. Understanding the impact of your JavaScript code will never be easier!

@container scroll-state: Replace JS scroll listeners nowCSS @container scroll-state lets you build sticky headers, snapping carousels, and scroll indicators without JavaScript. Here’s how to replace scroll listeners with clean, declarative state queries.

Explore 10 Web APIs that replace common JavaScript libraries and reduce npm dependencies, bundle size, and performance overhead.

Russ Miles, a software development expert and educator, joins the show to unpack why “developer productivity” platforms so often disappoint.

Discover what’s new in The Replay, LogRocket’s newsletter for dev and engineering leaders, in the February 18th issue.
Hey there, want to help make our blog better?
Join LogRocket’s Content Advisory Board. You’ll help inform the type of content we create and get access to exclusive meetups, social accreditation, and swag.
Sign up now