Fuse.js is a lightweight search engine that can run on the client side in a user’s browser. Let’s see how we can use it to easily add search functionality to a React application.

Search functionality is useful for many types of websites, allowing users to efficiently find what they are looking for. But why would we choose to use Fuse.js specifically?
There are many options for powering search, and perhaps the simplest is to use the existing database. Postgres has a full-text search feature, for example. MySQL does as well, and Redis has a RediSearch module.
There are also dedicated search engines, with Elasticsearch and Solr being the most popular. These require a more involved setup, but they have advanced functionality that you might need for your use case.
Lastly, you could use a search-as-a-service platform like Algolia or Swiftype. These services run their own search infrastructures. You just provide the data, configuration, and queries over an API.
You might not need the power exposed by these solutions, however, which can require a fair amount of work to implement, not to mention the cost. If you don’t have too much data to search through, Fuse.js requires minimal setup and can provide a search experience that is still much better than what you might be able to come up with yourself.
As far as how much data is too much for Fuse.js, consider that Fuse.js needs access to the entire dataset, so you’ll need to load it all on the client side. If the dataset is 100MB in size, that’s beyond what is reasonable to send to the client. But if it’s only a few kilobytes, it could be a great candidate for Fuse.js.
Let’s make a basic React application that uses Fuse.js to allow the user to search for dog breeds. You can view the final result here, and the source code is available on GitHub.
We’ll begin by setting up some scaffolding. Starting from a new Node.js project, we’ll install React and Fuse.js:
npm install --save react react-dom fuse.js
//or
yarn add react react-dom fuse.js
We’ll also install Parcel as a development dependency:
npm install --save-dev [email protected]
//or
yarn add --dev [email protected]
We’ll use it in a package.json start script to compile the application:
{
  "scripts": {
    "start": "parcel serve ./index.html --open"
  }
}
Next, we’ll create a barebones index.html that contains an empty div for React to render into and a noscript message to avoid a blank page in case the user has JavaScript disabled.
<!DOCTYPE html>
<html lang="en">
  <body>
    <div id="app"></div>
    <noscript>
      <p>Please enable JavaScript to view this page.</p>
    </noscript>
    <script src="./index.js"></script>
  </body>
</html>
We’ll make our index.js simple to start. We’ll render a form that has an input for the search query, though we won’t actually handle the search just yet.
import React, { useState } from "react";
import ReactDom from "react-dom";

function Search() {
  return (
    <form>
      <label htmlFor="query">Search for a dog breed:</label>
      <input type="search" id="query" />
      <button>Search</button>
    </form>
  );
}

ReactDom.render(<Search />, document.getElementById("app"));
At this point, if you run npm run start or yarn run start, Parcel should open the website in your browser, and you should see the form.
Let’s implement the search now. We’ll start with a component that shows the search results. We need to handle three cases:
We’ll display any results in an ordered list.
function SearchResults(props) {
  if (!props.results) {
    return null;
  }

  if (!props.results.length) {
    return <p>There are no results for your query.</p>;
  }

  return (
    <ol>
      {props.results.map((result) => (
        <li key={result}>{result}</li>
      ))}
    </ol>
  );
}
Let’s also write our own search function. Later, we’ll be able to compare the results from our naive approach with the results from Fuse.js.
Our approach is simple. We’ll go through the array of dog breeds (from this JSON list) and return any breeds that include the entire search query. We’ll also make everything lowercase to make it a case-insensitive search.
const dogs = [
  "Affenpinscher",
  "Afghan Hound",
  "Aidi",
  "Airedale Terrier",
  "Akbash Dog",
  "Akita",
  // More breeds..
];

function searchWithBasicApproach(query) {
  if (!query) {
    return [];
  }

  return dogs.filter((dog) => dog.toLowerCase().includes(query.toLowerCase()));
}
Next, let’s link it all together by getting the search query from the form submission, performing the search, and displaying the results.
function Search() {
  const [searchResults, setSearchResults] = useState(null);

  return (
    <>
      <form
        onSubmit={(event) => {
          event.preventDefault();
          const query = event.target.elements.query.value;
          const results = searchWithBasicApproach(query);
          setSearchResults(results);
        }}
      >
        <label htmlFor="query">Search for a dog breed:</label>
        <input type="search" id="query" />
        <button>Search</button>
      </form>

      <SearchResults results={searchResults} />
    </>
  );
}
Using Fuse.js is straightforward. We need to import it, let it index the data using new Fuse(), and then use the index’s search function. The search returns some metadata, so we’ll pull out just the actual items for display.
import Fuse from "fuse.js";

const fuse = new Fuse(dogs);

function searchWithFuse(query) {
  if (!query) {
    return [];
  }

  return fuse.search(query).map((result) => result.item);
}
The metadata includes a refIndex integer that lets us refer back to the corresponding item in the original dataset. If we initialize the index with new Fuse(dogs, {includeScore: true}), we’ll also get the match score: a value between 0 and 1, where 0 is a perfect match. A search result for “husky” would then look something like this:
[
  {
    item: "Siberian Husky",
    refIndex: 386,
    score: 0.18224241177399383
  }
]
We’ll add a checkbox to the Search component’s form to let the user choose whether to use Fuse.js instead of the basic search function.
<form
  onSubmit={(event) => {
    event.preventDefault();
    const query = event.target.elements.query.value;
    const useFuse = event.target.elements.fuse.checked;
    setSearchResults(
      useFuse ? searchWithFuse(query) : searchWithBasicApproach(query)
    );
  }}
>
  <label htmlFor="query">Search for a dog breed: </label>
  <input type="search" id="query" />
  <input type="checkbox" name="fuse" />
  <label htmlFor="fuse"> Use Fuse.js</label>
  <button>Search</button>
</form>
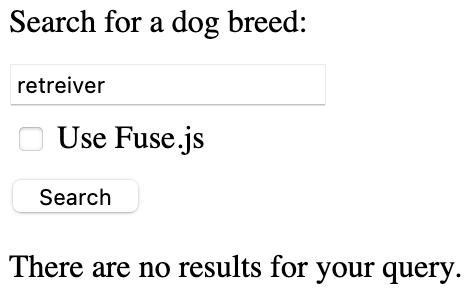
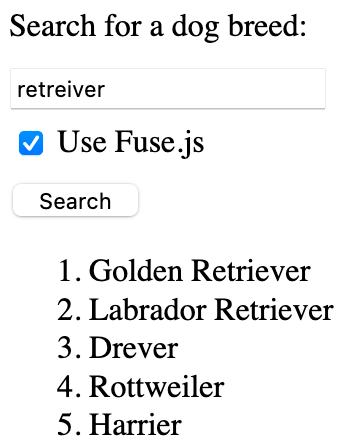
Now we can search with Fuse.js! We can use the checkbox to compare using it versus not using it. The biggest difference is that Fuse.js is tolerant of typos (through approximate string matching), whereas our basic search requires exact matches. Check out the basic search results if we misspell “retriever” as “retreiver”:

And here are the much more useful Fuse.js results for the same query:

Our search may be more complicated if we care about multiple fields. For example, imagine that we want to search by both breed and country of origin. Fuse.js supports this use case. When we create the index, we can specify the object keys to index.
const dogs = [
  {breed: "Affenpinscher", origin: "Germany"},
  {breed: "Afghan Hound", origin: "Afghanistan"},
  // More breeds..
];

const fuse = new Fuse(dogs, {keys: ["breed", "origin"]});
Now, Fuse.js will search both the breed and origin fields.
Sometimes we don’t want to spend the resources to set up a full-fledged Elasticsearch instance. When we have simple needs, Fuse.js can provide a correspondingly simple solution. And as we’ve seen, using it with React is also straightforward.
Even if we need more advanced functionality, Fuse.js allows for giving different fields different weights, adding AND and OR logic, tuning the fuzzy match logic, and so on. Consider it the next time you need to add search to an application.
Install LogRocket via npm or script tag. LogRocket.init() must be called client-side, not
server-side
$ npm i --save logrocket

// Code:

import LogRocket from 'logrocket';
LogRocket.init('app/id');
// Add to your HTML:

<script src="https://cdn.lr-ingest.com/LogRocket.min.js"></script>
<script>window.LogRocket && window.LogRocket.init('app/id');</script>
Hey there, want to help make our blog better?
Join LogRocket’s Content Advisory Board. You’ll help inform the type of content we create and get access to exclusive meetups, social accreditation, and swag.
Sign up now
This guide walks you through creating a web UI for an AI agent that browses, clicks, and extracts info from websites powered by Stagehand and Gemini.

This guide explores how to use Anthropic’s Claude 4 models, including Opus 4 and Sonnet 4, to build AI-powered applications.

Which AI frontend dev tool reigns supreme in July 2025? Check out our power rankings and use our interactive comparison tool to find out.

Learn how OpenAPI can automate API client generation to save time, reduce bugs, and streamline how your frontend app talks to backend APIs.