Next.js is awesome, and it has become a favored tool for frontend developers. The evolution of Next.js has been marvelous — it has so many features that help us write production-ready apps quickly and easily.
The framework expects all the routes to be within the pages folder. However, in a real-world scenario, we will have many teams working on individual pages or components, and we can’t realistically expect them to commit to a monolith.
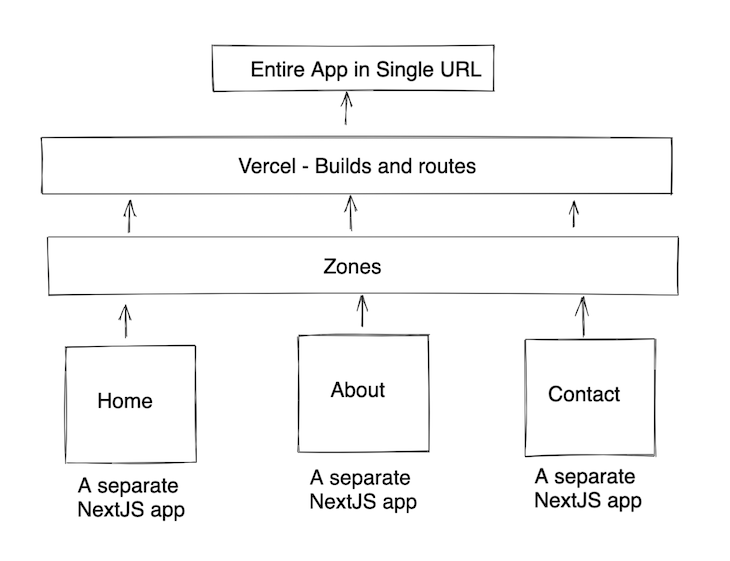
The solution to this problem is zones. As per the Next.js docs, a zone is a single deployment of a Next.js app.
Next.js allows you to have multiple zones for the deployment of individual Next.js apps, and all the zones can be accessed under a single URL. This allows different teams to build and deploy parts of the app individually, while on the user’s end, it appears as one complete application.
The Replay is a weekly newsletter for dev and engineering leaders.
Delivered once a week, it's your curated guide to the most important conversations around frontend dev, emerging AI tools, and the state of modern software.
Zones don’t have any specific APIs from Next.js; it’s based on HTTP proxies. You can implement multiple zones either with inbuilt support in Vercel or create your own HTTP proxy. However, Vercel tries to sell its own deployment by not providing examples for custom proxies, instead showing how simple it is in their platform.
If you use Vercel, it’s pretty simple. They have inbuilt support for zones, and you just have to list the builds of your individual apps and the routes for serving them in vercel.json.
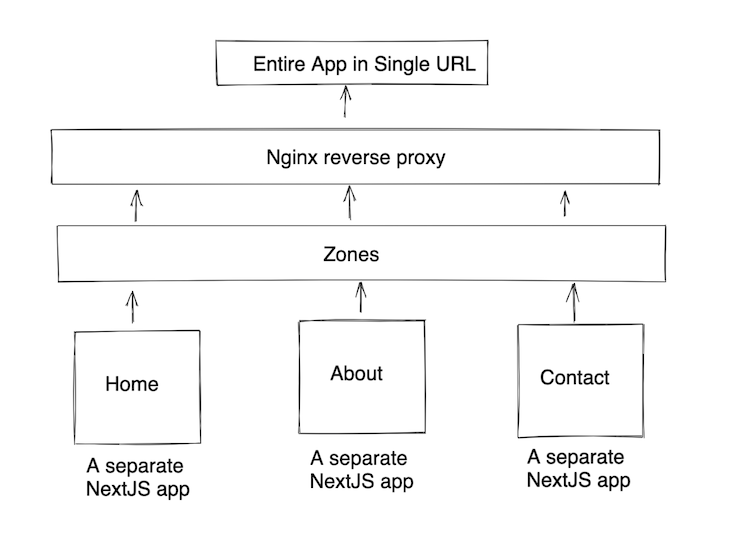
In a custom proxy, we can create a proxy server, like an Nginx server. This server will redirect internally to the respective Next.js apps.
There are two major things to consider when using zones:
In order to solve any conflicts among static files, we can leverage the assetPrefix. This will enable unique paths for all the static files based on the assetPrefix. Read more here.
module.exports = {
  assetPrefix: "about/",
}
Create a new folder called nextjs-zones and use create-next-app to bootstrap two new Next.js projects: home and about.
Let’s create a page inside each project.
// home/pages/home.js
function Home() {
  return (
    <div>
      <h1>Home</h1>
    </div>
  );
}
export default Home;
// about/pages/about.js
function About() {
  return (
    <div>
      <h1>About</h1>
    </div>
  );
}
export default About;
Home → localhost:3000
About → localhost:3001
# Sample nginx config

daemon off;
pid nginx.pid;

http {
    server {
        listen       8000;
        server_name  http://localhost:8000;
        proxy_buffering off;
        proxy_http_version 1.1;

        location / {
            proxy_pass    http://localhost:3000/home;
            proxy_redirect off;
        }
        location /about/ {
            proxy_pass    http://localhost:3001/about;
            proxy_redirect off;
        }
    }
}
events {
}
Now the Nginx server runs at localhost:8000 and directly points to the Home application. Likewise, localhost:8000/about points to the About application. Though Home and About run as different applications, both are now accessible through localhost:8000 now.
This is a very naive implementation to explain the concept. A more robust implementation would reverse-proxy the build files inside a Docker container.
Follow the same steps as above.
vercel.json fileIf you’re using Vercel as your deployment platform, it supports zones out of the box. Let’s create a vercel.json file with some data and we’ll be good to go.
// A sample vercel.json
{
  "version": 2,
  "build": {
    "env": {
      "BUILDING_FOR_NOW": "true"
    }
  },
  "builds": [
    { "src": "about/package.json", "use": "@now/next" },
    { "src": "home/package.json", "use": "@now/next" }
  ],
  "routes": [
    { "src": "/about(.*)", "dest": "about$1" },
    { "src": "(.*)", "dest": "home$1" }
  ]
}
Here we can combine different types of zones together — e.g., an SSG zone and a Next zone can work under the same URL. In the above example, we are using @now/next for both Home and About, and we define routes that help Vercel decide which build to load based on the URLs.
This approach has the potential to solve a lot of issues for larger teams using Next.js by decoupling the applications to a greater extent. This feature can be used even better with webpack module federation, and it could truly become the next big thing in micro-frontends.
If you have a better approach or ideology, please let me know in the comments.
Debugging Next applications can be difficult, especially when users experience issues that are difficult to reproduce. If you’re interested in monitoring and tracking state, automatically surfacing JavaScript errors, and tracking slow network requests and component load time, try LogRocket.
LogRocket captures console logs, errors, network requests, and pixel-perfect DOM recordings from user sessions and lets you replay them as users saw it, eliminating guesswork around why bugs happen — compatible with all frameworks.
LogRocket's Galileo AI watches sessions for you, instantly identifying and explaining user struggles with automated monitoring of your entire product experience.
The LogRocket Redux middleware package adds an extra layer of visibility into your user sessions. LogRocket logs all actions and state from your Redux stores.


Modernize how you debug your Next.js apps — start monitoring for free.

Learn what context rot is, why AI agent sessions degrade over time, and how to fix it with compaction, prompt anchoring, context files, plan files, and RAG.

Learn about TypeScript v6’s breaking changes, new ES2025 features, and deprecated options. A complete migration guide from v5 to prepare for v7.

Learn how Vite+ unifies Vite, Vitest, Oxlint, Oxfmt, Rolldown, and Node.js management in one CLI.

AI companies are buying developer tools as coding agents turn runtimes, package managers, and linters into strategic infrastructure.
Hey there, want to help make our blog better?
Join LogRocket’s Content Advisory Board. You’ll help inform the type of content we create and get access to exclusive meetups, social accreditation, and swag.
Sign up now

