I’ve had a great deal of fun with the Web Audio API recently. There are already a lot of articles about this API, but there are so many other interesting things you can do with it.
For instance, you can easily use the Web MIDI API in conjunction with the Web Audio API. This opens up opportunities to add a new level of interactivity for users. In this article, we’ll explore how to use the Web Audio API and Web MIDI API using virtual pianos.
Jump ahead:
You can interact with the demos in this CodePen collection. Let’s start with the UI — namely, the virtual pianos.
The Replay is a weekly newsletter for dev and engineering leaders.
Delivered once a week, it's your curated guide to the most important conversations around frontend dev, emerging AI tools, and the state of modern software.
Most of the examples I could find for “CSS virtual pianos” used float properties and separate containers for the black and white piano keys. This approach isn’t very accessible.
So instead, I wanted a simple wrapper containing all the notes within as <button> elements in the correct order, like so:
<div>
  <button aria-label="A0" data-freq="27.5"></button>
  <button aria-label="A#0" data-freq="29.135"></button>
  <!-- etc -->
</div>
Using <button> elements in the correct order allows you to tab through the notes and trigger their playable state with a click event.
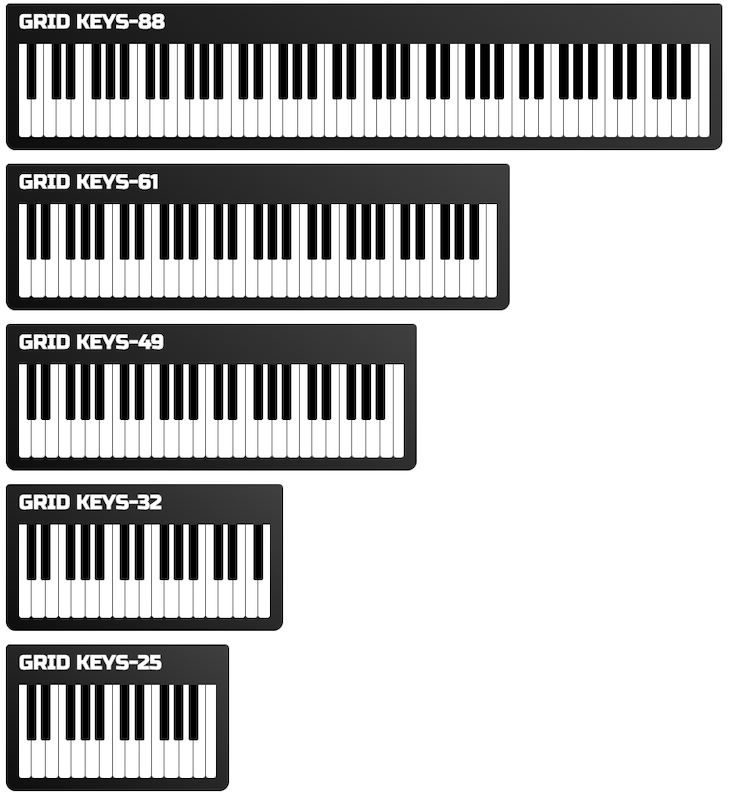
I also wanted responsive virtual pianos along with a simple way to render them in various sizes to represent the typical sizes of MIDI keyboards: 88 keys, 61 keys, 49 keys, 32 keys, and 25 keys. These are also the sizes you typically see in music software.
For example, here’s a 32-key keyboard from Native Instruments:
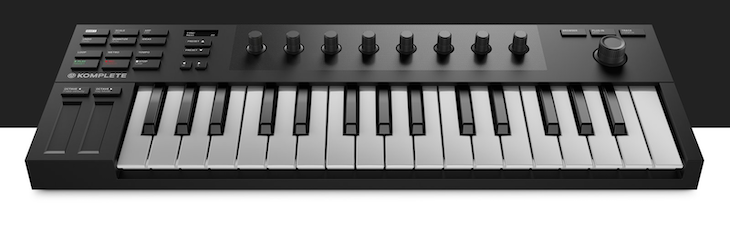
Using your browser’s Web MIDI API, you can connect a real USB-connected MIDI keyboard like the one above and detect its events in your browser. These events can then be used to trigger the Web Audio API.
At the end of this article, we’ll use all these techniques together for the practical purpose of building a chord visualizer, a tool to help you learn chords in any key by seeing, hearing, and practicing them on a virtual keyboard.
It doesn’t make sense to manually type all the <button> elements and their frequencies. Let’s use JavaScript for that.
First, let’s define a method to get the frequency for a given note:
const getHz = (N = 0) => 440 * Math.pow(2, N / 12);
We provide an integer N that indicates each note’s position relative to the A440 pitch, which is the A4 key on a piano as well as the tuning standard for Western music. So, A#4 — the next note in the sequence — will have N = 1.
Next, we need an array of the notes in an octave on a piano:
const notes = ['A','A#','B','C','C#','D','D#','E','F','F#','G','G#'];
All the black keys are defined using sharp # note names. I have excluded the flat notes since they’re just equivalents of the sharp notes by different names.
Now we need to create some data. The returned data will be an array of objects, with each object representing a note on the piano:
const freqs = (start, end) => {
  let black = 0,
    white = -2;
  return Array(end - start)
    .fill()
    .map((_, i) => {
      const key = (start + i) % 12;
      const note = notes[key < 0 ? 12 + key : key];
      const octave = Math.ceil(4 + (start + i) / 12);
      if (i === 0 && note === "C") black = -3;
      note.includes("#")
        ? ((black += 3), ["C#", "F#"].includes(note)
        && (black += 3))
        : (white += 3);

      return {
        note,
        freq: getHz(start + i),
        octave: note === "B" || note === "A#"
        ? octave - 1 : octave,
        offset: note.includes("#") ? black : white,
      };
    });
};
Let’s break down what’s happening in the code above:
start and end parameters are integers defining the number of notes to the left (start) and right (end) of A440. On a grand piano, which has 88 keys, this is the same as freqs(-48, 40)black and white notes, which we will discuss more in the CSS section laterkey, position. The magic number 12 represents the number of notes in an octavenote name in the notes array12, we find the octave to which the note belongs. There are seven octaves — plus an additional four notes — on a grand pianoA0-note, while other popular keyboards all start with a C, so the if statement handles the indexes for black and white notes no matter what the start note isnote name, freq, octave, and offset for each notePhew! Let’s add a simple render method:
const render = (data) => data.map(item => `
  <button data-note="${item.note}${item.octave}"
  data-freq="${item.freq}" style="--gcs:${item.offset}"
  type="button>"></button>`).join('\n')
Add a wrapper:
<div id="kb88" class="kb"></div>
Finally, we’ll call our render script:
kb88.innerHTML = render(freqs(-48, 40))
Now I will finally explain what the offset and the black and white indexes were for!
Each white key on our keyboard will span three grid columns, while each black key will span two grid columns. Additionally, each white key will span five grid rows, while each black key spans three grid rows, or 60 percent of the keyboard height:
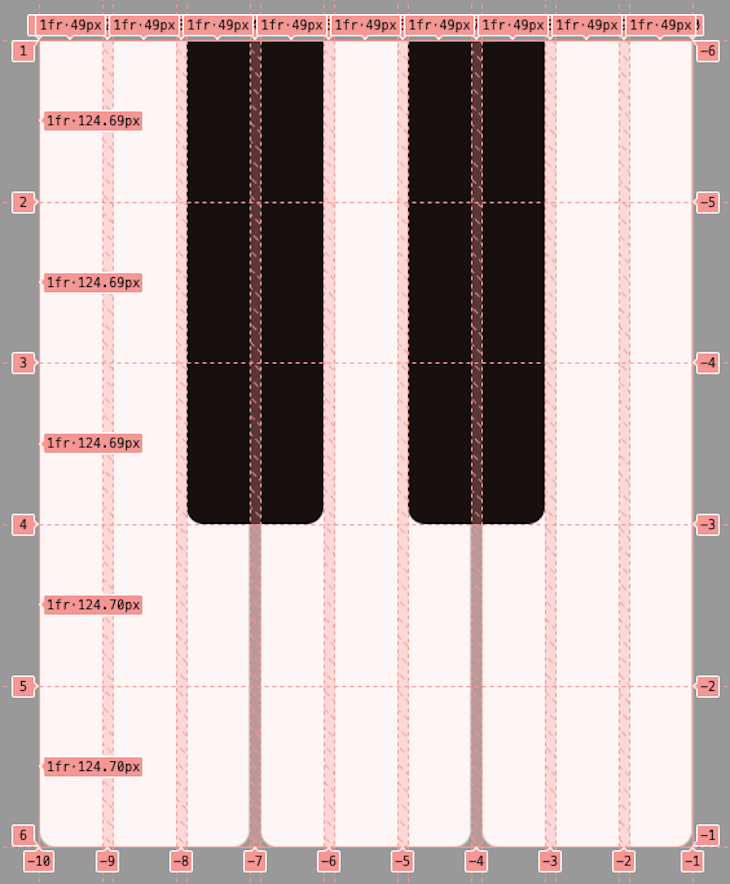
On a grand piano, there are 52 white keys. Since each key spans three columns, we’ll create a custom property --_r to represent the total number of grid columns needed for all our white keys. We’ll set its default value to 52*3, which is 156:
.kb {
  block-size: 10rem;
  display: grid;
  grid-column-gap: 1px;
  grid-template-columns: repeat(var(--_r, 156), 1fr);
  grid-template-rows: repeat(5, 1fr);
}
All the notes need a unique grid-column-start property. This property is set on each <button> — from the offset-property, using either a “black” or “white” index — as a CSS custom property named --_gcs.
As each white key spans three grid columns, there will be a difference of three between each white key. The black keys span two grid columns, but their offset follows a more irregular pattern.
For the notes, we’ll add some common styles with a few custom properties:
.kb [data-note] {
  background-color: var(--_bgc, #FFF);
  border: 0;
  border-radius: 0 0 3px 3px;
  grid-column: var(--gcs) / span var(--_csp, 3);
  grid-row: 1 / span var(--_rsp, 5);
}
Then, for the black keys, we’ll update some of the properties:
.kb [aria-label*="#"] {
  --_bgc: #000;
  --_csp: 2;
  --_rsp: 3;
  position: relative;
}
OK, let’s see what we’ve created:

Cool! Let’s create some popular variants.
Here’s what needs to change for a 61-key variant:
kb61.innerHTML = render(freqs(-33, 28));
Here’s the result:

Likewise, you can update the code like so for the 49-key variant:
kb49.innerHTML = render(freqs(-21, 28));
This would be the outcome:

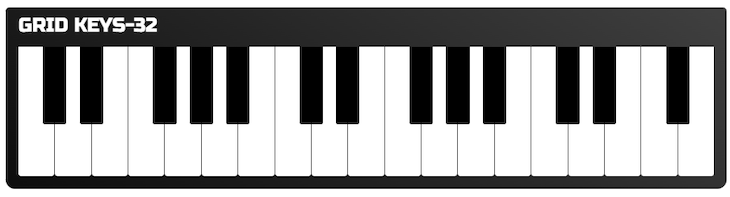
Here’s the code for the 32-key variant:
kb32.innerHTML = render(freqs(-9, 23));
The keyboard should look like this:
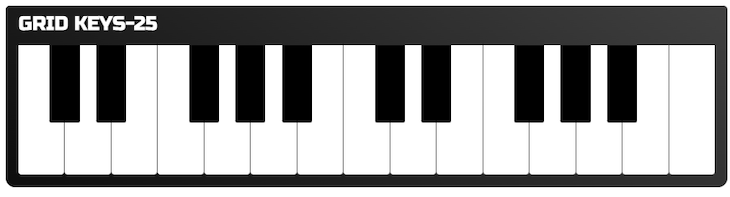
Finally, here’s the code for the 25-key variant:
kb61.innerHTML = render(freqs(-33, 28));kb25.innerHTML = render(freqs(-9, 16));
The result should look like the below:
For these examples, I added an extra wrapper around the keyboards — <div class="synth"> — and added titles.
If we add inline-size: max-content to this, the keyboards will all line up nicely:
You can interact with the pianos in this CodePen demo:
See the Pen CSS Grid Pianos by Mads Stoumann (@stoumann)
on CodePen.
For the best experience, I recommend opening the demo in a new tab or browser window so you can interact with it on a larger screen. Note that these pianos are not playable yet — we’ll cover that later in this article.
All the notes on the pianos are <button> elements and are thus focusable and tabbable. As they are rendered in their natural order within the same wrapper, there’s no need to do anything extra to control tab order or anything else.
We added a box-shadow effect to highlight the piano key on hover or when a user is using :focus-visible) to focus on a note. You can change the color of this shadow by updating the --_h hue property. You can also expand this capability to show chords:

Additionally, each note has an aria-label attribute with the note name. With very little CSS and only 385 bytes of minified/gzipped JavaScript, there’s plenty of room to be creative with the Web Audio API!
Now it’s time to take a look at the Web Audio API. We’ll use some very simple logic to get us started. First, we’ll create the AudioContext object and a default gainNode:
const audioCtx = new (window.AudioContext || window.webkitAudioContext)
const gainNode = audioCtx.createGain()
const notemap = new Map();
gainNode.connect(audioCtx.destination);
Next, let’s go over a simple method to create an oscillator, which will produce our sound. We’ll add a single param, freq, which is the frequency we want to play:
function createOscillator(freq) {
  const oscNode = audioCtx.createOscillator()
  oscNode.type = 'triangle'
  oscNode.frequency.value = freq
  oscNode.connect(gainNode)
  return oscNode
}
We’ll add two methods to handle noteon and noteoff:
export function noteoff(key) {
  key.classList.remove('keydown')
  const oscNode = notemap.get(key.name)
  if (oscNode) oscNode.stop(0)
  notemap.delete(key.name)
}
And finally, we’ll add event listeners to all the keys:
keys.forEach(key => {
  key.addEventListener('pointerdown', event => {
    noteon(event.target, [{freq: event.target.dataset.freq}])
  })
  key.addEventListener('pointerup', event => { noteoff(event.target) })
  key.addEventListener('pointerleave', event => { noteoff(event.target) })
})
And that’s it. Let’s take a look at the Web MIDI API next.
MIDI, or Musical Instrument Digital Interface, is a communication protocol for electronic musical instruments.
Back in the late 1980s, I used it to connect and sync my Yamaha DX7IIFD-synth to my RX7 Digital Rhythm Programmer! This was before anyone used computers for music. But MIDI is still very much alive, and widely used.
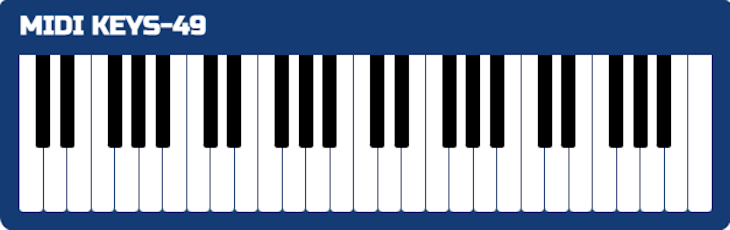
If you own a real MIDI keyboard, it’s time to plug it in! We’ll be connecting a 49-key MIDI keyboard in this tutorial:
Although all browsers except Safari support MIDI, you can test whether your browser supports it using the following command:
if (navigator.requestMIDIAccess) { ... }
If supported, use the following command to request access to the MIDI device:
navigator.requestMIDIAccess().then(onMIDISuccess, onMIDIError)
The then method takes two arguments — onMIDISucess if access is granted, and onMIDIError if access is denied. We have to create both methods, starting with onMIDISuccess:
const onMIDISuccess = (midiAccess) => {
  for (var input of midiAccess.inputs.values()) input.onmidimessage = getMIDIMessage;
}
For the onMIDIError, I simply return an inline method, that returns a message to the console:
() => console.log('Could not access your MIDI devices.')
In the code above, onMIDISuccess receives a midiAccess object that represents a list of inputs, or available MIDI devices.
It then iterates over these inputs and sets the onmidimessage to the function getMIDIMessage. When the MIDI device sends a message — in this case, when a user presses a key on the digital piano — the function will be called.
Now we need to configure the MIDI message events for the getMIDIMessage function. MIDI has a lot of events, but we’ll skip to the most important part: note on and note off:
const getMIDIMessage = message => {
  const [command, note, velocity] = message.data;
  switch (command) {
    case 144: // on
      if (velocity > 0) {
        console.log('note on')
      }
    break;
    case 128: // off
      console.log('note off')
    break;
  }
}
If you press some notes on your keyboard, you should see the MIDI note number in the console.
Now, we’ll replace the console.log entries from the getMIDIMEssage method with custom events:
/* NOTE ON */
const event = new CustomEvent('noteon', { detail: { note, velocity }});
element.dispatchEvent(event)

/* NOTE OFF */
const event = new CustomEvent('noteoff', { detail: { note }});
element.dispatchEvent(event)
Back in our app code, we’ll add two new event listeners. We’ll call the noteon and noteoff-methods from these event listeners:
midi.addEventListener('noteon', (event) => {
  const note = midi.elements[`midi_${event.detail.note}`]
  note.style.setProperty('--v', event.detail.velocity)
  noteon(note, [{freq: note.dataset.freq}])
})
midi.addEventListener('noteoff', (event) => {
  const note = midi.elements[`midi_${event.detail.note}`]
  noteoff(note)
})
If you save and refresh — and have a real MIDI keyboard connected — you should be able to play it now. Make sure you’re also not using Safari. Try the demo below:
See the Pen Web MIDI API Demo by Mads Stoumann (@stoumann)
on CodePen.
For a data scientist, chords are arrays of frequencies. For musicians, they just sound good!
In the final part of this tutorial, let’s create a tool that’ll help us visualize and play all kinds of chords in any key. We’ll be building this:
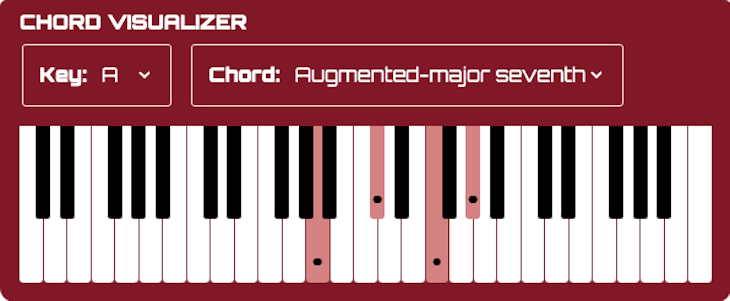
First, we need an array of chord types. All chords can be transposed to any key, so we’ll create a “mathematical chord” where the root note or piano key always equals zero.
For a major chord — also called a major triad — we have a root note, a major third, and a perfect fifth. We won’t dive deep into music theory here, but in a JavaScript array, this equals [0, 4, 7], where:
0 is the root note4 is the major third note, with three piano keys between the root and the major third7 is the perfect fifth note, with seven piano keys between the root and the perfect fifthWe’ll define other popular chord types like so:
const chords = {
  'Major triad': [0, 4, 7],
  'Minor triad': [0, 3, 7],
  'Augmented triad': [0, 4, 8],
  'Diminished  triad': [0, 3, 6],
  'Dominanth seventh': [0, 4, 7, 10],
  'Major seventh': [0, 4, 7, 11],
  'Minor-major seventh': [0, 3, 7, 11],
  'Minor seventh': [0, 3, 7, 10],
  'Augmented-major seventh': [0, 4, 8, 11],
  'Augmented seventh': [0, 4, 8, 10],
  'Half-diminished seventh': [0, 3, 8, 10],
  'Diminished seventh': [0, 3, 6, 10],
  'Dominant seventh flat five': [0, 4, 6, 10],
  'Major ninth': [0, 4, 7, 11, 14],
  'Dominant ninth': [0, 4, 7, 10, 14],
  'Dominant minor ninth': [0, 4, 7, 10, 13],
  'Minor-major ninth': [0, 3, 7, 11, 14],
  'Minor ninth': [0, 3, 7, 10, 14],
  'Augmented major ninth': [0, 4, 8, 11, 14],
  'Augmented dominant ninth': [0, 4, 8, 10, 14],
  'Half-diminished ninth': [0, 3, 6, 10, 14],
  'Half-diminished minor ninth': [0, 3, 6, 10, 13],
  'Diminished ninth': [0, 3, 6, 10, 14],
  'Diminished minor ninth': [0, 3, 6, 10, 13],
}
We need a little extra markup to help us select the key and chord type:
<form id="app">
  <fieldset>
    <label><strong>Key:</strong><select id="key"></select></label>
    <label><strong>Chord:</strong><select id="chord"></select></label>
  </fieldset>
  /* rendered keyboard here */
</form>
Using the notes array from our first step and the chords from above, we’ll render additional markup that will return the chords as a list of options in a <select> dropdown:
key.innerHTML = notes.map(key => `<option value="${key}">${key}</option>`).join('');
chord.innerHTML = Object.keys(chords).map(key => `<option value="${key}">${key}</option>`).join('');
Next, we’ll set up a getChord method to return an array of note objects:
function getChord(key, chord) {
  const index = notes.indexOf(key);
  return chords[chord].map(note => getNote(note + index))
}
The getChord method uses a small helper method to get a single note within a chord:
function getNote(N) {
  const key = N % 12;
  const note = notes[key < 0 ? 12 + key : key];
  const octave = Math.ceil(4 + (N / 12)); /* 4 is octave of root, 440 */
  return {
    freq: getHz(N),
    midi: N + 69, /* A4 === MIDI note number 69 */
    note,
    octave: note === 'B' || note === 'A#' ? octave - 1 : octave
  }
}
To trigger a chord change, we’ll add a change event to the form we just added. This event will trigger each time you either change the key or the chord:
app.addEventListener('change', () => {
  const notes = getChord(key.value, chord.value);
  playChord(app, notes)
})
The method playChord is a new addition that iterates the notes of the chord and creates an oscillator for each. Instead of handling noteoff, we simply stop the audio after 1.5 seconds:
function playChord(app, notes) {
  /* Remove 'keydown'-classes for any selected note */
  app.querySelectorAll('.keydown').forEach(key => key.classList.remove('keydown'))
  gainNode.gain.value = 1 / notes.length
  notes.forEach(note => {
    const key = app.elements[`midi_${note.midi}`]
    key.classList.add('keydown')
    const oscNode = createOscillator(note.freq)
    oscNode.start(0)
    oscNode.stop(audioCtx.currentTime + 1.5)
    gainNode.gain.setTargetAtTime(0, 0.75, 0.25)
  })
}
And that’s finally it. Try the demo below:
See the Pen Chord Visualizer by Mads Stoumann (@stoumann)
on CodePen.
This concludes my tour of virtual pianos, the Web Audio API, and the Web MIDI API.
The graphic designer in me really loves how you can utilize CSS Grid in so many interesting ways — even building complex, multi-column-spanning, layered piano keys!
The mathematician in me really loves the link between frequencies, chords, and harmonies, along with how you can use simple math to calculate those. Music is math, the same way as colors are math.
And finally, the musician in me just had a great time fumbling around with these APIs, and often got stuck playing a new tune while I was supposed to be writing!
If you want to investigate any of the covered topics further, fork any of the CodePens and have fun!
Debugging code is always a tedious task. But the more you understand your errors, the easier it is to fix them.
LogRocket allows you to understand these errors in new and unique ways. Our frontend monitoring solution tracks user engagement with your JavaScript frontends to give you the ability to see exactly what the user did that led to an error.

LogRocket records console logs, page load times, stack traces, slow network requests/responses with headers + bodies, browser metadata, and custom logs. Understanding the impact of your JavaScript code will never be easier!

useEffect breaks AI streaming responses in ReactSee why useEffect breaks AI streaming in React, and how moving stream state outside React fixes flicker and stale updates.

A real-world debugging session using Claude to solve a tricky Next.js UI bug, exploring how AI helps, where it struggles, and what actually fixed the issue.

CSS wasn’t built for dynamic UIs. Pretext flips the model by measuring text before rendering, enabling accurate layouts, faster performance, and better control in React apps.

Why do real-time frontends break at scale? Learn how event-driven patterns reduce drift, race conditions, and inconsistent UI state.
Hey there, want to help make our blog better?
Join LogRocket’s Content Advisory Board. You’ll help inform the type of content we create and get access to exclusive meetups, social accreditation, and swag.
Sign up now

