Over the past few years, AI has taken the world by storm. From chatbots that can plan entire trips, write code, rephrase sentences, and so much more, the possibilities seem endless thanks to powerful Large Language Models (LLMs).

But LLMs are trained on existing data sources and information, so the models are often limited in their knowledge. Retrieval-Augmented Generation (RAG) aims to solve this problem once and for all.
RAG is a technique that augments an LLM’s response generation by retrieving information from a source, which can be anything from a database to a search engine. When the latest information is fed into the model, it uses its training data and this newly supplied information to generate a response.
There are currently two main methods to integrate RAG into your application: the Model Context Protocol (MCP) and function calling. In this guide, we will take a deep look at these processes, paying special attention to the less popular function calling, to build an AI scheduling assistant that allows you to review your calendar and book meetings in real time.
Let’s get started!
The Replay is a weekly newsletter for dev and engineering leaders.
Delivered once a week, it's your curated guide to the most important conversations around frontend dev, emerging AI tools, and the state of modern software.
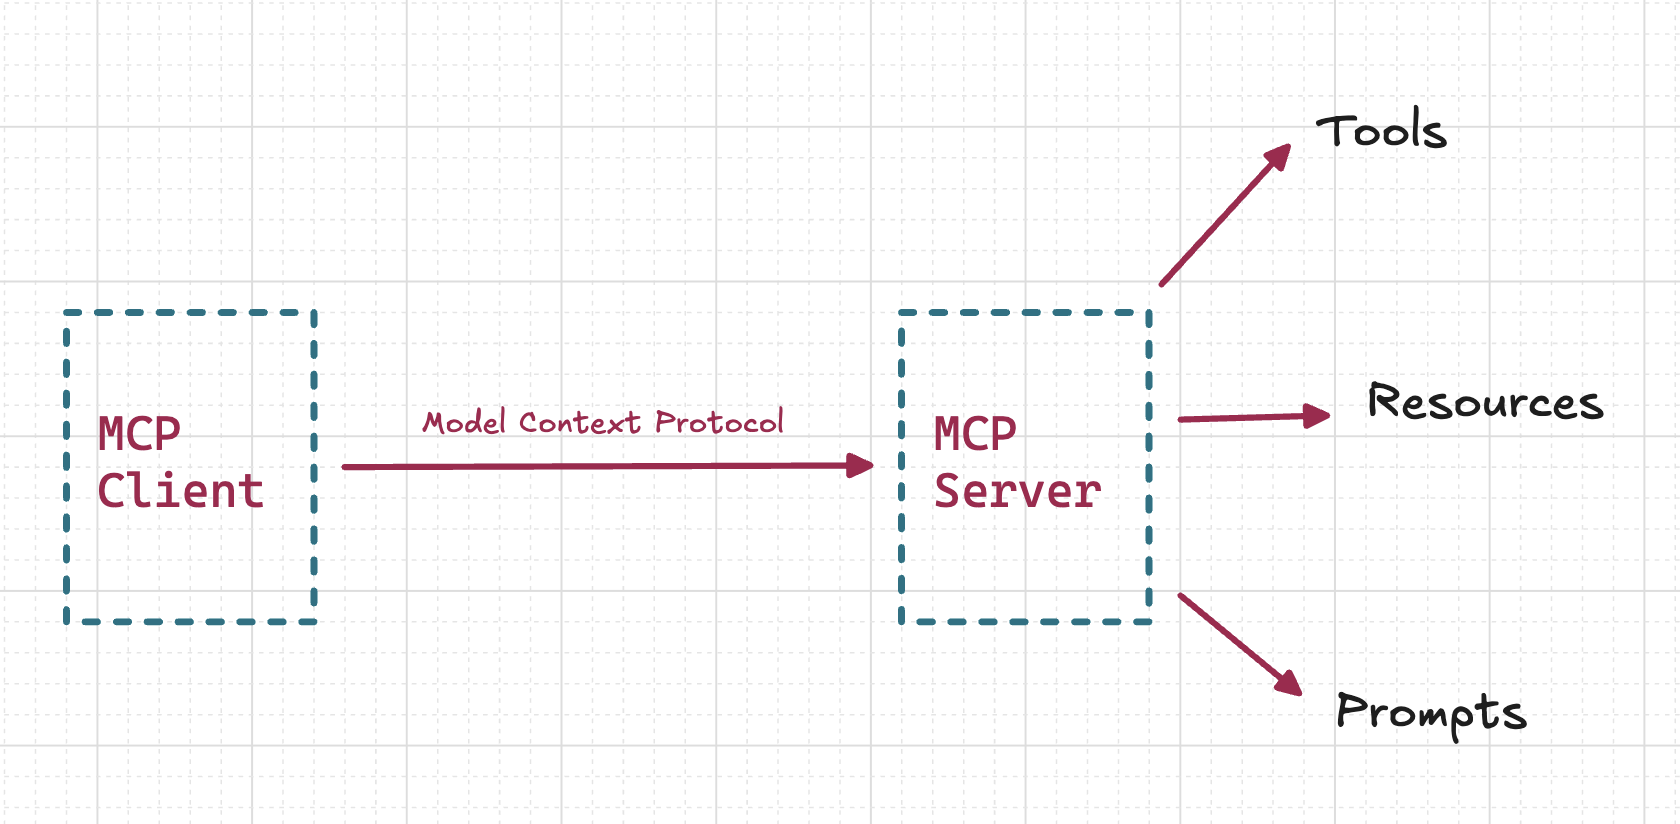
If you’ve been on X or LinkedIn lately, you’ve probably seen the term “MCP” being thrown around. MCP is a protocol defined by Anthropic that describes a language or a framework via which we can connect an LLM model with the external world.
MCP goes beyond just augmenting the knowledge base of the model with the latest information. In addition to fetching information, MCP also allows your model to perform certain actions.
The way MCP is integrated into a model is by creating an MCP server, which implements the MCP protocol and can talk to other clients that also implement the MCP protocol.
The server acts as a bridge between the client and the external world via the Model Context Protocol. The client can get information about tools, resources, and prompts from the server (during the initial discovery phase of the protocol), based on which further communication can take place. The server can also perform actions based on the information it receives from the client.
This is how an interaction between an MCP server and client can be visualized:
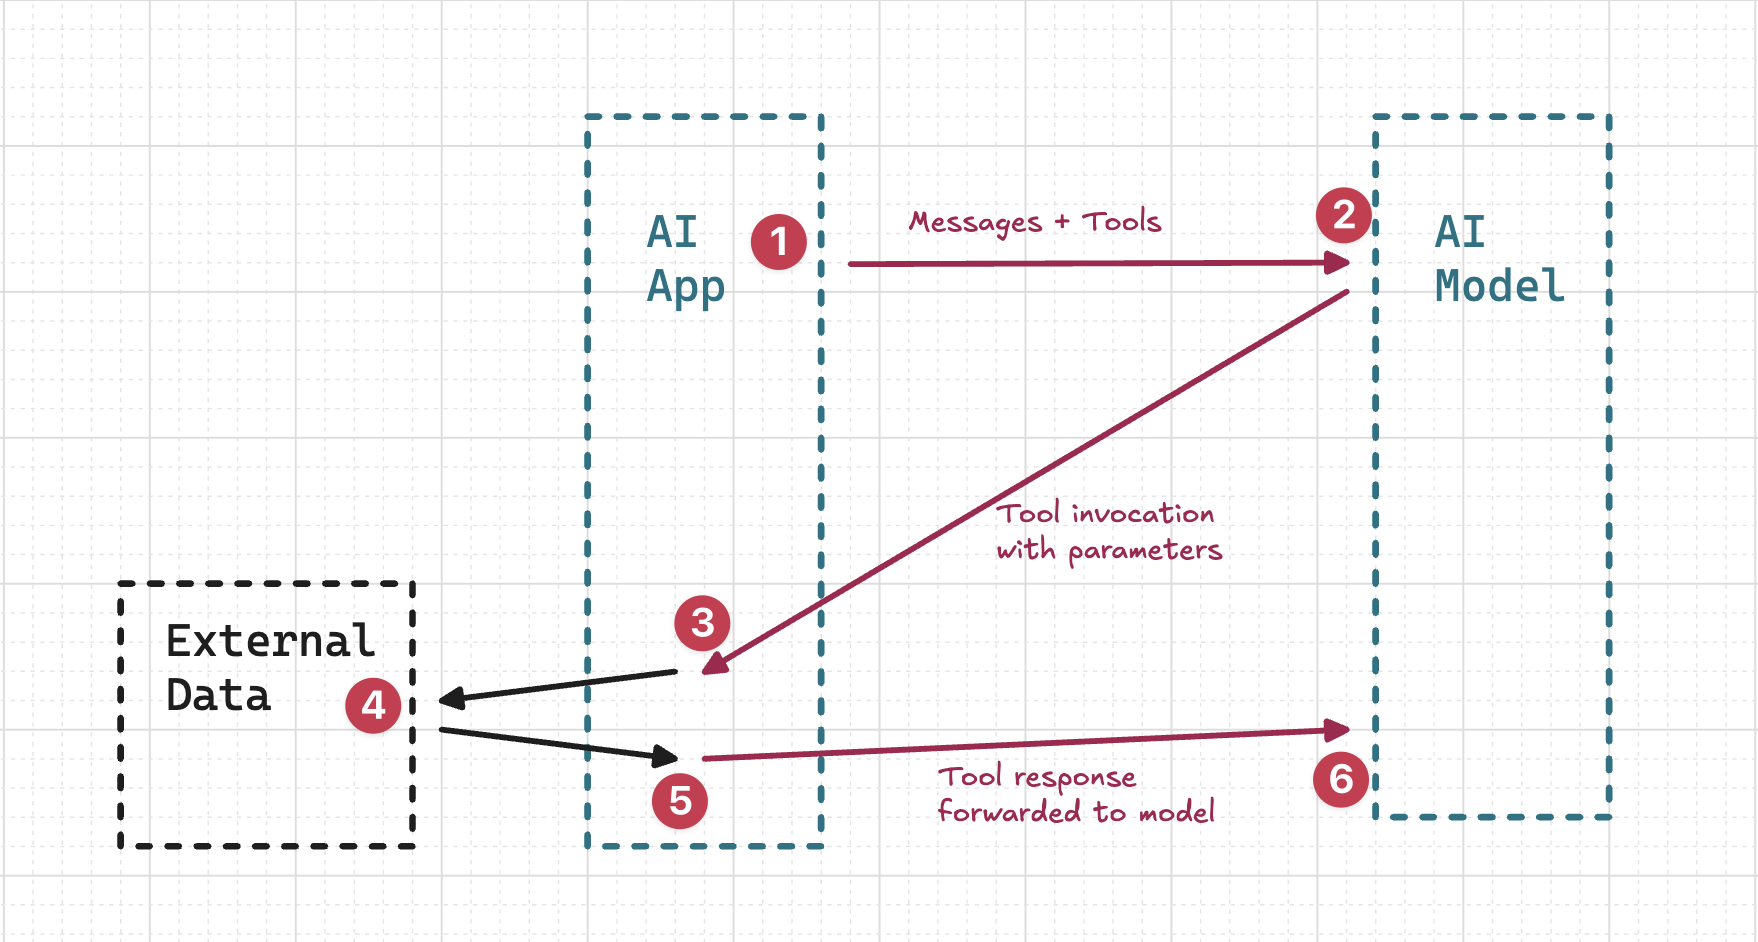
Function calling is a less popular, yet equally capable, method of integrating RAG into your application. Function calling is supported by all the major LLMs provided by OpenAI, Google, and Anthropic, and it is built into the way the models are queried via APIs.
With function calling, whenever we call the /completions or /responses APIs, which are the primary ways to interact with an LLM, we supply them with a list of functions or tools. These functions/tools are a list of “capabilities” that are being provided to the model with proper descriptions of their purpose, input parameters, and output.
The model uses this information to decide whether or not a function needs to be invoked. It conveys this decision in the response of the API call by returning the function name and the parameters that need to be passed to the function. It is the client’s responsibility to implement the function and return the result to the model.
The model can then use this information to generate a response. This process is similar to implementing the MCP protocol, as we also specify tools in that case. But it differs in that we, as the developers, have fine-grained control over when to invoke these tools. There is a higher level of agency than is offered by MCP.
This is how an interaction between an AI app and the model via function calling can be visualized:
Think of a service like GitHub. If GitHub wants to expose all of its data to an AI model, it can create an MCP server that structurally exposes this data via MCP. Thereafter, any client that implements the MCP protocol can access this data. It’s a great way for big services like GitHub to expose their data to the outside world.
MCP works great in certain situations. In the previous example about GitHub, if a code editor needs to have information about the latest documentation, the code editor can be the MCP client, and the entity whose documentation is being accessed can implement an MCP server. Once this is done, there is a direct “bridge” between the documentation and the code editor. This can be leveraged throughout the whole development process with just the initial effort.
While MCP is all the hype these days, and it works well in scenarios like the one we mentioned above, it might not be the best solution for your use case. In the next section, we’ll discuss some points worth considering before you choose to implement MCP for your application.
As seen in the diagram above, the MCP approach takes the control out of the hands of the client. It is a more authoritative approach where the model is given full access to the external world, and there are no checks and balances to ensure that the model doesn’t do anything unexpected. This can be a problem if the model is given access to sensitive information or is allowed to perform actions that can have a negative impact on the organization (like accidentally deleting data from the database).
On the other hand, function calling is a more controlled approach where the client has full control over what actions can be performed. This is because the model can only suggest invoking certain functions with particular arguments. The client then decides whether to invoke the function or not, adding a second layer of protection. This is a more transparent approach because the client has full visibility into what actions are being performed by the model, and the client has the end responsibility of supplying the required data to the model.
The MCP server is a separate entity that needs to be maintained and monitored. It runs as a separate process from your program and will consume additional resources. If your main program runs as a Docker container, you will need to run the MCP server as a separate container. This adds additional responsibility for maintaining the server. This can be a problem if your program is running in a resource-constrained environment or if you are running multiple instances of your program.
Once you set up an MCP server, it is not necessarily true that the server can communicate with all other programs. The server can only communicate with clients that also implement the MCP protocol. Thus, before implementing your own MCP server, you need to verify that the consumer or the client first supports the MCP protocol.
With that in mind, let’s look at an example of function calling with the OpenAI API. We will implement a scheduling assistant that can help others book meetings on your calendar by checking your availability in real time.
The assistant will interact with the user to get the date and time of the meeting in natural language. Then, it will check your calendar to see if you are available at the given time. If you are, it will book the meeting and send a confirmation email to the user. If you are not available, it will ask for an alternative time and repeat the process.
We’ll use React Router to set up the boilerplate frontend repository, Tailwind CSS to style the application, and the OpenAI API for the LLM.
For the functionality of checking your calendar, we will use a mock API that stores meetings in a JSON structure. Later, this can be replaced with any calendar API, like Google Calendar or Outlook Calendar. The code for this project is available in this GitHub repository.
To set up the boilerplate, run the following command:
npx create-react-router@latest ai-assistant
Then, navigate to the welcome.tsx file and remove the boilerplate code. We will create a new file called chat.jsx in the same folder.
To simplify our task of implementing the chat UI, we will use a pre-built chat component from the Shadcn library. The chat UI component can be found on GitHub. For that to work, we will need to first initialize the Shadcn library. We can do that by running the following command:
npx shadcn-ui@latest init
This will create a new folder, lib, and a file called utils.ts inside that folder. This will contain the utils required for the Shadcn library.
Now, we’ll install the required core components from the Shadcn library that are used in the chat component. We’ll do that by running the following command:
npx shadcn@latest add avatar button card input
This installs the required components under the components/ui folder in our codebase. This is the specialty of Shadcn Library. The components are installed as code in our own repository instead of being installed as a package. This allows us to customize the components as per our needs.
After tweaking the imports in the chat.jsx file, we will have the following code:
import { cn } from '../lib/utils';
import {
  Avatar,
  AvatarFallback,
} from '../components/ui/avatar';
import { Button } from '../components/ui/button';
import {
  Card,
  CardContent,
  CardFooter,
  CardHeader,
} from '../components/ui/card';
import { Input } from '../components/ui/input';
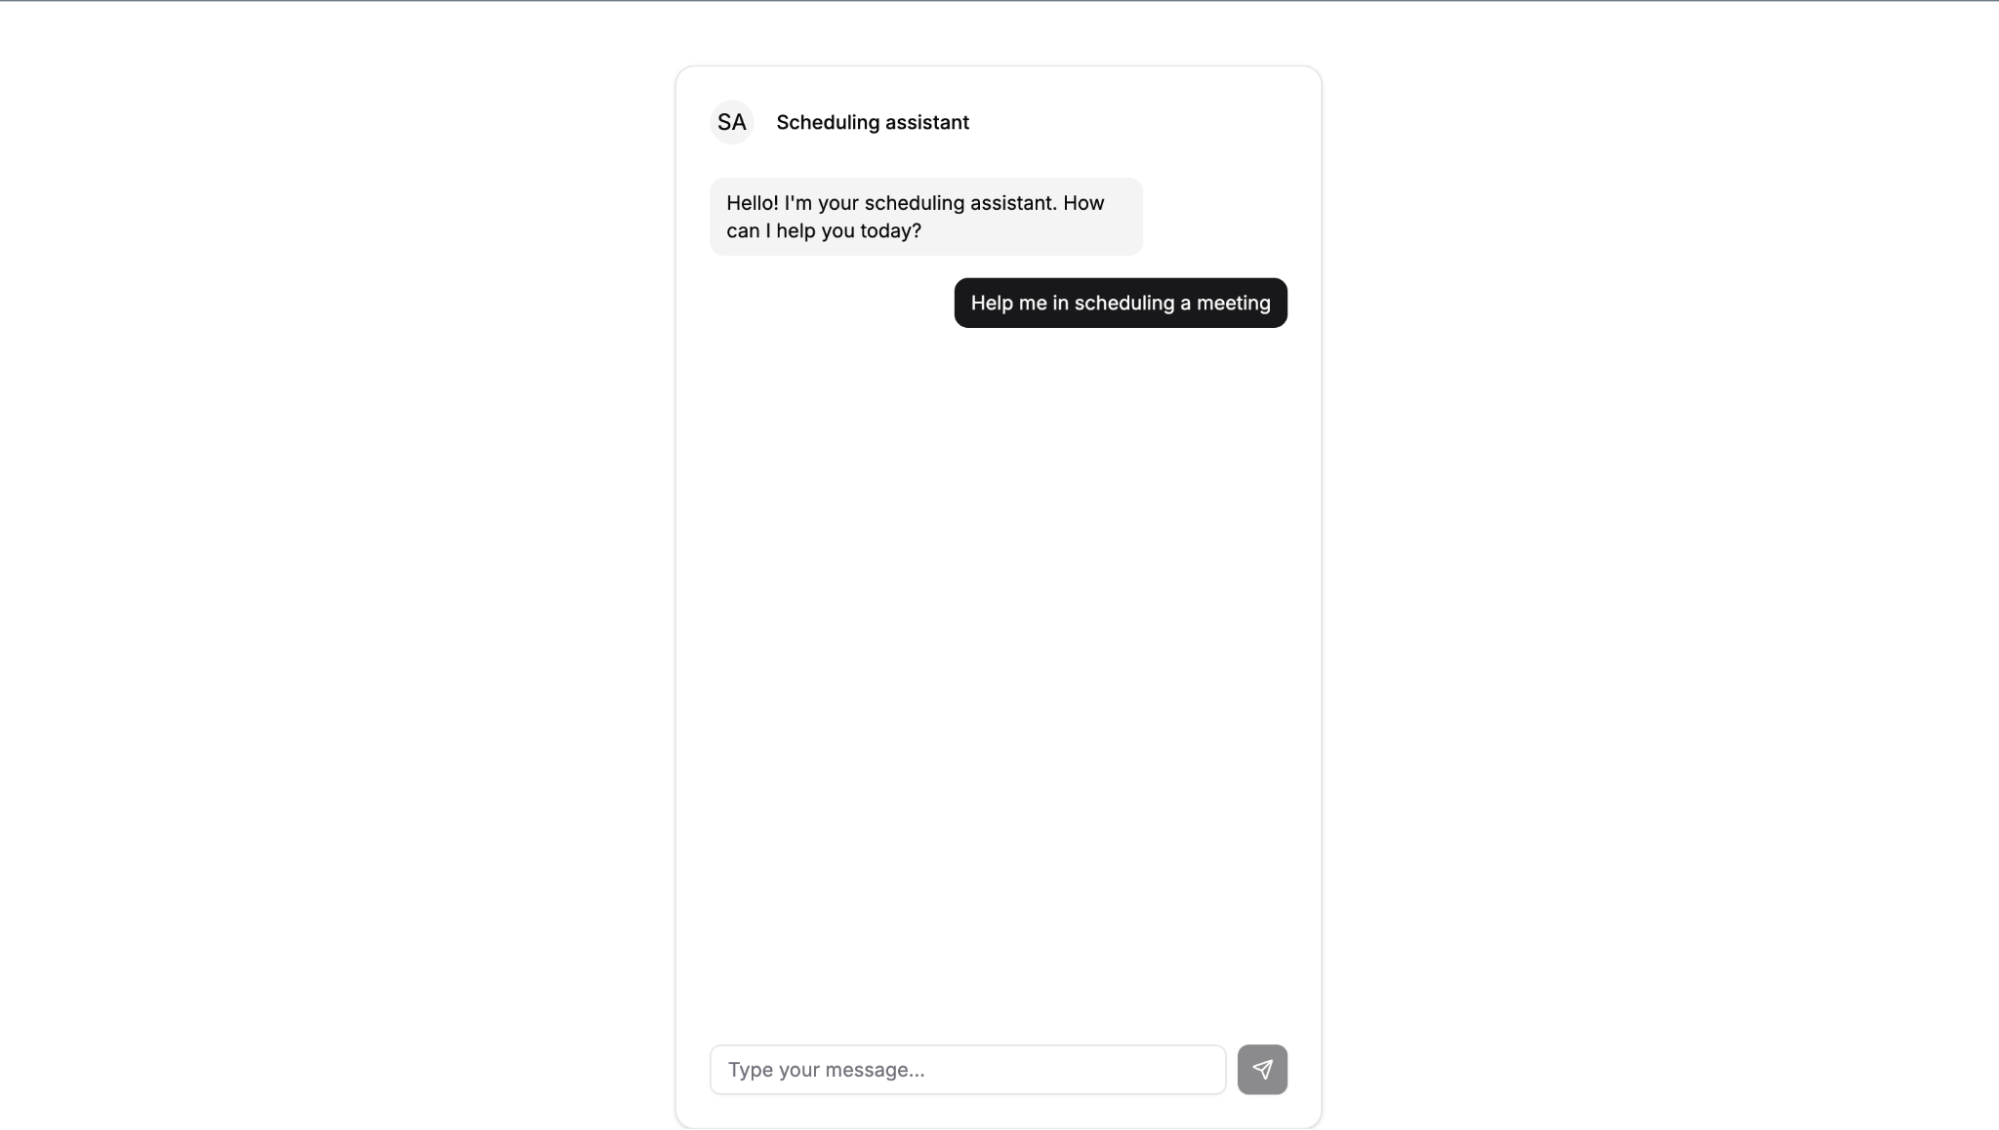
And this is how the UI looks:
We will now integrate the OpenAI API into our application. We first get an API key by registering as a developer on the OpenAI platform. Next, we will install the OpenAI API client by running the following command:
npm install openai
We create an .env.local file in the root of our project and add the following line:
VITE_OPENAI_API_KEY=your_api_key
Replace your_api_key with the API key you got from the OpenAI platform. Then, we import the OpenAI client into our chat.jsx file:
import { OpenAI } from 'openai';
Initialize the client:
const API_KEY = import.meta.env.VITE_OPENAI_API_KEY
const openai = new OpenAI({
  apiKey: API_KEY,
});
We modify the handleSubmit function to call the OpenAI API and get a response. We will use the GPT 4.1 model for this. The function will look like this:
const updatedMessages = [
  ...messages,
  {
    role: 'user',
    content: input,
  },
];

const response = await client.responses.create({
  model: "gpt-4.1",
  input: updatedMessages,
});

const assistantMessage = response.output_text;

setMessages((prev) => [
  ...prev,
  {
    role: 'assistant',
    content: assistantMessage,
  },
]);
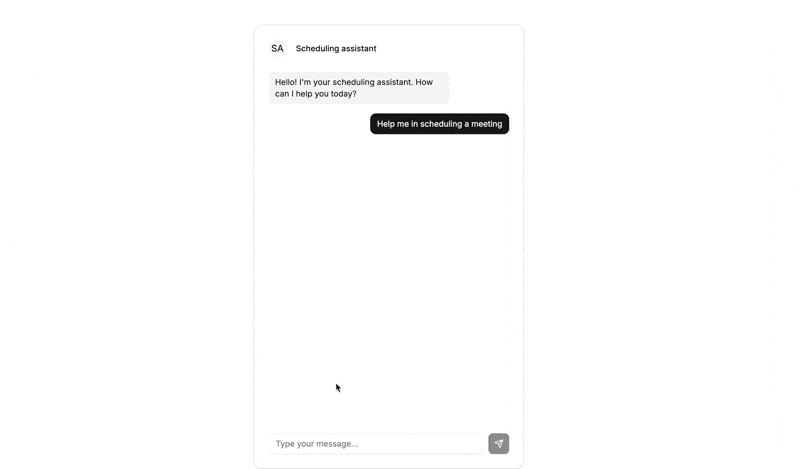
Notice that we append the latest user message to the list of messages and then call the API with the updated list. We also take the output message (the assistant’s response) and append it to the list of messages. This way, the UI gets updated with the latest message:
You can see that the assistant is replying, asking for a time and date for the meeting. This is because of the system prompt that we have set, which explains the assistant’s role to the model. We will set the system prompt as follows:
{
  role: 'system',
  content: "You are a scheduling assistant for Mr. KK. You can help the user in scheduling a 30 minute meeting by first accepting the date for which the meeting is expected. Then, using the tools, try to schedule the meeting during that time and provide confirmation after calling the proper tool.",
},
We will now define the tools or functions that the assistant can utilize to fulfill the user’s request. These functions will act as the model’s eyes and ears to the outside world. The model will use these functions to check the calendar for availability and book the meeting.
But before that, we need a function to work with dates and times.
parse_date functionWe run into our first problem when the user provides a date and time to the model in natural language. Consider the scenario where the user inputs Tomorrow for the date.
If we do not have a function to parse the date, the model will take Tomorrow to be the next day from the knowledge cut-off date. This is not what we want. We want the model to understand that Tomorrow means the next day from the current date. To implement this, we will create a tool definition in the expected JSON format:
{
  "type": "function",
  "name": "parse_date",
  "description": "Get the date from natural language sentence",
  "parameters": {
    "type": "object",
    "properties": {
      "date": {
        "type": "string",
        "description": "A natural language date like yesterday, tomorrow, last friday, 24th April"
      }
    },
    "required": [
      "date"
    ],
    "additionalProperties": false
  },
  "strict": true
}
This is the format specified by OpenAI for defining functions that the model can use. Here, we give the function a name, specify its purpose in detail in the description field, and also provide detailed information about the input parameters. We then pass this function inside a tools array to the API call as follows:
const response = await client.responses.create({
  model: "gpt-4.1",
  input: updatedMessages,
  tools: tools,
});
With that in place, let’s test how this works. We’ll send a message to the assistant asking for a meeting “two weeks from now”:

Because the assistant is unable to understand the date from that natural language context, in the response, we see that its output is of type function:
{
  "id": "fc_6815f785b7188191a7c15279f9e9084102e882e0265f41fb",
  "type": "function_call",
  "status": "completed",
  "arguments": "{\"date\":\"2 weeks from now\"}",
  "call_id": "call_awXJ39Zj0pryh9nDcN9ao6X4",
  "name": "parse_date"
}
This means that the model is passing the context back to the client and asking it to call the parse_date function with the arguments {"date":"2 weeks from now"}. So we now need to implement the parse_date function. We will use the chrono-node library for this purpose. Let’s first install the library by running the following command:
npm install chrono-node
Then, we will import it into our chat.jsx file:
import chrono from 'chrono-node';
We will then implement the parse_date function as follows:
const date_args = JSON.parse(firstResponse.arguments);
const parsedDate = chrono.parseDate(date_args.date);
const pDate = new Date(parsedDate);
const formatted = format(pDate, 'EEEE, do MMMM');
setMessages((prev) => [
  ...prev,
  {
    role: 'assistant',
    content: `I see that you want to schedule a meeting for ${formatted}. Is that correct?`,
  },
]);
Here, we are taking the arguments from the model’s response and parsing them using the chrono-node library. We then format the date to a more readable format and add it back to the messages array. That way, when the messages are sent back to the model after the user confirms the date, the model will have the correct date to work with.
After the function is invoked, this message gets added to the chat:
{
  "role": "assistant",
  "content": "I see that you want to schedule a meeting for Saturday, 17th May. Is that correct?"
}
The user can then confirm the date by replying with yes or no. If the user replies yes, we can move on to the next step of scheduling the meeting. If the user replies no, we can ask for an alternative date and repeat the process.
schedule_meeting functionOnce the user confirms the date and we have a programmatic date to work with, we need to invoke a scheduler function that will check the calendar for availability and book the meeting. We will define the function as follows:
{
  "type": "function",
  "name": "schedule_meeting",
  "description": "Schedule a meeting at the specified date and time",
  "parameters": {
    "type": "object",
    "properties": {
      "date": {
        "type": "string",
        "description": "A date to schedule the meetings for e.g 25 april, tomorrow, next friday etc.",
      },
      "time": {
        "type": "string",
        "description": "A time to schedule the meetings for e.g 9am 2pm",
      }
      "title": {
        "type": "string",
        "description": "A title for the meeting like 'meeting with KK', 'meeting with client', 'meeting with team' etc.",
      }
    },
    "required": [
      "date", "time"
    ],
    "additionalProperties": false
  },
  "strict": true
},
Notice that this function definition takes in three parameters: date, time, and title. The model will invoke this function after getting the date, time, and title from the user through its natural language processing capabilities. If the model has the necessary data, it will send the output as a function call. This is how that invocation looks:
{
  "id": "fc_68161f5c5d6481918d27bbc4bbc6b0d00ea30a77b5168b68",
  "type": "function_call",
  "status": "completed",
  "arguments": "{\"date\":\"tomorrow\",\"time\":\"10am\",\"title\":\"Meeting with Tim\"}",
  "call_id": "call_nJLPsGfrY8tQs5qlgXRxqfVO",
  "name": "schedule_meeting"
}
As we are successfully able to invoke the function, we will implement it now. We can code the schedule_meeting function as follows:
const meeting_args = JSON.parse(firstResponse.arguments);
const date = meeting_args.date;
const time = meeting_args.time;
const title = meeting_args.title;
const parsedDateTime = chrono.parseDate(`${date} ${time}`);
const status = await scheduleMeetings(parsedDateTime, title);
let message = "";

if (status === 'success') {
  message = "scheduled successfully!";
} else {
  message = "Sorry, I was unable to schedule the meeting. Can you try another date and time.";
}

const newMessages = [
  ...updatedMessages,
  {
    role: 'assistant',
    content: message,
  },
]
setMessages(newMessages);
Notice how we are parsing the date and time from the model’s response and then creating a valid date object from it using the chrono-node library. We then call the scheduleMeetings function, which will mock the process of checking the calendar and booking the meeting.
Let’s implement the scheduleMeetings function. We will use a hardcoded JSON object to mock the current meetings in the calendar. The function will look like this:
export function scheduleMeetings(date, title) {

  const d = new Date(date);
  const overlap = doesMeetingOverlap(d, 30);

  if (overlap) {
    return 'error';
  } else {
    const startTime = new Date(d.getTime());
    const endTime = new Date(startTime.getTime() + 30 * 60000);
    existingMeetings.push({ title: title, startTime, endTime });
    return 'success';
  }
}
Here, we are checking if the meeting overlaps with any of the existing meetings in the calendar. If it does, we return an error. If it does not, we add the meeting to the list of existing meetings and return success.
Once this success or error message is returned to the user, the assistant will then send a confirmation message to the user based on the logic in the handler. And that is the whole flow. With that in place, this is what a sample conversation looks like:
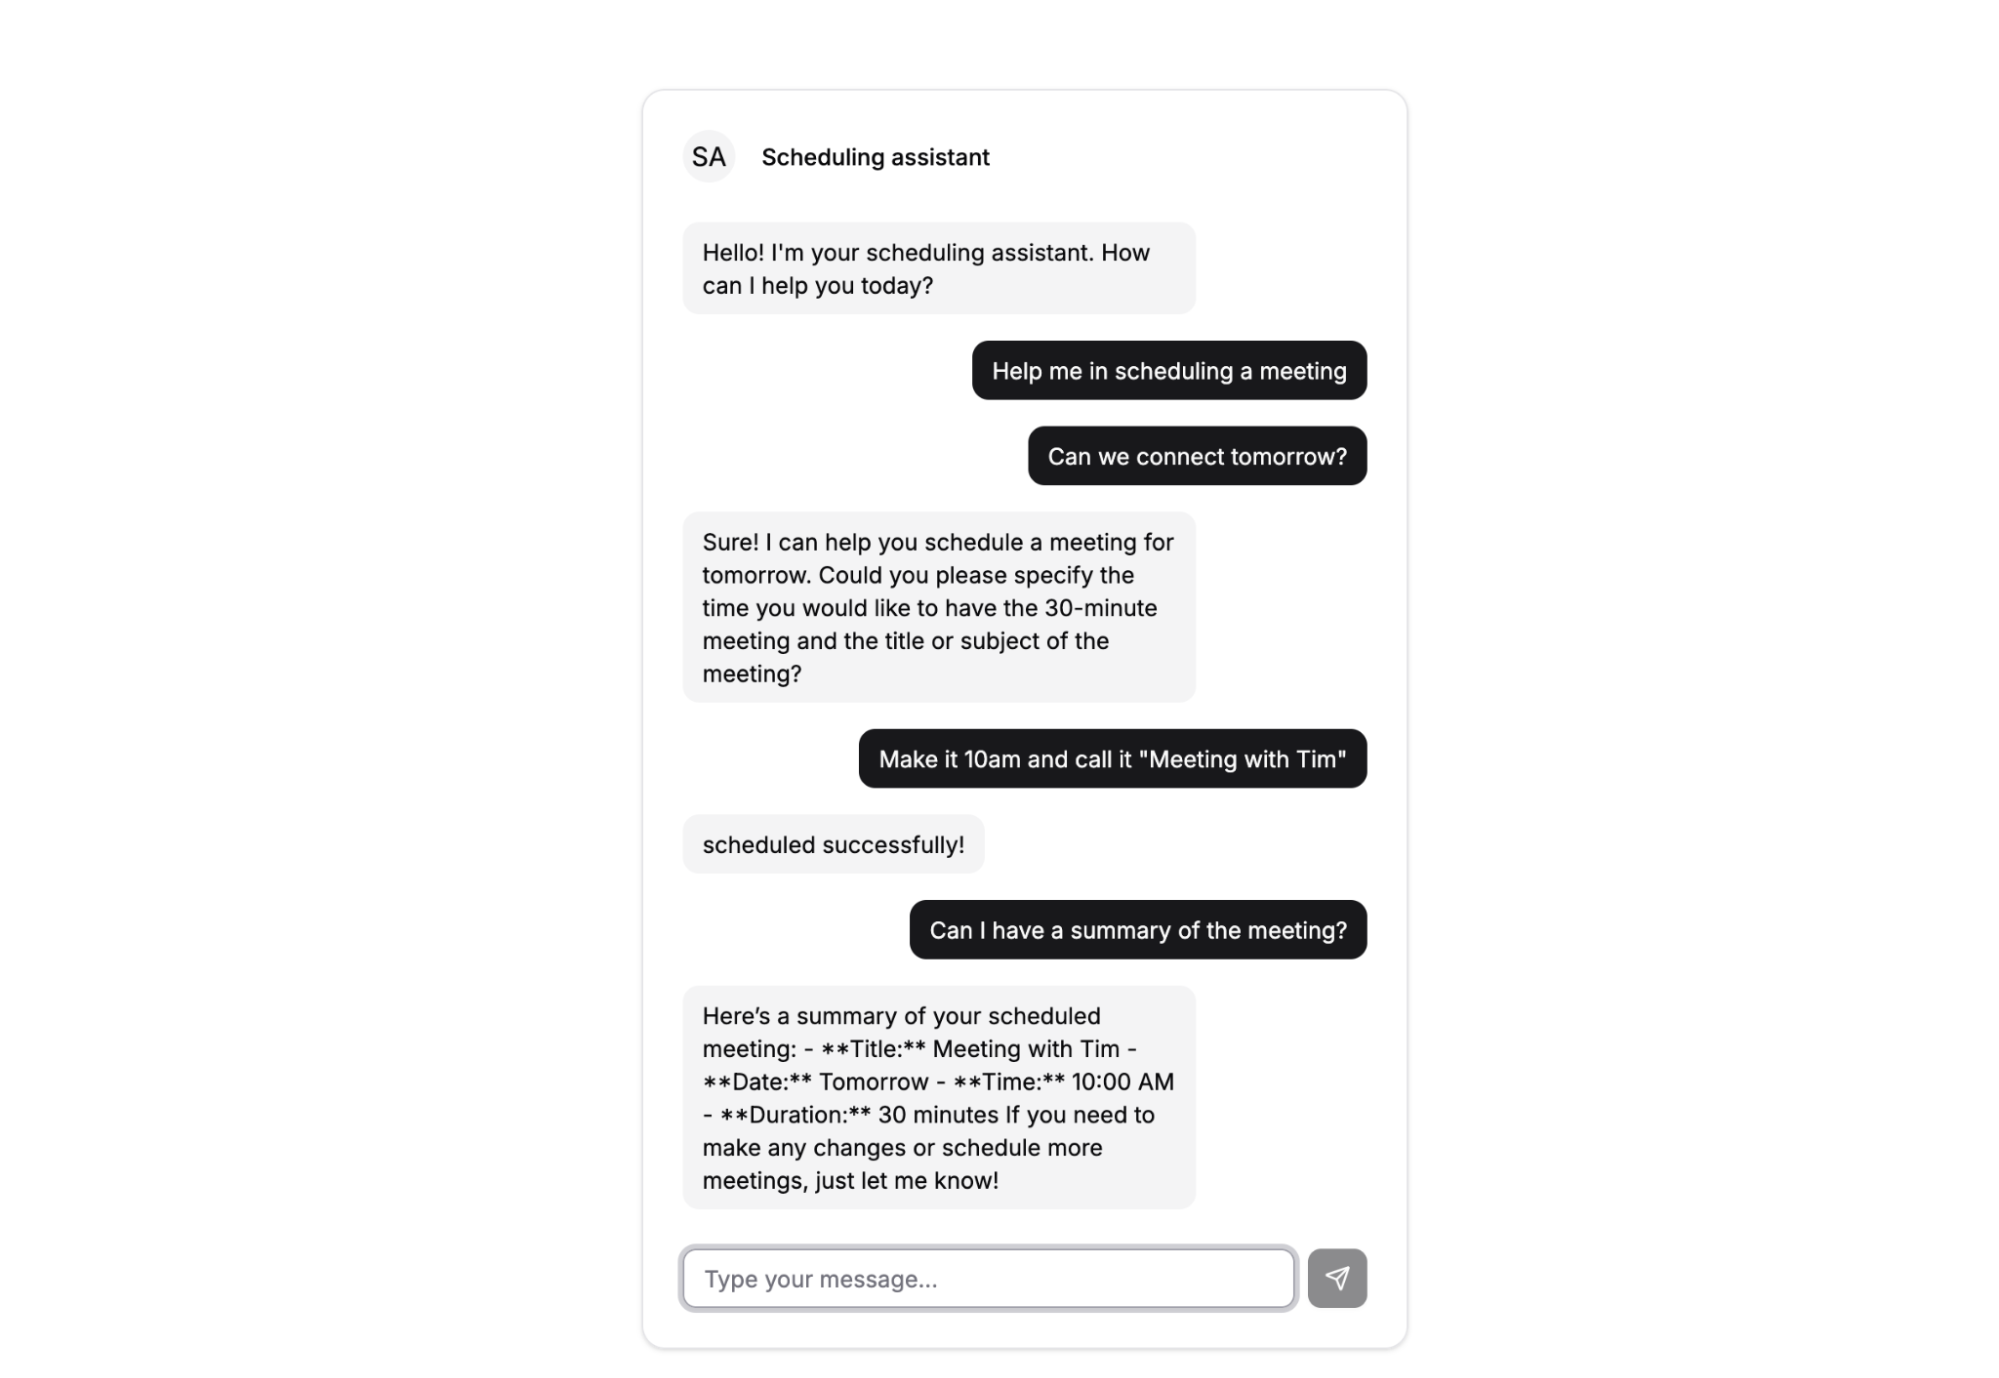
Notice how the assistant can pull out the time as 10 am and the title as “Meeting with Tim” based on the message, “Make it 10 am and call it ‘Meeting with Tim'”. That is the power of LLMs. They can understand the context and extract the necessary information from the user’s message.
Now, let’s try to schedule a meeting for a time when the host is already blocked as per the dummy calendar we’ve set up. As we can see, there is already a meeting scheduled from 11 am to 12 pm. Let’s try to schedule another meeting at 11 am:
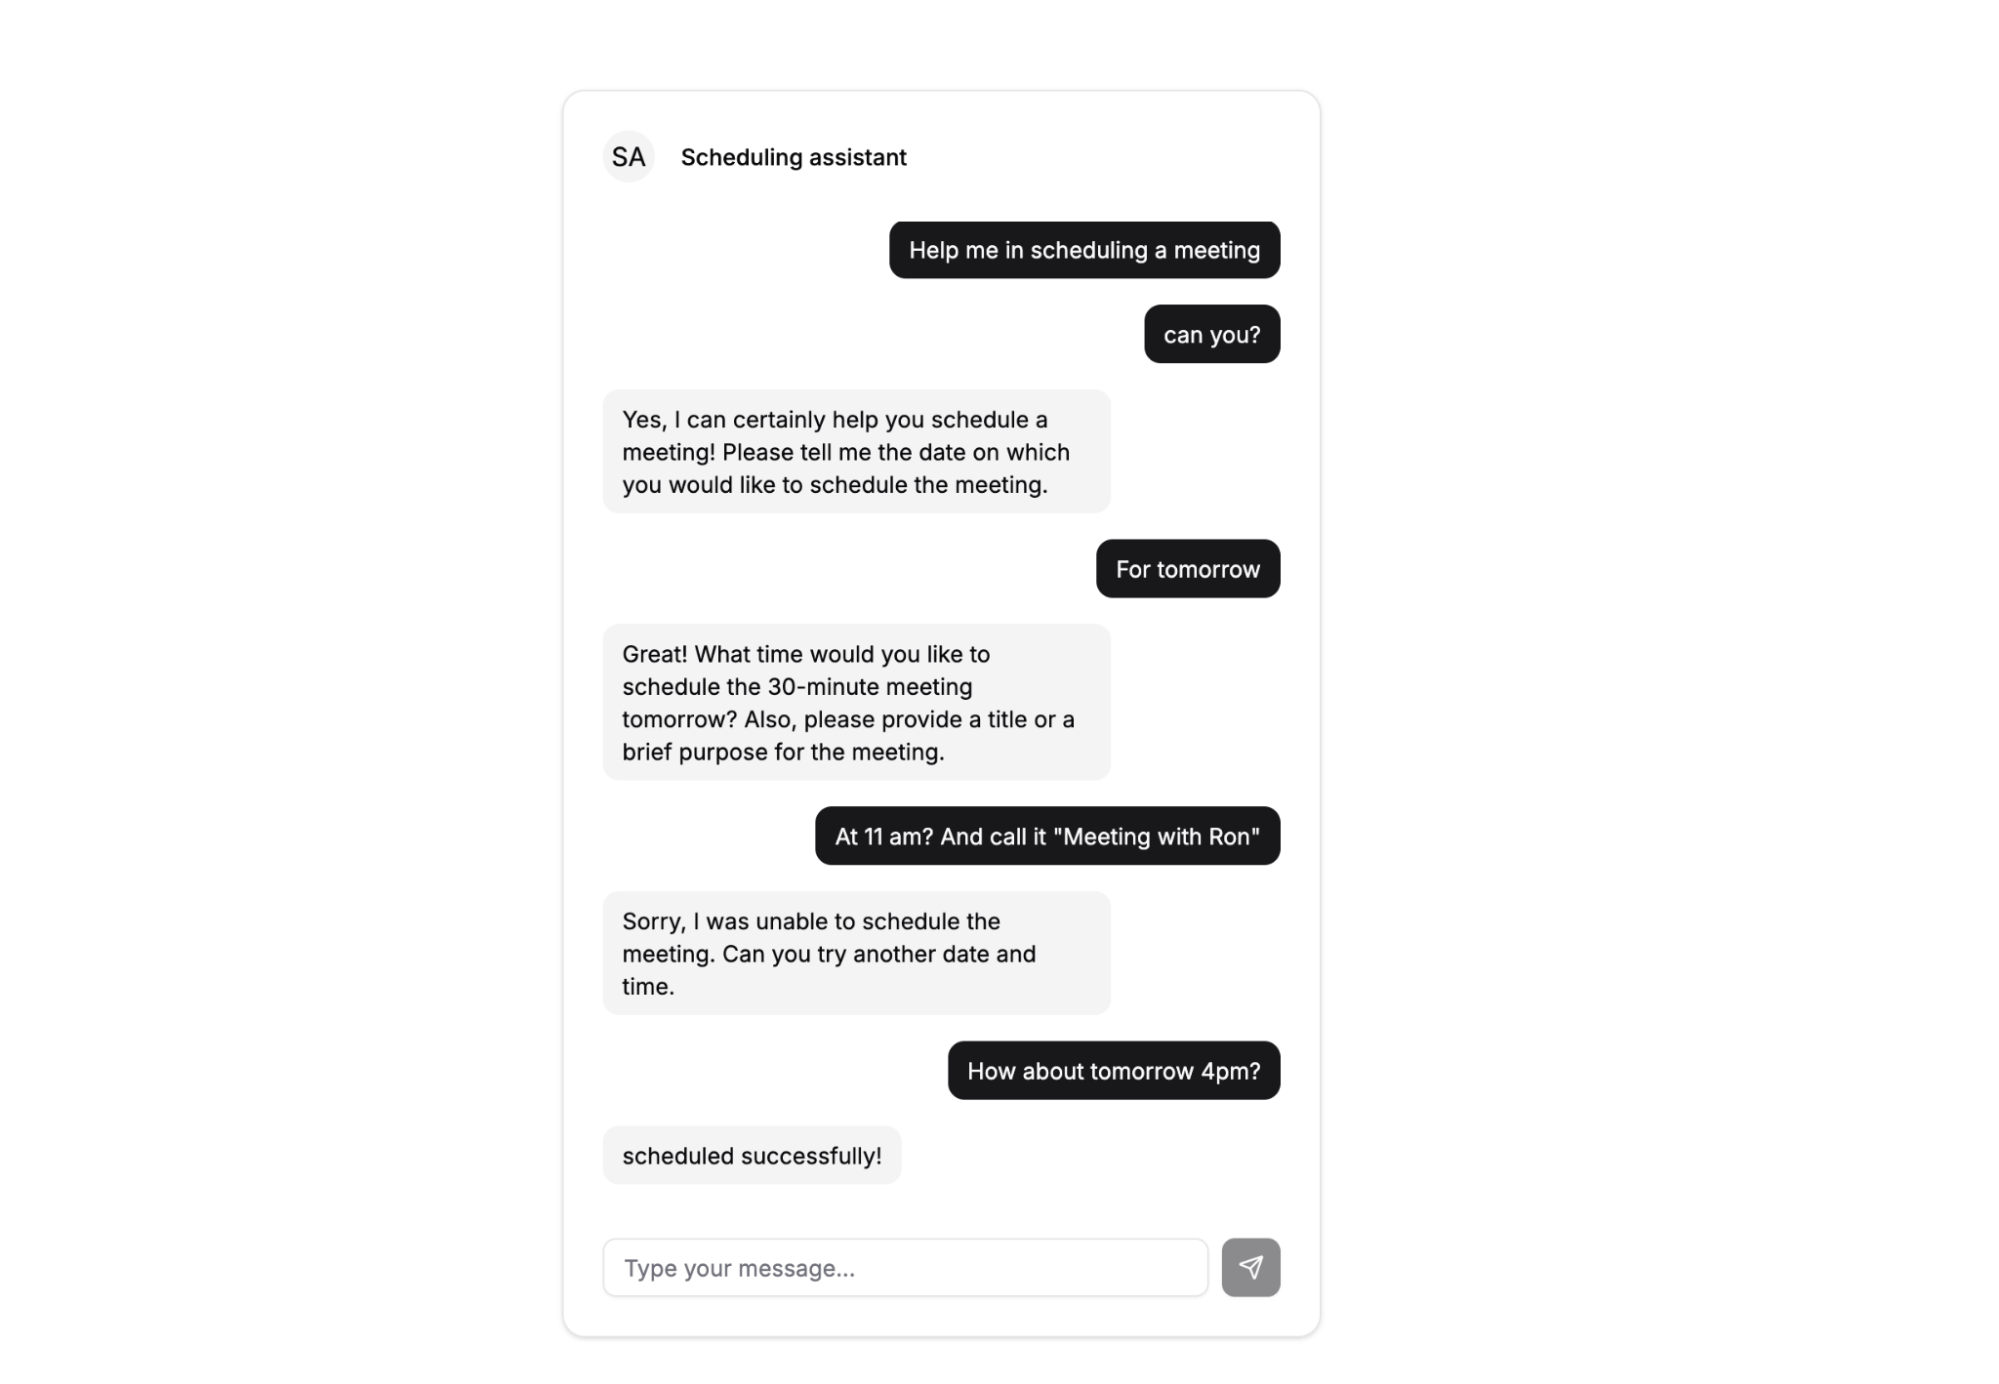
This request fails the first time because our scheduleMeetings function returns an error. The model adds a relevant chat message based on the error response. The user provides an alternate time. Notice how the model does not ask for the meeting date and title again. It just uses the relevant data from the previous function and calls the scheduleMeetings function again. This time, the function returns a successful message, and the meeting is scheduled.
And there we go! We have our fully functional scheduling assistant.
In this tutorial, we implemented a scheduling assistant that can help you book meetings in your calendar by checking your availability in real time. The assistant can understand natural language and extract the necessary information from users’ messages. It is also able to check the calendar for availability and book meetings, functionalities made possible through function calling. The functions will run in the context of our application and don’t need a separate server.
The next time you find yourself reaching for the MCP server, consider using function calling instead. It might just be a better and easier solution for your use case.

useEffect breaks AI streaming responses in ReactSee why useEffect breaks AI streaming in React, and how moving stream state outside React fixes flicker and stale updates.

A real-world debugging session using Claude to solve a tricky Next.js UI bug, exploring how AI helps, where it struggles, and what actually fixed the issue.

CSS wasn’t built for dynamic UIs. Pretext flips the model by measuring text before rendering, enabling accurate layouts, faster performance, and better control in React apps.

Why do real-time frontends break at scale? Learn how event-driven patterns reduce drift, race conditions, and inconsistent UI state.
Hey there, want to help make our blog better?
Join LogRocket’s Content Advisory Board. You’ll help inform the type of content we create and get access to exclusive meetups, social accreditation, and swag.
Sign up now

