Choosing how to deploy modern web applications quickly leads you to Platform as a Service tools like Vercel, Netlify, Neon, and Supabase. They promise cloud hosting with almost zero setup, and to be fair, they deliver on that promise.
These platforms are genuinely pleasant to use. They smooth out development workflows and come packed with conveniences. Vercel and Netlify, for example, ship with global CDNs and edge networks out of the box to keep latency low. Most of them also handle scaling automatically, so traffic spikes don’t immediately turn into operational problems.
The downside is what comes with that convenience. Pricing is often unpredictable, and control over the underlying infrastructure is intentionally limited.
I ran head-first into those limits while working on a side project with two internal services: a backend server and a Content Management System (CMS). Each needed its own Postgres “environment.” In a shared setup, database migrations from the CMS kept wiping data created by the server. My first attempt at fixing this was straightforward: split things into separate schemas, cms alongside the default public. That should have worked. It didn’t.
The reason was frustrating. The database provider had taken a well-known open source project and locked basic functionality behind a paywall, wrapped in a glossy UI. What should have been a simple configuration choice turned into a pricing tier problem. I was livid.
That kind of vendor lock-in story isn’t rare. Developers regularly share accounts of apps going viral and triggering shockingly high cloud bills. In 2022, David Heinemeier Hansson (DHH) publicly announced his company’s exit from the cloud after spending around $3.2 million per year on infrastructure. By moving back to on-prem hardware, his companies saved roughly $1.5 million annually, without layoffs or team restructuring.
Examples like these are why self-hosted PaaS tools such as Coolify and Dokploy are so appealing. Running on your own VPS or local network, they give you back control over your infrastructure, predictable costs, and the freedom to run software the way you actually need to, without vendor-imposed constraints.
The Replay is a weekly newsletter for dev and engineering leaders.
Delivered once a week, it's your curated guide to the most important conversations around frontend dev, emerging AI tools, and the state of modern software.
Before diving in, here’s what you’ll need:
Start by purchasing a VPS from a reliable provider like Hetzner, Hostinger, or DigitalOcean. Once you have access, we’ll secure and prepare it for production before installing PaaS software.
First, update the system:
sudo apt update && sudo apt upgrade -y # For Ubuntu/Debian
Next, generate an SSH key on your local machine for secure access:
ssh-keygen -t ed25519 -C "[email protected]"
Now copy the public key into your VPS:
ssh-copy-id user@your-vps-ip
Next, we’ll perform a few essential security steps to protect your VPS. It is strongly recommended that you create a new Linux user and avoid accessing the server as the root user, as doing so introduces significant security risks and a high chance of accidental, irreversible system damage.
Start by creating the new user and adding them to the sudo group:
sudo adduser mynewuser
sudo usermod -aG sudo mynewuser
You’ll be prompted to enter a password for your new user. You must store it safely, as we’re going to disable root SSH login and password authentication. Run sudo nano ~/etc/ssh/sshd_config and edit these lines:
PermitRootLogin no
PasswordAuthentication no
This significantly reduces the attack surface by blocking the automated bots that constantly attempt brute-force SSH logins on newly provisioned servers.
It’s also advised to enable a firewall with UFW. You can also install Fail2Ban for brute-force protection:
sudo apt install ufw fail2ban -y
sudo ufw allow OpenSSH
sudo ufw enable
Finally, restart the SSH service:
sudo systemctl restart sshd
For more advanced setups, like exposing services from a home network, consider tools like Cloudflare Tunnels or Tailscale for secure access.
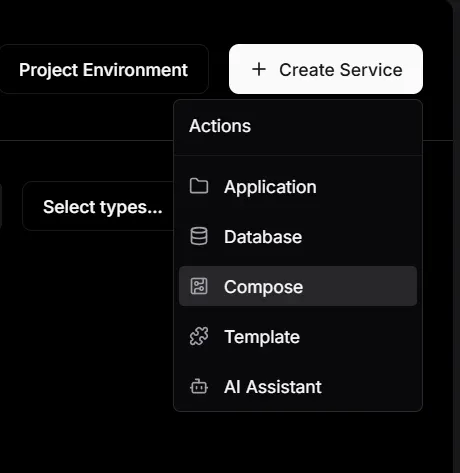
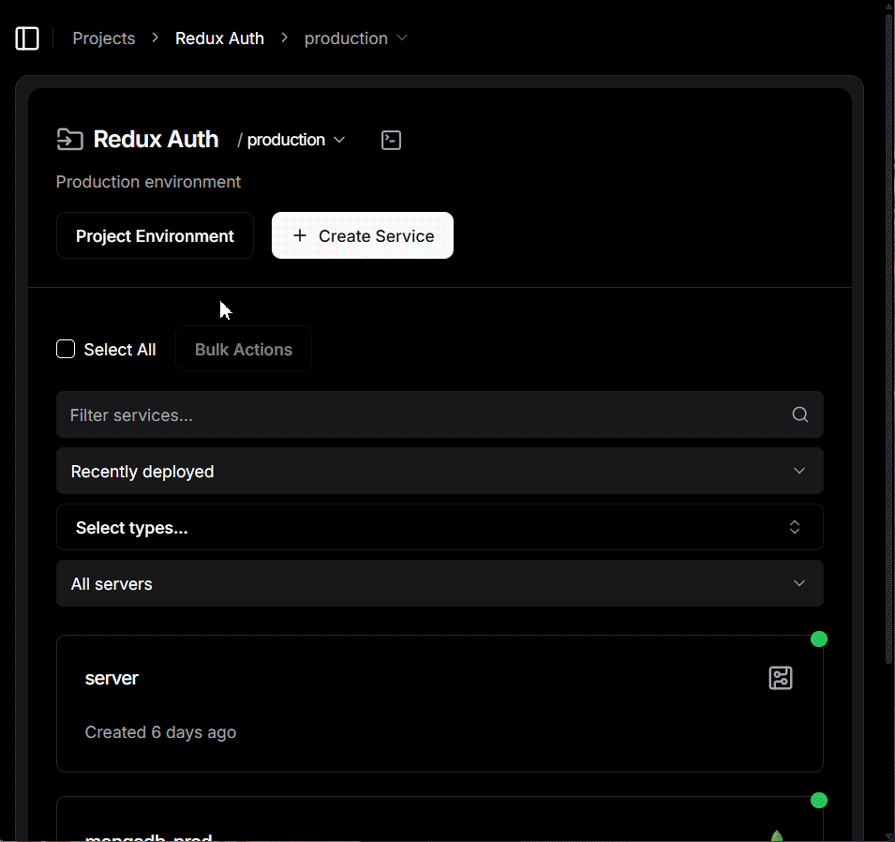
With the VPS configured, you can now install Dokploy and evaluate its core features, including database services, backups, application deployment, scheduled jobs, domain configuration, and Docker Compose compatibility, while comparing them against Coolify’s feature set.
Install Dokploy by running the following command in your terminal:
curl -sSL https://dokploy.com/install.sh | sh
This command automatically installs Docker if it’s not present, configures the web interface on port 3000, and gets you started within minutes. Access the dashboard at http://your-vps-ip:3000 and create your admin account.
If you want to experiment with both platforms side-by-side, you can install Coolify on the same server, but this approach isn’t recommended for production environments due to port conflicts, such as on 80 (HTTP) and 443 (HTTPS). Since Coolify offers more granular installation options than Dokploy, you can configure it to run on an alternate port, such as 9000:
sudo env APP_PORT=9000 bash -c "$(curl -fsSL https://cdn.coollabs.io/coolify/install.sh)"
Coolify provides an onboarding wizard that guides you through initial configuration, while Dokploy places you directly into the dashboard. Both platforms handle Docker and its dependencies automatically, though Dokploy’s installation script executes noticeably faster – 21 minutes faster in my case.
By default, running Docker commands as your non-root user requires the sudo prefix. You can eliminate this requirement by adding your user to the Docker group:
sudo apt install docker.io -y  # Ubuntu
sudo usermod -aG docker mynewuser
newgrp docker # activate docker group membership
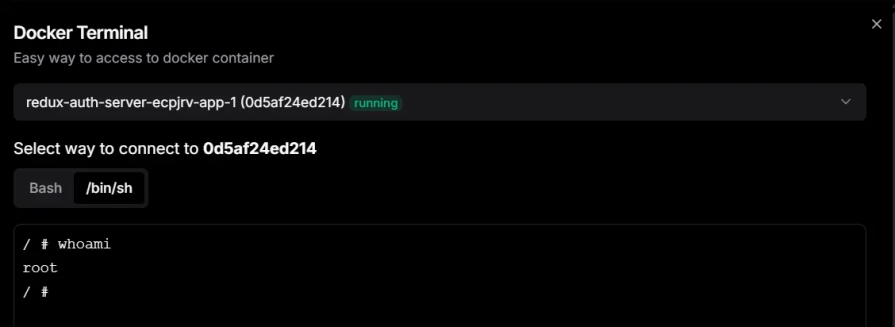
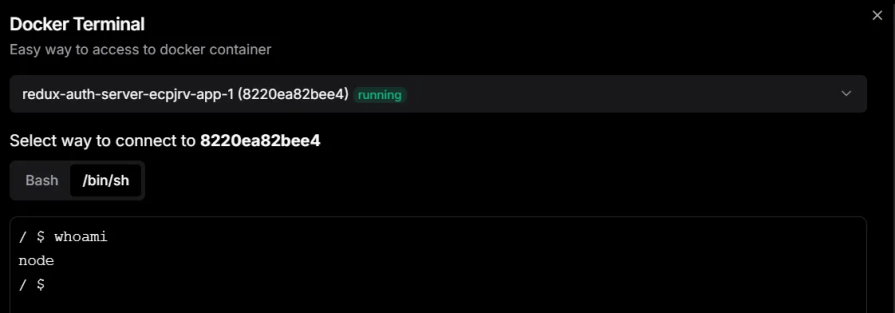
Before we jump into deploying an application on either of these services, it’s crucial to understand that Docker containers themselves should never run as root. This security principle became evident during the recent React2Shell vulnerability exploit, where attackers exploited a flaw in React Server Components to execute malicious server-side code.
In a reported case on Reddit, the attacker was able to take full control of the server because the Dockerized application was running as root. If the application had been configured to run as a non-root user, the attacker’s access would have been limited to that user’s permissions, preventing a complete system takeover.
When deploying applications with Docker Compose, you can enforce non-root execution by specifying a user ID (UID)and group ID (GID):
version: '3.9'

services:
  app:
    image: node:20-alpine
    container_name: app
    working_dir: /app
    volumes:
      - .:/app
    command: npm run start
    user: '1000:1000' # run as non-root user
    ports:
      - '3000:3000'
The 1000:1000 values correspond to the UID and GID of the first regular user created on most Linux systems. If you’re working with a different user, say, the third user account on your server, you’ll need to identify their specific UID and GID and update the compose file accordingly. Run this to get their credentials:
id mythirduser
# Output: uid=1002(mythirduser) gid=1002(mythirduser) groups=1002(mythirduser)
For example, here’s the difference in Dokploy before and after adding the non-root user setting.
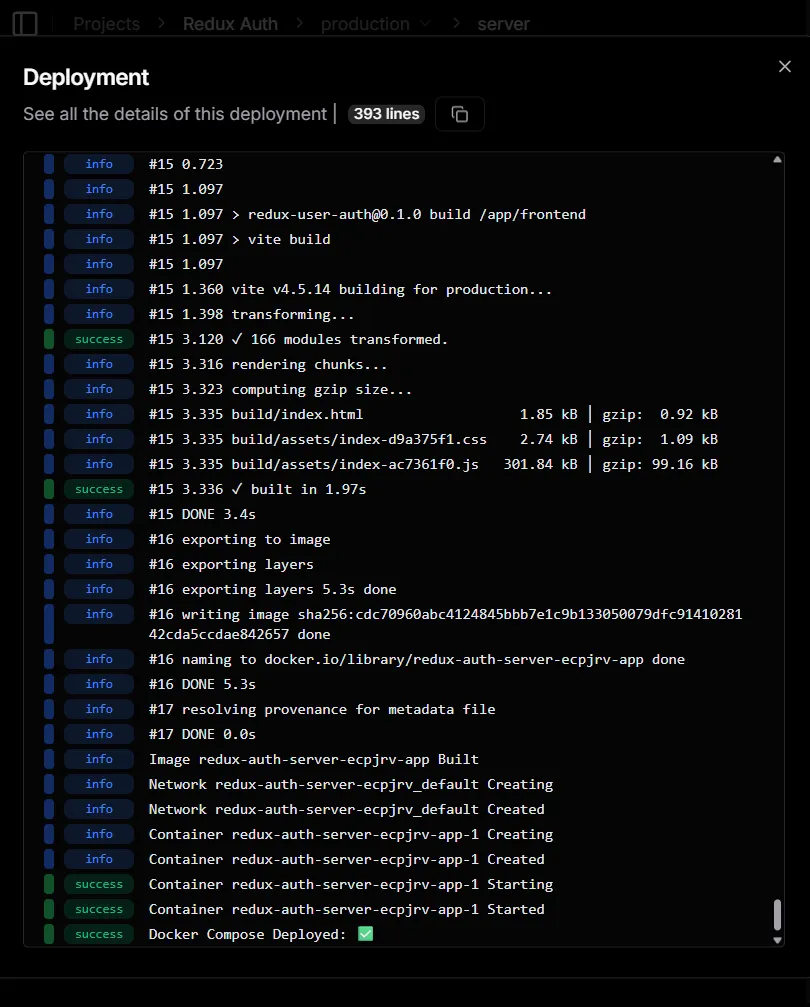
Let’s now proceed to deploy a MERN stack application that demonstrates user authentication and uses Docker Compose.
I deployed this MERN Stack application on both platforms to keep the comparison honest. The goal was simple: connect a repo, deploy it with Docker Compose, make some changes, and redeploy to test the build workflow. The Docker Compose setup also contains a Docker volume for storing application logs so we can test volume backups. This structure is enough to help us test the fundamental features of both services.
Both Dokploy and Coolify support the Git providers you would expect: GitHub, GitLab, Bitbucket, and Gitea. Dokploy also offers the nostalgic “FTP drag and drop” style deployment. Although this method requires a .zip upload. Dokploy also claims to help with AI during deployment. I added an AI provider, but I could not find where that AI help shows up in the actual deployment flow.
Coolify’s flow required too many clicks for me. After adding the GitHub provider, I was still prompted to select my provider during deployment, and I had to click a button to load my selected repository list.
Dokploy felt more direct here. Once I connected GitHub, it auto-loaded my account and repository data without extra steps.
Both platforms support the big three build paths:
I used Docker Compose on both tools. On Dokploy, the Docker Compose deployment was a little faster in my test. On Coolify, I noticed it injected a helper image during each deployment. That may be part of how it orchestrates builds and networking, and it could also affect deployment speed.
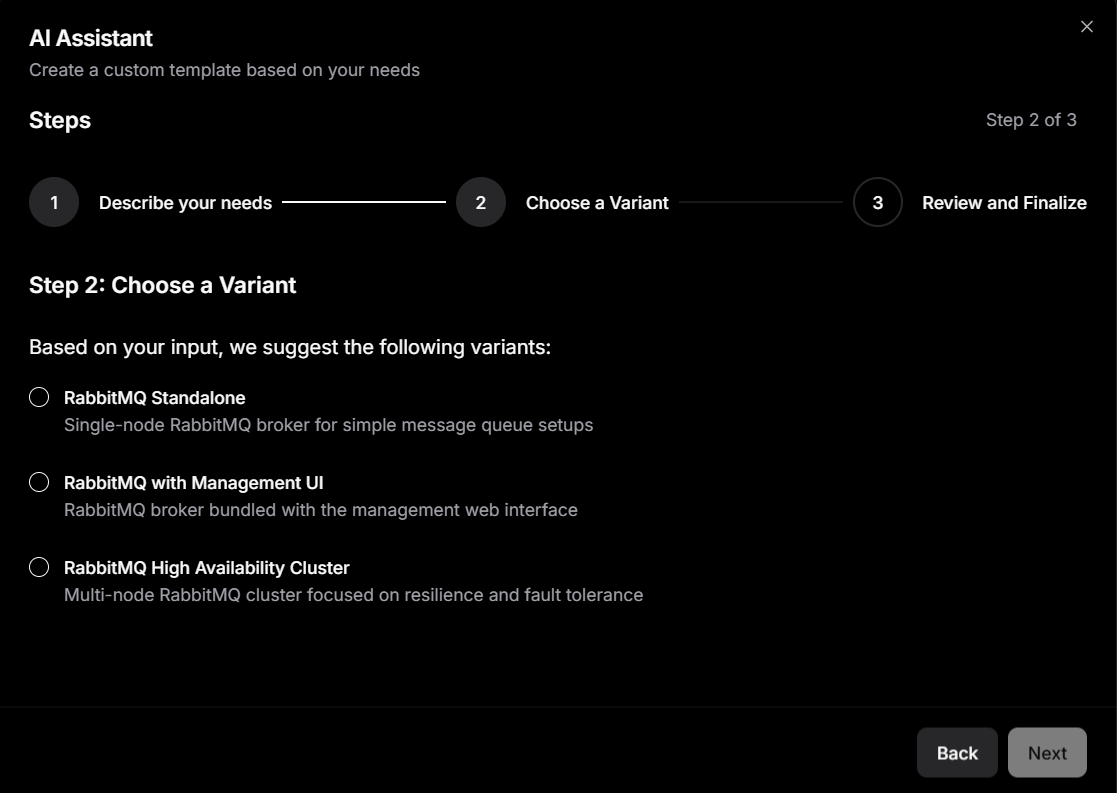
Interestingly, Dokploy also lets you deploy applications using its AI assistant, which appears as the last option in the dropdown shown above. After connecting an AI provider, you can describe the kind of application you want to deploy, and the agent generates a Docker Compose file based on that description.
While experimenting with both services and updating my application’s source code, I noticed that stopping and restarting a container on Dokploy did not require a full rebuild of the app. It behaved like a straightforward container stop and start.
On Coolify, however, stopping and starting the app triggered a rebuild from scratch. If your workflow includes frequent restarts while you debug the configuration, this detail changes the “feel” of the platform.
Preview deployments were easier to get going on Coolify. On Dokploy, preview deployments required extra setup work compared to Coolify.
Both platforms support environment variables, but the philosophies differ. Dokploy has a concept of shared variables(project-level), environment-level variables, and service-level variables. It also supports referencing shared variables from services.
Coolify supports build-time and runtime environment variables, and it has the idea of shared variables scoped to teams, projects, and environments.
When it comes to Docker Compose compatibility, both Dokploy and Coolify support deploying multi-service applications, but they take noticeably different approaches in how closely they stick to Docker’s native workflow.
Dokploy is designed to work directly with standard Docker Compose files. You can deploy an existing docker-compose.ymlwith little to no modification, and the platform largely treats it the same way Docker itself would. Networking, volumes, and service definitions behave as expected, and Dokploy handles ingress by attaching Traefik routing internally rather than forcing you to restructure your Compose setup. This makes it especially friendly for teams migrating existing Compose projects, since what works locally tends to work the same way in production.
Coolify also supports Docker Compose, and it allows you to deploy stacks by pasting or syncing a Compose file from a repository. However, Coolify layers its own platform logic on top of Compose. It creates managed networks, injects proxy containers, and maps routing and domains through its UI. While this simplifies common use cases, it can introduce friction in more complex or non-standard Compose setups, where port exposure, labels, or networking behave slightly differently than they would under plain Docker Compose.
Both platforms use Traefik for routing, but again, the level of abstraction differs. Dokploy stays close to Docker’s label-based routing model and allows direct control when needed. Coolify still uses Traefik under the hood, but much of the routing configuration is handled automatically by the platform, which can make advanced customization less transparent.
Dokploy also ships with native Docker Swarm support as the installation process initializes and uses Docker Swarm as part of setting up Dokploy on a server. This lets you scale Compose-based stacks across multiple servers using Docker’s own orchestration tools. Coolify has multi-server capabilities, but they are still flagged as experimental
Overall, Dokploy’s philosophy is to stay close to Docker itself, with fewer abstractions between your Compose files and what actually runs on the server. Coolify provides more platform features and guardrails, but that convenience comes with added abstraction and occasional compatibility quirks in complex Docker Compose projects.
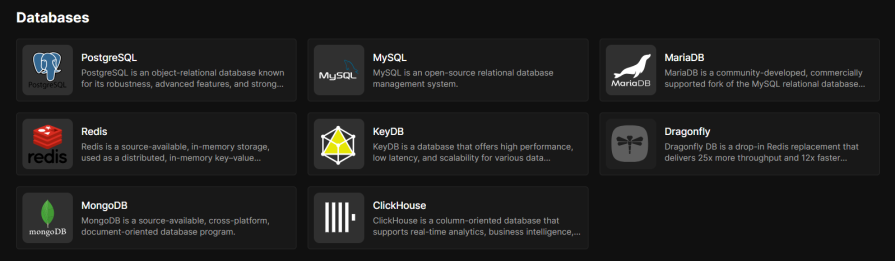
Databases were the whole reason I cared about open source PaaS in the first place. Both platforms give you one-click database provisioning, and they cover the usual engines: PostgreSQL, MySQL, MariaDB, Redis, and MongoDB. Coolify goes further with a longer list of database options for more specialized use cases.
I was able to provision a MongoDB on both services and connected it to my development server without drama. I also spun up a Postgres instance and verified that I could create as many schemas as I wanted, with no restrictions or paywall.
Where the two start to separate is in backups. Coolify backups target databases in particular. If the thing you care about is protecting a Postgres or Mongo instance, it fits well.
Dokploy’s backup story is broader. It supports volume backups to S3-compatible storage, and that is a big deal when your“data” is not only a database. Think SQLite, uploaded files, or anything else living inside a persistent volume.
There is a catch worth calling out because it affects real deployments. Dokploy’s volume backups work with Docker named volumes, not bind mounts. If you are used to mounting host folders directly, you may need to adjust how you persist data.
Scheduled tasks are an essential part of production. Dokploy approaches this from a few angles. You can run commands inside application containers, inside specific Docker Compose services, and you can also schedule scripts that run on the host. That host-level option matters when you need basic server maintenance tasks, or when the job should not live inside any particular container.
Coolify supports scheduled tasks at the application level, which is usually what you want for simple cron-style jobs, things like running a script or triggering a periodic command.
The practical takeaway is simple: if your “cron” needs to stop at running a command inside your app, both platforms cover it. If you want scheduled work that operates at the machine level, Dokploy makes that a first-class option.
Probably the most underrated but essential feature for a production server is notifications, as you’re not going to spend all your time monitoring the dashboard, waiting for something to go wrong.
Coolify supports a wide range of notification channels, including options people already work with every day, such as Telegram, Discord, Slack, and Pushover.
Dokploy’s Gotify integration stood out because it fits nicely into automation workflows. If you already use tools like n8n or Node-RED, Gotify can act like a clean bridge between “something happened on the server” and “run this workflow”.
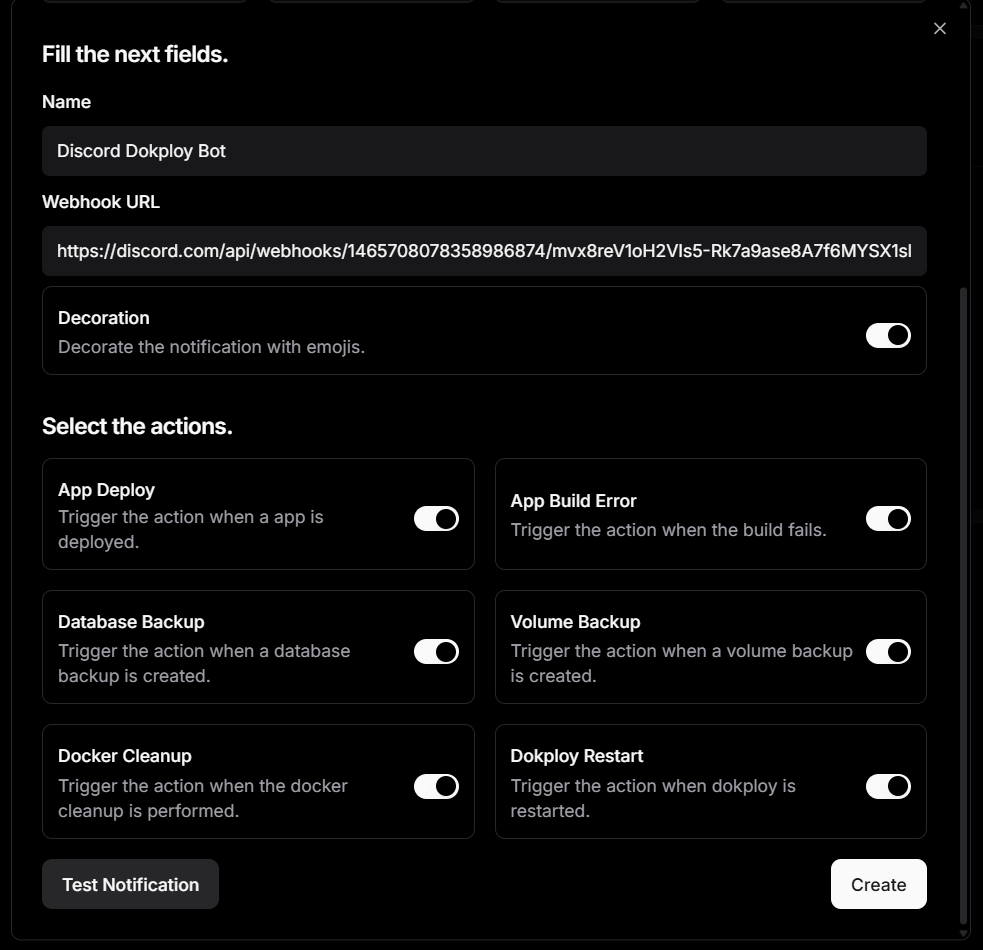
Here’s an example Discord bot set up to send notifications on application deploys, database and volume backups, app build errors, and more:
And here’s an example output after a successful build:

Dokploy also has a built-in monitoring UI that lets you view real-time server and container resource metrics like CPU, memory, disk, and network directly in its dashboard.
Coolify also supports viewing metrics, but you first need to enable and configure its monitoring components (e.g., Sentinel/metrics) before you can see server usage graphs in its UI. It isn’t shown by default without that setup.
Licensing starts to matter once you’re in business and not just experimenting with these tools for fun. When you hit a breaking change, a security issue, or need to adapt the software, what matters is what the license actually allows you to do with the code.
Coolify is clear on this. It is licensed under Apache 2.0, which gives you full open-source rights: audit the code, modify it, fork it, and run it in production without extra conditions. There are no additional restrictions layered on top of the license.
Dokploy is different. While the repository includes an Apache 2.0 license, the project adds restrictions around certain features, especially concerning resale and commercial use. As the maintainers have explained, this means parts of Dokploy are better described as source-available rather than strictly open source.
For many teams, this distinction may not matter. But if you plan to build and monetize your own PaaS on top of one of these tools, the choice becomes pretty obvious.
Dokploy stands out for production because it stays close to the Docker mental model. The neat UI helps, but it does not hide the fundamentals. When something goes wrong, the path to understanding it is usually shorter.
Coolify still makes sense when you want more guided workflows, especially around Git-based automation and previews. If you are deploying a straightforward web app and you value guardrails, the extra abstraction can be a feature, not a flaw.
My final recommendation is still Dokploy. If you already chosen a VPS to regain control, it makes sense to go all in on a platform that keeps that control close to the surface.

Learn how inline props break React.memo, trigger unnecessary re-renders, and hurt React performance — plus how to fix them.

This article showcases a curated list of open source mobile applications for Flutter that will make your development learning journey faster.

Discover what’s new in The Replay, LogRocket’s newsletter for dev and engineering leaders, in the April 1st issue.
This post walks through a complete six-step image optimization strategy for React apps, demonstrating how the right combination of compression, CDN delivery, modern formats, and caching can slash LCP from 8.8 seconds to just 1.22 seconds.
Would you be interested in joining LogRocket's developer community?
Join LogRocket’s Content Advisory Board. You’ll help inform the type of content we create and get access to exclusive meetups, social accreditation, and swag.
Sign up now

