margin vs. padding
The CSS margin and padding properties give developers the ability to control the space inside and outside of elements on a webpage, giving it the desired look and feel.

As important as these properties are, they are often misunderstood by most developers, especially newbies. This tutorial demystifies the questions surrounding CSS margins vs. padding.
We’ll cover the CSS box model, the meaning of the margin and padding properties, how and when to use them, and the differences between them.
The Replay is a weekly newsletter for dev and engineering leaders.
Delivered once a week, it's your curated guide to the most important conversations around frontend dev, emerging AI tools, and the state of modern software.
To effectively understand CSS margin vs. padding, it’s imperative to understand the CSS box model and how HTML elements render following its standard.
Every HTML element added to a webpage renders as a box in the browser. For instance, the image below does not seem to contain boxes and instead comprises a circle and text.
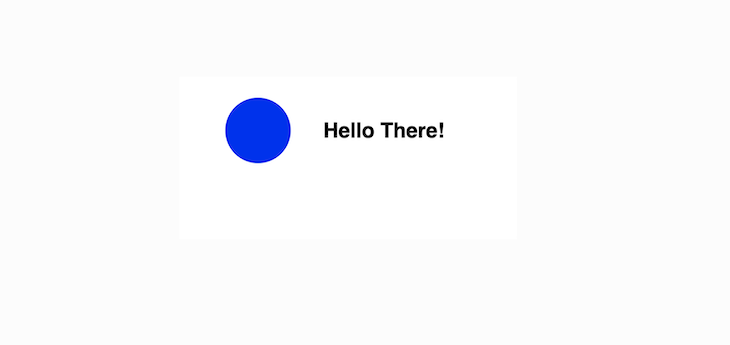
However, if a browser inspects these elements, as seen in the image below, the browser’s rendering engine represents the elements as a box according to the CSS box model.
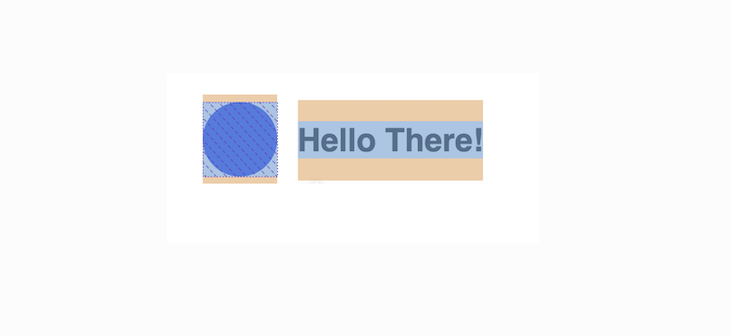
So, what exactly is the CSS box model? It is essentially a box that wraps around every block-level HTML element on a website.
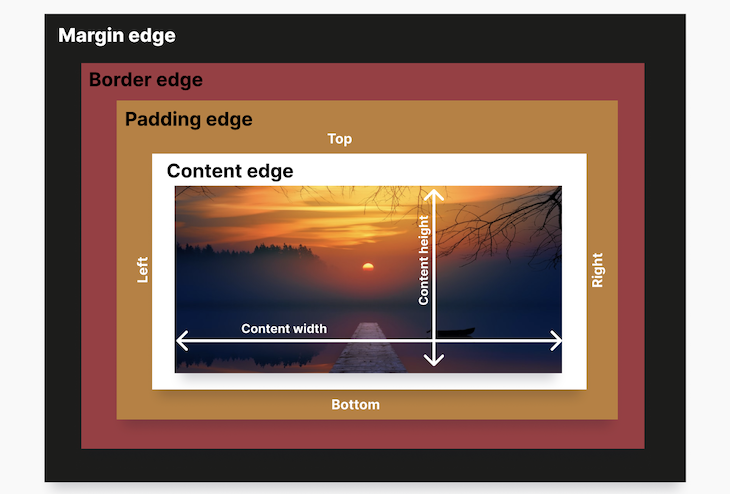
Every box is composed of four areas defined by their respective edges: the content edge, padding edge, border edge, and margin edge.
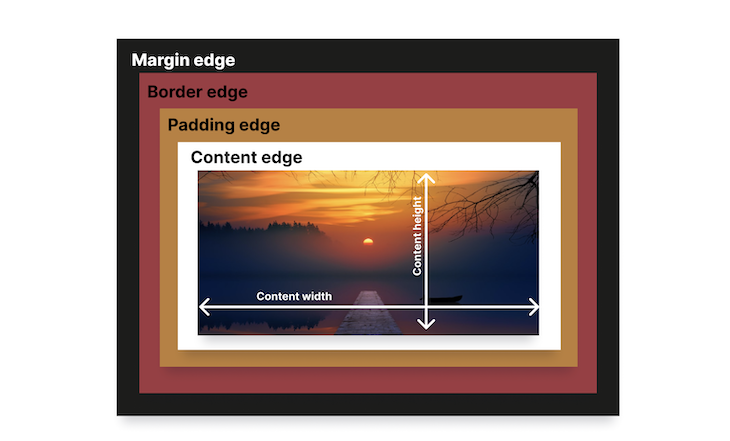
Using the illustration above as an example, let’s elaborate on the four areas of every box.
The content area, defined by the content edge, represents the value of the specified HTML element.
For example, if adding an <h1> element to a webpage, the element’s content renders as text, and if adding an <audio> element, the content renders as an audio player.
In our example above, the content is an image, defined by the <img> element.
Surrounding the content area is the padding area, defined by the padding edge. An element’s padding area is the space between its content area and its border area.
The size of the padding area is set using the CSS shorthand padding property or its sub-properties: padding-top, padding-right, padding-bottom, and padding-left.
The ability to set the size of the padding area using the CSS padding property is vital because an element’s padding area size can significantly affect or improve the appearance of content on a webpage.
Then comes the border area, which surrounds an element’s padding area and acts as the edge or shield for the box wrapped around every block-level HTML element.
The border area is made visible by adding the CSS border property to an element.
The margin area, defined by the margin edge is an invisible area around the border area that separates an element from other elements around it.
The size of the margin area is determined by the CSS shorthand margin property and its sub-properties: margin-top, margin-right, margin-bottom, and margin-left.
margin vs. paddingIn the section above, we talked about the CSS box model and it’s four areas. These four areas have respective CSS properties that define or control them:
padding propertyborder propertymargin property.Despite the ability of these properties to define the four areas of the CSS box model, the impact of the margin and padding properties almost seem invisible.
Without these properties, you can see an image on a webpage when you use an <img> tag and the border around that image when you use the border property. But, when adding a margin or padding property to an element, the best you can see is space.
And often, some people can’t even see the space, and that, my friend, is why these two properties are often misunderstood or used interchangeably.
To help you have a better understanding of the margin and padding properties, this section will cover what they are, how to use them, their differences, and when to use padding vs. margin.
margin?Remember that every HTML element on a webpage is a box. On top of that, all the HTML elements have four sides: top, right, bottom, and left.
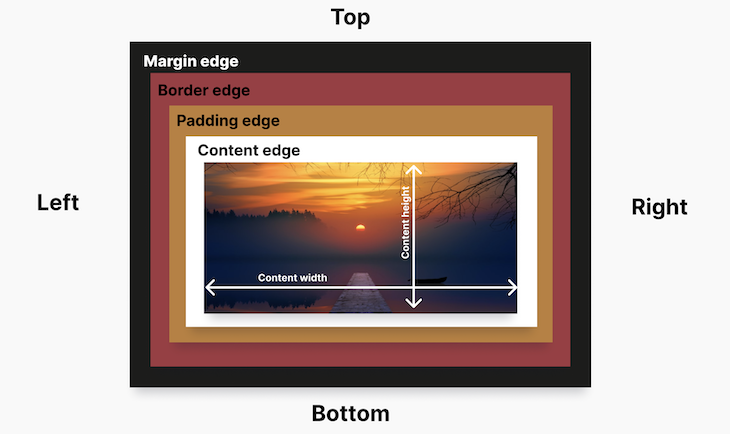
The margin’s invisible space around the HTML element pushes other elements away from it.
Because the margin surrounds all four sides of the box (top, right, bottom, left) it gives us the ability to target and change the size of the margin area for each or all sides of the box:
margin: 50px;
margin-top: 20px:
margin-right: 40px;
margin-bottom: 70px
margin-left: 20px;
You can increase or reduce the size of the margin area independently at the top, bottom, left, and right sides using these sub-properties:
margin-topmargin-bottommargin-leftmargin-rightYou can also increase or reduce the size of all margin area sides at once using the shorthand margin property.
In the demo below, a margin of 50 pixels (margin: 50px;) was added to the circle to create a space between it and the text:
See the Pen
Margin 1 (Margin vs. Padding tutorial) by Didicodes (@edyasikpo)
on CodePen.
If you remove margin, the space decreases between both elements, making them appear joined. This shows that the margin property only adds space outside the element and not within the element:
See the Pen
Margin 2 (Margin vs. Padding tutorial) by Didicodes (@edyasikpo)
on CodePen.
padding?The padding property defines the inner portion of the CSS box model. It either increases or reduces the size of the padding area.
Just like the HTML element has four sides, the content within the HTML element, such as text, images, or an audio player, also has four sides as well: the top, right, left, and bottom.
The padding property increases or reduces the size of the padding area, thereby creating a space between the content and the border:
padding: 50px;
padding-top: 20px:
padding-right: 40px;
padding-bottom: 70px
padding-left: 20px;
Just like margin, the padding property surrounds all four sides of the content, giving you the ability to increase or reduce the padding size independently at the top, bottom, left, and right sides using these sub-properties:
padding-toppadding-bottompadding-leftpadding-rightYou can also increase or reduce the size of all the padding area sides simultaneously using the shorthand padding property.
In the following demo, there is no padding added. You can see that the content text is very close to the border — this means the padding area is relatively small or doesn’t exist — and you must increase it by using the padding property:
See the Pen
Padding 1 (CSS Margin vs. Padding tutorial) by Didicodes (@edyasikpo)
on CodePen.
So, let’s add 15 pixels of padding with padding: 15px to our current demo and see what it will do to the content of the HTML element:
See the Pen
Padding 2 (CSS Margin vs. Padding tutorial) by Didicodes (@edyasikpo)
on CodePen.
As you can see, the padding area of the box has increased by 15 pixels, thereby adding a space between the content and the border.
margin and paddingEven though these two CSS properties are similar and often mistakenly used interchangeably, they are quite different, and understanding their differences can be beneficial for web developers.
One of the core differences between margin and padding is that padding controls the space between the border and the content of an element while margin controls the space between the border and other elements around it.
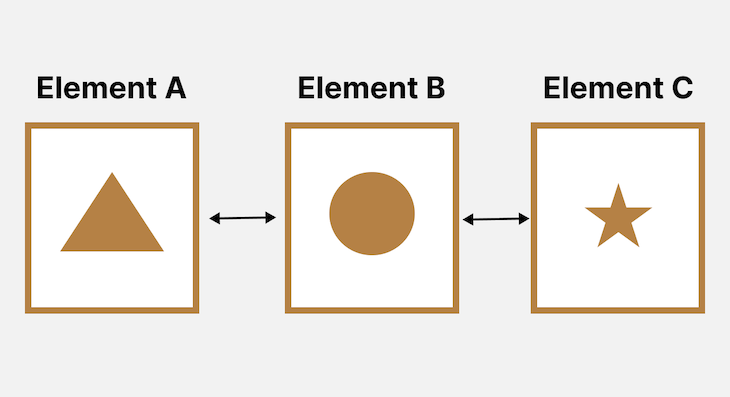
The illustration below represents the space added when using a margin property. The arrow signifies the invisible space (margin) added around the three different elements to ensure they are not close to each other.
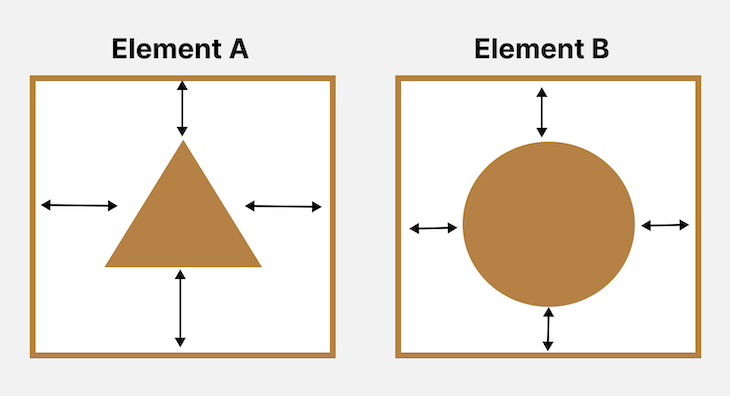
Whereas the figure below represents the space added when using a padding. The arrows signify the invisible space (padding) added to ensure the content (the circle and triangle) isn’t close to the border of the element.
In layman’s terms, padding allows us to define space inside an element while margin allows us to define space between elements.
Padding takes the background color; Margin doesn’tThe space created by the margin and padding is invisible. However, if a background color is added to an element, padding will no longer be invisible because it takes the color of the element while the space created by the margin remains invisible.
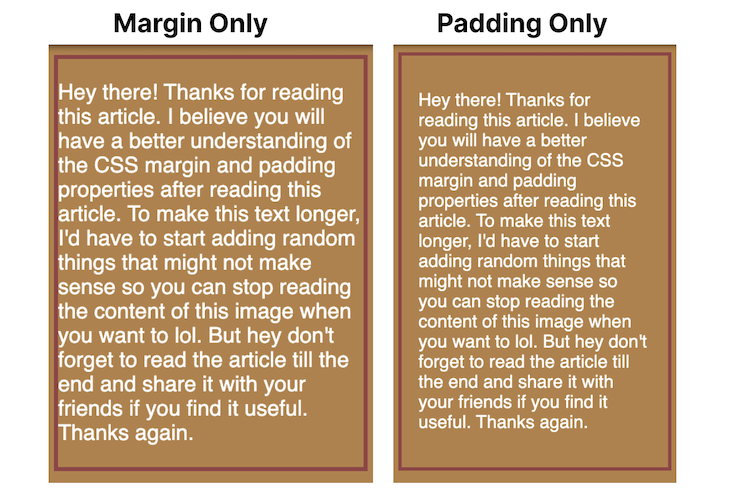
For instance, the illustration below contains two simple webpages. The left image only has margin applied, while the right image only has padding applied.
Due to the presence of the background color, the padding becomes more obvious while the margin still seems invisible.
margin can be set to auto; padding cannotIf you set margin: auto to an element with a fixed width, it centers the element horizontally (or vertically when using a flexbox).
And because centering elements has always been tricky for web developers to understand or remember (you can tell by the funny memes about centering divs online), this feature comes in very handy.
On the other hand, it is impossible to set padding to auto.
See the Pen
Margin Auto (CSS Margin vs. Padding tutorial) by Didicodes (@edyasikpo)
on CodePen.
margin can have a negative value; padding cannotYou can set margin values to negative if you want elements to overlap. This negative value can come in very handy when you want to implement beautiful designs on your website.
See the Pen
Overlapping (CSS Margin vs. Padding tutorial) by Didicodes (@edyasikpo)
on CodePen.
padding values, however, can only be positive because negative padding causes borders to collapse into the content, making the content area smaller than the content itself.
padding ignores inline elementsWhen you add padding to an inline element, the changes only reflect on the left and right side of the element, but not the top and bottom.
For instance, the demo below has a span element <span>super</span> with a padding of 20 pixels (padding: 20px;). As you can see, this adds spaces only to the left and right sides of the element, but not the top and bottom.
See the Pen
Ignoring Inline Elements (CSS Margin vs. Padding tutorial) by Didicodes (@edyasikpo)
on CodePen.
margin vs. padding?padding and margin are two important elements in web design that add extra space in different places. But, where and when should you use one over the other?
For padding, you can use it in the following circumstances:
For margin, use it in the following circumstances:
We covered a lot of ground in this tutorial, and I really appreciate that you made it all the way to the end. 💛
Now that you fully understand the difference between the CSS margin and padding properties, you’ll be able to make better design decisions for your website.
If you have any questions or concerns, share them in the comment section below, and I’ll reply to every comment.
As web frontends get increasingly complex, resource-greedy features demand more and more from the browser. If you’re interested in monitoring and tracking client-side CPU usage, memory usage, and more for all of your users in production, try LogRocket.

LogRocket lets you replay user sessions, eliminating guesswork around why bugs happen by showing exactly what users experienced. It captures console logs, errors, network requests, and pixel-perfect DOM recordings — compatible with all frameworks.
LogRocket's Galileo AI watches sessions for you, instantly identifying and explaining user struggles with automated monitoring of your entire product experience.
Modernize how you debug web and mobile apps — start monitoring for free.

@container scroll-state: Replace JS scroll listeners nowCSS @container scroll-state lets you build sticky headers, snapping carousels, and scroll indicators without JavaScript. Here’s how to replace scroll listeners with clean, declarative state queries.

Explore 10 Web APIs that replace common JavaScript libraries and reduce npm dependencies, bundle size, and performance overhead.

Russ Miles, a software development expert and educator, joins the show to unpack why “developer productivity” platforms so often disappoint.

Discover what’s new in The Replay, LogRocket’s newsletter for dev and engineering leaders, in the February 18th issue.
Would you be interested in joining LogRocket's developer community?
Join LogRocket’s Content Advisory Board. You’ll help inform the type of content we create and get access to exclusive meetups, social accreditation, and swag.
Sign up now