
Are you building microservices but still want to use a monorepo? Let me help you with that! Using a monorepo is a convenient way to manage multiple related projects under a single code repository.

This blog demonstrates how to create separate CD pipelines for the sub-projects in your monorepo, which makes it much more feasible to use a monorepo for your small or early-stage microservices application, and to continue using that monorepo for as long as possible.
Included with this blog post are a series of working example code that you can fork in your own GitHub account to try out the automated deployment pipeline for yourself.
Jump ahead:
The Replay is a weekly newsletter for dev and engineering leaders.
Delivered once a week, it's your curated guide to the most important conversations around frontend dev, emerging AI tools, and the state of modern software.
Why do we use microservices? There are many reasons why microservices might fit your project, but one of the most important reasons is that using microservices reduces our deployment risk.
When you deploy a monolith, you risk breaking the whole thing and leaving your customers without a working product (until you can fix it). This isn’t good financially or reputationally for your company.
When you deploy a microservice, you risk breaking only a small part of your application because one microservice is only a small part of your application. The part you risk breaking is small — and often not even customer facing — so the risk it represents is smaller as well.
Small problems are also easier to fix (and less stressful) than large problems, so rolling back a broken microservice to a working state can often be easier than rolling back a monolith.
For this to work though, our microservices must have independent deployment pipelines. That is to say, each microservice must be able to be deployed separately from the others.
If, instead, you have one deployment pipeline that deploys all your microservices at once — well, that’s not much better than having a monolith. To make the most of microservices, each one needs its own separate and independent continuous deployment (CD) pipeline.
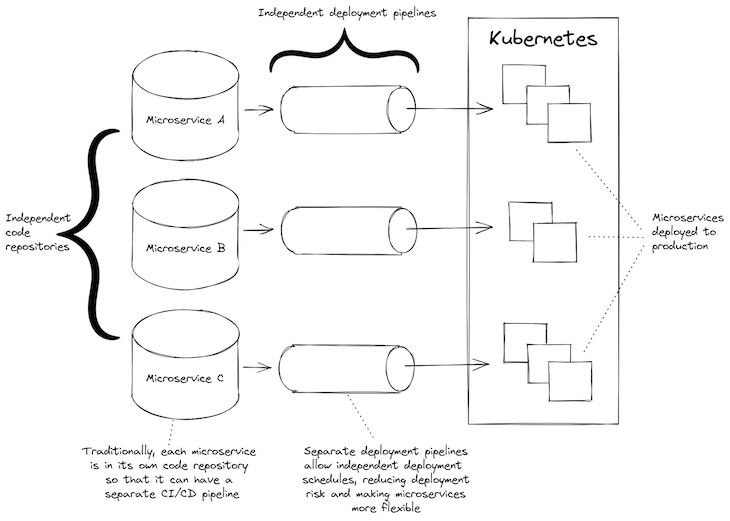
Can we use a monorepo with microservices? Sure, of course we can. In fact, using a monorepo containing all your microservices is a very convenient and straightforward way to start a new microservices project. I’ve started multiple new microservices projects this way.
Traditionally though, the problem is that a monorepo has one CD pipeline that is invoked when code changes are pushed to the code repository. So, no matter which microservice changes, all microservices will be deployed.
This isn’t too bad in the early days of the application when all microservices are being developed and change frequently. But as the application matures, you need to be able to deploy microservices individually — not only because deploying all microservices is time consuming (especially as the number of microservices starts to explode), but because you want to mitigate, minimize, and control your deployment risk.
There usually comes a time — a certain level of maturity, or just too many microservices — where the single CD pipeline of a microservice becomes a major hindrance to the scalability of your application. Unfortunately, this time often comes very quickly with microservices!
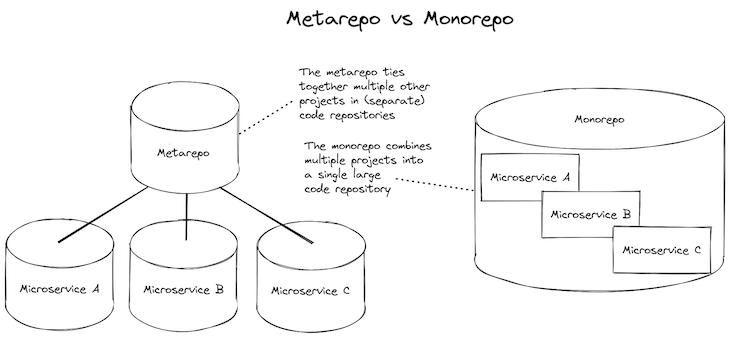
At this point, we’d usually start to restructure by pulling stabilized microservices out to their own code repository where they can have their own CD pipeline. After we separate our microservices out to their own code repositories, we might then bring them back together into a metarepo (see the meta package for details).
Metarepos combine the convenience of a monorepo with the flexibility of separate code repositories. But still, having separate code repositories adds complexity, and it would be better if we could stick to the simpler monorepo for as long as possible.
There are other reasons to split out the monorepo. For a growing company, splitting out to separate repositories can allow you to scale across a growing development team.
But if it’s just the separate CD pipelines that you want, wouldn’t it be nice to be able to stick with the simpler monorepo for longer and be able to have separate CD pipelines for each sub-project?
Well, the good news is that it is possible. You can have multiple CD pipelines — at least you can using GitHub Actions — which allows us to retain the simplicity of our monorepo for much longer.
When we host our code on GitHub, we can use GitHub Actions to create workflows that are automatically invoked when code is pushed to our code repository. We can use these to create pipelines for continuous integration (CI) and continuous deployment (CD).
To make this simpler, I like to explain this as “automatically running a shell script in the cloud.” Specify the commands in a script, and then that script is automatically executed by GitHub Actions whenever it detects changes to your code.
The output of each workflow is displayed in the GitHub Actions user interface; an example is shown below in Figure 3. This collects and displays the output and state (success or failure) of each workflow invocation. Typically, when a workflow has failed, GitHub will automatically send an email to the team to inform them someone has broken something.

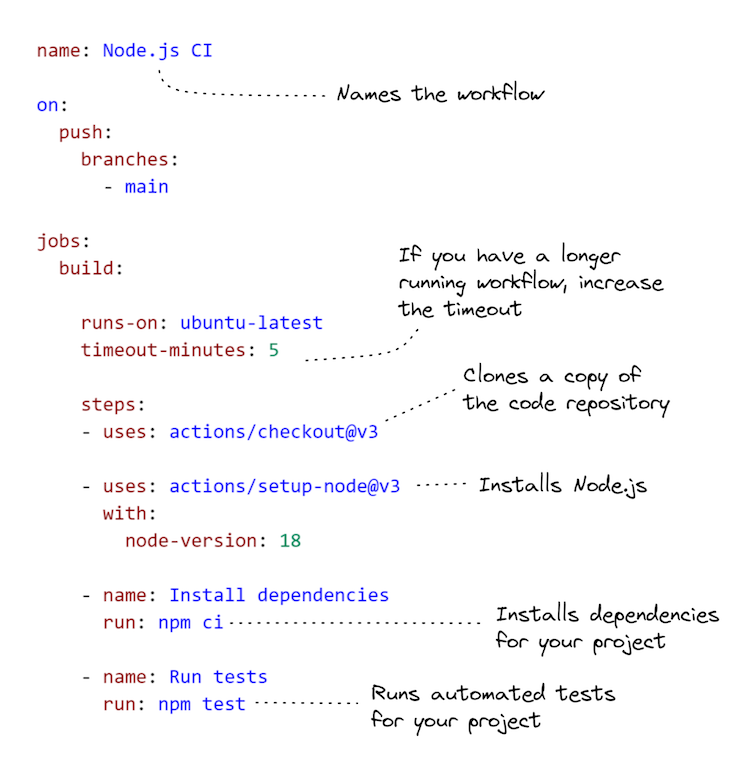
To warm up, let’s see what basic workflow configuration looks like. The example code below shows a workflow to run automated tests for a Node.js project. We can have as many workflows as we’d like in a code repository, so the one below could be just one of many in a particular code repository.
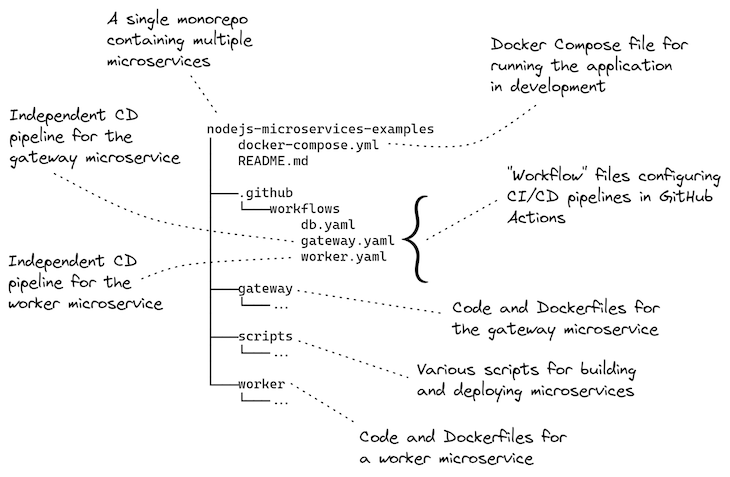
This post comes with a working example you can try for yourself. The example project is a monorepo containing two microservices. Each one has its own separate CD pipeline that deploys the microservice to a Kubernetes cluster.
The code is available on GitHub. Clone a local copy of the example repo like this:
git clone https://github.com/ashleydavis/nodejs-microservices-example.git
You can also download the zip file or, if you just want to see what the GitHub Actions workflow history looks like, I’ve linked there to the example in GitHub.
Below, Figure 4 provides an overview of the example project. It shows the workflow configurations in relation to the projects for each of the two microservices, and the configuration for their deployment to Kubernetes.
What do you need to run the example project?
Well, that depends on how you want to run it!
If you’d like to run the microservices application locally on your development computer, you will need:
If you’d like to deploy it to Kubernetes by running the deployment scripts from your development computer, you’ll need:
If you’d like to have the GitHub Actions workflows running for yourself, you will need:
In the rest of this post, we’ll work through each of these examples in more detail.
If you’d like to try running this microservices application locally in development, you just need to install Docker Desktop.
Listing 1 shows the Docker Compose file that makes this possible. You can see how it starts multiple “services”: one for a MongoDB database server, and one for each of our microservices. It also starts a service for loading test data into our database (the one named db-fixture).
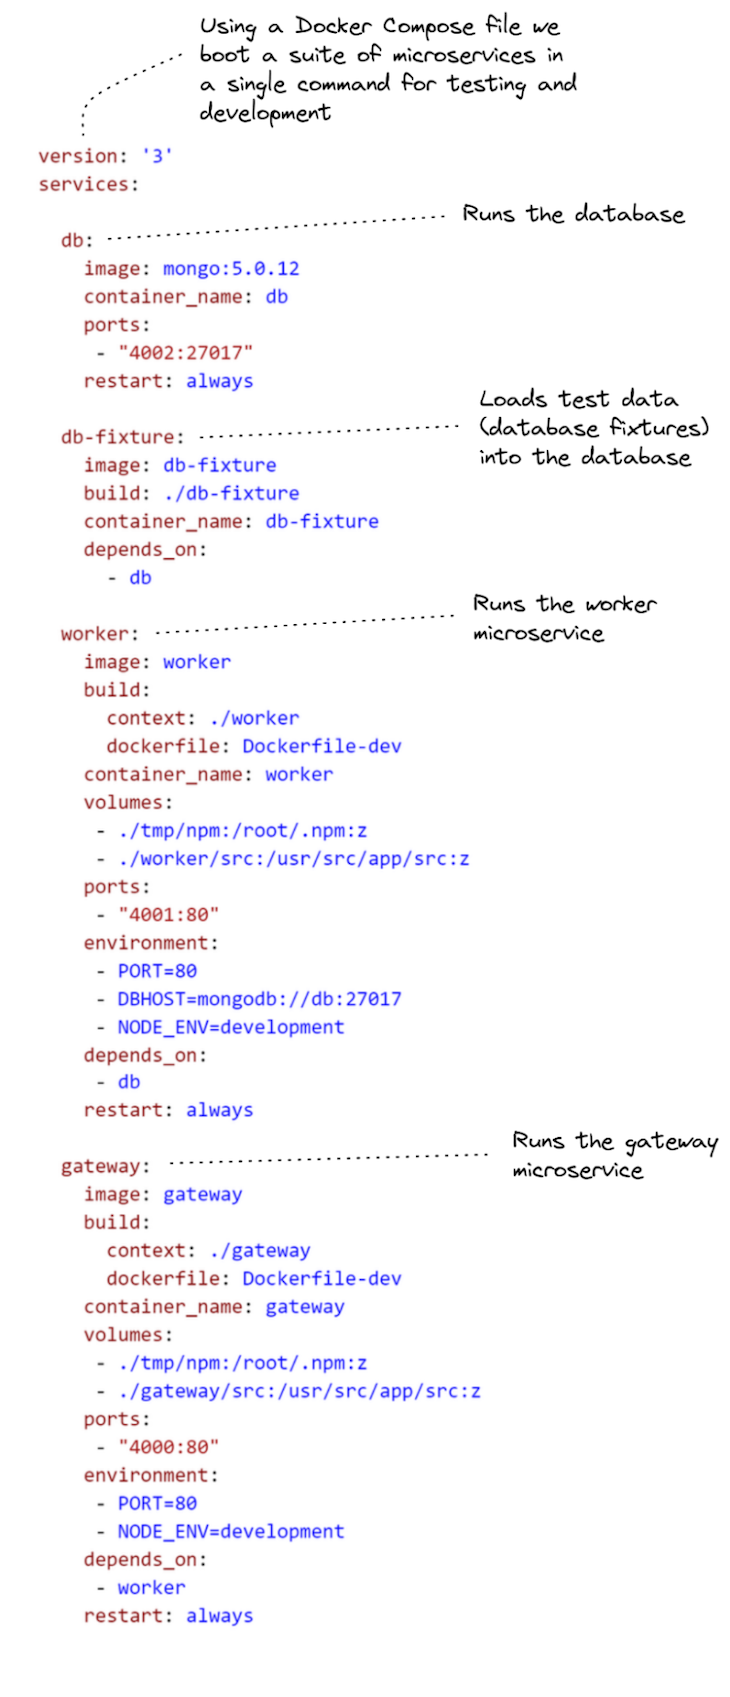
To run this, first change directory into your local copy of the code repository:
cd nodejs-microservices-example
Then, boot the local microservices application under Docker Compose:
docker compose up --build
Once running, you can test it by opening your web browser and navigating to http://localhost:4000/. You should see “Hello computer!” printed in the web page. It’s simple, but it shows you the gateway microservice is serving a web page.
There is an example REST API available through the gateway microservice under the route /api/data; navigate your browser to http://localhost:4000/api/data to see its output.
The gateway microservice forwards the REST API request to the worker microservices, which you can access directly at http://localhost:4001/api/data. Note that we can only access the worker microservice directly like this when running the microservices application in development. When we deploy the application to Kubernetes, it is configured so that only the gateway microservice is accessible from the outside world, and the worker microservice is accessible only within the Kubernetes cluster.
Feel free to try experimenting with the code while you have the microservices application running locally. It is configured for live reload, so any changes you make to the code for each microservice will cause that microservice to automatically reload to incorporate your changes.
When finished you can take down the local microservices application:
docker compose down
Docker Compose is a very convenient way to start and stop a local microservices application.
Before creating an automated deployment pipeline (say, using GitHub Actions), it’s a good idea to first practice the commands that we’ll be automating.
If you want to run these commands from your own development computer, you’ll need:
You don’t need to do this, of course. You could jump directly to getting this example working in GitHub Actions (if so skip to the next section). But you can easily run into problems, like issues authenticating with your Kubernetes cluster. Those kinds of problems are difficult and slow to debug if we are trying to solve them under GitHub Actions.
It is quicker and easier to experiment and solve problems by first practicing the deployment from our local development computer. This sets us up for success before we try and automate our deployment scripts in GitHub Actions.
Let’s start by deploying a MongoDB database to our Kubernetes cluster. This is an easy starting point because we don’t have to build a Docker image for it (we reuse the pre-built image available on DockerHub) and we don’t have to parameterize the Kubernetes configuration file for the deployment.
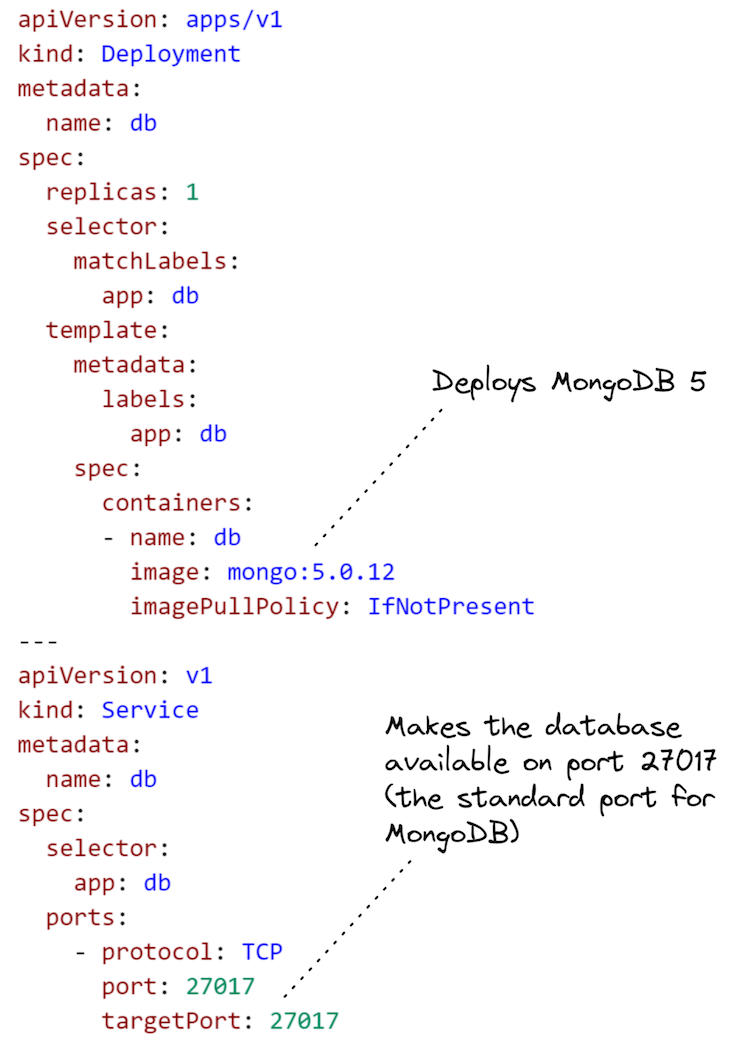
We deploy this configuration using Kubectl:
kubectl apply -f ./scripts/kubernetes/db.yaml
Now, let’s deploy our two microservices. This is not quite as simple because their deployment configurations need parameters, and we must fill the gaps in those configurations before deploying them.
I created my own tool, called Figit, for expanding templated configurations. Figit is a command line tool that runs under Node.js. We input YAML files to Figit and it fills out the parameters from the environment variables.
Why do we even need to parameterize our configuration files? Well, for one thing, it’s nice to be able to reuse our configuration files in different circumstances. But in this blog post, we’ll use it to “plug in” the URL for our container registry and the version for each Docker image.
You can see in Listing 3 that configuration for the worker microservice is similar to the configuration for the database (from Listing 2), except that we parameterize the reference to the Docker image. That part is highlighted below in Listing 3 so you can easily see it.
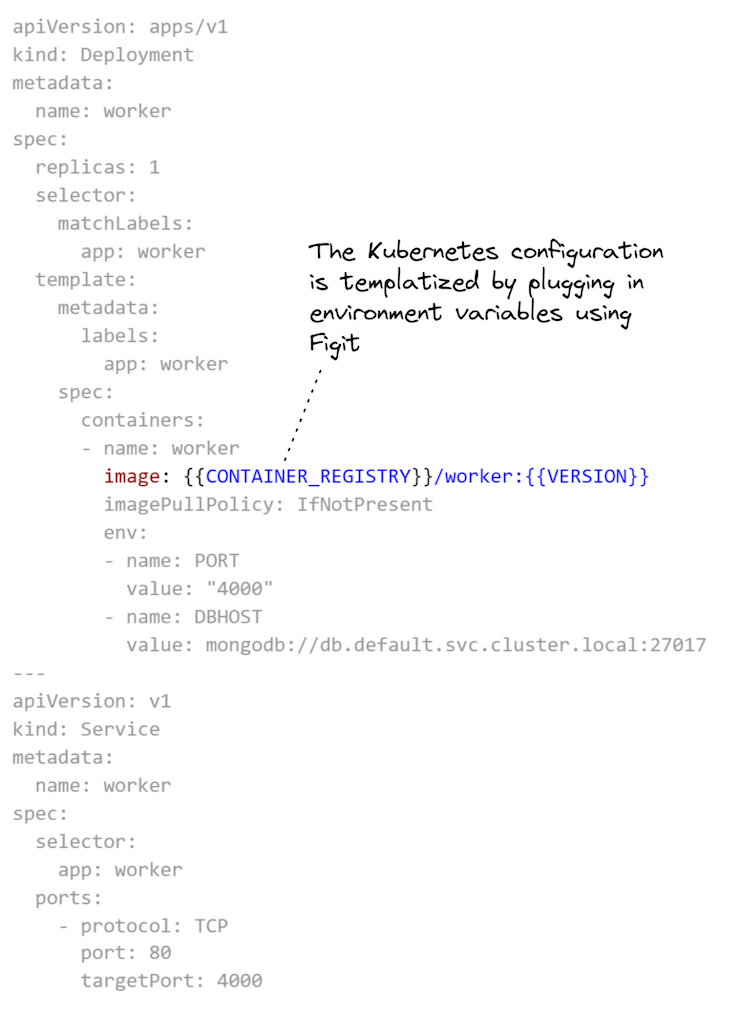
Before deploying, we must expand the configuration template in Listing 3. To do that, we need to set the environment variables CONTAINER_REGISTRY and VERSION:
export CONTAINER_REGISTRY=<url-to-your-container-registry>
export VERSION=1
Or on Windows, like this:
set CONTAINER_REGISTRY=<url-to-your-container-registry>
set VERSION=1
Now we can do a trial run of the expansion and see the result. To run figit, we must install Node.js dependencies:
npm install
Now we can expand the YAML configuration template and see the result:
npx figit ./scripts/kubernetes/worker.yaml
The output in your terminal should show that CONTAINER_REGISTRY and VERSION in the configuration have been replaced with the values set for the environment variables.
The example project includes shell scripts to build and publish Docker images for each of the microservices.
To build each microservice:
./scripts/build-image.sh worker
./scripts/build-image.sh gateway
These shell scripts won’t work on Windows, though. If you want to try this on Windows, you might like to use the Linux terminal under WSL2 or invoke the docker build command directly (peek inside the shell script for the details of the command).
To publish, you must first set some environment variables with the username and password for your container registry:
export REGISTRY_UN=<container-registry-username>
export REGISTRY_PW=<container-registry-password>
On Windows, use the set command instead of export.
Then, to publish the images for the microservices to your container registry, use the following:
./scripts/publish-image.sh worker
./scripts/publish-image.sh gateway
With the microservice built and published, we are now ready to deploy them.
Let’s deploy the microservices to Kubernetes. For this, we must use figit to expand the configuration templates and pipe the expanded configuration to kubectl, deploying our microservices to the Kubernetes cluster:
npx figit ./scripts/kubernetes/worker.yaml --output yaml | kubectl apply -f -

npx figit ./scripts/kubernetes/gateway.yaml --output yaml | kubectl apply -f -
To check the deployment, invoke kubectl get pods and kubectl get deployments to see if our deployment to Kubernetes was successful.
All going well, our microservices should now be running in Kubernetes. The worker microservice is hidden and not accessible, but the gateway microservice is open to the world so we can test it from our web browser. To find the IP address, invoke kubectl get services, look up gateway in the list. Navigate your web browser to that IP address to see the web page for the gateway microservice.
If you’d like to change the code and try deploying an updated version of one of the microservices, be sure to increment your VERSION environment variable before building, publishing, and deploying the microservice.
This has been a practice run of our deployment to be sure our deployment process works before automating it. In a moment we’ll set up the real deployment in a moment to run under GitHub Actions.
First though, we should clean up our Kubernetes cluster and remove the microservices we deployed in our practice run:
npx figit ./scripts/kubernetes/worker.yaml --output yaml | kubectl delete -f -

npx figit ./scripts/kubernetes/gateway.yaml --output yaml | kubectl delete -f -
And now, for the main event! In this final part, we automate the deployment of our microservices using GitHub Actions.
To try this out for yourself, you will need:
The most important part is how each GitHub Actions workflow is scoped to the sub-directory for each sub-project in the monorepo. You can see how this is specified in Listing 4. This is what allows each microservice in the monorepo to have its own separate CD pipeline.
You can add as many microservices to this monorepo as you like, but they all need their own workflow configuration that is scoped to their subdirectory in the monorepo.
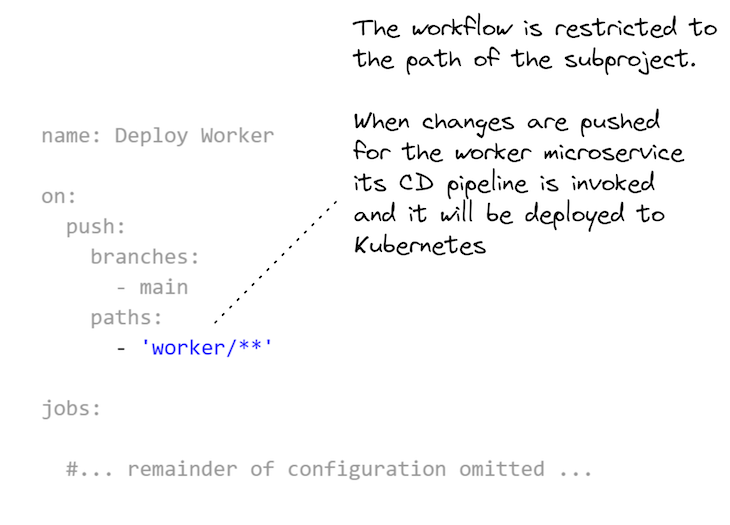
Listing 4, above, was just an extract to highlight the important part. Listing 5, below, shows the complete workflow configuration for the worker microservice’s CD pipeline, including:
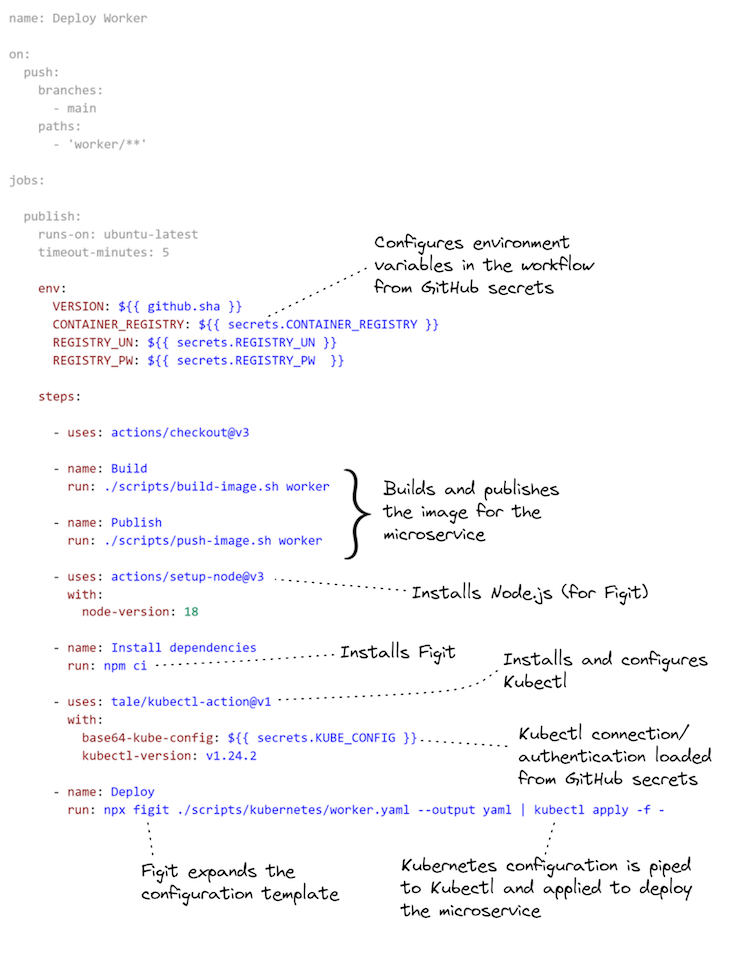
For more information on using the kubectl-action in GitHub Actions, please see the documentation.
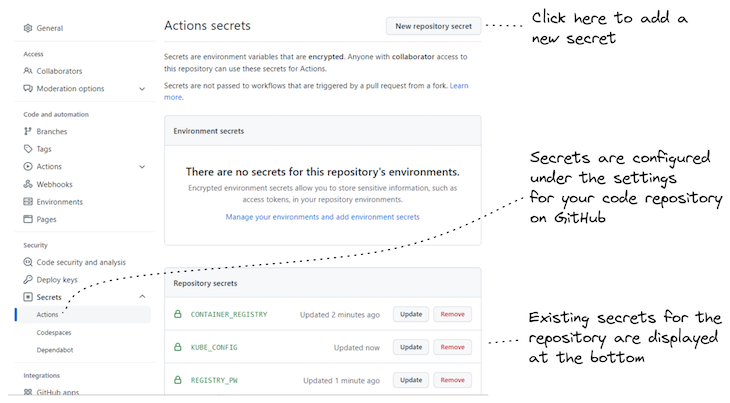
To be able to run the workflow for each microservice in GitHub Actions, we must add the required environment variables to GitHub Secrets for the code repository. These are the environment variables CONTAINER_REGISTRY, REGISTRY_UN and REGISTRY_PW that we set earlier, when practicing the deployment from our local computer.
Don’t worry about setting VERSION, though — that’s automatically set in the workflow configuration from the commit hash of the most recent change to the code repository. That’s a nice way to make sure we always have a new version number for our Docker images and we don’t have to worry about incrementing them manually.
Figure 5 shows how to set a GitHub Secret on the code repository.
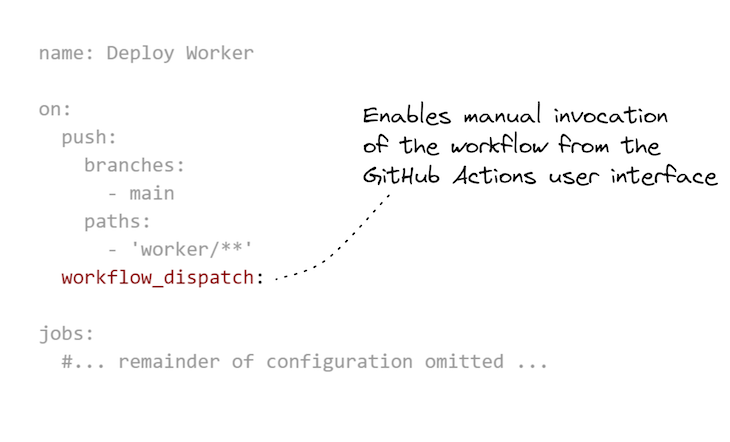
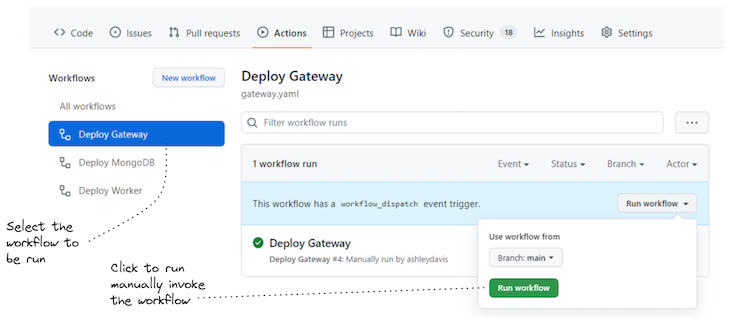
There’s one last thing that’s worth mentioning: we can make a small update to our GitHub Actions workflow configuration that allows us to invoke it manually. This is really useful on occasion to be able to click a button to invoke the deployment of a microservice even when its code hasn’t changed.
One reason to do this is when we want to reconfigure an environment variable through GitHub Secrets. Changing the value of an environment variable from a secret doesn’t automatically trigger a re-deployment, so when we do that, we need to manually trigger it our deployment pipeline.
Listing 6 shows the addition we need to make to enable manual invocation of a GitHub Actions workflow. In Figure 6, you can see how we invoke the workflow through the GitHub Actions UI to redeploy the worker microservice.
Now you can try out GitHub Actions for yourself. Before you do this, you should really work through the earlier section, Practicing deployment to Kubernetes from your development computer. Deploying to Kubernetes from your local computer helps to work out all the kinks that are more difficult to figure out when it runs under GitHub Actions because you don’t have direct access to the computer that’s running the deployment pipeline.
For this, you need your own GitHub Account, and then fork the repo for the example project.
Now, add GitHub Secrets to your forked repository to set CONTAINER_REGISTRY, CONTAINER_UN, CONTAINER_PW and KUBE_CONFIG. The first three environment variables were mentioned earlier; the new one, KUBE_CONFIG, is the base64-encoded Kubernetes configuration that configures kubectl to access your Kubernetes cluster.
This is easy enough to generate. If you are already have kubectl configured locally, you can encode your local configuration like this:
cat ~/.kube/config | base64
Then copy the base64-encoded configuration from your terminal and put that in the KUBE_CONFIG secret.
That’s basically it!
Now you have two ways to trigger the deployment pipeline for a microservice:
Of course, many things can go wrong — just configuring the connection to Kubernetes is difficult when you haven’t done it before. That’s why you should practice locally before trying to get your deployment pipeline working in GitHub Actions.
Using a monorepo is a convenient way to start a microservices project, but usually, before too long, we have to split it into multiple repos so that we can make independent deployment pipelines for our microservices to get the full benefit of the microservices architecture pattern.
However, this blog post shows a different approach. We have demonstrated how to create separate CD pipelines for microservice in a monorepo using GitHub Actions and this means we can stick with our monorepo, and the continued convenience that it offers, much further into the lifecycle of our microservices project.
Install LogRocket via npm or script tag. LogRocket.init() must be called client-side, not
server-side
$ npm i --save logrocket

// Code:

import LogRocket from 'logrocket';
LogRocket.init('app/id');
// Add to your HTML:

<script src="https://cdn.lr-ingest.com/LogRocket.min.js"></script>
<script>window.LogRocket && window.LogRocket.init('app/id');</script>

React Server Components and the Next.js App Router enable streaming and smaller client bundles, but only when used correctly. This article explores six common mistakes that block streaming, bloat hydration, and create stale UI in production.

Gil Fink (SparXis CEO) joins PodRocket to break down today’s most common web rendering patterns: SSR, CSR, static rednering, and islands/resumability.

@container scroll-state: Replace JS scroll listeners nowCSS @container scroll-state lets you build sticky headers, snapping carousels, and scroll indicators without JavaScript. Here’s how to replace scroll listeners with clean, declarative state queries.

Explore 10 Web APIs that replace common JavaScript libraries and reduce npm dependencies, bundle size, and performance overhead.
Would you be interested in joining LogRocket's developer community?
Join LogRocket’s Content Advisory Board. You’ll help inform the type of content we create and get access to exclusive meetups, social accreditation, and swag.
Sign up now
3 Replies to "Creating separate monorepo CI/CD pipelines with GitHub Actions"
Hi. Tks for this article. I always have a big question about this Workflow.
What happen if I merge into main a super feture which work and run perfectly on PR/MR but when run on main there was a small error in a yml file or some missconfiguring file? The code was already merged but no one of the changes was deployed. So I fix the yml but non of the paths defined in change/rules where touched then nothing will de deployed… We cann’t just re run the last failed pipeline because it always checked out agains the old commit..
There is no way to run the same projects that failed unless I touch some files (with empty spaces or enter or whatever change). This is ugly for me.
One idea came up, what if I always build all projects on main but when deploy the docker images that hasn’t changed won’t be deployed
Any ideas? Thanks
You can run the workflow on any branch and even on a pull request.
Here’s the docs for a pull request trigger: https://docs.github.com/en/actions/using-workflows/events-that-trigger-workflows#pull_request
You can trigger the workflow on push to any branch as well: https://docs.github.com/en/actions/using-workflows/events-that-trigger-workflows#push
Or you could just not use branches and push directly to main. That usually works nicely!
Thanks for your reply