MJML is a modern email tool that allows developers to create great emails that are beautiful and responsive across all devices and mail clients. This markup language is designed to reduce the pain of coding responsive emails.

Its semantic syntax makes it easy and straightforward to use. It is also feature-rich, with standard components that speed up development time. In this tutorial, we’ll be building beautiful and responsive emails with MJML and testing across several email clients.
You can install MJML with npm to use it with Node.js or the CLI:
$ npm install -g mjml
To get started, create a file named email.mjml, although you can also choose any other name you’d like. Now that we’ve created the file, our responsive email will be divided into the following sections:
The sections serve as the skeleton for our responsive email. As seen above, our email will be divided into six sections. In our email.mjml file:
<mjml>
  <mj-body>
    <!-- Company Header -->
    <mj-section background-color="#f0f0f0"></mj-section>
    <!-- Image Header -->
    <mj-section background-color="#f0f0f0"></mj-section>
    <!-- Email Introduction -->
    <mj-section background-color="#fafafa"></mj-section>
    <!-- Columns section -->
    <mj-section background-color="white"></mj-section>
    <!-- Icons -->
    <mj-section background-color="#fbfbfb"></mj-section>
    <!-- Social icons -->
    <mj-section background-color="#f0f0f0"></mj-section>
  </mj-body>
</mjml>
From the above, you can see we’re making use of two MJML components: mj-body and mj-section. mj-body defines the starting point of our email, and mj-section defines a section to contain other components.
For each section defined, a background-color attribute with their respective hex value is also defined. This helps our readers to easily identify sections of our email.
This section of our email will only contain our company/brand name in a center banner position:
<!-- Company Header -->
<mj-section background-color="#f0f0f0">
  <mj-column>
    <mj-text  font-style="bold"
        font-size="20px"
        align="center"
        color="#626262">
    Central Park Cruise
    </mj-text>
  </mj-column>
</mj-section>
The mj-column component is used to define a column. The mj-text component is for our text content and takes styling attributes like font-style, font-size, color, etc.
In this section, we’ll have a background image and a block of text, which should represent our company slogan. We’ll also have a call to action button that points to a page with more details.
To add the image header, you will have to replace the section’s background-color with a background-url. Similarly to the first header, you will have to center the text both vertically and horizontally. The padding remains the same.
The button’s href sets the button location. In order to have the background rendered full-width in the column, set the column width to 600px with width="600px".
This section of our email will only contain our company/brand name in a center banner position:
<!-- Image Header -->
<mj-section background-url="https://ca-times.brightspotcdn.com/dims4/default/2af165c/2147483647/strip/true/crop/2048x1363+0+0/resize/1440x958!/quality/90/?url=https%3A%2F%2Fwww.trbimg.com%2Fimg-4f561d37%2Fturbine%2Forl-disneyfantasy720120306062055"
        background-size="cover"
        background-repeat="no-repeat">
        <mj-column width="600px">
            <mj-text  align="center"
                color="#fff"
                font-size="40px"
                font-family="Helvetica Neue">Christmas Discount</mj-text>
            <mj-button background-color="#F63A4D" href="#">
                See Promotions
            </mj-button>
        </mj-column>
    </mj-section>
To use an image header, we will add a background-url attribute to the mj-section component and then also style the image using the background-size and the background-repeat attributes.
For our slogan text block, we’ve aligned the text both vertically and horizontally to be in the center using the align attribute. You can also set the text color, font size, font family, etc. as you wish.
The call to action button is implemented using the mj-button component. The background-color attribute allows us to specify the button background color and then href to specify the link or page location.
The introduction text will consist of a title, the main body text, and a call to action button.
<!-- Intro text -->
<mj-section background-color="#fafafa">
    <mj-column width="400px">
      <mj-text font-style="bold"
        font-size="20px"
        font-family="Helvetica Neue"
        color="#626262">Ultimate Christmas Experience</mj-text>
        <mj-text color="#525252">
            Lorem ipsum dolor sit amet, consectetur adipiscing elit. Proin rutrum enim eget magna efficitur, eu semper augue semper. Aliquam erat volutpat. Cras id dui lectus. Vestibulum sed finibus lectus, sit amet suscipit nibh. Proin nec commodo purus. Sed eget nulla elit. Nulla aliquet mollis faucibus.
        </mj-text>
        <mj-button background-color="#F45E43" href="#">Learn more</mj-button>
    </mj-column>
</mj-section>
In the section of this email, we will have two columns: one will contain a descriptive image, and the second will contain our text block to complement the image in the first section.
<!-- Side image -->
<mj-section background-color="white">
  <!-- Left image -->
  <mj-column>
      <mj-image width="200px"
          src="https://navis-consulting.com/wp-content/uploads/2019/09/Cruise1-1.png"/>
  </mj-column>
  <!-- right paragraph -->
  <mj-column>
      <mj-text font-style="bold"
          font-size="20px"
          font-family="Helvetica Neue"
          color="#626262">
          Amazing Experiences
      </mj-text>
      <mj-text color="#525252">
          Lorem ipsum dolor sit amet, consectetur adipiscing elit.
          Proin rutrum enim eget magna efficitur, eu semper augue semper.
          Aliquam erat volutpat. Cras id dui lectus. Vestibulum sed finibus
          lectus.
      </mj-text>
  </mj-column>
</mj-section>
The first column on the left uses the mj-image component to specify the image to be used. The image can be a local file or, as in our case, an image hosted remotely.
The second column on the right contains two text blocks, one for our title and the other as the main body text.
The icons section will have three columns. You could also add more, depending on how you want the email to look.
<!-- Icons -->
<mj-section background-color="#fbfbfb">
    <mj-column>
        <mj-image width="100px" src="https://191n.mj.am/img/191n/3s/x0l.png" />
    </mj-column>
    <mj-column>
        <mj-image width="100px" src="https://191n.mj.am/img/191n/3s/x01.png" />
    </mj-column>
    <mj-column>
        <mj-image width="100px" src="https://191n.mj.am/img/191n/3s/x0s.png" />
    </mj-column>
</mj-section>
Each column has its own mj-image component used to render the icon image.
This section will contain icons that point to our social media accounts.
<mj-section background-color="#e7e7e7">
    <mj-column>
        <mj-social>
            <mj-social-element name="instagram" />
        </mj-social>
    </mj-column>
</mj-section>
MJML comes with mj-social components that can easily be used to display social media icons. In our email, we’ve used the Twitter mj-social-element.
Now thats we’ve implemented all sections, our full email.mjml should look like:
<mjml>
  <mj-body>
    <!-- Company Header -->
    <mj-section background-color="#f0f0f0">
        <mj-column>
            <mj-text  font-style="bold"
                font-size="20px"
                align="center"
                color="#626262">
            Central Park Cruises
            </mj-text>
        </mj-column>
    </mj-section>
    <!-- Image Header -->
    <mj-section background-url="https://ca-times.brightspotcdn.com/dims4/default/2af165c/2147483647/strip/true/crop/2048x1363+0+0/resize/1440x958!/quality/90/?url=https%3A%2F%2Fwww.trbimg.com%2Fimg-4f561d37%2Fturbine%2Forl-disneyfantasy720120306062055"
        background-size="cover"
        background-repeat="no-repeat">
        <mj-column width="600px">
            <mj-text  align="center"
                color="#fff"
                font-size="40px"
                font-family="Helvetica Neue">Christmas Discount</mj-text>
            <mj-button background-color="#F63A4D" href="#">
                See Promotions
            </mj-button>
        </mj-column>
    </mj-section>
    <!-- Email Introduction -->
    <mj-section background-color="#fafafa">
        <mj-column width="400px">
          <mj-text font-style="bold"
            font-size="20px"
            font-family="Helvetica Neue"
            color="#626262">Ultimate Christmas Experience</mj-text>
            <mj-text color="#525252">
                Lorem ipsum dolor sit amet, consectetur adipiscing elit. Proin rutrum enim eget magna efficitur, eu semper augue semper. Aliquam erat volutpat. Cras id dui lectus. Vestibulum sed finibus lectus, sit amet suscipit nibh. Proin nec commodo purus. Sed eget nulla elit. Nulla aliquet mollis faucibus.
            </mj-text>
            <mj-button background-color="#F45E43" href="#">Learn more</mj-button>
        </mj-column>
    </mj-section>
    <!-- Columns section -->
    <mj-section background-color="white">
        <!-- Left image -->
        <mj-column>
            <mj-image width="200px"
                src="https://navis-consulting.com/wp-content/uploads/2019/09/Cruise1-1.png"/>
        </mj-column>
        <!-- right paragraph -->
        <mj-column>
            <mj-text font-style="bold"
                font-size="20px"
                font-family="Helvetica Neue"
                color="#626262">
                Amazing Experiences
            </mj-text>
            <mj-text color="#525252">
                Lorem ipsum dolor sit amet, consectetur adipiscing elit.
                Proin rutrum enim eget magna efficitur, eu semper augue semper.
                Aliquam erat volutpat. Cras id dui lectus. Vestibulum sed finibus
                lectus.
            </mj-text>
        </mj-column>
    </mj-section>
    <!-- Icons -->
    <mj-section background-color="#fbfbfb">
        <mj-column>
            <mj-image width="100px" src="https://191n.mj.am/img/191n/3s/x0l.png" />
        </mj-column>
        <mj-column>
            <mj-image width="100px" src="https://191n.mj.am/img/191n/3s/x01.png" />
        </mj-column>
        <mj-column>
            <mj-image width="100px" src="https://191n.mj.am/img/191n/3s/x0s.png" />
        </mj-column>
    </mj-section>
    <!-- Social icons -->
    <mj-section background-color="#e7e7e7">
        <mj-column>
            <mj-social>
                <mj-social-element name="instagram" />
            </mj-social>
        </mj-column>
    </mj-section>
  </mj-body>
</mjml>
Now that we’re done building our email, we can go ahead and compile it to see what it looks like. To do so, we type the following in our terminal:
mjml -r email.mjml -o .
-r allows MJML to read and compile our mjml file-o . tells MJML to save the compiled mjml output to be saved in the same directoryOnce MJML finishes compiling, you should now see an email.html file in the same directory. Open it up with your favorite email client or browser, and it should look similar to the image below:
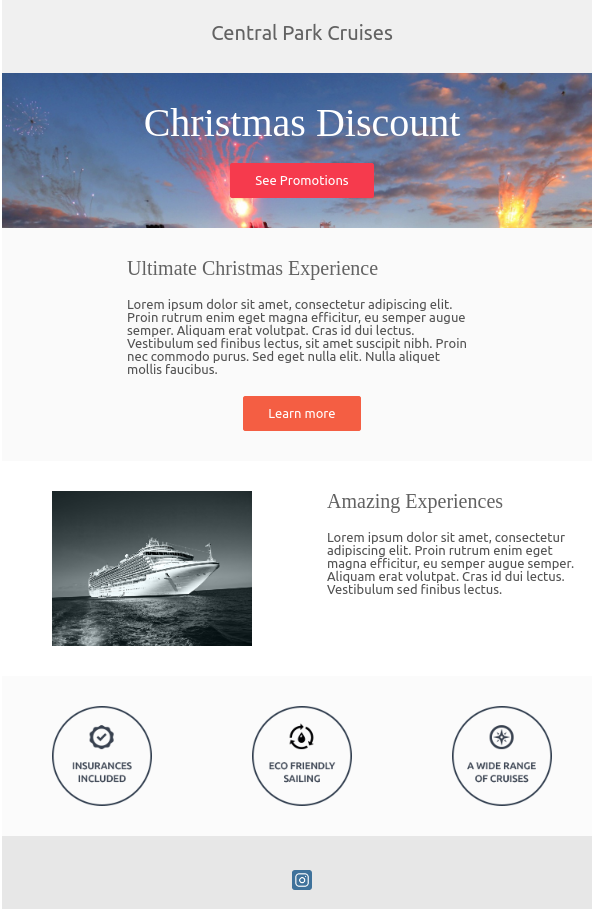
As we’ve just seen, MJML helps us to produce quality, beautiful HTML emails that are responsive across multiple browsers and clients.

Learn how to use Fallow to analyze AI-generated code, detect dead code, duplicate logic, and complexity issues, and integrate automated code quality checks into your AI-assisted development workflow.

Learn how to protect full-stack projects from NPM supply chain attacks with a practical security checklist.

Explore 15 essential MCP servers for web developers to enhance AI workflows with tools, data, and automation.

Learn how contrast-color() automatically picks accessible text colors using native CSS, without JavaScript.
Would you be interested in joining LogRocket's developer community?
Join LogRocket’s Content Advisory Board. You’ll help inform the type of content we create and get access to exclusive meetups, social accreditation, and swag.
Sign up now

