create-t3-app vs. RedwoodJS: Comparing full-stack React frameworks
Nowadays, speed and productivity are the key factors in beating the competition when it comes to app and web development. This is why full-stack frameworks have gained popularity, providing devs with a solid base to efficiently implement projects that require both frontend and backend development.

In this article, we will be comparing two full-stack React frameworks: create-t3-app and RedwoodJS.
The former is a CLI for full-stack Next.js projects, while the latter is a full-stack React framework with an integrated CLI. Both have open-source codebases on GitHub, meaning anyone can explore the code and contribute.
We will take a look at the main technologies they are based on, learn how to set them up, explore the internal build structure for both, see how to work with frontend and backend development, and review what API solutions they support.
Let’s get started.
Jump ahead:
The Replay is a weekly newsletter for dev and engineering leaders.
Delivered once a week, it's your curated guide to the most important conversations around frontend dev, emerging AI tools, and the state of modern software.
create-t3-appOne of the main cornerstones of the T3 stack — besides simplicity and modularity — is type safety. Therefore, the project requires users to use TypeScript. The project is built on top of Next.js, so if you are familiar with its file structure and features, it will be easier to get started with create-t3-app.
The recommended styling solution is Tailwind CSS, which is a utility-first CSS framework based on concise classes that can be efficiently composed directly in the markup. Prisma is suggested as a database client, while tRPC is offered as the core solution for API calls. The user can also use NextAuth.js to speed up the authentication for the project.
The original creator of T3 Stack itself is Theo, and the create-t3-app CLI tool was made by nexxeln. If you want an indication of the popularity of this project, look no further than its GitHub star history towards the end of 2022:
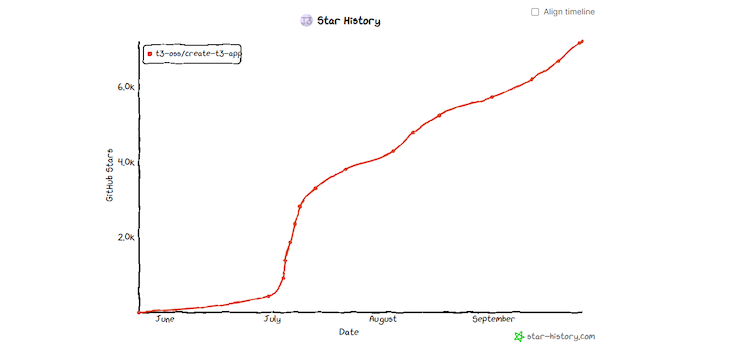
Impressive, right?
The typed syntax for RedwoodJS is optional. The user has a chance to bootstrap the project either with vanilla JS or TypeScript by adding the --ts flag in the installation command. RedwoodJS follows the patterns of React and is not further based on any other framework; the styling libraries can be optionally added with a single terminal command.
Instead of using tRPC, RedwoodJS uses GraphQL for its API solution. Similarly, Prisma is the recommended database client. On top of that, users can utilize Storybook as a UI component catalog, test all the code paths with Jest, and do logging with Pino.
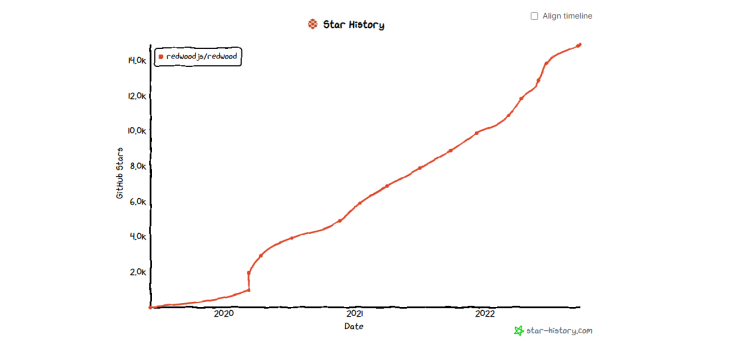
RedwoodJS was founded by Tom Preston-Werner, Peter Pistorius, Rob Cameron, and David Price. It has grown steadily since 2020, reaching more than 14K stars in about three years:
create-t3-appTo set up a create-t3-app project, users can use either npx, Yarn, or pnpm by running the following commands in the terminal, respectively:
//npx
npx create-t3-app@latest

//yarn
yarn create t3-app

//pnpm
pnpm dlx create-t3-app@latest
For the purposes of this article, we will use npx. Run npx create-t3-app@latest t3app in your terminal.
That will take you through a simple terminal wizard, asking you to configure the project. We will select all the available technologies in the wizard, which are Prisma, tRCP, NextAuth, and Tailwind.
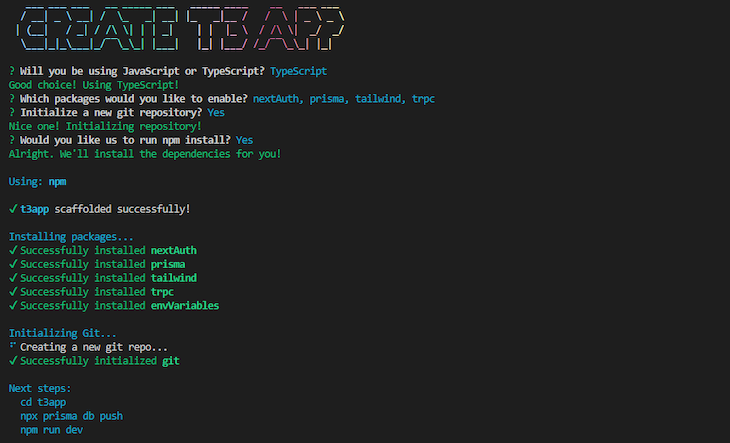
Once the setup is complete, change the working directory to the newly created project folder with cd t3app, then push the Prisma database instance via npx prisma db push, and run npm run dev to start the development server.
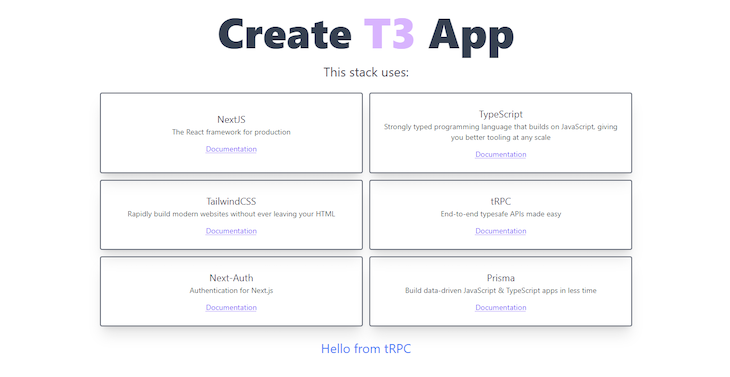
To preview the application, open your browser, paste http://localhost:3000 in the URL bar, and execute. You should be presented with this:
Setting up RedwoodJS is equally simple, although there are some differing nuances. For RedwoodJS, yarn is a requirement, there is no interactive terminal wizard, and by default the app runs on a different port.
Run yarn create redwood-app --ts ./redwoodapp to start the setup:
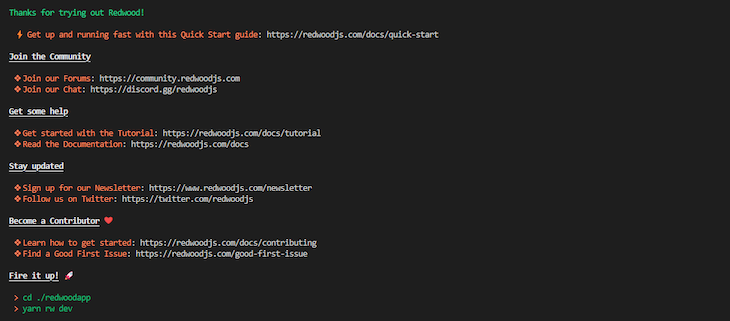
Once the installation is complete, change the working directory into the newly created folder via cd ./redwoodapp and run yarn rw dev to start the development server.
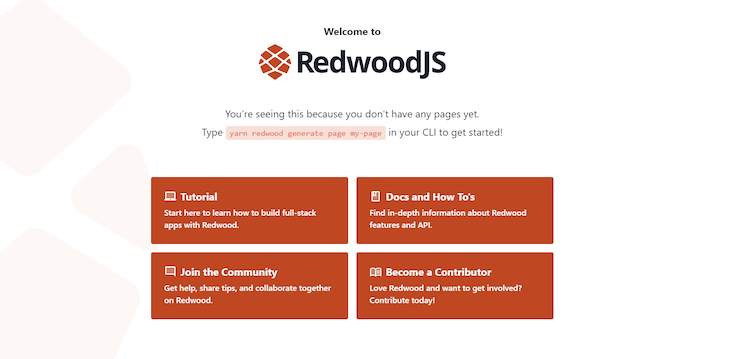
It should bring up your default browser and present you with the RedwoodJS welcome page. If this does not happen, enter http://localhost:8910 in your browser URL and execute:
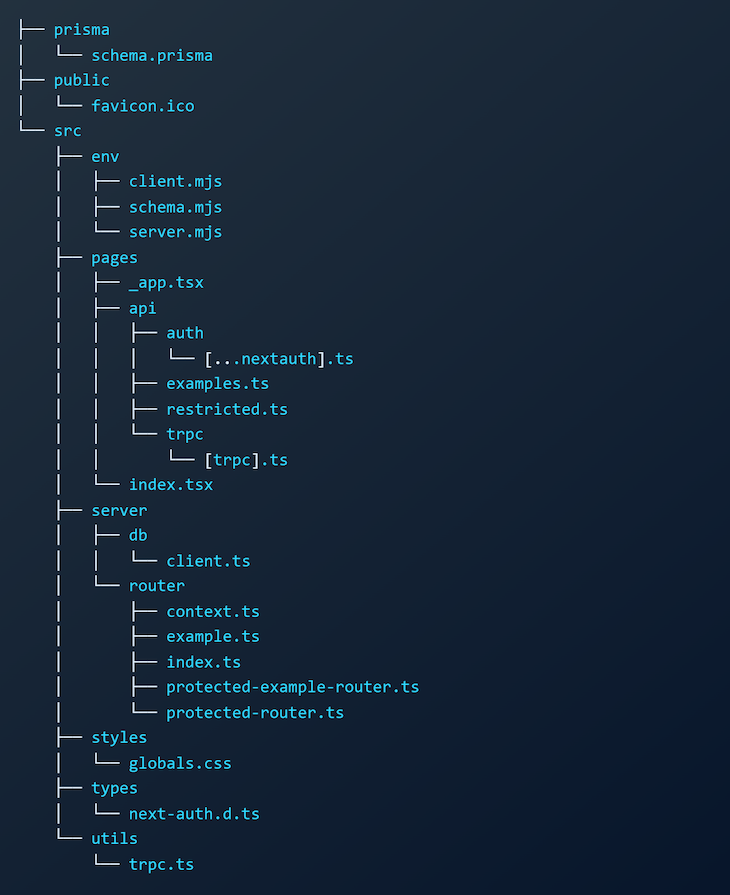
create-t3-appAt the root level, both the frontend and backend live in the src folder. The only things that are separated are the database schema in the prisma folder and the public assets like favicon, images, audio, and related files.
The src folder is further divided into six subfolders: env, pages, server, styles, types, and utils.
env contains the code to ensure the app is built with valid environment variablespages is used to create new pages and API endpointsserver holds the information about the database client and the router configurationstyles is for the external stylesheet filestypes is for NextAuth type definitionsutils is for additional tRCP configurationThe overall schema of the file system should look like this:
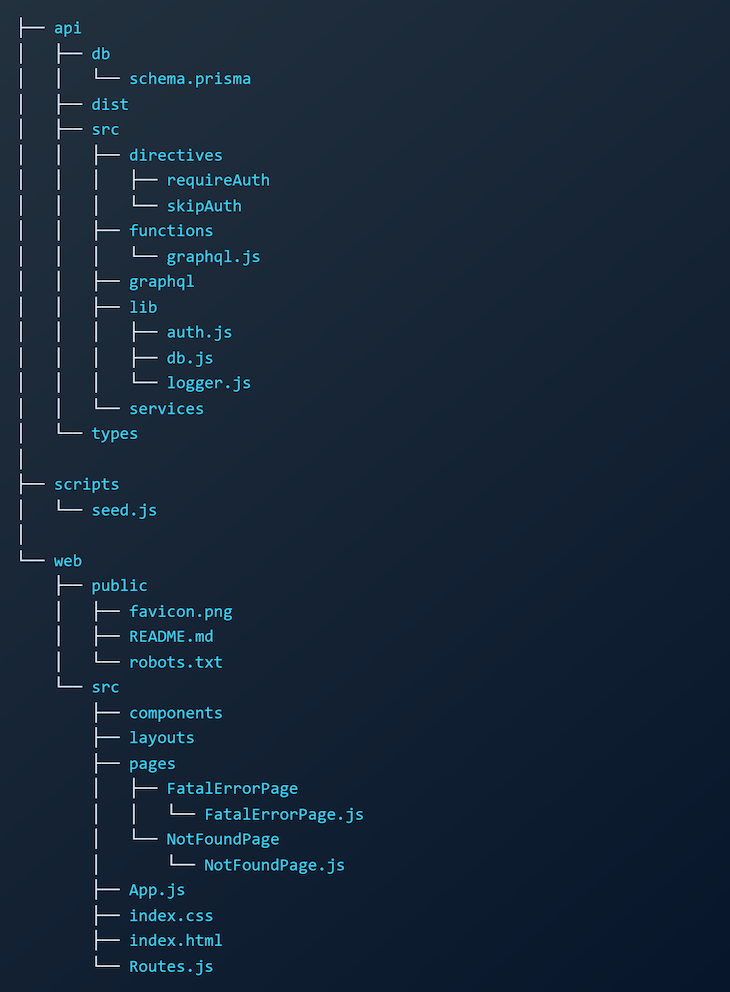
In RedwoodJS, the frontend is fully separated from the backend. All the frontend code is stored in the web folder, while the backend code is in the api folder.
The frontend is then divided further into the public folder, which holds all the public assets for the app, and the src folder, which is further divided into components, layouts, and pages, which allow the user to create individual components and common layouts and import them into the pages.
The rest of the individual files in the src folder are meant to implement the root-level logic of the application, style it, and provide the routing between pages.
The backend is further divided into:
db folder for database schemadist folder for compiled codetypes folder for compiled GraphQL typessrc folderThe src folder is then further divided into directives for GraphQL schema directives:
functions for lambda functions generated by RedwoodJSgraphql for the GraphQL schemalib for configuring auth, database, and loggingservices for business logic related to your dataThe overall schema of the file system looks as follows:
create-t3-appSince create-t3-app is based on the Next.js file structure, all the pages are stored as a separate file in the pages folder. Once you give the file a name, it automatically becomes a route. For navigating between pages, you can use the built-in Link component.
To create a new page, test, that links back to the home, you can create test.tsx in the src folder and include the following code:
import type { NextPage } from "next";
import Link from "next/link";

const Test: NextPage = () => {
  return (
    <>
      <ul className="flex">
        <li className="mr-6">
          <Link href="/">
            <a>Back to home</a>
          </Link>
        </li>
        <li className="mr-6">
          <Link href="/test">
            <a>Test</a>
          </Link>
        </li>
      </ul>
      <p>This is a test page</p>
    </>
  );
};

export default Test;
We chose to install Tailwind in the setup wizard and already used it in the code snippet above to configure the flex layout for navigation.
In order to preview the result, open your browser and navigate to http://localhost:3000/test.

To create a new page in RedwoodJS, you should use the scaffold command yarn redwood generate page test, where test would be your desired page title and route.
It will automatically create a new file web/src/pages/Testpage/Testpage.tsx with the following code:
import { Link, routes } from '@redwoodjs/router'
import { MetaTags } from '@redwoodjs/web'

const TestPage = () => {
  return (
    <>
      <MetaTags title="Test" description="Test page" />
      <p>
        Find me in <code>./web/src/pages/TestPage/TestPage.tsx</code>
      </p>
      <p>
        This route is named <code>test</code>, link to me via `
        <Link to={routes.test()}>Test</Link>`
      </p>
      <p>
        The link to home `<Link to={routes.home()}>Back to Home</Link>`
      </p>
    </>
  )
}

export default TestPage
Notice that the routing is imported from @redwoodjs/router, and then the path name is used as a method on the routes. For the home route, you would first create a new page via yarn redwood generate page home / and then use the routes.home() method.
The scaffold command will also populate the web/src/pages/TestPage with two additional files: TestPage.test.tsx for testing purposes and TestPage.stories.tsx for allowing you to work with Storybook.
If you would like to style the page with Tailwind, you would first need to run yarn rw setup ui tailwind and then use it as in any other React app.
To preview the result, open your browser and navigate to http://localhost:8910/test.

create-t3-appThe suggested way of handling the communication between the app and the database is via the Prisma client.
To do this, create-t3-app already has a bootstrapped scheme, which is available in prisma/schema.prisma. For the purpose of this tutorial, open it and include the code:
generator client {
    provider = "prisma-client-js"
}

datasource db {
    provider = "sqlite"
    url      = env("DATABASE_URL")
}

model Post {
    id    Int   @id @default(autoincrement())
    title String?
}
To save any changes in the Prisma schema, run a migration using the command npx prisma migrate dev --name init. The --name flag allows you to assign the migration name right from the terminal command.
That will create the migrations folder inside the prisma directory, including the migrations file with SQL commands to update the database. After the migration is complete, generate the Prisma client via npx prisma generate.
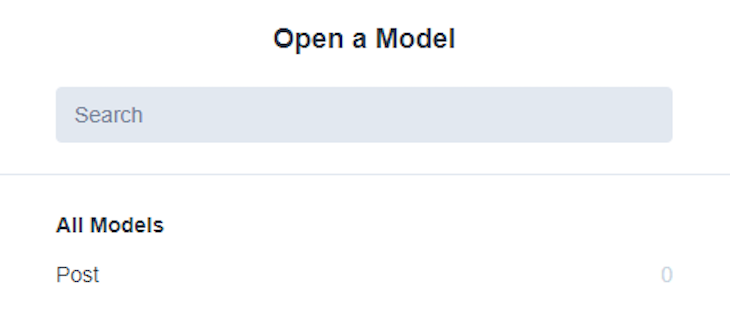
You can now view the database in Prisma studio. You can access it by running npx prisma studio, which will start it on http://localhost:5555.
Redwood uses Prisma as the ORM as well, so it follows a similar structure for the scheme. The only difference is that in RedwoodJS it is located at api/db/schema.prisma.
For the purpose of this tutorial, open it and include the code:
datasource db {
  provider = "sqlite"
  url      = env("DATABASE_URL")
}

generator client {
  provider      = "prisma-client-js"
  binaryTargets = "native"
}

model Post {
  id    Int   @id @default(autoincrement())
  title  String?
}
To migrate the changes in the schema, you have to run yarn rw prisma migrate dev --name init. It will create a new path api/db/migrations and include the SQL file with queries to update the database according to the schema.
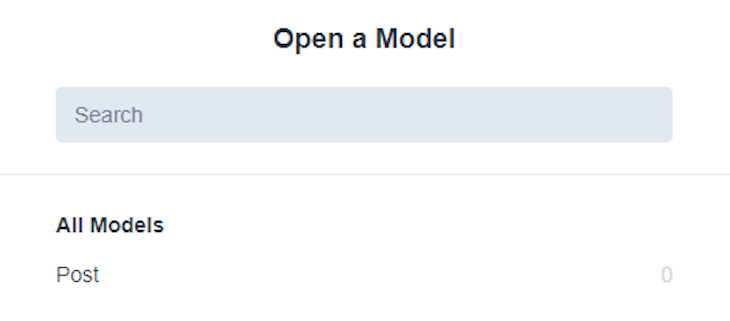
Similarly, you should be able to access the Prisma studio. Run yarn rw prisma studio and it should start it on http://localhost:5555 if the port is available.
create-t3-appThe communication with the backend in create-t3-app is provided via tRPC. To give you an idea of how it works, we will create a simple read functionality for the posts in the database.
First, open the Prima studio and create a few records in the Post table so we have some sample data to work with:

Then, create a new file /src/server/router/post.ts, initialize a new postRouter instance, use the query() method to add an all endpoint to the router, and query all the posts via Prisma’s findMany() method:
import { prisma } from "../db/client";
import { createRouter } from "./context";

export const postRouter = createRouter().query("all", {
  async resolve() {
    return prisma.post.findMany();
  },
});
After that, import the postRouter in /src/server/router/index.ts and merge all routers into a single appRouter via merge() method:
lang=typescript
import { createRouter } from "./context";
import superjson from "superjson";

import { postRouter } from "./post";

export const appRouter = createRouter()
  .transformer(superjson)
  .merge("post.", postRouter);

export type AppRouter = typeof appRouter;
To display the posts, use the useQuery() method and access the all endpoint of the posts, and then map through the received data. To achieve this, change the /src/pages/index.tsx to the following code:
import type { NextPage } from "next";
import { trpc } from "../utils/trpc";

const Home: NextPage = () => {
  const { data, isLoading } = trpc.useQuery(["post.all"]);

  if (isLoading) {
    return <p>Loading...</p>;
  }

  return (
    <div>
      {data?.map((post, index: number) => {
        return <p key={index}>{post.title}</p>;
      })}
    </div>
  );
};

export default Home;
In order to preview the result, open your browser and navigate to http://localhost:3000.

We can also make use of the api folder in the pages directory.
Create a new file /src/pages/api/posts.ts and include the following code, which will create an API endpoint on posts and fetch all the posts:
import type { NextApiRequest, NextApiResponse } from "next";
import { prisma } from "../../server/db/client";

const posts = async (req: NextApiRequest, res: NextApiResponse) => {
  const posts = await prisma.post.findMany();
  res.status(200).json(posts);
};

export default posts;
Now, open your browser and navigate to http://localhost:3000/api/posts and you should be able to retrieve the data in the JSON format:

RedwoodJS offers a scaffold command to create a basic CRUD operation boilerplate with the dedicated route. To do this, run yarn rw g scaffold post. The post is the name of the route; make sure you have the corresponding model with the same name in the Prisma schema file.
After that, navigate to http://localhost:8910/posts and you should see a page with CRUD functionality.

Make sure to add some records, then view the first entry separately. You should be taken to http://localhost:8910/posts/1.

To understand how the backend works, we will take a closer look at how the data was fetched from the database.
First, by running the scaffold command in the beginning, a new file web/src/components/PostCell/PostCell.tsx was created that uses GraphQL to fetch the data:
import type { FindPostById } from 'types/graphql'
import type { CellSuccessProps, CellFailureProps } from '@redwoodjs/web'
import Post from 'src/components/Post/Post'

export const QUERY = gql`
  query FindPostById($id: Int!) {
    post: post(id: $id) {
      id
      title
    }
  }
`

export const Loading = () => <div>Loading...</div>

export const Empty = () => <div>Post not found</div>

export const Failure = ({ error }: CellFailureProps) => (
  <div className="rw-cell-error">{error?.message}</div>
)

export const Success = ({ post }: CellSuccessProps<FindPostById>) => {
  return <Post post={post} />
}
The component was then imported in the web/src/pages/post/PostPage/PostPage.tsx, and the specific post ID from the URL was passed to GraphQL as a prop to query the particular post:
import PostCell from 'src/components/Post/PostCell'

type PostPageProps = {
  id: number
}

const PostPage = ({ id }: PostPageProps) => {
  return <PostCell id={id} />
}

export default PostPage
To test it out, try to switch between http://localhost:8910/posts/1 to http://localhost:8910/posts/2 and notice the changes.

create-t3-app is built on top of Next.js, meaning the developers get a heavily optimized environment to work with. By setting TypeScript as a requirement, create-t3-app also makes sure it will be easier to detect errors in the app. By comparison, the typed syntax is optional in RedwoodJS.
Both are easy to set up, though create-t3-app offers more flexibility to configure what technologies you want to include through the setup wizard. In RedwoodJS, on the other hand, the user is required to work with GraphQL, and Storybook is already integrated.
If you are a fan of scaffolding, RedwoodJS could help to speed up the development process when there are lots of pages, layouts, components, and routes to create. It allows you to create basic CRUD functionality quickly.
Overall, I would recommend create-t3-app for those that are strong advocates of TypeScript, love to work with Next.js, and want more flexibility. For those who seek optional vanilla JS support, prefer to work with GraphQL, and need quick scaffolding, RedwoodJS could be a good fit.
Install LogRocket via npm or script tag. LogRocket.init() must be called client-side, not
server-side
$ npm i --save logrocket

// Code:

import LogRocket from 'logrocket';
LogRocket.init('app/id');
// Add to your HTML:

<script src="https://cdn.lr-ingest.com/LogRocket.min.js"></script>
<script>window.LogRocket && window.LogRocket.init('app/id');</script>

React Server Components and the Next.js App Router enable streaming and smaller client bundles, but only when used correctly. This article explores six common mistakes that block streaming, bloat hydration, and create stale UI in production.

Gil Fink (SparXis CEO) joins PodRocket to break down today’s most common web rendering patterns: SSR, CSR, static rednering, and islands/resumability.

@container scroll-state: Replace JS scroll listeners nowCSS @container scroll-state lets you build sticky headers, snapping carousels, and scroll indicators without JavaScript. Here’s how to replace scroll listeners with clean, declarative state queries.

Explore 10 Web APIs that replace common JavaScript libraries and reduce npm dependencies, bundle size, and performance overhead.
Hey there, want to help make our blog better?
Join LogRocket’s Content Advisory Board. You’ll help inform the type of content we create and get access to exclusive meetups, social accreditation, and swag.
Sign up now